|
|
Как сделать красивый бантик-How to make a beautiful bow V3
|

04.01.2013, 09:04
|
|
Администратор
|
|
Регистрация: 07.09.2010
Сообщений: 7,669
|
|

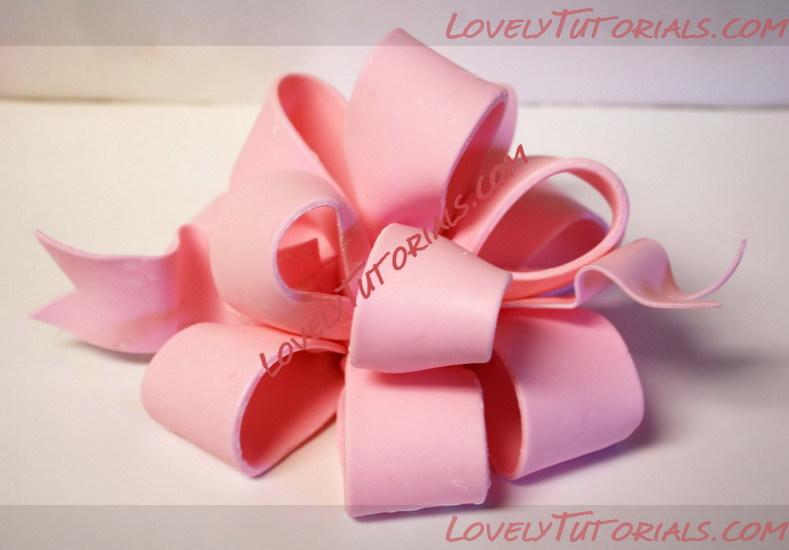
Огромная благодарность Автору rosebakes за Мастер-класс First up, don’t you hate it when you read a recipe all the way to the end to find out something is going to take exponentially longer than you planned? I do! So, let me say up front that generally speaking, you cannot do this in a single day! You will need at least one day of dry time, but 2-3 days is better!
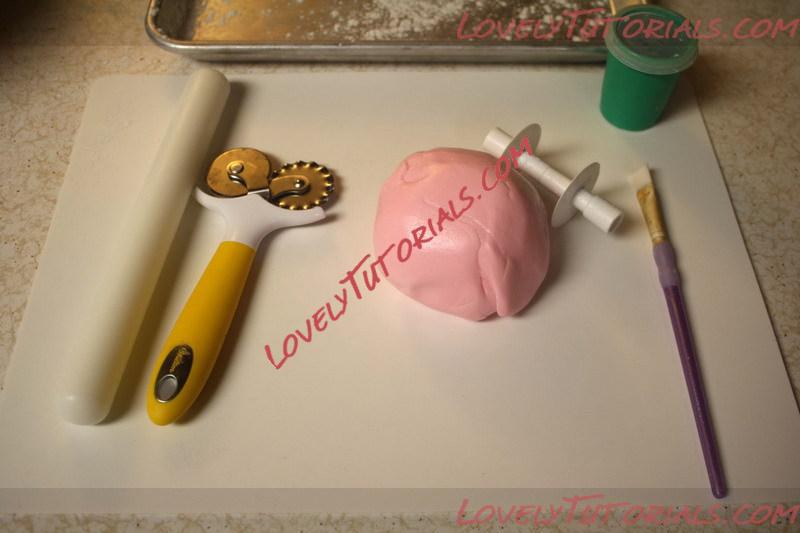
So, let’s get started! Here’s a list of what you’ll need. Everything is not in the picture and you can probably substitute for some of these items, but this is everything Iused.
- Fondant with Tylose powder or gum paste (about 1 pound)
- Rolling Pin
- Ribbon Cutter
- Shortening
- Sugar Glue (Water with a tiny amount Tylose powder added), or you can just use plain water, but the glue works better!
- Paint Brush
- White Chocolate (optional)
- Round Cookie Cutter (about 3.5″)
- Pastry Wheel or Pizza Cutter
- Ruler
- Plastic Wrap
- Cookie Sheet, dusted with corn starch
Today I wanted to share a tutorial on how to make a pretty poofy bow with fondant or gum paste. For this post I’ll be using Wilton gum paste (and referring to it), but you could also do homemade fondant with Tylose powder added. Note: I don’t usually measure, but my estimate is that you’ll need 2-3 tsp. of Tylose per pound of fondant.
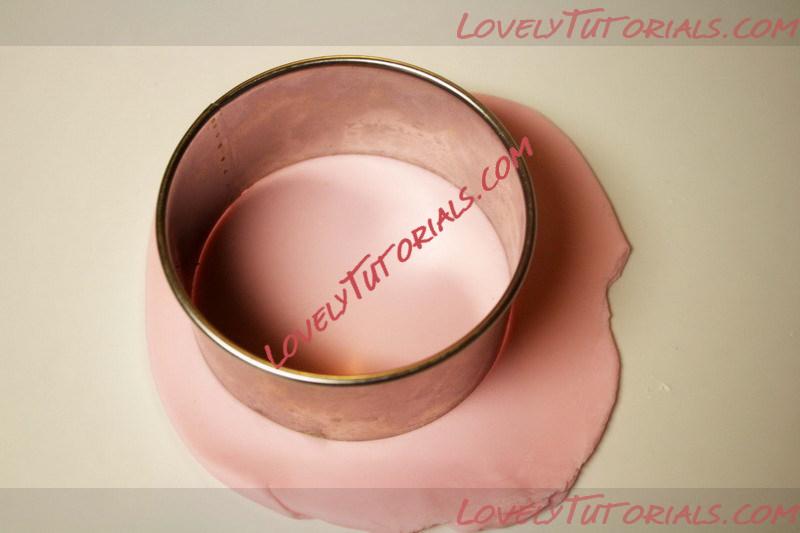
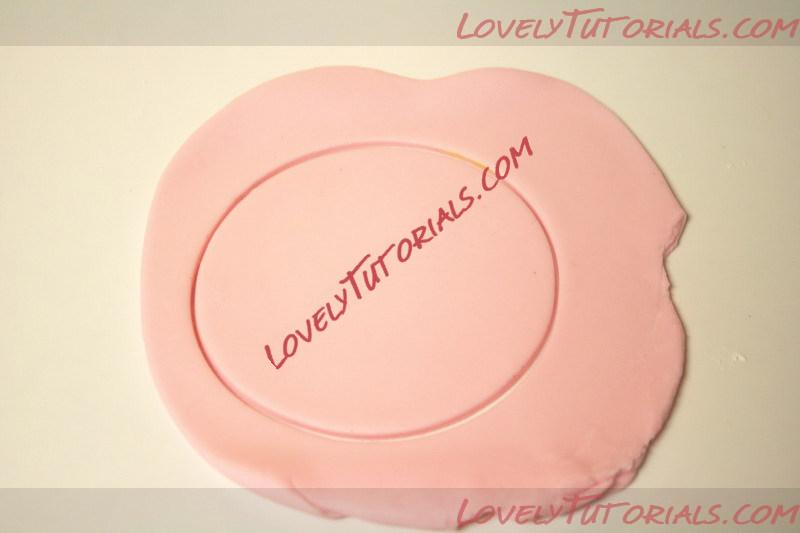
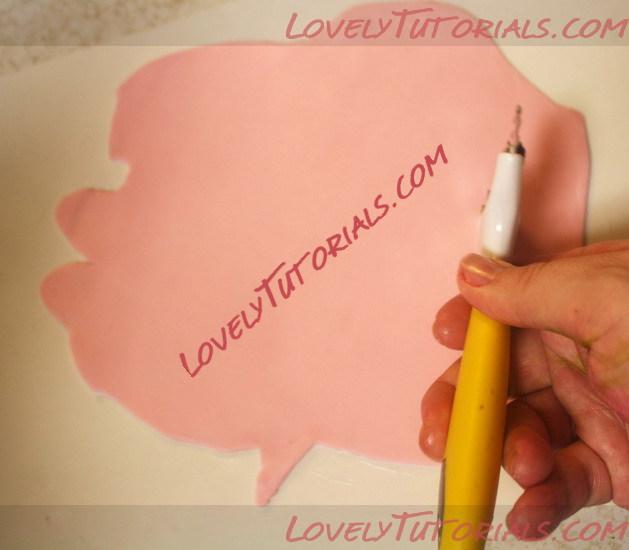
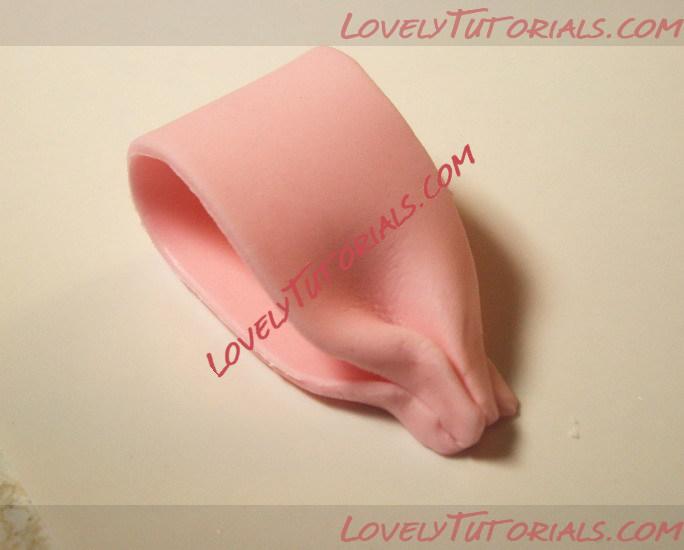
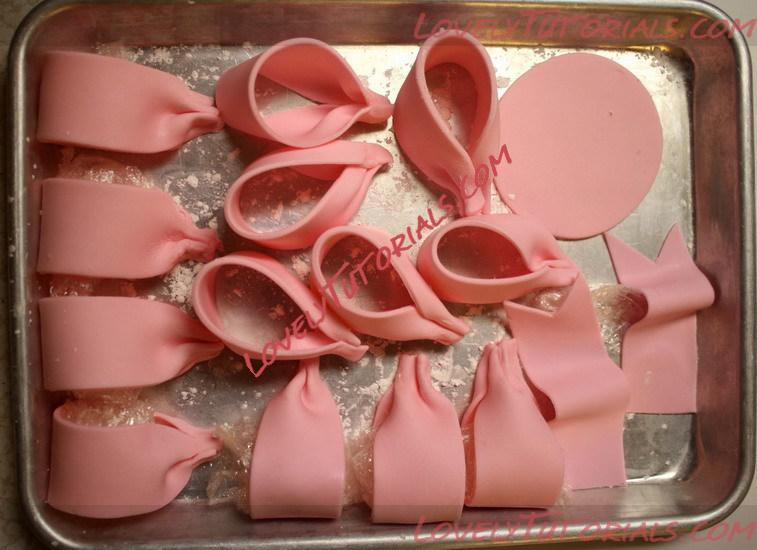
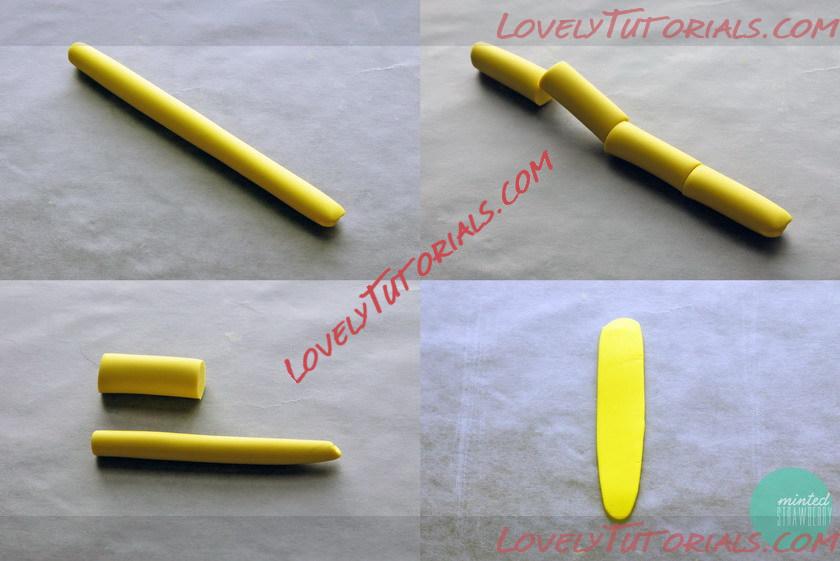
My first step is to make a round base for my bow. I roll out a small piece of gum paste, then cut a 3.5″ circle. This is a super easy step.. just cut it and set it on your cookie sheet to dry.
You do not want this gum paste paper thin… maybe an 1/8th”.
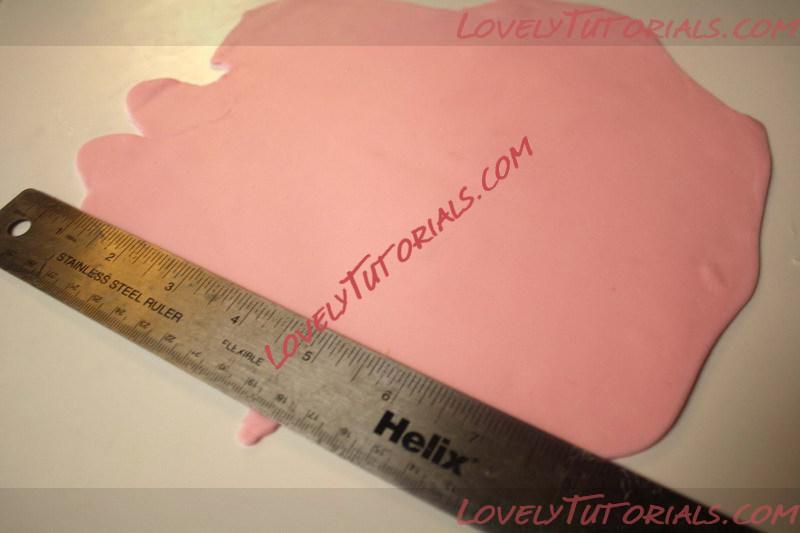
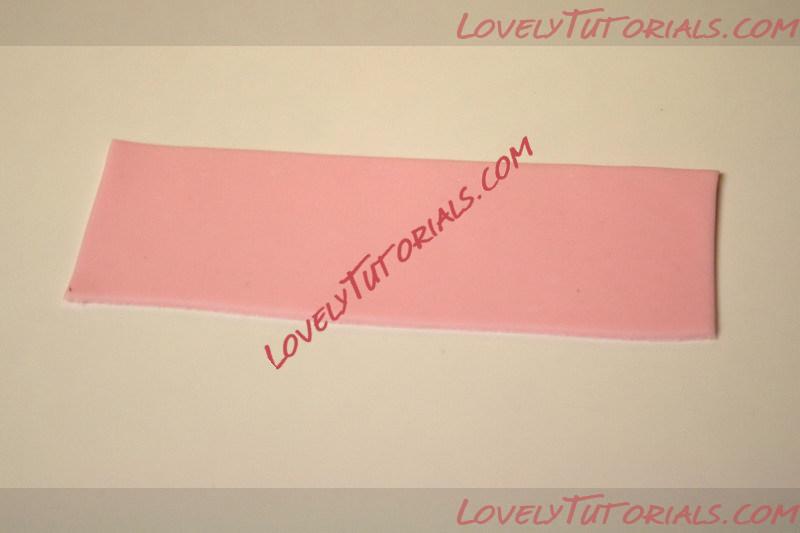
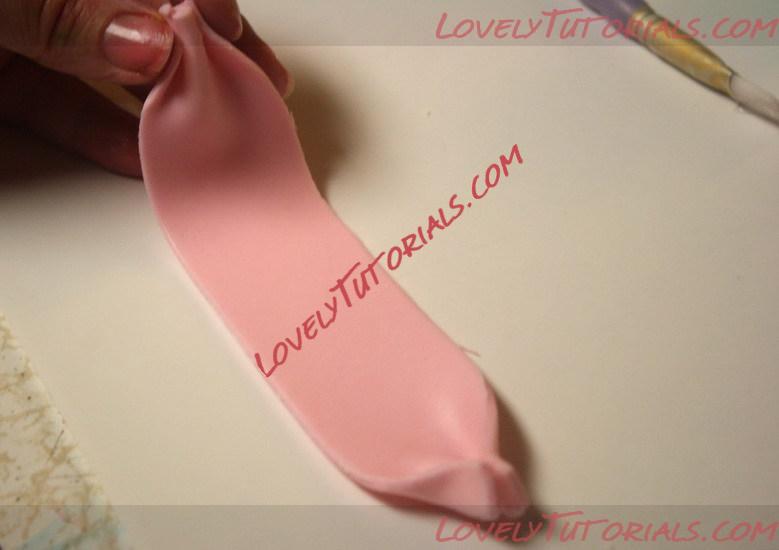
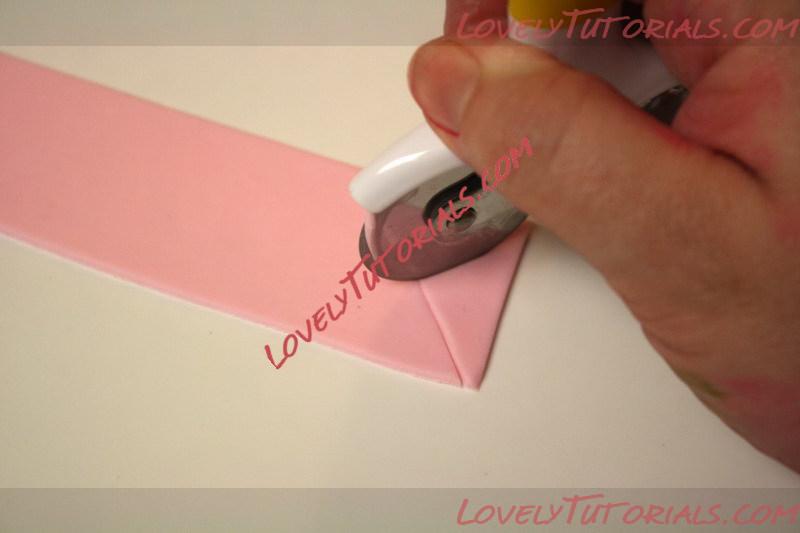
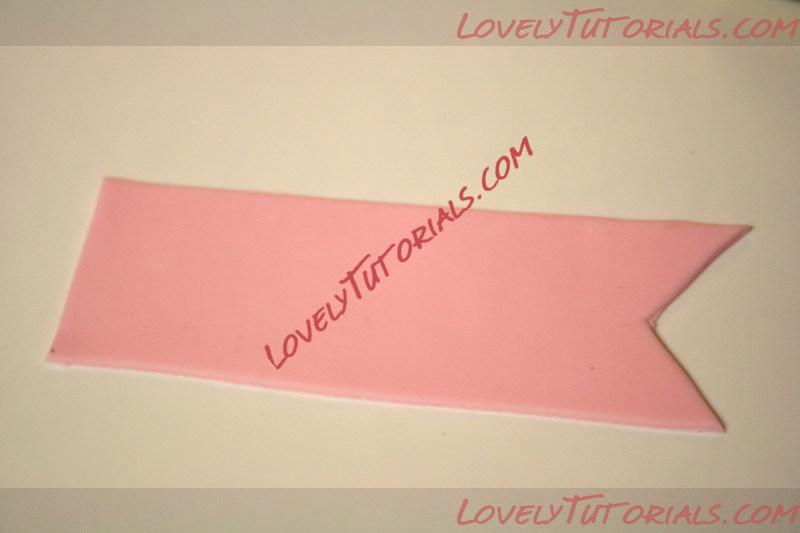
After you’ve done that, take about half of your remaining gum paste and knead it until it’s soft and pliable (keep the other half wrapped so it doesn’t dry out). Then roll it out pretty thin – large enough so that you can cut strips 7″ long.
I roll mine out on a flexible cutting board (I bought this cheap set of 5 and use them all the time!) with a thin layer of shortening on it to prevent sticking! Any smooth surface will work. After it’s rolled out, trim it on all sides – but again, make sure it’s at least 7″ long in one direction.
Cut as many strips from it as I could (balling back up and re-kneading, then re-rolling until it runs out) then moved on to the other half.
Note: I made lots of red and green fondant before doing this bow, hence my hands are green and red. In addition (as if the red and green were not enough), apparently I have freakish, non-photogenic hands… yikes!
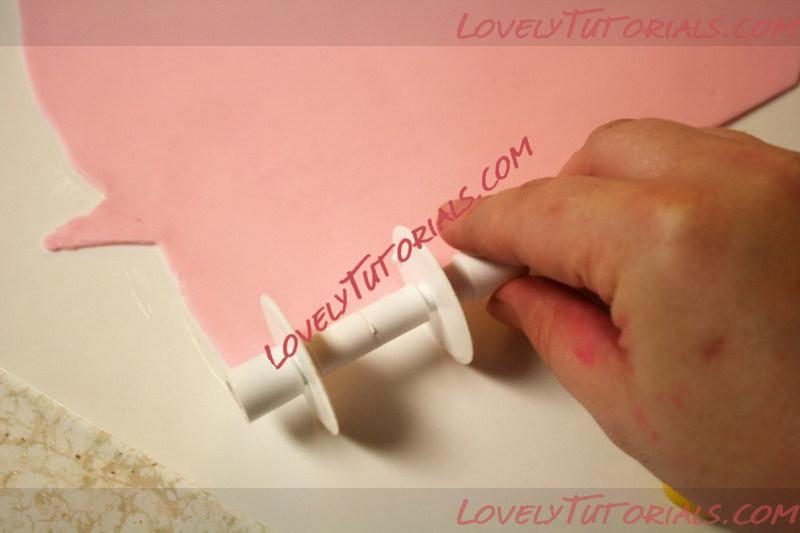
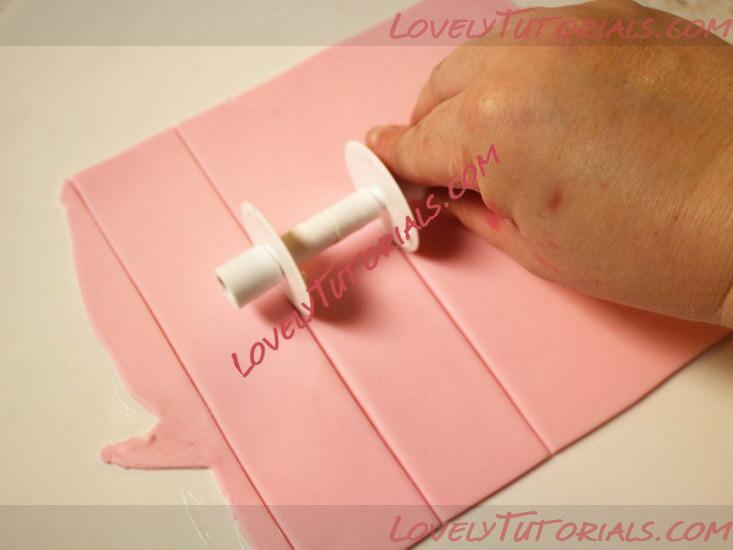
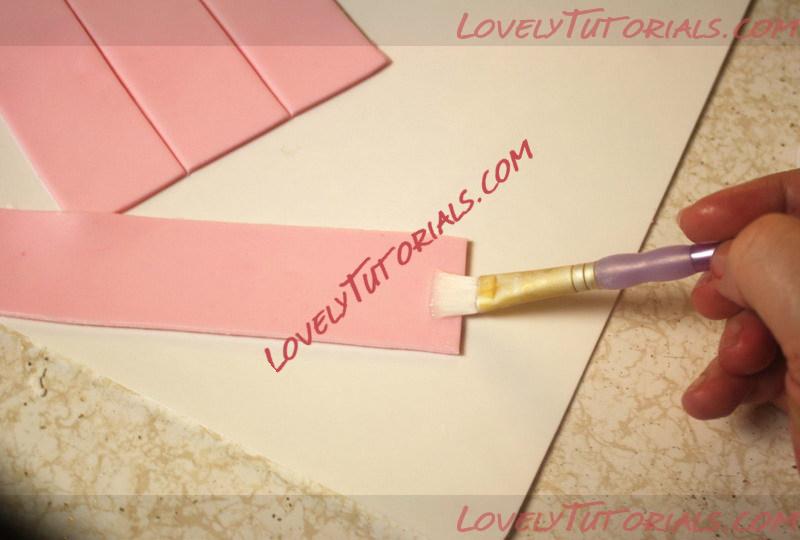
If you don’t have a ribbon cutter, you could do all of this cutting with a pastry wheel and a ruler. My ribbons are each 1.5″ wide. I do 3-4 strips at a time and make my loops, then roll out again, do 3-4 more, etc.
Note: the 7″ long loops give you a bow that is about 6″ in diameter. You can see this on a cake in part 2 of the poofy bow tutorial!
Back to your ribbons…
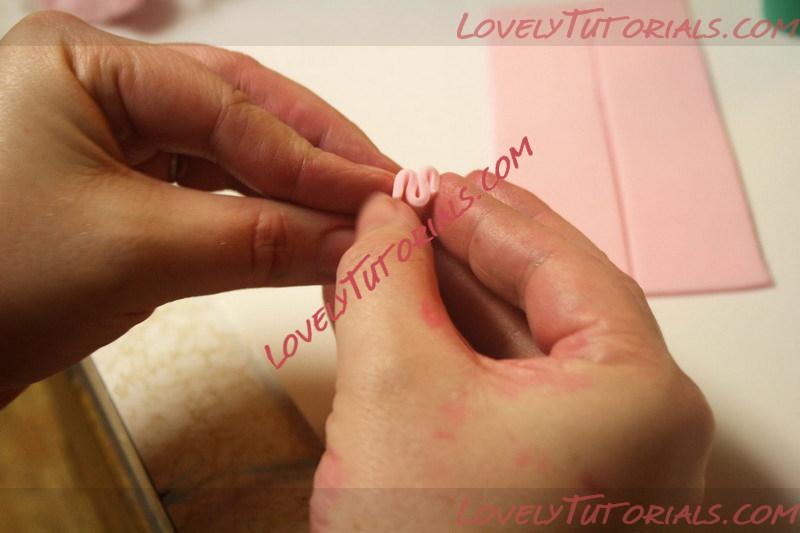
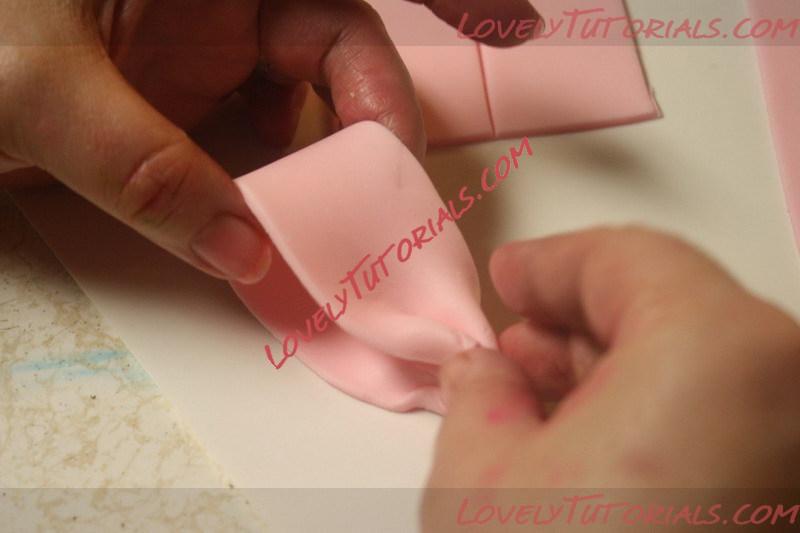
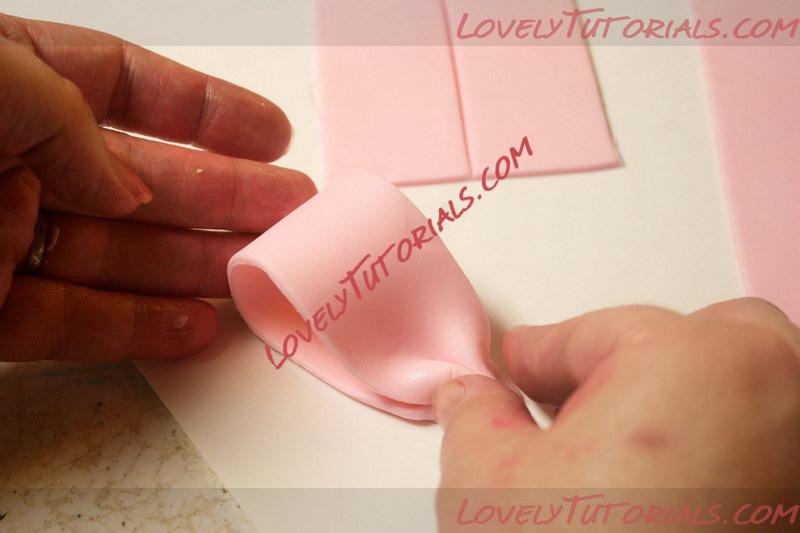
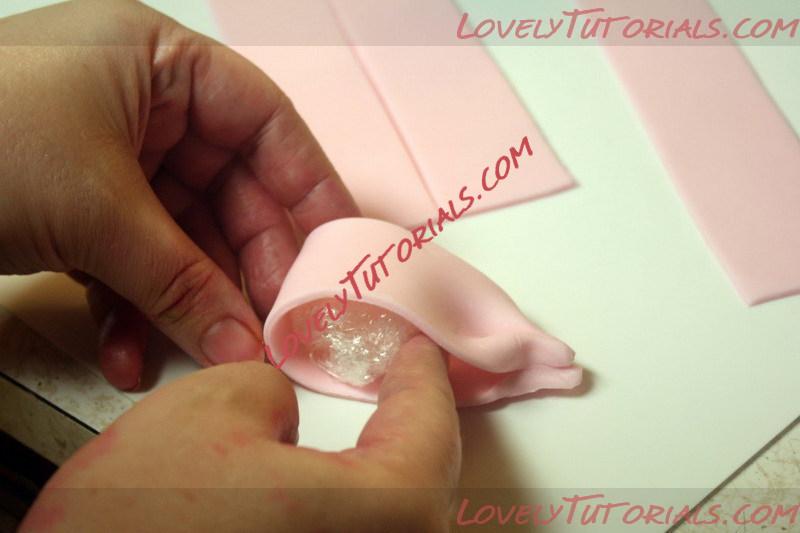
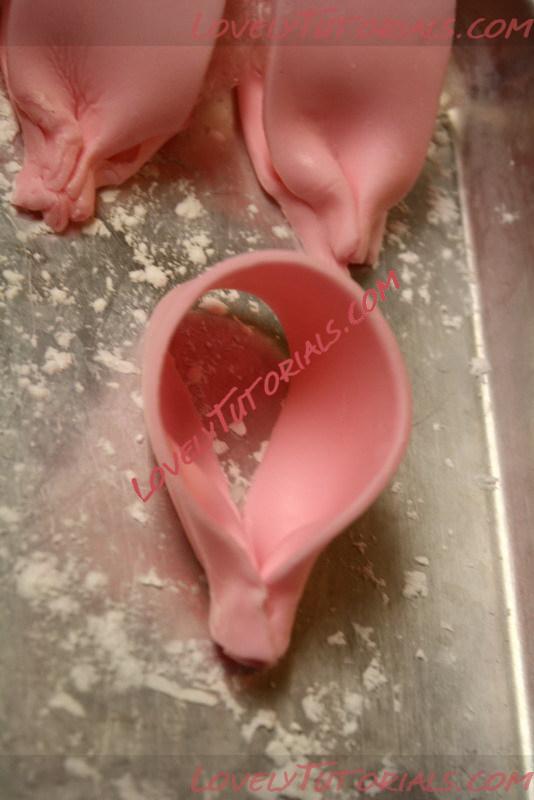
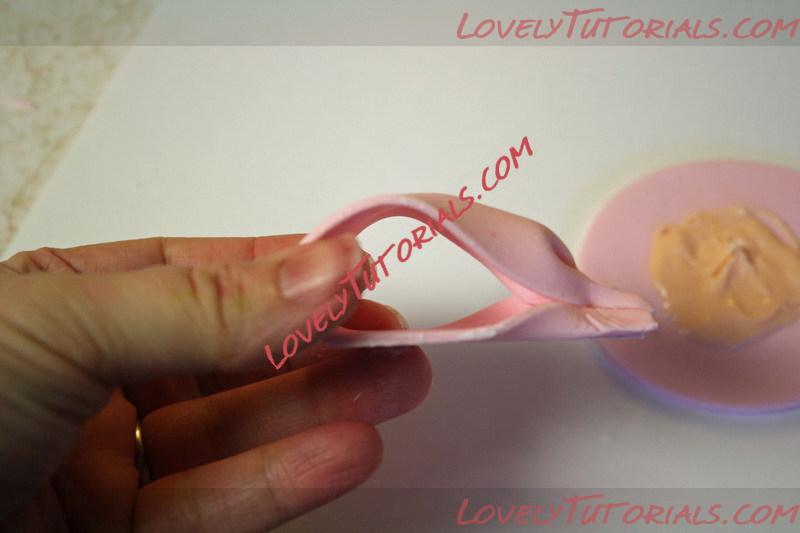
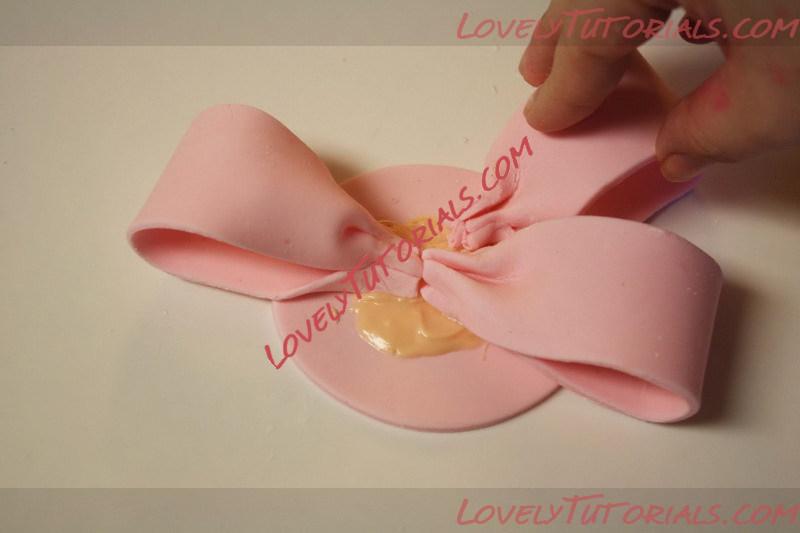
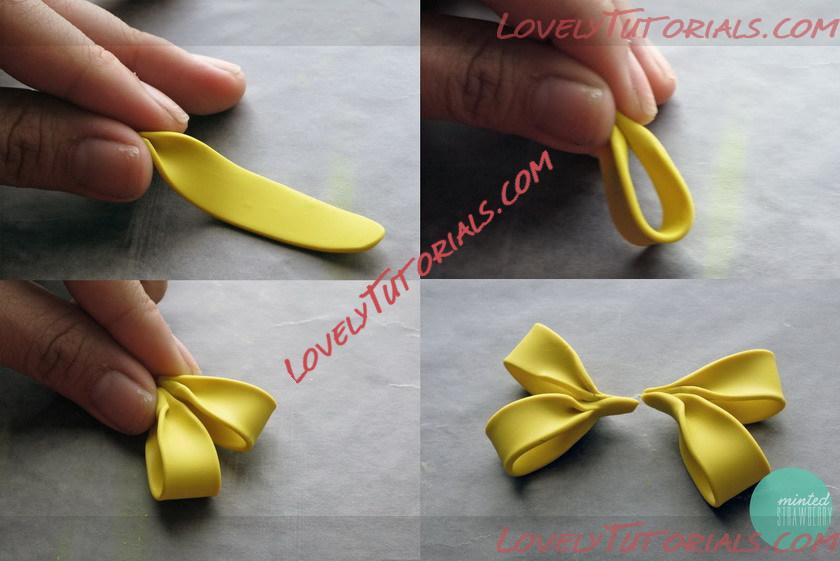
So, after I get a few strips of ribbon cut, I flip one over and paint each end with sugar glue. As I stated above, you can use water, but the glue is thicker and doesn’t drip as easily (ie., I don’t make nearly as big of a mess with it)! After it’s painted, I pinch the ends to make them stick.
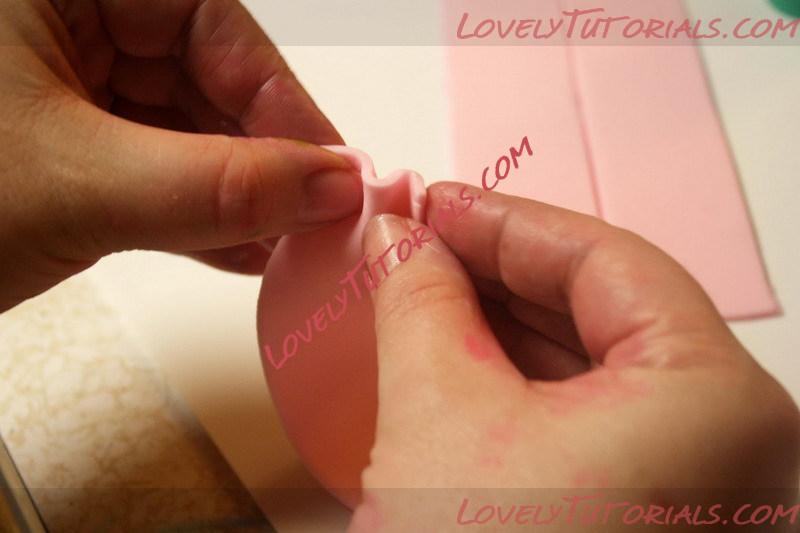
I try do a special little tri-fold. I don’t know how to explain it, but I think you can see it in these pictures…
Once both ends are pinched, you’re going to fold the loop over and pinch the ends to each other. There should be enough sugar glue there to make them stick, but if you need to, paint a little more on.
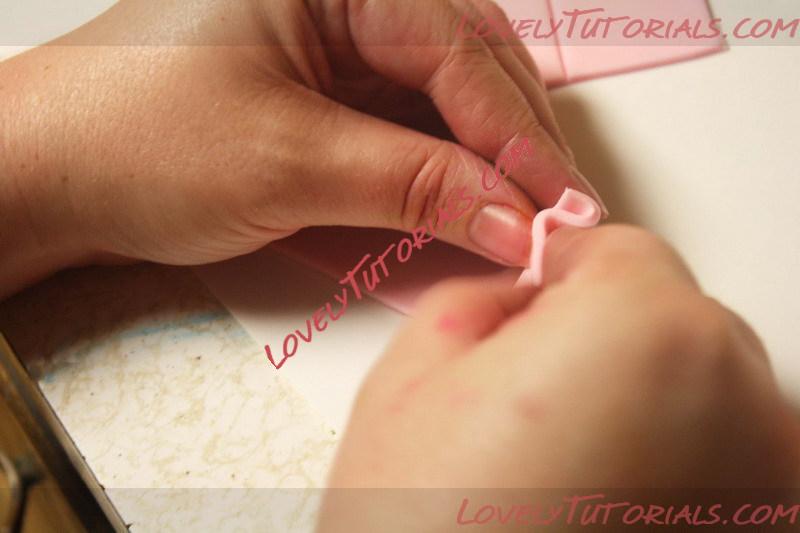
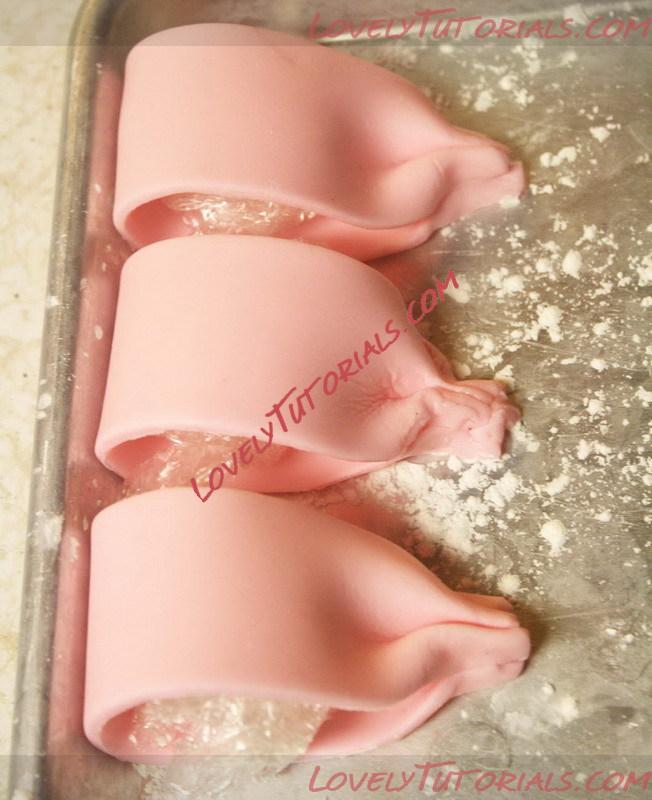
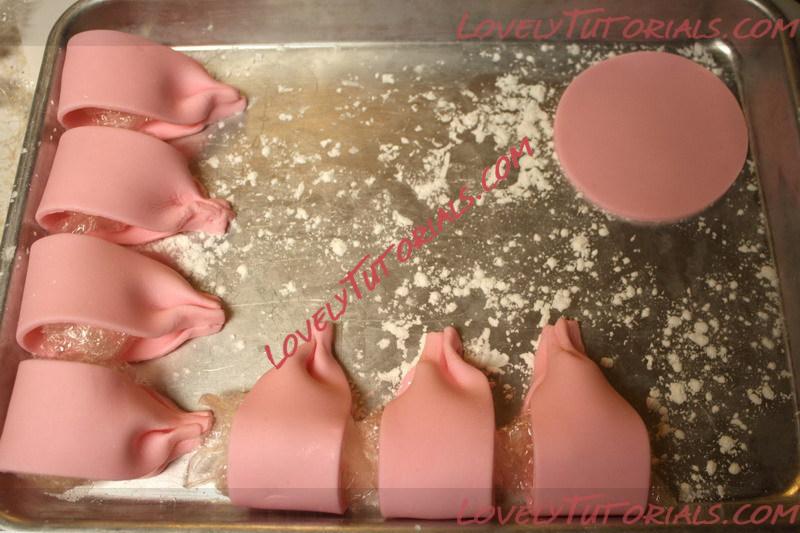
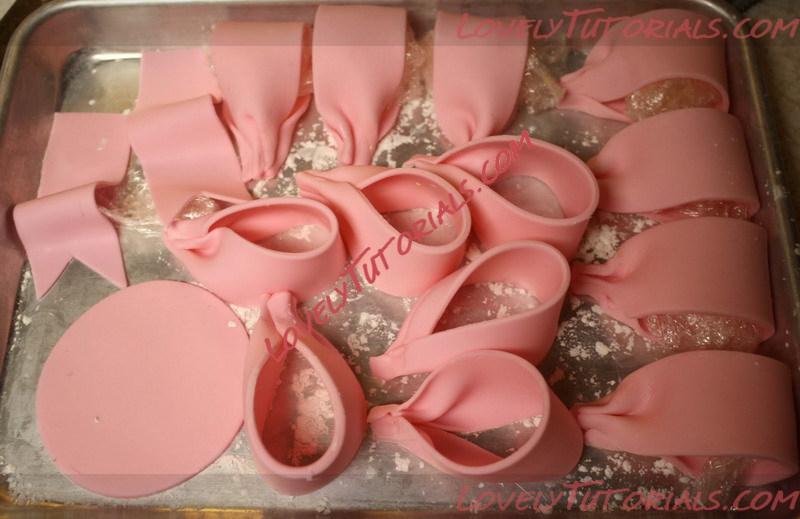
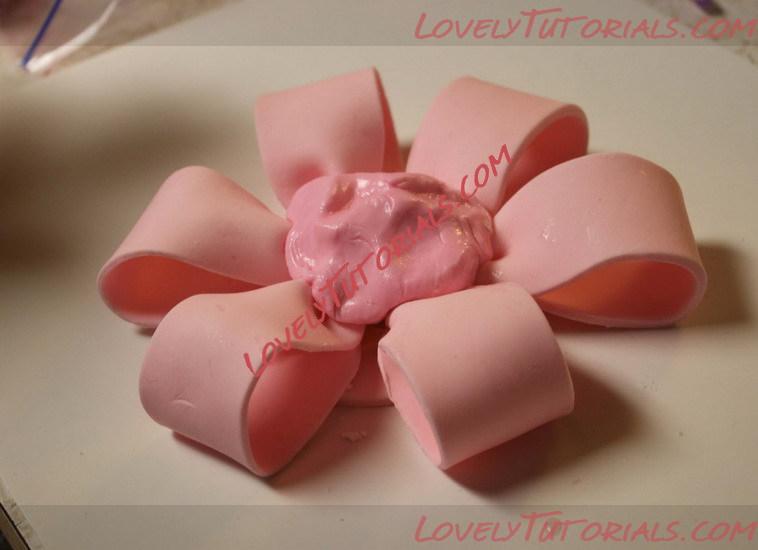
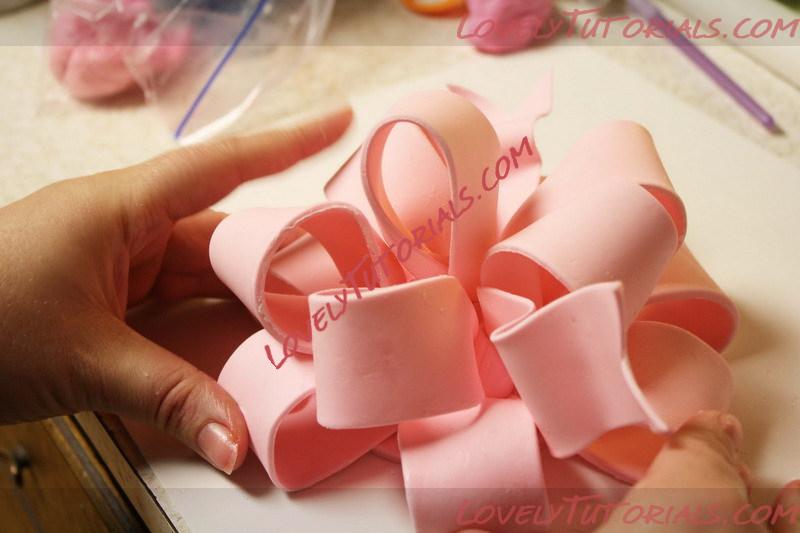
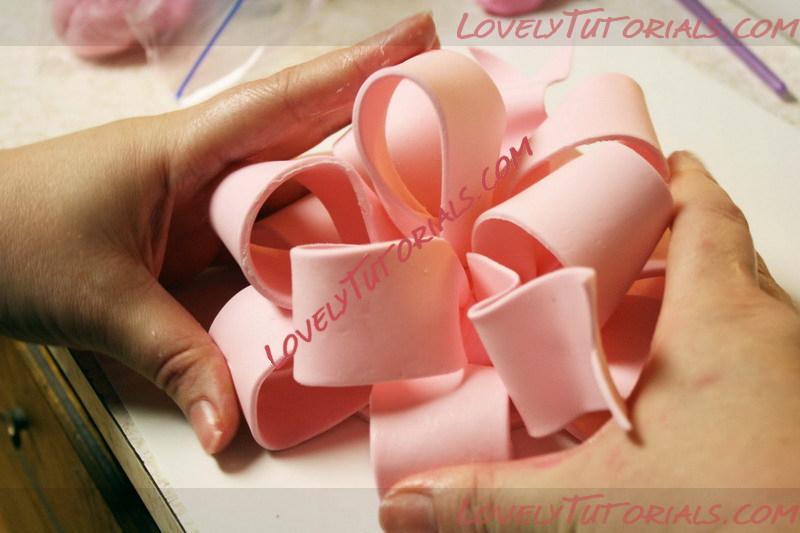
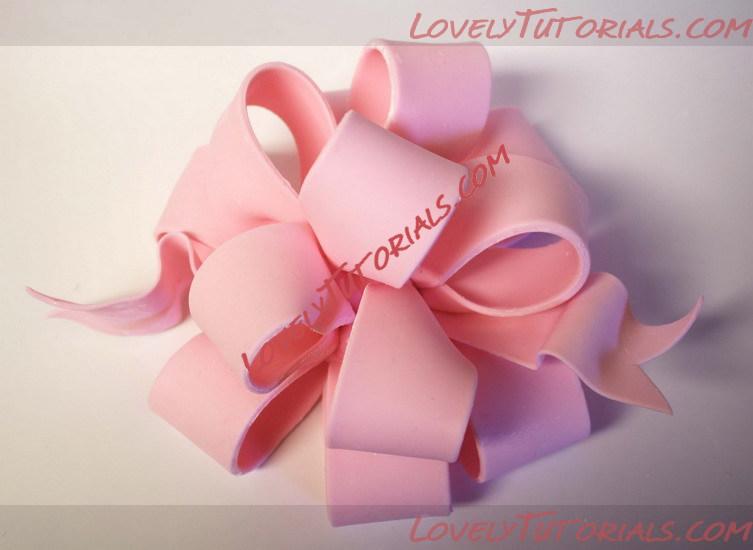
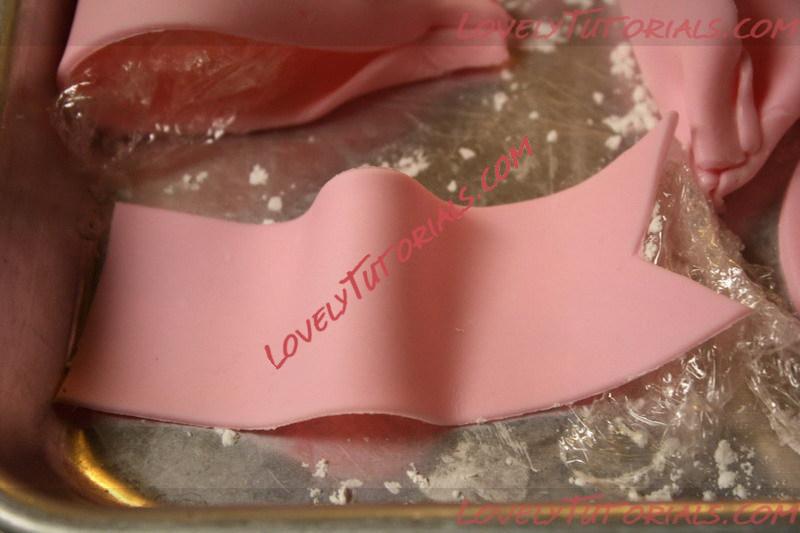
Now, if you leave this loop as it, it’ll sag and be flat before drying. To prevent that, simply wad up a ball of plastic wrap and place it inside the loop… like this. This bow can have either 11 or 12 loops. For the bottom layer, you’ll definitely want six loops (you’ll see why in part 2). For those, I set them down flat and push them against the side of my (corn starch dusted) cookie sheet to keep them good and poofy… I usually do at least one extra, if not two extra loops like this, just in case one or two crack or break. After you have at least 6-8 laid flat, you’ll repeat the above process and do another 5-8 loops (I recommend at least 6), except this time, you’ll lay them on their sides. That way they are “poofy” with no flat sides for the top layers of the bow. Lastly, you’ll want to make some “tails” for your bow. I only made 2 for this bow, but you can add up to 5 or 6. These are super easy! Just roll out some more strips, but this time they only need to be about 4-5″ long. Then cut them to make the pointy ends. Transfer them over to your cookie sheet, and wrinkle them up however you like. I placed a little piece of plastic wrap under the end to make it curl a little. *NOTE* The one thing I forgot to do was pinch the ends of the tails. You will want to pinch them just like the ends of the loop ribbons… this makes them much easier to put in your bow!!
|
04.01.2013, 09:06
|
|
Администратор
|
|
Регистрация: 07.09.2010
Сообщений: 7,669
|
|
Огромная благодарность Автору rosebakes за Мастер-класс
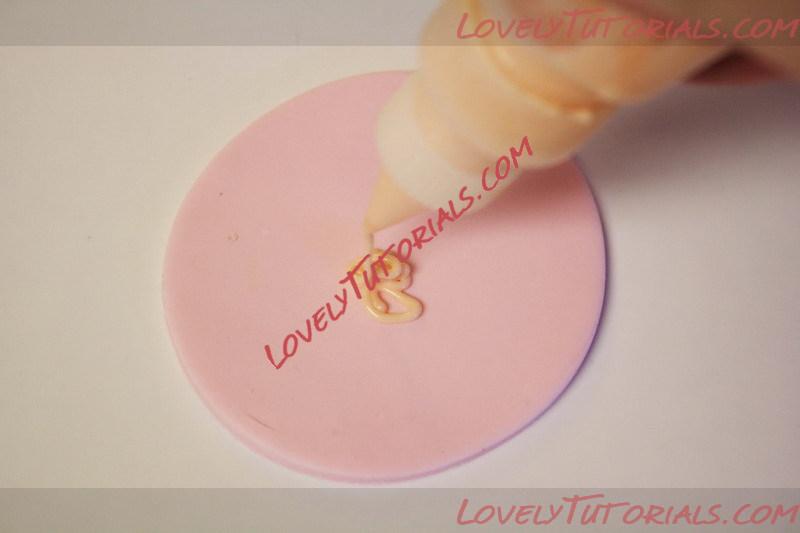
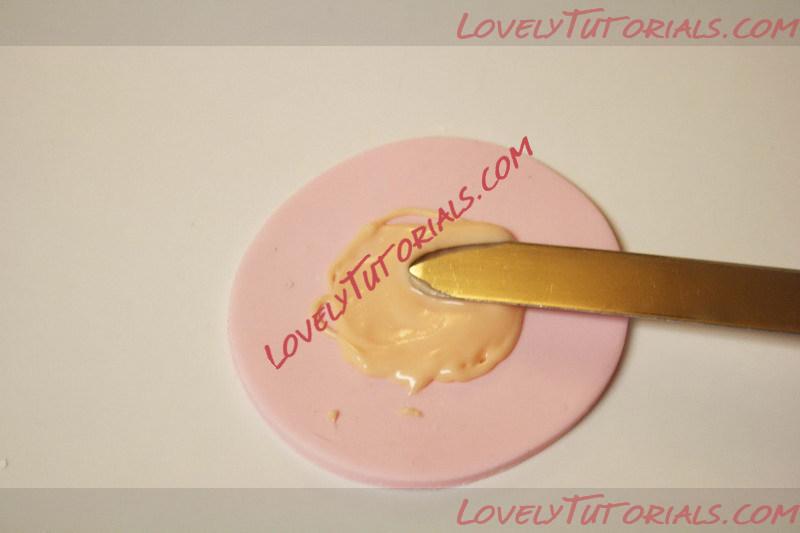
Now, your bow loops and tails have dried overnight (or longer) and we’re ready to assemble. You’ll want to start by melting some white chocolate. If you have candy coloring on hand, you can color the chocolate to match your fondant, but if not, the white shouldn’t show up after all the loops are there. Ignore the fact that mine was orange – I already had it on hand so I figured I’d use it up instead of waste it.
I used a squirt bottle to put a circle of white chocolate on my dried circle. You could also just do this with a spoon, then just spread it around. Don’t skimp on the white chocolate, you’ll want to have enough for your first set of loops to stick to!
After this, you’ll want to start by adding 6 of the flat-bottom loops in a circle (shown in part one).
I won’t include a lot of dialogue here, but you can see the step-by-step…
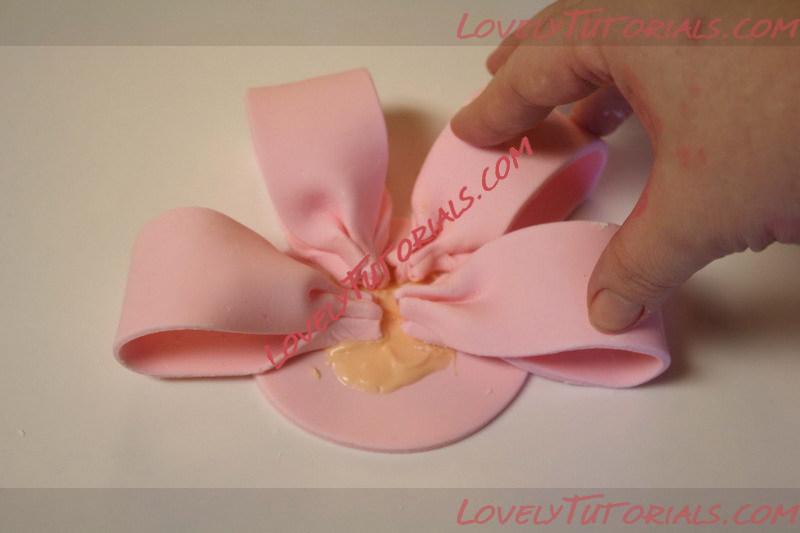
I’m so sorry about the lighting in these pictures. I have terrible lighting in my kitchen and I have no idea how to fix it with my camera :-(
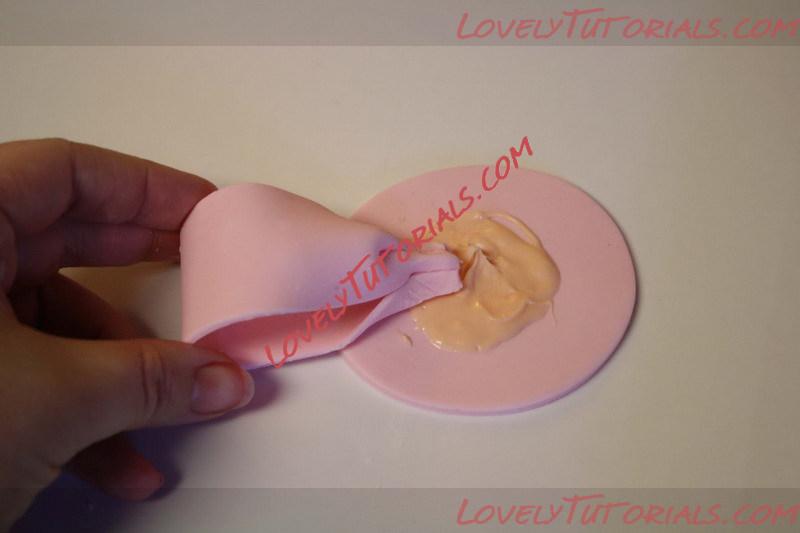
Now that all of those loops are set, you’ll want to take a ball of leftover gum paste (or fondant) that is colored to match your bow, and wet it.
|
04.01.2013, 09:07
|
|
Администратор
|
|
Регистрация: 07.09.2010
Сообщений: 7,669
|
|
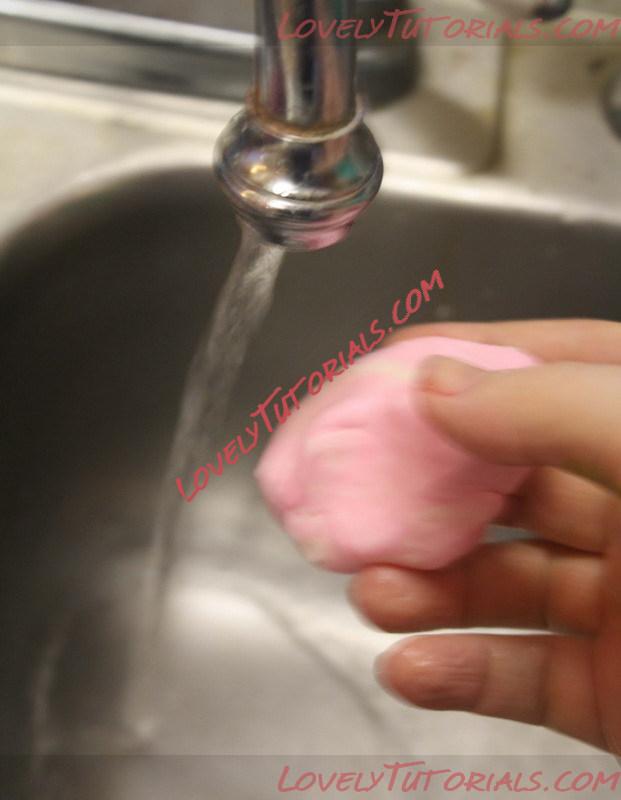
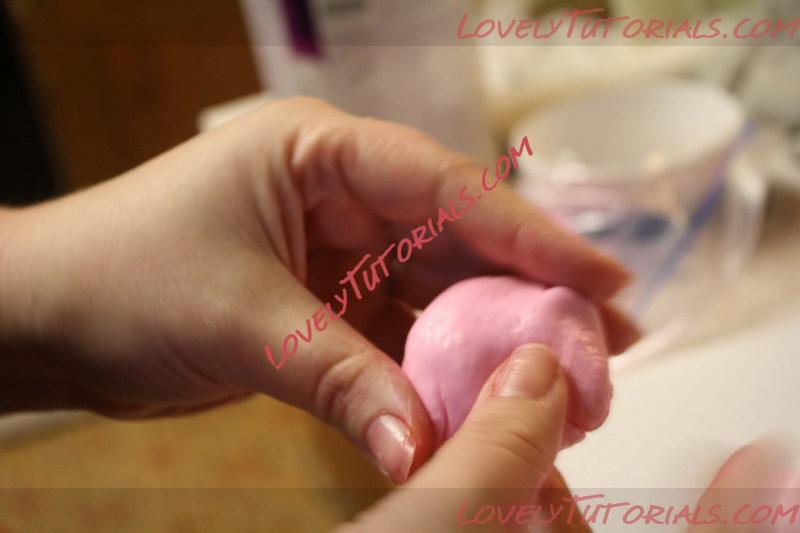
I stick mine directly under running water and squish it around until it’s good and sticky. It should be about 2″ in diameter (I don’t know how else to tell you the size).
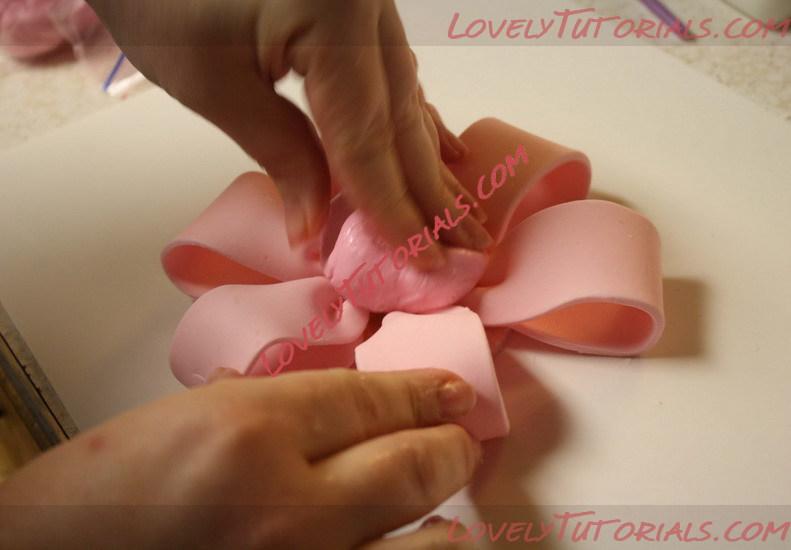
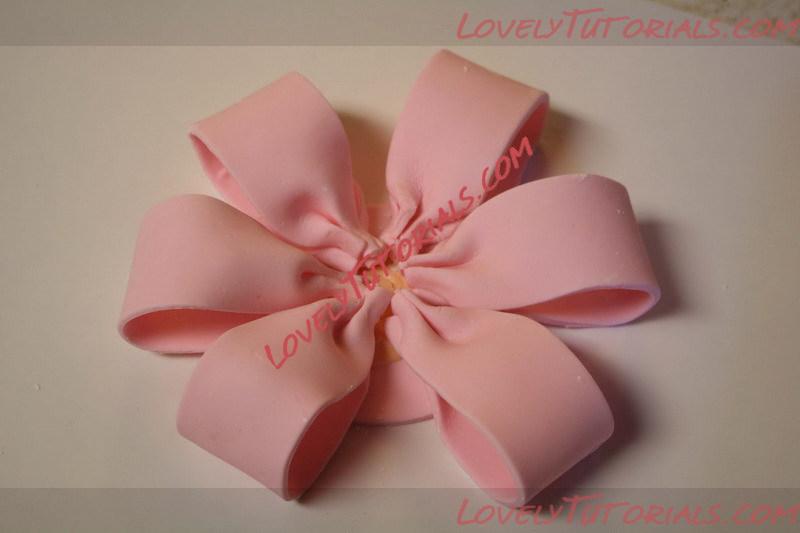
Take that wet ball and push it into the center of your bottom layer of loops… If your loops push out at all or get out of shape, just push them back into a circle…
It should look like this:
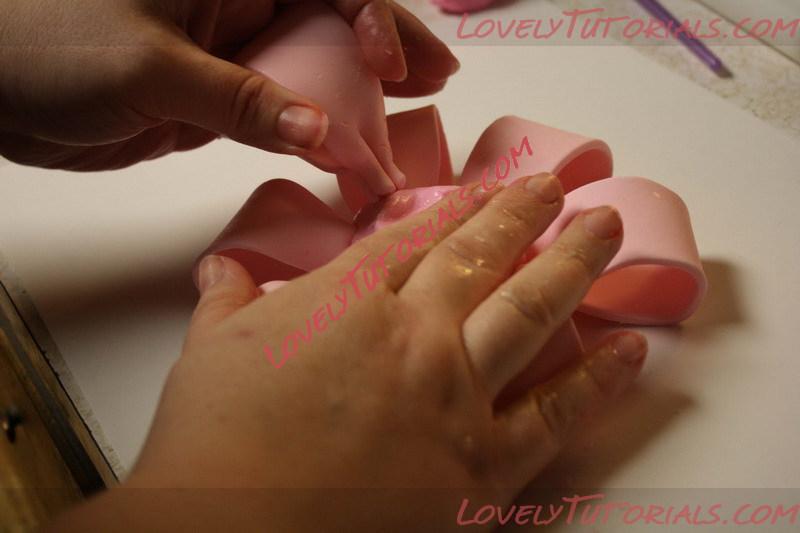
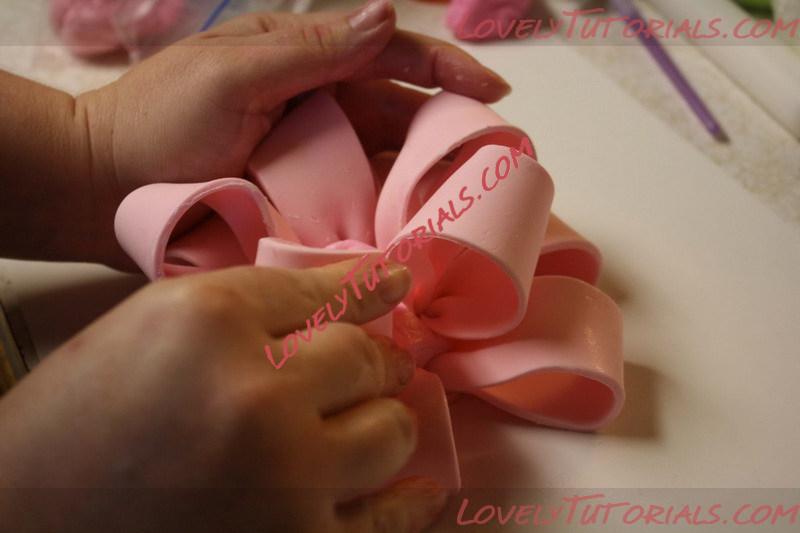
Next you’ll take the non-flat bottom loops and start sticking them into the wet fondant. This second layer will get 5 loops. Don’t worry if there are a few spaces here and there – that’s where you can stick the tails (or even an extra loop if you want to at the end).
After each loop, you’ll want to squish it all back together tight. Do this each time so it doesn’t start to spread out on you…
|
04.01.2013, 09:07
|
|
Администратор
|
|
Регистрация: 07.09.2010
Сообщений: 7,669
|
|
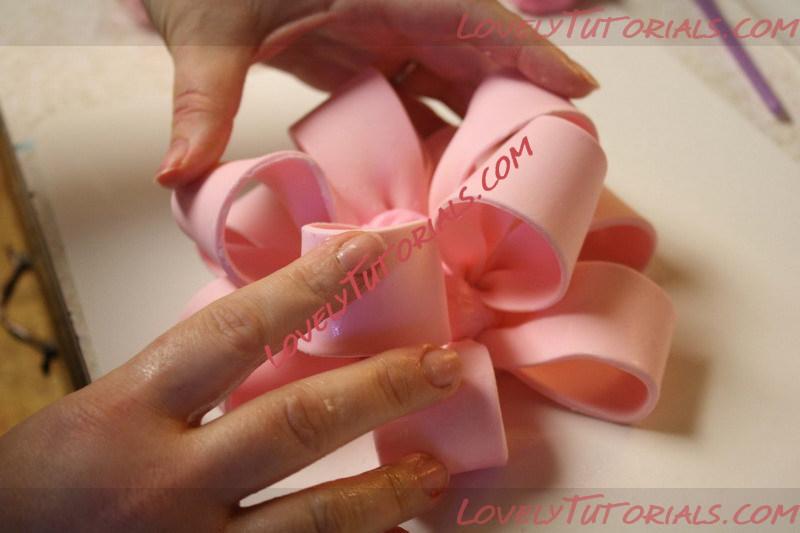
Again.. not a lot of dialogue, but here are a few step-by-step (loop-by-loop) pictures!
See how I turned that last one up on it’s side a little? You can do that too! Or you can alternate them laying down and on their sides to give the bow a little more random look!
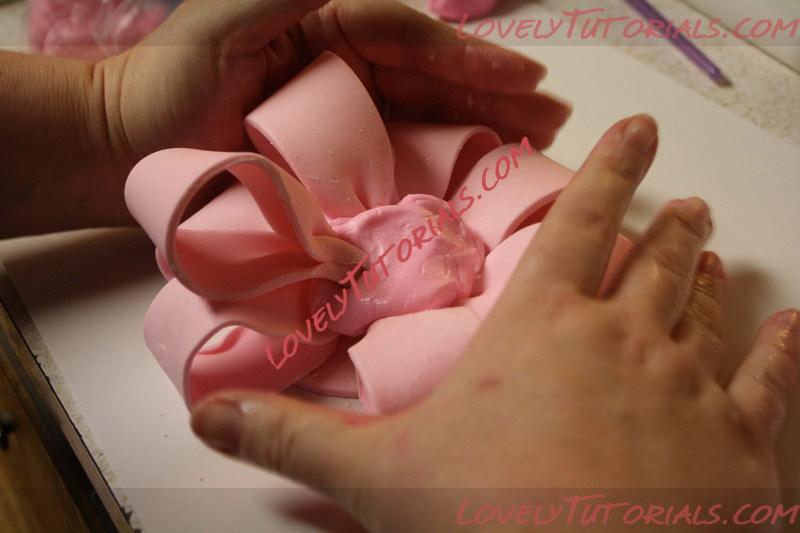
After you’ve got 5 loops added, it’s time to do the top center loop. Do it the same way, just push it into the wet fondant…
|
04.01.2013, 09:08
|
|
Администратор
|
|
Регистрация: 07.09.2010
Сообщений: 7,669
|
|
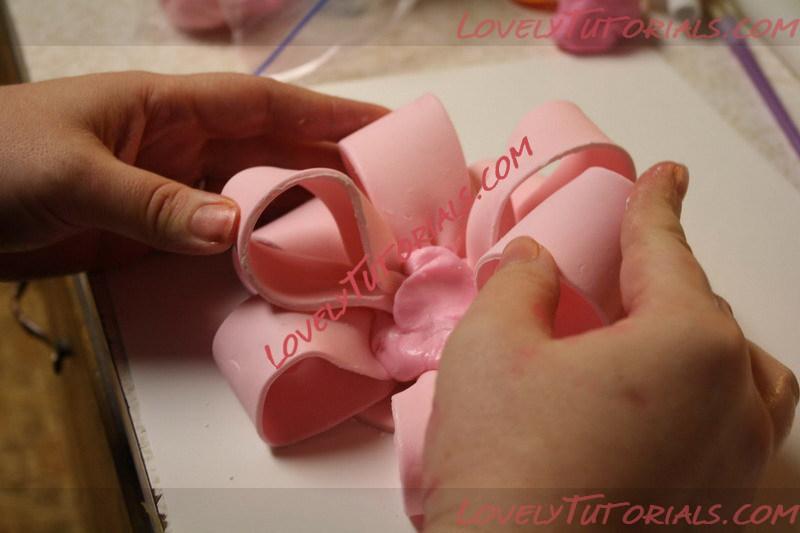
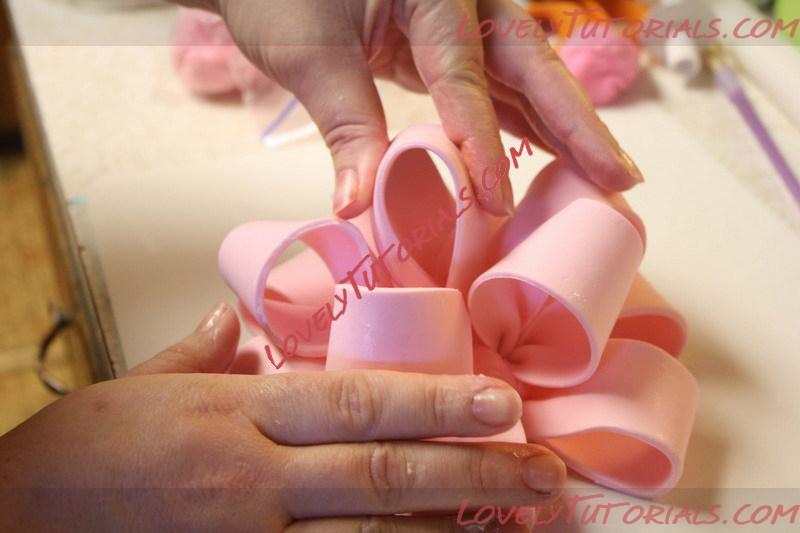
Lastly, add your tails. If you remember from part one, I forgot to pinch the ends of my tails, but if you’ve done that, it’ll be really easy to push them into any empty spaces on your bow…
Then squish it all together tight again…
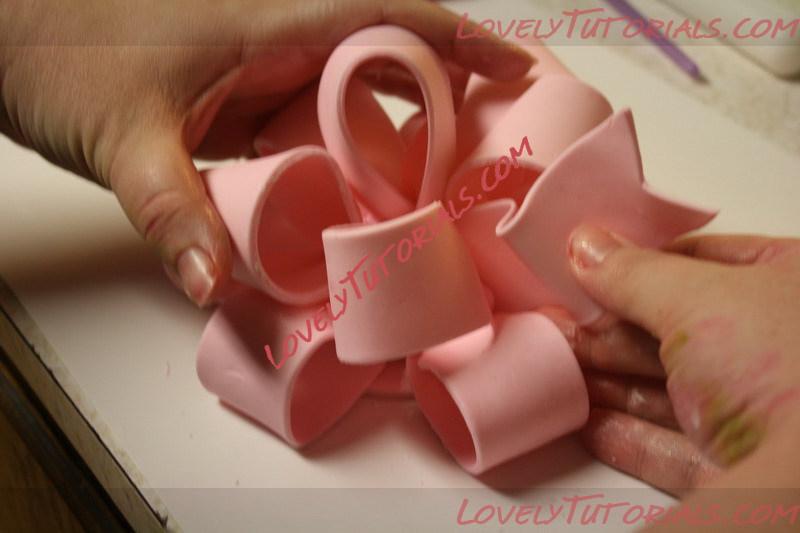
Now you’re done! You’ll want this to sit awhile and and let that soft squishy ball in the middle dry/harden up. Again, I prefer overnight, but if you don’t have that sort of time, just be careful applying it to your cake and it should be fine!
|
06.01.2013, 19:12
|
|
Администратор
|
|
Регистрация: 07.09.2010
Сообщений: 7,669
|
|
Огромная благодарность Автору mrsmudrashl за Мастер-класс

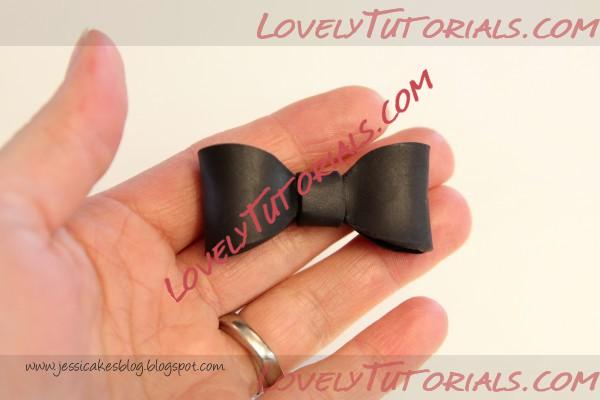
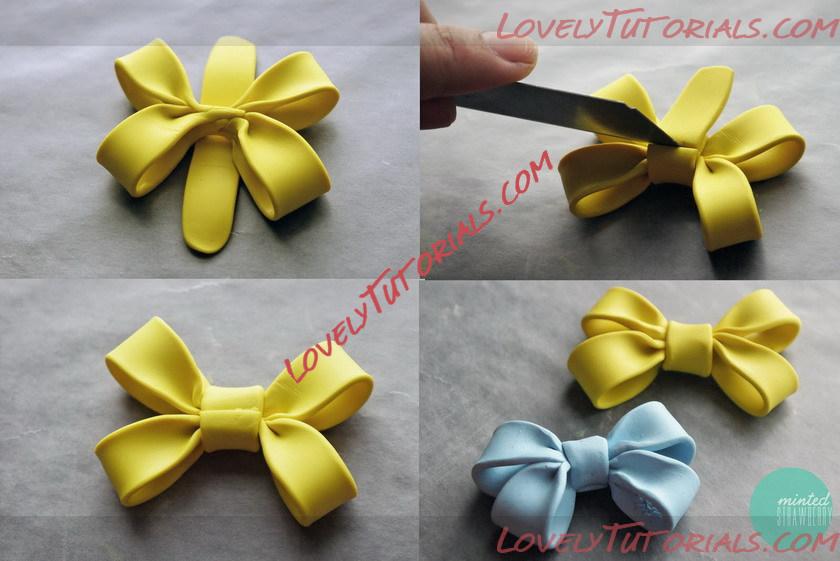
I came up with this simple way to make a bow that involves only two pieces of modeling chocolate. I make this using modeling chocolate because it sets up almost right away and it easy to handle, although you can make it with fondant or gumpaste. No worries about ruffling or tufting anything...just use the template to cut out your chocolate, then fold your edges together and you're basically done! Enjoy! List of Materials
- Modeling chocolate
- Rolling pin
- Template
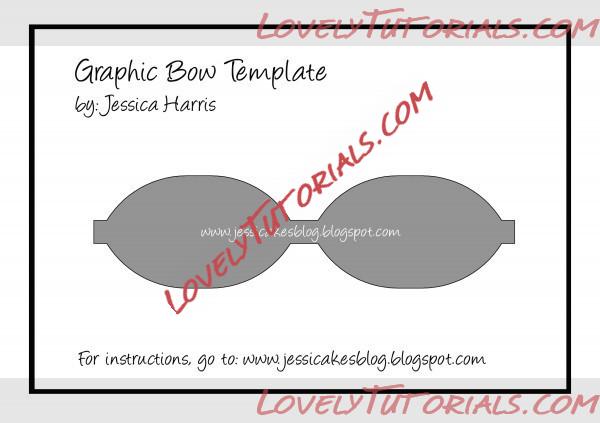
Print out the template to whatever size bow you'd like. Cut the template out and place it on your rolled out modeling chocolate.
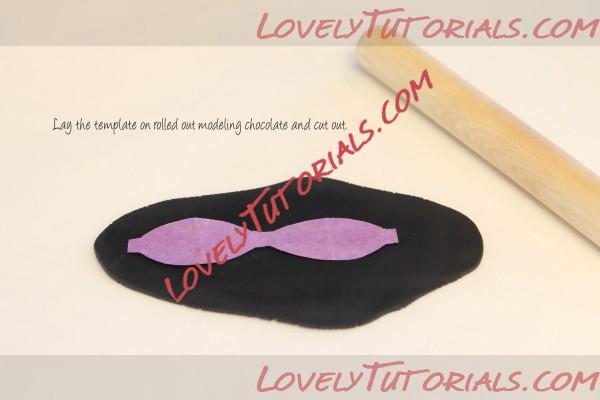
Cut out the modeling chocolate around the template.
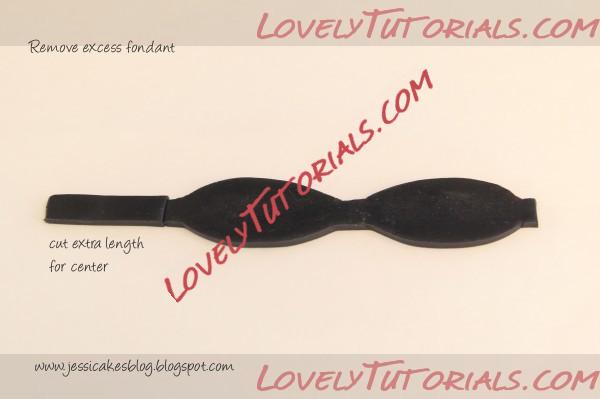
Make sure you cut a bit extra length on the side so you have a strip for the center of the bow. Remove excess modeling chocolate and store away.
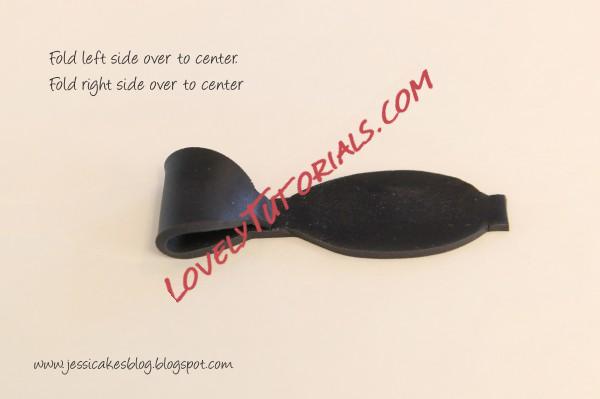
Fold left edge to center.
Fold right edge to center.
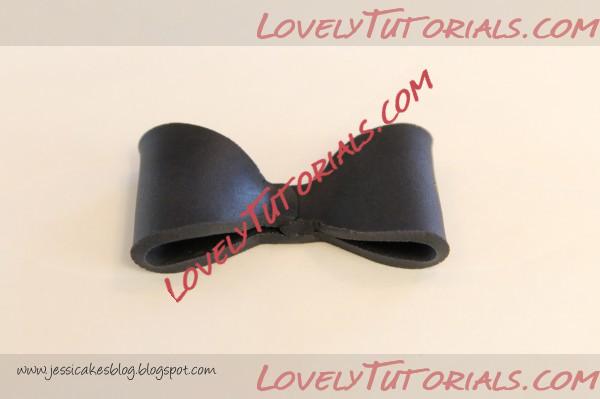
You're almost done! - looking like a little bow now isn't it!? 
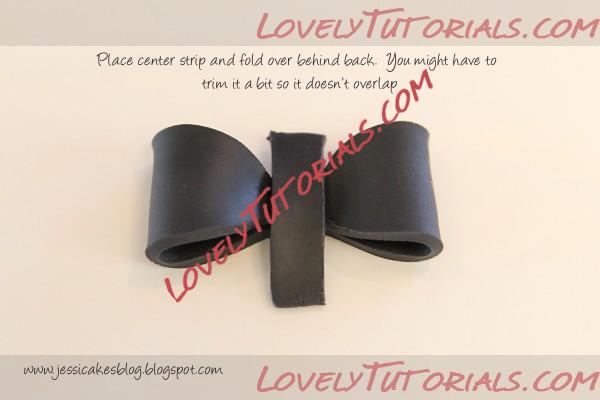
Put the strip you cut out earlier over the center and tuck it behind the bow.
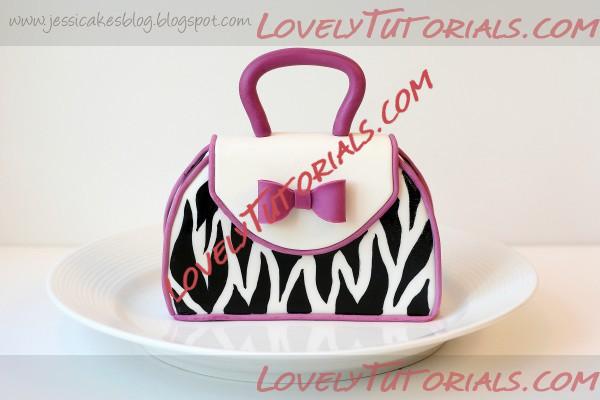
Use a little melted chocolate to attach it to your favorite purse, shoe or cake! Enjoy!
|
06.01.2013, 19:32
|
|
Администратор
|
|
Регистрация: 07.09.2010
Сообщений: 7,669
|
|
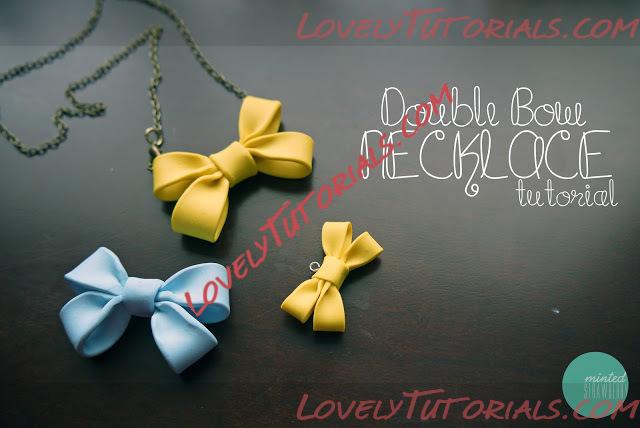
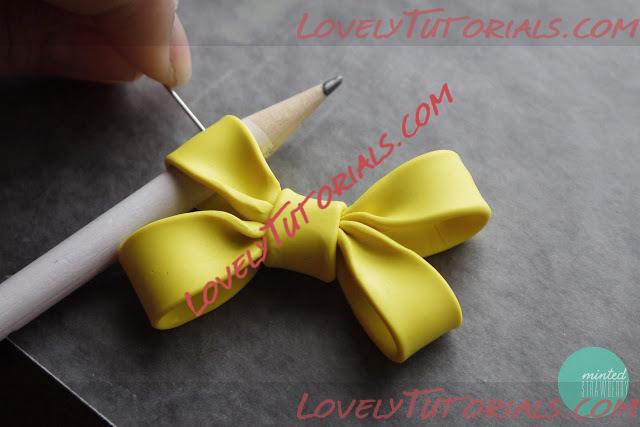
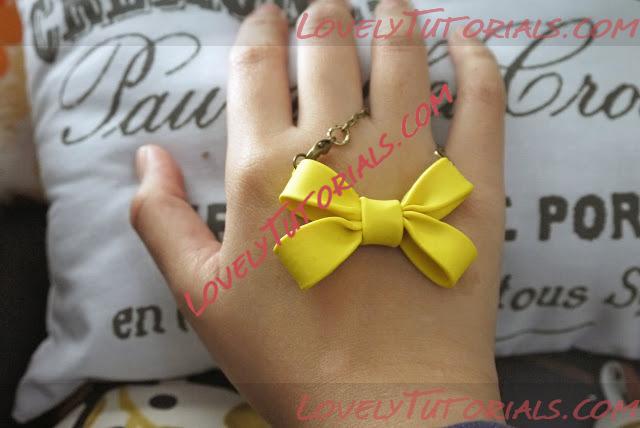
Огромная благодарность Автору Aki за Мастер-класс

|
 |
|
|
Метки
|
3d figures, addım-addım təlimat, adım, adım adım yönergeler, arc-noeud, arco-nó, artesanatos passo a passo, bemutató, birthday cake, biscuit, bogenknoten, bolando bolos, bolos decorados, boog-knoop, bow, bow-düğüm, bow-knot, bow-knut, bow-knute, cake decorating, cake decorating techniques, cake topper, cake toppers, cake tops, cerâmica plástica, character figures, characters, children's cake, cold porcelain, confeitando bolos, csomó, curso de modelado, decoracion de pasteles, decoración de tortas, decorada en fondant, decorare le torte, decorazioni, deko fondant, dekorace na dort, dekoracija, dekoracije, dekorasyon, dekorácie, especializada em modelagem de biscuit, fender, figur kager, figuras, figure making tutorials, figuren, figures, figurice, figurice od fondana, figurine on the cake, figurines, figurinhas, figurky, figúrky, figür modelleme, fimo, fiocco passo-passo, fixando a cabencinha, flower paste, fondan, fondant, fondente, fondente di zucchero, fotopostup, foundant, fundă, gebak, glazuur, gum pasta, gum paste, gumpaste, hand-made, handmade, how to, how to make a beautiful bow, how-to's, instrucţiuni, instrukcijas, instrukcje, jak na, kage dekoration, kagedekoration, kakebaking, keula-solmu, korak, korak za korakom navodila, korak-po-korak upute, koristeet ja koristelu, krok, krok po kroku, krok za krokem, krok-za-krokem, la modélisation, laivapriekio mazgas, las instrucciones, las técnicas, le tecniche, leptir-čvor, les techniques, luk-uzel, luk-uzol, lukie, marcipanové figurky, marshmallow, marsipanfigurer, masa flexible, master-class, master-klasse, master-klasy, meistras klasės, metodikas, mistr třídy, modelado, modelagem, modelando a barriga, modelando a cabencinha, modelando a perninha, modelando as maozinhas, modelando o cabelinho, modelando o corpinho, modelando os bracinhos, modelando os pezinhos, modelare, modelerte figurer, modeling, modeling paste, modeliranje, modellazione, modelleme, modellering, modellieren, modellierpaste, modelling, modelling past, modelləşdirmə, modelovanie, modelování, modelowanie, motivtorten, návod, opplæringen, orelhas, ozdoby, pamoka, pap, pas, pas-cu-pas, paso, paso a paso, passo, passo a passo, passo-a-passo, passo-passo le istruzioni, pasta de goma, pasta de miel, pasta flexible, pasta laminada, pintura dos olhos, pocelana fria, polymer clay, postupak za ukrasavanje, pravljenje figurica za torte, pâtisserie, předměty z marcipánu, schmelzend, schritt für schritt anleitung, schritt-für-schritt, schritt-für-schritt-anleitungen, sculpting, soggetti, souvenirs, stap, stap-voor-stap, stap-voor-stap instructies, steg for steg, steg-för-steg-instruktion, step, step by step, step-by-lépésre, step-by-step, step-by-step instructions, styrofoam, sugarcraft, sugarpaste, suikerglazuur, technieken, techniken, techniki, techniky, technikák, techniques, tecnicas de decoracion, tecniche, tehnici, tehnike, teknikker, teknikler, telgopor, topo de bolo, topo do bolo, topos de bolo, torte, torte decorate, torten dekorieren, torti, trin, trin for trin, trin-for-trin, trin-for-trin instruktioner, trinn, trinn for trinn, trinn-for-trinn-instruksjoner, tutorial, tutoriale, tutorias, tutorias/ideas para decorar los bizcochos, tutoriel, tutorijal, técnicas, udžbenik, ukrašavanje torti, uputstvo za dekoraciju, zuckerfigürchen, zuckermasse, सजा केक, ट्यूटोरियल मास्टर वर्ग, कदम, कदम दर कदम निर्देश, तकनीक, मॉडलिंग, モデル, étape, étape par étape les instructions, íj, öğretici, 一步, 一步一步的指示術, žingsnis, žingsnis po žingsnio, 宗師級教程, 建模, 裝飾蛋糕, βήμα, βήμα προς βήμα οδηγίες, οδηγίες βήμα βήμα, παντεσπάνι art, τεχνικές, τόξο-κόμβων, φροντιστήριο, инструкция, как сделать, как сделать красивый бантик, крок за кроком, крок за крокам, покроково, полимерная глина, пошагово, пошаговые фотки, пакрокава, персонажи, миниатюра, мк, моделиране, майстор-класа урок, майстар-клас, майстер-клас, майстер-класи, маршмеллоу, мастика, мастер-класс, бант, лепка, лък възел, ліплення, ручной работы, ручная работа, украшение тортов, сахарная мастика, уроки прикрашання, стъпка, стъпка по стъпка инструкции, техники, техника, техніка, туториал, туторіал, тэхніка, фигурки, фигурка на торт, фимо, фігурки, фігуркі, холодный фарфор, шаг за шагом, інструкцыя, інструкція  |
|