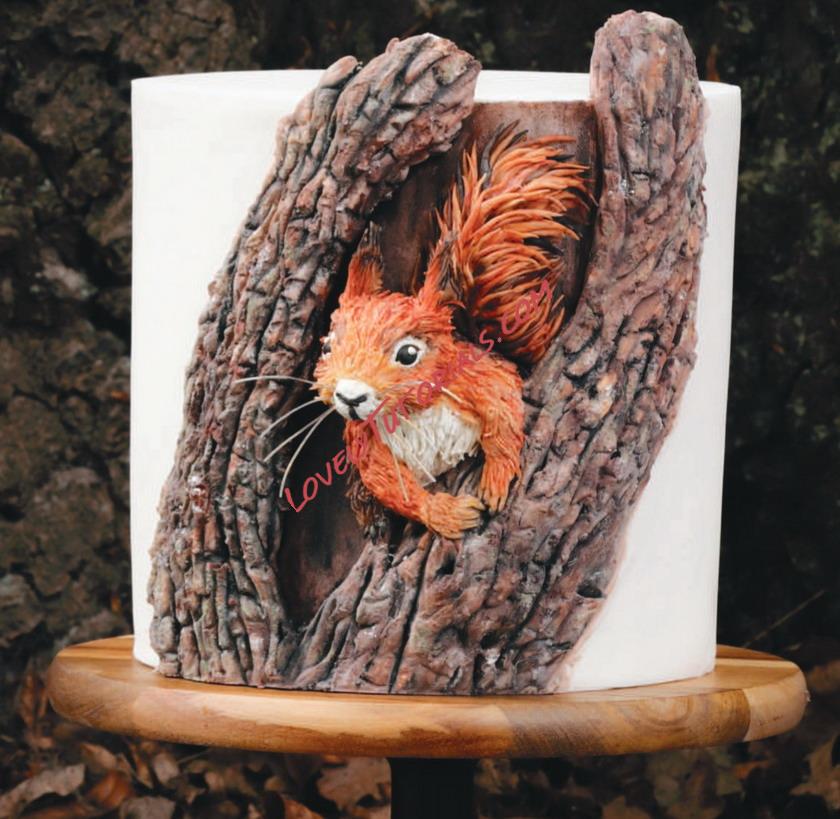
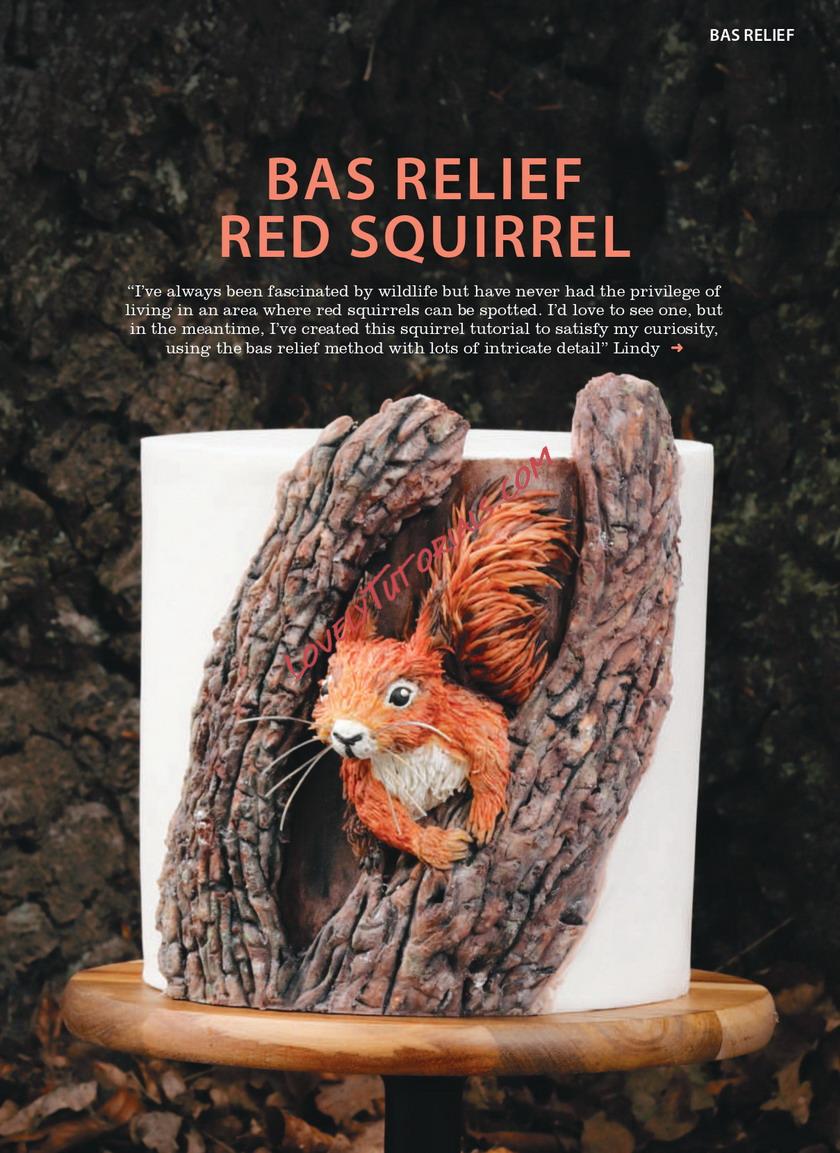
BAS RELIEF RED SQUIRREL cake tutorial
YOU WILL NEED
EDIBLES:
• 6in diameter x 6in height cake of your choice covered with lkg white sugarpaste
• 200g white sugarpaste
• Brown, orange, green, black and white edible food dusts
• Cocoa butter
• Sugar glue/piping gel/water
• loog white chocolate modelling paste
• Short length of spaghetti
• Fine rice vermicelli for whiskers
EQUIPMENT:
• Modelling tools or sugar shaper tools
• Long-nosed pliers (optional)
• Squirrel template (12cm high)
• Selection of paintbrushes
• White plates
• Source of heat - simmering pan of hot water or tea light in pot warmer
• Paintbrushes
• Craft knife
• Scissors
• Ball tool
• Dresden/veining tool
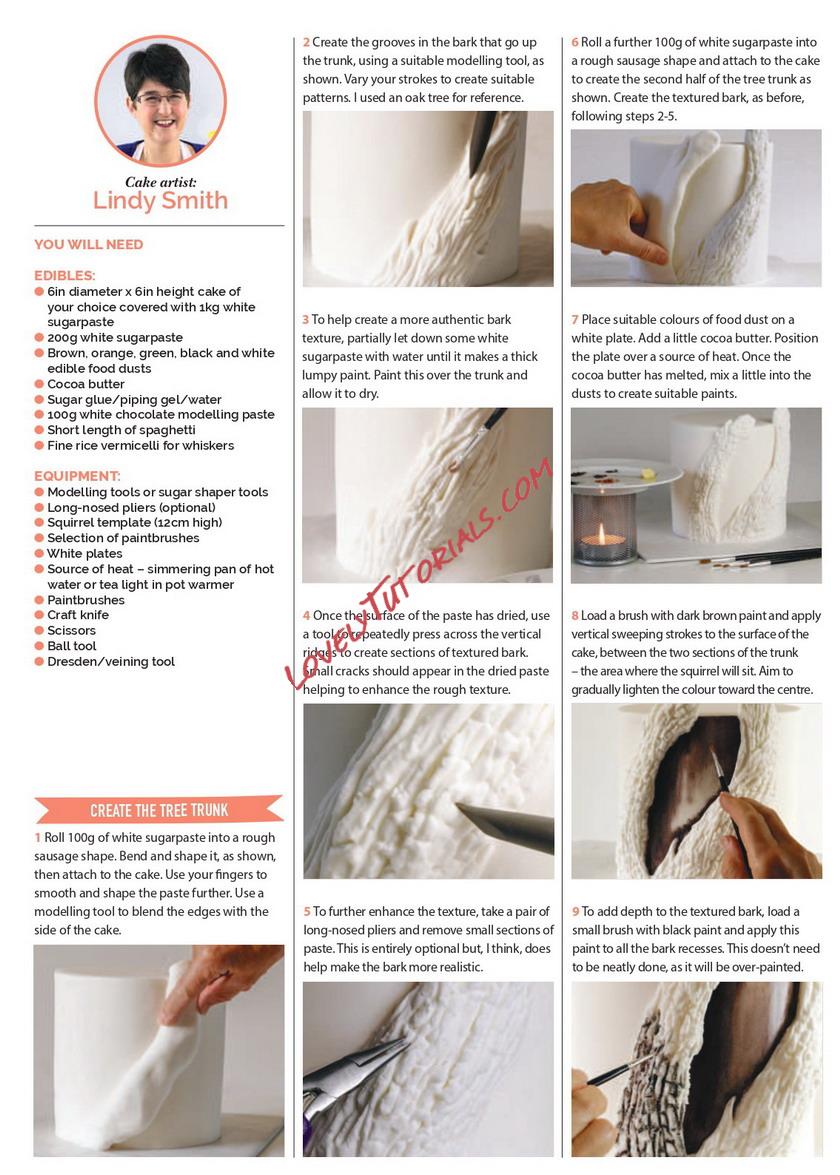
1 Roll 100g of white sugarpaste into a rough sausage shape. Bend and shape it, as shown, then attach to the cake. Use your fingers to smooth and shape the paste further. Use a modelling tool to blend the edges with the side of the cake.
2 Create the grooves in the bark that go up the trunk, using a suitable modelling tool, as shown. Vary your strokes to create suitable patterns. I used an oak tree for reference.
3 To help create a more authentic bark texture, partially let down some white sugarpaste with water until it makes a thick lumpy paint. Paint this over the trunk and allow it to dry.
4 Once the surface of the paste has dried, use a tool to repeatedly press across the vertical ridges to create sections of textured bark. Small cracks should appear in the dried paste helping to enhance the rough texture.
5 To further enhance the texture, take a pair of long-nosed pliers and remove small sections of paste.This is entirely optional but, I think, does help make the bark more realistic.
6 Roll a further 100g of white sugarpaste into a rough sausage shape and attach to the cake to create the second half of the tree trunk as shown. Create thetextured bark, as before, following steps 2-5.
7 Place suitable colours of food dust on a white plate. Add a little cocoa butter. Position the plate over a source of heat. Once the cocoa butter has melted, mix a little into the dusts to create suitable paints.
8 Load a brush with dark brown paintand apply vertical sweeping strokes to the surface of the cake, between the two sections of the trunk - the area where the squirrel will sit. Aim to gradually lighten the colour toward the centre.
9 To add depth to the textured bark, load a small brush with black paint and apply this paint to all the bark recesses. This doesn't need to be neatly done, as it will be over-
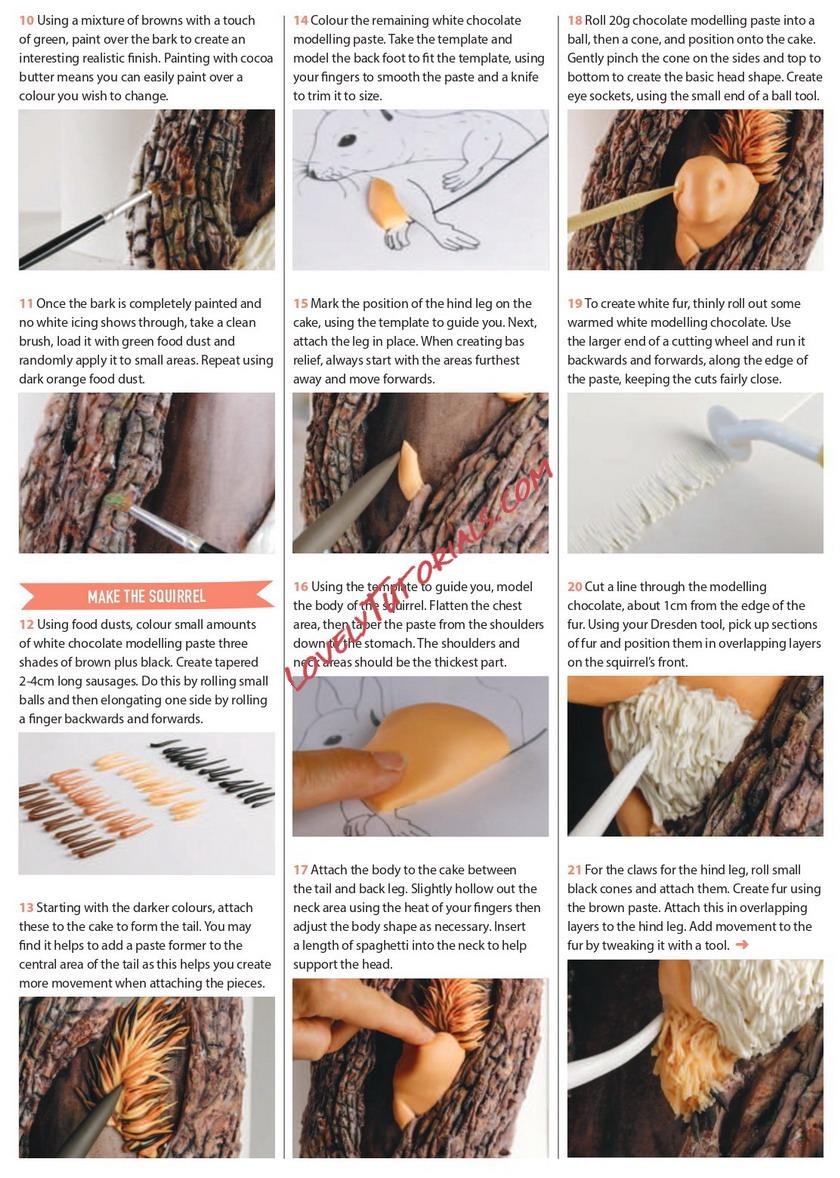
10 Using a mixture of browns with a touch of green, paint over the bark to create an interesting realistic finish. Painting with cocoa butter means you can easily paint over a colour you wish to change.
\
11 Once the bark is completely painted and no white icing shows through, take a clean brush, load it with green food dust and randomly apply it to small areas. Repeat using dark orange food dust.
12 Using food dusts, colour small amounts of white chocolate modelling paste three shades of brown plus black. Create tapered 2-4cm long sausages. Do this by rolling small balls and then elongating one side by rolling a finger backwards and forwards.
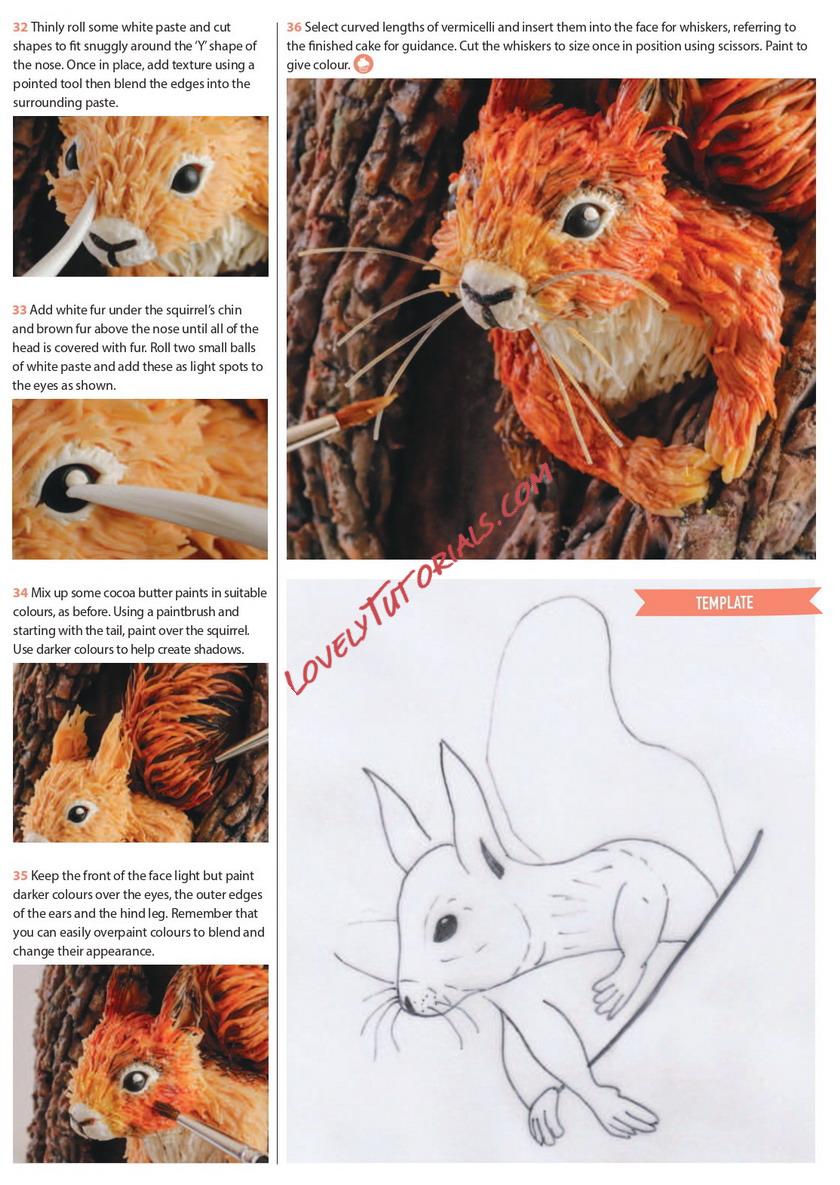
13 Starting with the darker colours, attach these to the cake to form the tail. You may find it helps to add a paste former to the central area of the tail as this helps you create more movement when attaching the pieces.
14 Colour the remaining white chocolate modelling paste. Take the template and model the back foot to fit the template, using your fingers to smooth the paste and a knife to trim it to size.
15 Mark the position of the hind leg on the cake, using the template to guide you. Next, attach the leg in place. When creating bas relief, always start with the areas furthest away and move forwards.
16 Using the template to guide you, model the body of the squirrel. Flatten the chest area, then taper the paste from the shoulders down to the stomach.The shoulders and neck areas should be the thickest part.
17 Attach the body to the cake between the tail and back leg. Slightly hollow out the neck area using the heat of your fingers then adjust the body shape as necessary. Insert a length of spaghetti into the neck to help support the head
18 Roll 20g chocolate modelling paste into a ball, then a cone, and position onto the cake. Gently pinch the cone on the sides and top to bottom to create the basic head shape. Create eye sockets, using the small end of a ball tool.
19 To create white fur, thinly roll out some warmed white modelling chocolate. Use the larger end of a cutting wheel and run it backwards and forwards, along the edge of the paste, keeping the cuts fairly close.
16 Using the template to guide you, model the body of the squirrel. Flatten the chest area, then taper the paste from the shoulders down to the stomach.The shoulders and neck areas should be the thickest part.
20 Cut a line through the modelling chocolate, about 1cm from the edge of the fur. Using your Dresden tool, pick up sections of fur and position them in overlapping layers on the squirrel's front.
21 For the claws for the hind leg, roll small black cones and attach them. Create fur using the brown paste. Attach this in overlapping layers to the hi nd leg. Add movement to the fur by tweaking it with a tool. ->
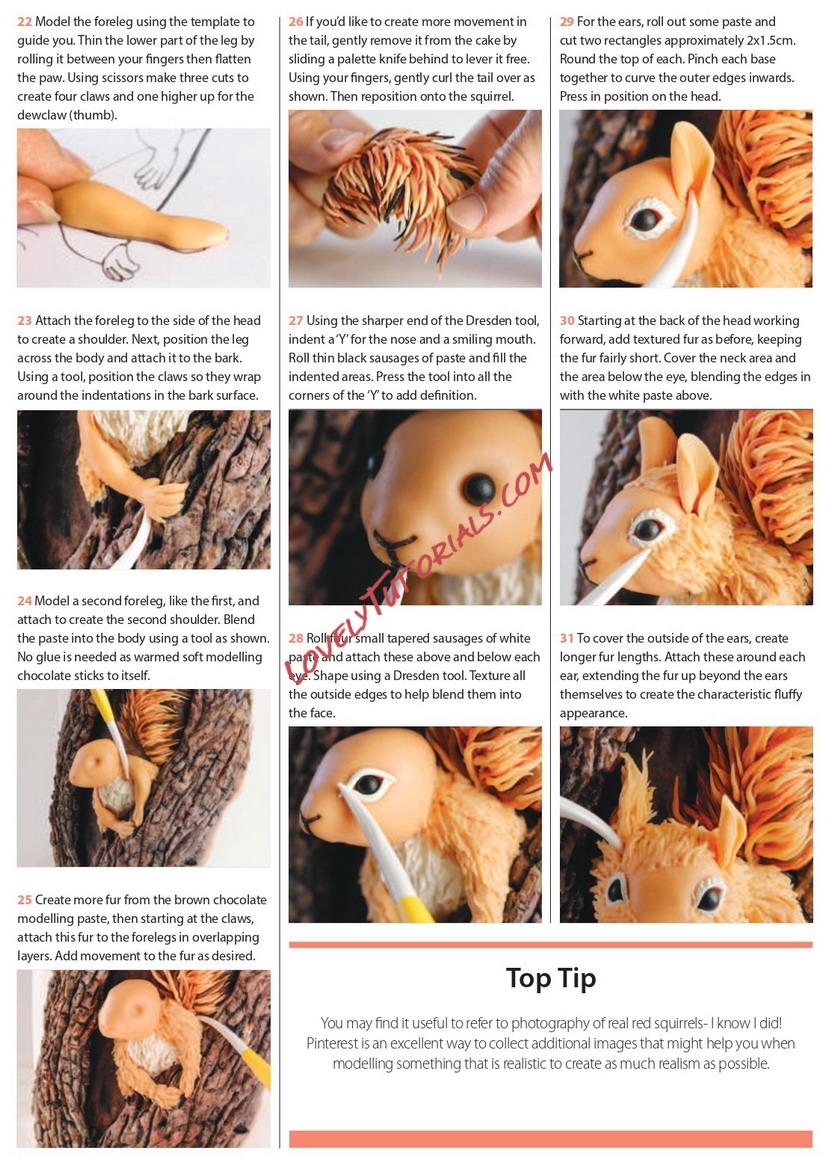
22 Model the foreleg using the template to guide you. Thin the lower part of the leg by rolling it between your fingers then flatten the paw. Using scissors make three cuts to create four claws and one higher up for the dewdaw (thumb).
23 Attach the foreleg to the side of the head to create a shoulder. Next, position the leg across the body and attach it to the bark.
Usi ng a tool, position the claws so they wraparound the indentations in the bark surface.
24 Model a second foreleg, like the first, and attach to create the second shoulder. Blend the paste into the body using a tool as shown No glue is needed as warmed soft modelling chocolate sticks to itself.
25 Create more fur from the brown chocolate modelling paste, then starting at the claws, attach this fur to the forelegs in overlapping layers. Add movement to the fur as desired.
26 If you'd like to create more movement in the tail, gently remove it from the cake by sliding a palette knife behind to lever it free. Using yourfingers, gently curl the tail over as shown. Then reposition onto the squirrel.
27 Using the sharper end of the Dresden tool, indent a'Y'forthe nose and a smiling mouth. Roll thin black sausages of paste and fill the indented areas. Press the tool into all the corners of the 'Y'to add definition.
28 Roll four small tapered sausages of white paste and attach these above and below each eye. Shape using a Dresden tool. Texture all the outside edges to help blend them into the face.
29 For the ears, roll out some paste and cut two rectangles approximately 2x1.5cm. Round the top of each. Pinch each base together to curve the outer edges inwards. Press in position on the head.
30 Starting at the back of the head working forward, add textured fur as before, keeping the fur fairly short. Cover the neck area and the area below the eye, blending the edges in with the white paste above.
31 To cover the outside of the ears, create longer fur lengths. Attach these around each ear, extending the fur up beyond the ears themselves to create the characteristic fluffy appearance.


