Огромная благодарность Автору Karisha Pithwa за Мастер-класс


Equipment Required
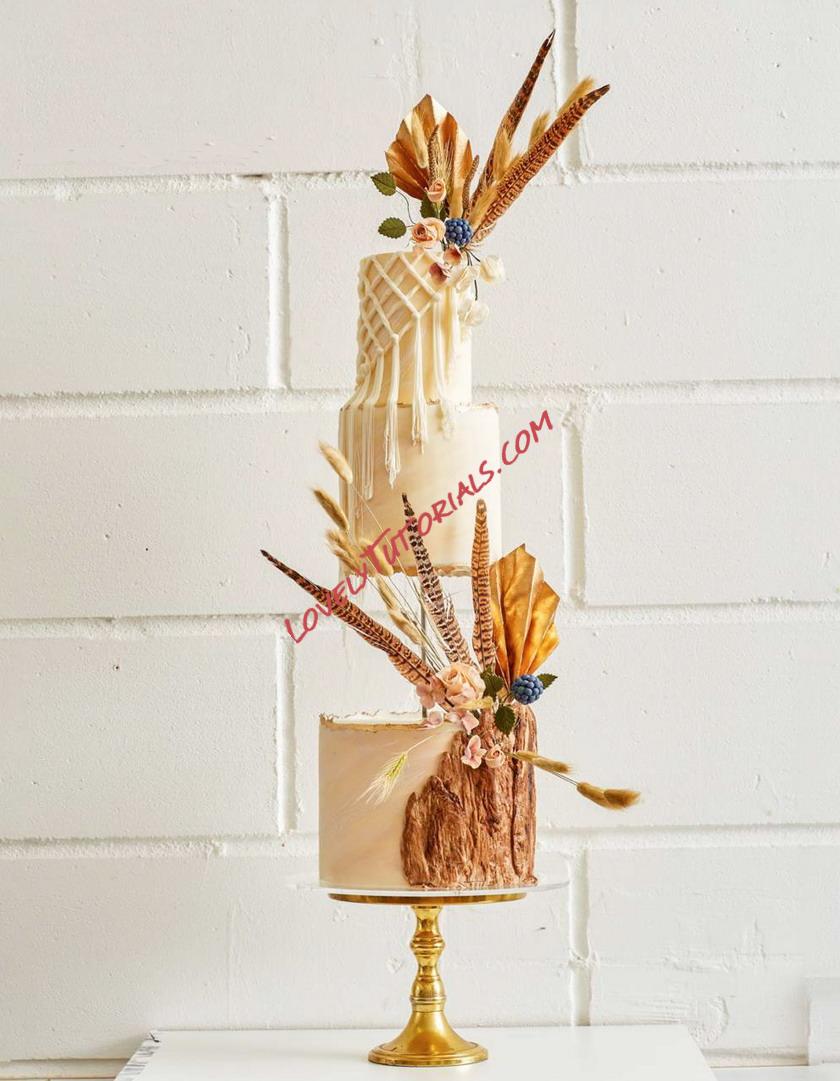
• Cakes: 4" round x 6" high, 6" round x 6" high, 8" round x 6" high
• Prop Options cake separator with central bar
• 12" round acrylic board
• 2.5kg Ivory THE SUGAR PASTE™
• 30g THE FLOWER PASTE™
• Sugarflair Dark Brown Spectral Paste
• Fractal Colours Ivory ShimAir
• Roxy & Rich Chai Tea Hybrid Petal Dust
• Roxy & Rich Natural Pearl Hybrid Lustre Dust
• Claire Bowman Gold lustre dust
• Lemon extract
• Dipping solution
• Shortening
• Sugarflair 24 Carat Gold Leaf Transfer (optional)
• 2 tbsp gelatine powder/granules
• 5 tbsp cold water
• Cornflour
• Small mixing bowl
Board/plates Non-stick rolling pin Microwave Measuring spoons Brushes Sponges
26 gauge floral wire Brown floral tape (if you do not have brown wire)
Pliers
Polystyrene block Makings Ultimate Clay Extruder Deluxe Set
The Old Piping Bag Wood Plank - Long mould
Alphabet Moulds Barley Twist mould (optional)
Wafer paper sheets Safety Seal
Pheasant feathers Difficulty Rating
Dried flowers
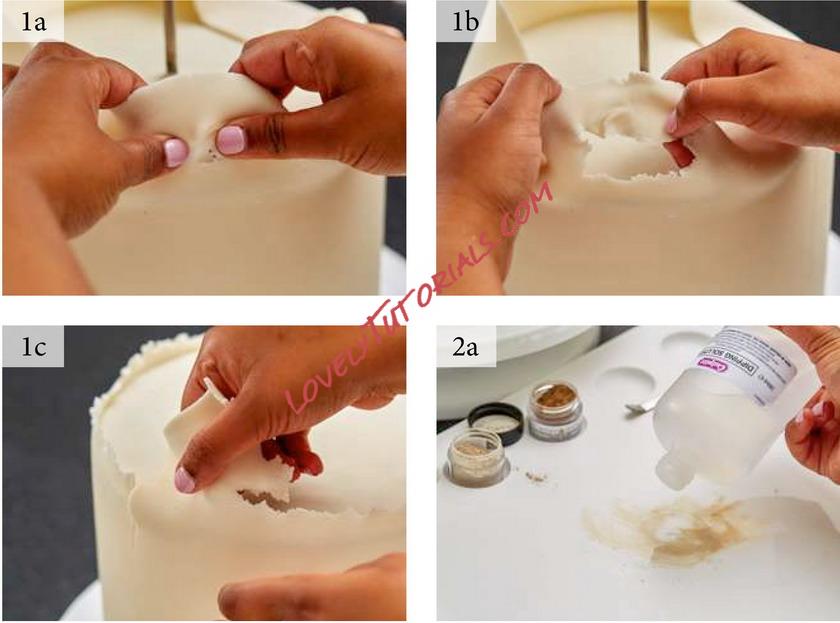
Step la.
Cover tiers in ivory paste with the wrapping method. Cut off excess.
Step lb.
To achieve a rustic torn textured edge, begin tearing excess away being careful not to tear too much. Leave 0.5-lcm.
Step lc.
Continue all around the cake.
Step 2a.
Place the dusts onto a board/plate and pour on dipping solution. The more dipping solution you add, the more translucent the colour will be, which is what was achieved on this cake.
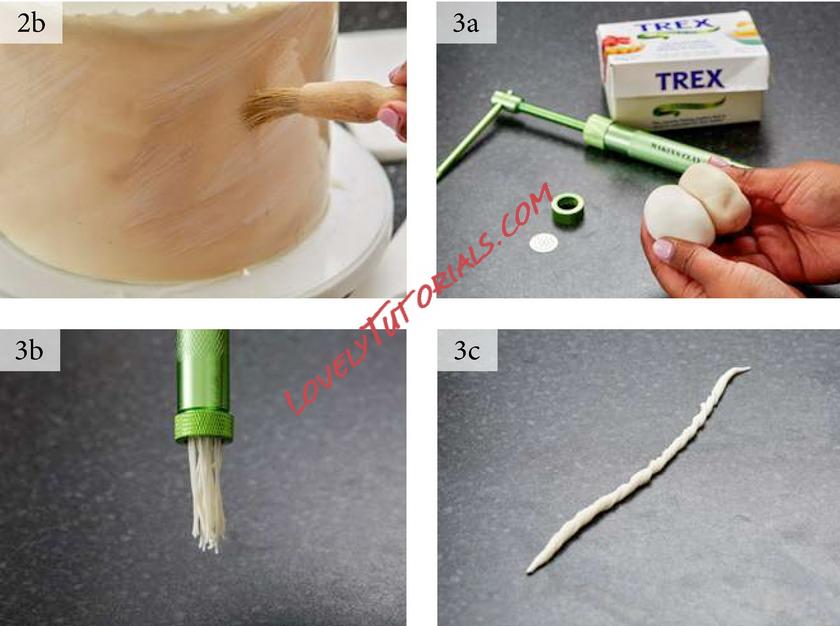
Step 2b.
Using a brush or sponge, brush the paint in an angled direction. Begin with the lightest colour. Be gentle. If too dark, use white dust with dipping solution to brush over and lighten the darker areas.
Step 3a.
Mix 50/50 sugarpaste and flower paste with 30g of each. Combine with shortening. Create a sausage.
Step 3b.
Use the 19 hole extruder disc for tassels. Feed paste into the extruder. Tear off excess and place the lid with the 19 hole disc back on. Twist the bar on the extruder to release the paste.
Step 3c.
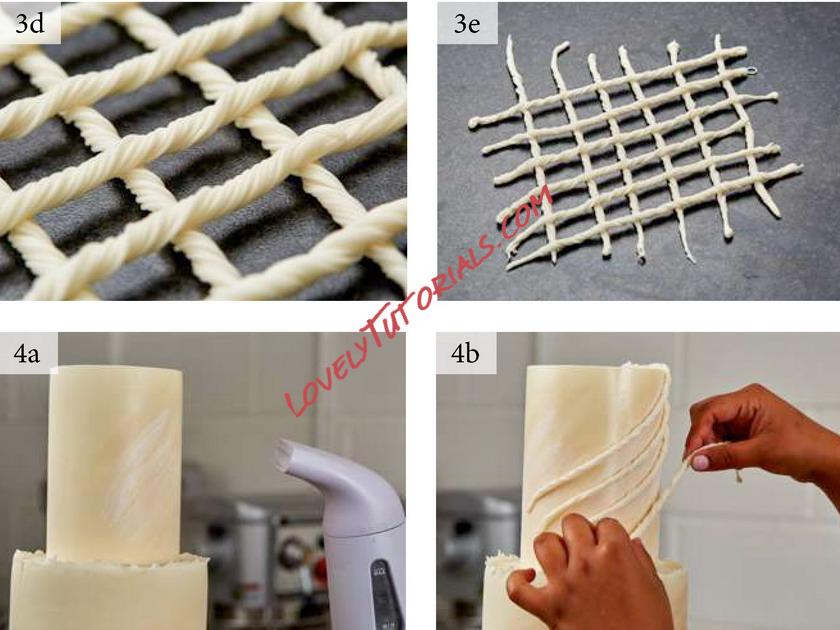
Allow for 15cm of tassel to come out. Twist each end. Place at an angle. Create another 6-8 and lay out. Make another batch and lay diagonally across the first layer. You should have 12-14 twists.
Steps 3d & e.
The twists should look as shown to achieve the perfect boho net. Do not worry about trimming anything yet.
Step 4a.
Steam the cake so the area becomes tacky enough for the net to stick.
Step 4b.
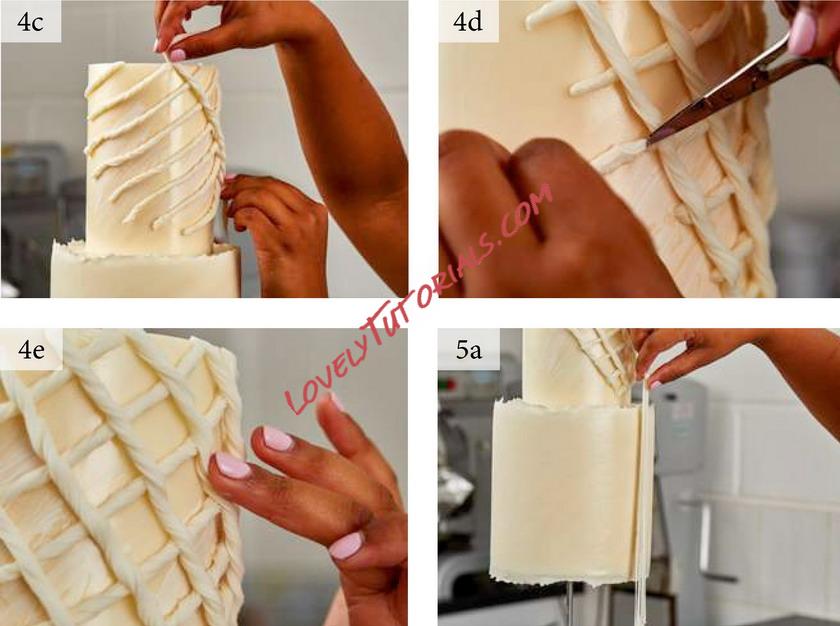
Place the twists onto the cake at an angle. Step 4c.
Continue with the next layer in the opposite direction for a crisscross effect.
Step 4d.
Once the twists have been placed, trim off loose fringes.
Step 4e.
Press the twists down flat on the cake. Step 5a.
Create the fringing to complete the net. Make different lengths using the 19 hole disc. The lowest point is the longest and as you go up, the tassels get shorter.
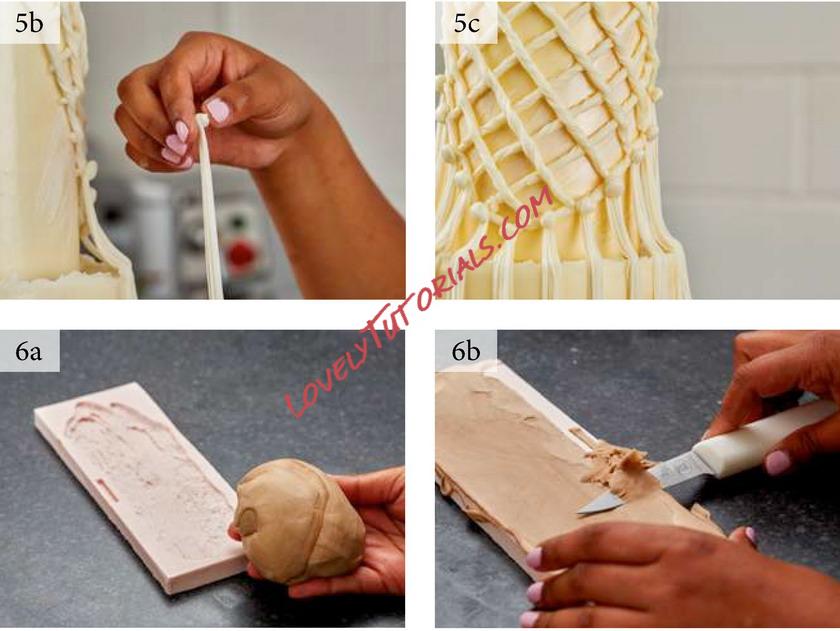
Step 5b.
Once you have the tassel, before sticking onto the cake, roll your fingers whilst holding the tassel and create a ball. You could also stick the tassel onto the cake and create a ball to stick on after.
Step 5c.
Continue to finish the tassels and keep steaming the cake to stick on.
Step 6a.
Take 50/50 sugarpaste and flower paste and mix. Add brown gel ensuring it is gradually coloured. Mix and combine. You do not need it to be combined fully.
Step 6b.
Roll the paste into a sausage the same length as the mould. Dust the mould with cornflour. Flatten the paste into the mould. With the rolling pin, roll into the mould ensuring it is covered. Cut off excess.
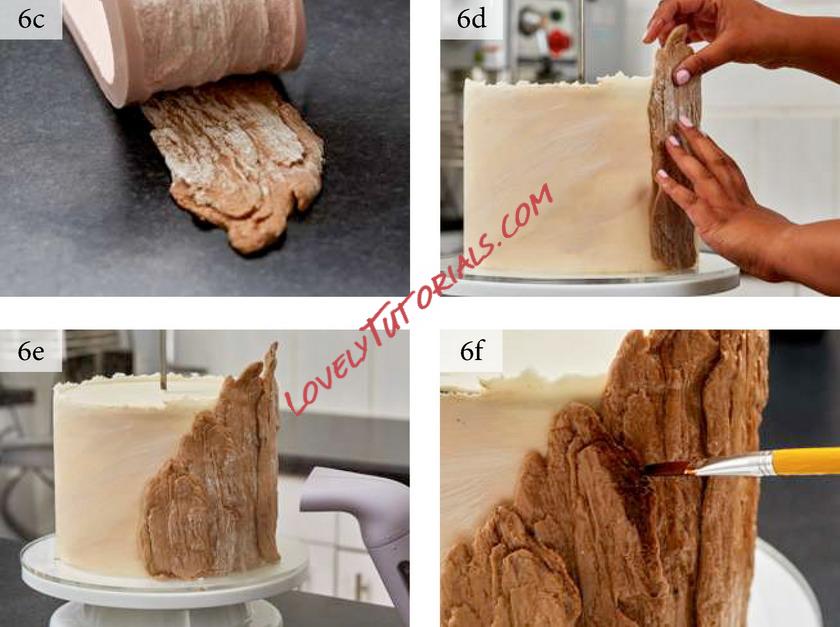
Step 6c.
Turn upside down and peel away.
Step 6d.
Stick onto the cake with water or glue. Step 6e.
Steam to remove unwanted cornflour. Step 6f.
Mix brown gel and dipping solution to create a darker brown and paint onto some of the bark to enhance detailing.
Steps 7a & b.
On a plate, mix lemon extract and gold dust. Paint the edges of the paste torn at the beginning and between tassels.
Step 8a.
Mix gold dust and dipping solution together to a slightly thick consistency. Paint onto a sheet of wafer paper.
Step 8b.
Flip over and paint the reverse.
Step 8c.
Allow to dry for 10-15 minutes. Do not worry if it curls slightly. Once dry, fold.
Steps 8d-g.
Fold to create a zig zag fan. Place two sheets of folded wafer paper over each other and three quarters up from the bottom, cut rounded to the corner of the opposite side. Place both sheets next to each other with the long sides touching. Put together to look like a spear palm.
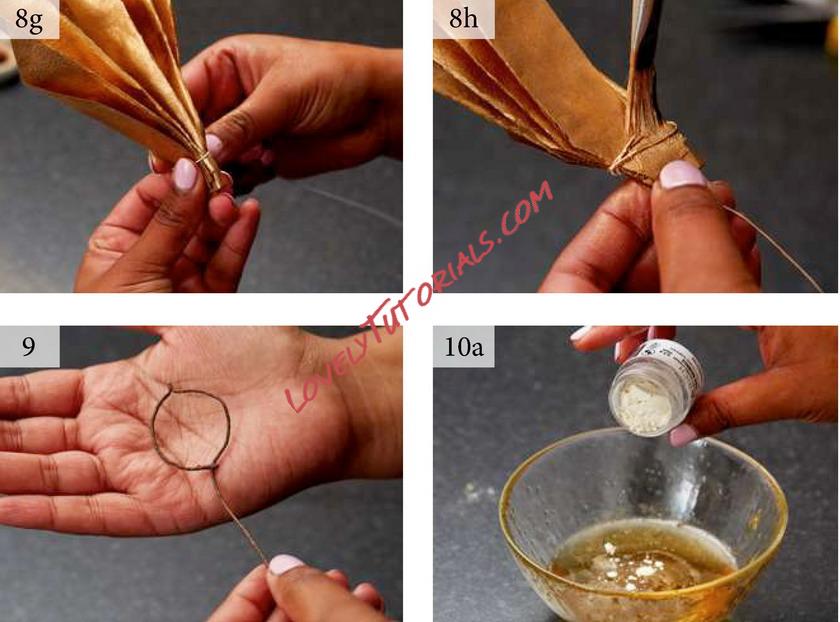
Step 8h.
Neatly wrap wire around the bottom. Using pliers, squeeze the wire to secure. Paint the wire with gold to tidy up.
Step 9.
Wrap the wire in brown tape. Do not do this if you have brown wire. Bend and cut the wire in half with the pliers. Create a loop the size of a 50p. Fold the end to create a full loop. Use the pliers to press and squeeze. Pinch the top to create a tip.
Step 10a.
Place the cold water and gelatine in the bowl. Do not stir. Heat in the microwave for 2-3 minutes until the mixture looks clear. Add a touch of pearl dust.
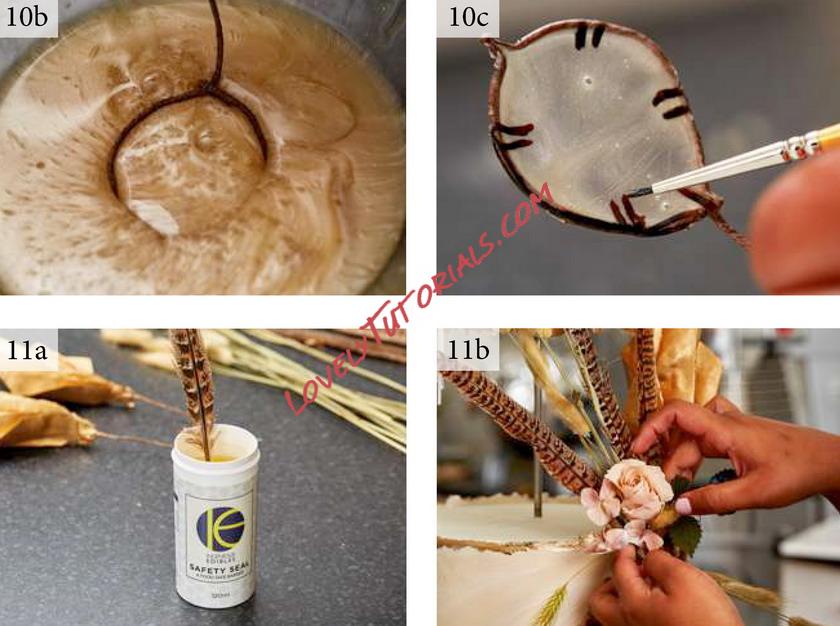
Step 10b.
The gelatine should now look pearlised. Place the wire loop into the mixture and wait a few seconds before removing. Remove slowly ensuring the gelatine has filled the loop.
Step 10c.
It should look like this. Allow to dry for an hour. It may seem springy but after a few hours, it will tighten up. Take a fine brush and brown gel and paint lines for detail.
Steps 11a & b.
It is important to seal anything sticking into the cake where the sponge may be exposed to it. Place the Safety Seal pot without the lid into the microwave until melted. Dip the feathers, dried flowers and any wires in. Allow to set for a few minutes and dip again. Arrange all elements on the cake using the final photo as a guide.


