Огромная благодарность Автору
Faria Malik за Мастер-класс.
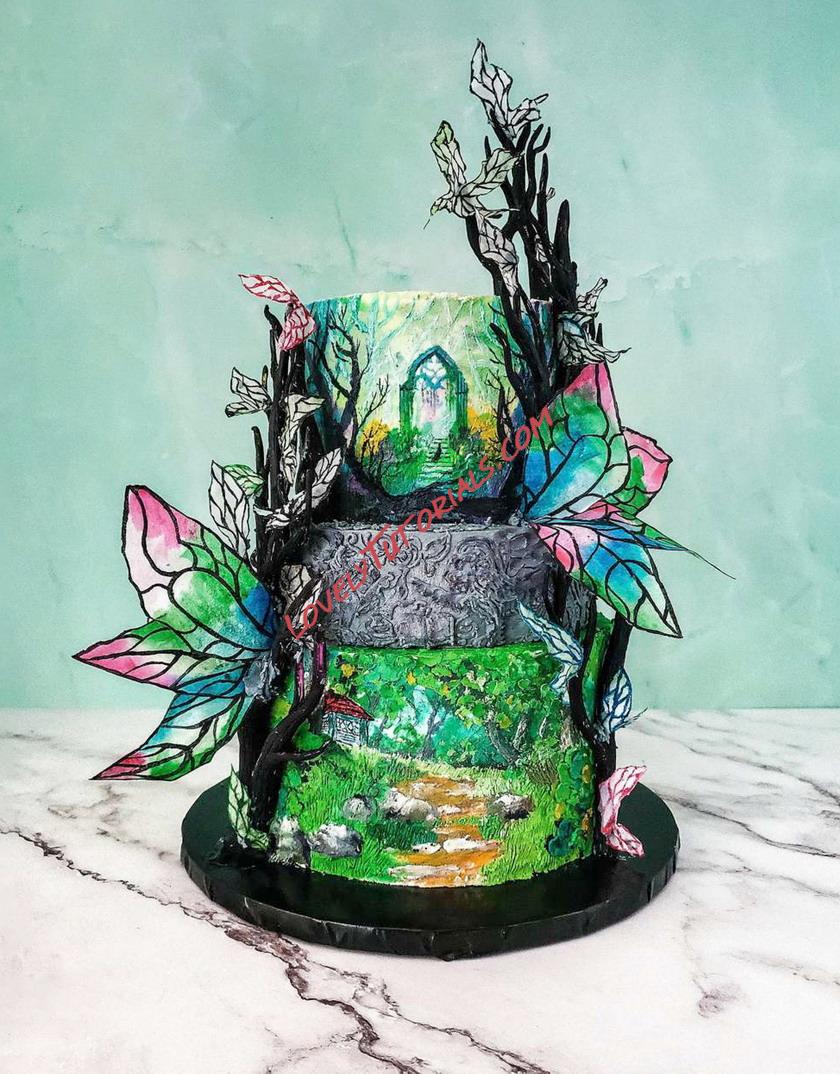
Cakes: 5" round x 4" tall covered in white buttercream, 6" round x 2" tall covered in grey buttercream, 7" round x 4" tall covered in white buttercream 10" black cake board Cutting board Gum paste Wafer paper
Gels: blue, pink, green, purple, white
Black edible paint
Black lustre dust
Water
Brushes
Dresden tool
Cookie scribe X-acto knife Scissors Palette knives Offset spatula Parchment Silicone mat Piping bags Couplers
Wilton piping tips: #2, #11, #105 Baking tray/sheet pan Paper towel Toothpicks
Preparation
Ice tiers in American buttercream, ensuring they are fully covered. Colour one tbsp of buttercream in each of the following: red, yellow, green, blue, brown, black, pink, purple. Create several shades of green and blue. Keep a cup of white buttercream to lighten colours as needed. These colours will act as your buttercream 'paint'. Place all colours of buttercream paint on a plate.
TIP: When painting small details with buttercream, water it down so it forms a runny glaze. You'll be able to pick up a small amount of colour to spread with a brush. The moisture will evaporate once chilled and painted portions will not remain runny.
Chill cakes frequently between steps to ensure colours don't mix. The frequency you may need to chill will depend on climate. Place the cake in the fridge, not the freezer. If you freeze the cake between painting, it will sweat and colours may run.
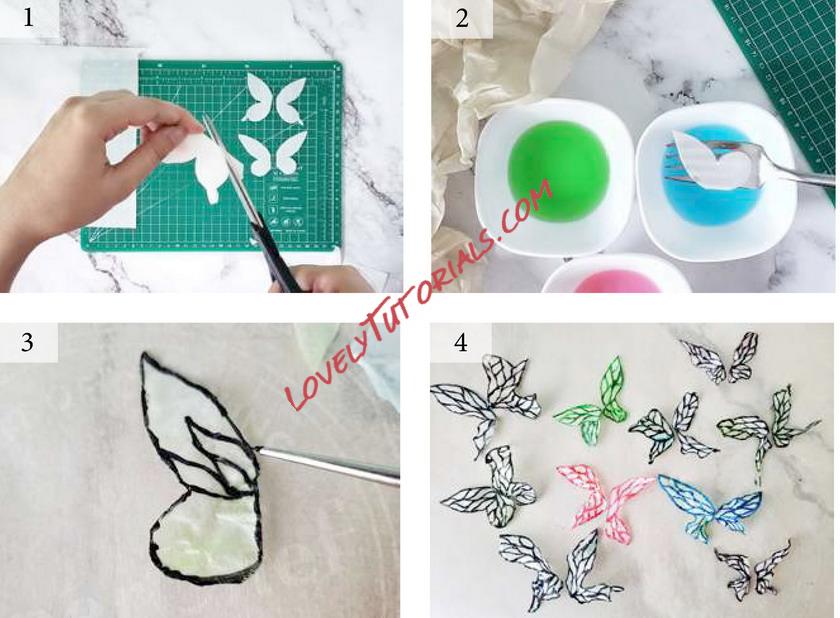
Small Fairy Wings
Step 1.
Using scissors, cut wafer paper into wings.
Cut out in 1-2" assortment of sizes.
Step 2.
Colour water with blue, pink and green gels. Scrunch parchment and set aside.
Quickly dip wings into the water then place on the parchment. Let dry overnight.
Once completely dried, pry off gently.
Step 3.
Using a fine tip brush and black edible paint, paint a teardrop outlining the top and bottom of the wing. Paint a leaf in the centre. Paint leaves to fill the space.
Step 4.
Paint all wings. You can paint with gels diluted with water but do not use too much as this can disintegrate the paper.
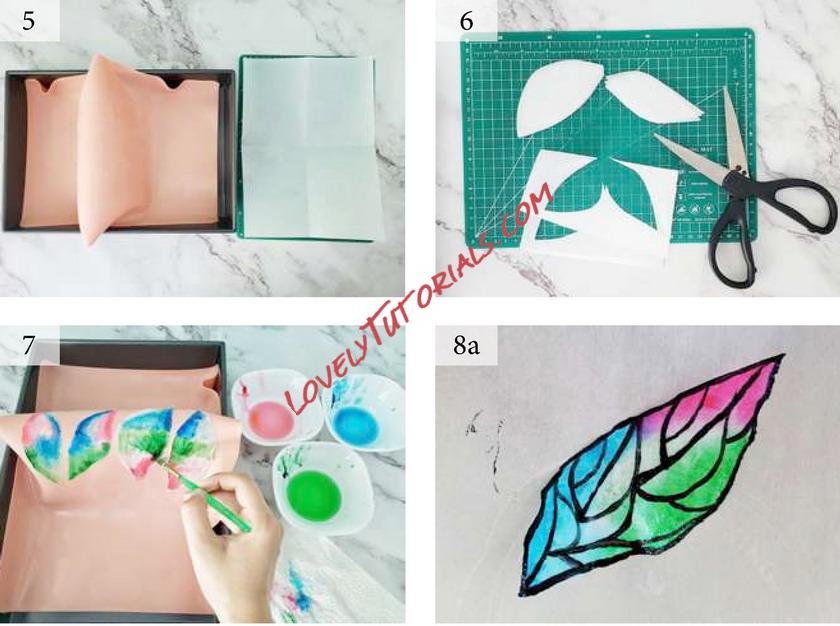
Large Fairy Wings
Step 5.
Press the silicone mat into the baking tray creating a fold in the centre. Fold a sheet of wafer paper in half then half again.
Step 6.
Cut out several large leaf shaped wings from the folded wafer paper.
Step 7.
Place on the curved mat. Brush green, blue and pink gels diluted with very little water onto the wings. Brush on directly to create vibrant wings. Dab the brush on paper towel before applying colour. Once painted all wings, leave to dry overnight.
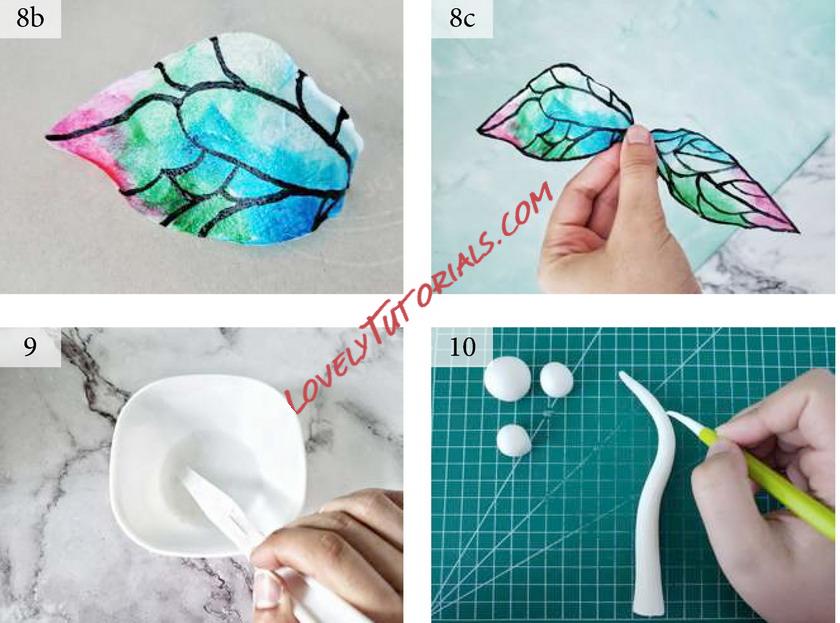
Steps 8a-c.
Once dry paint uneven semicircles using black edible paint and a fine tip round brush. Work from one corner to the other using short even strokes. On some wings, paint a large teardrop in the centre with curved lines leading out. Paint the outline last. Set aside to dry.
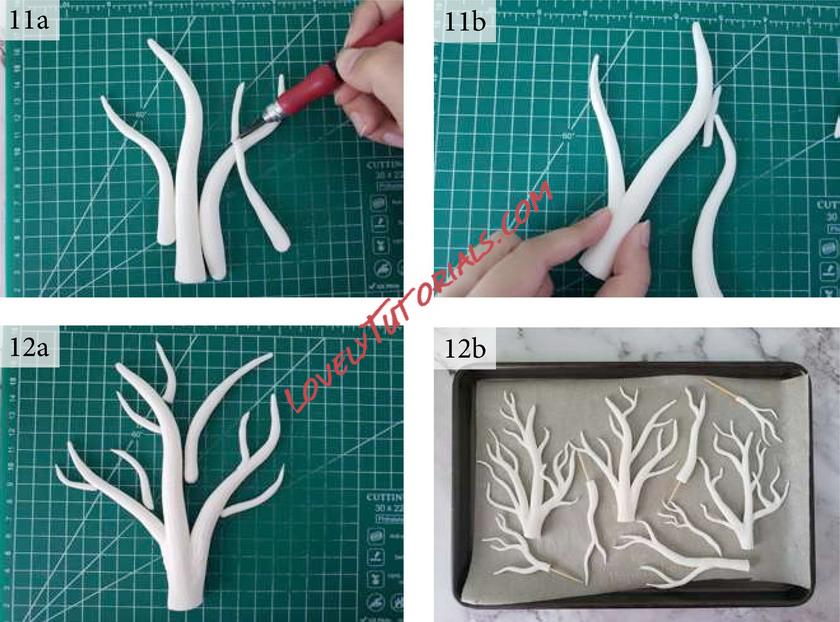
Branches
Step 9.
Dissolve a pea sized ball of gum paste in water to create edible glue.
Step 10.
Roll several balls of gum paste in varying sizes. Take the largest and roll into a long log. Roll one end so it tapers. Cut the other flat. Using the dresden tool, add vertical lines. Curve the top of the branch slightly.
Steps 11a & b.
Create varied sizes and arrange. Cut the ends at an angle and adhere to one another with edible glue. Pinch branches together and hold. Score with the dresden tool to hide seams.
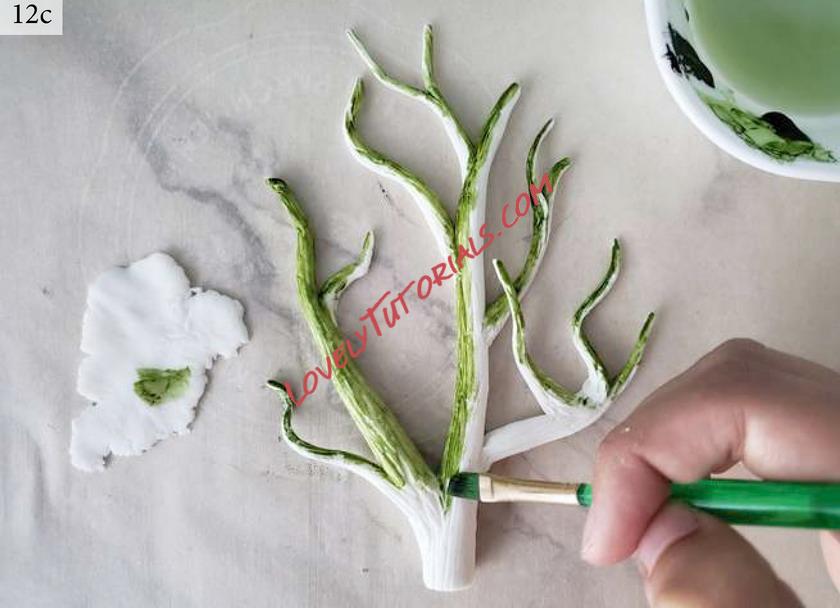
Steps 12a-d.
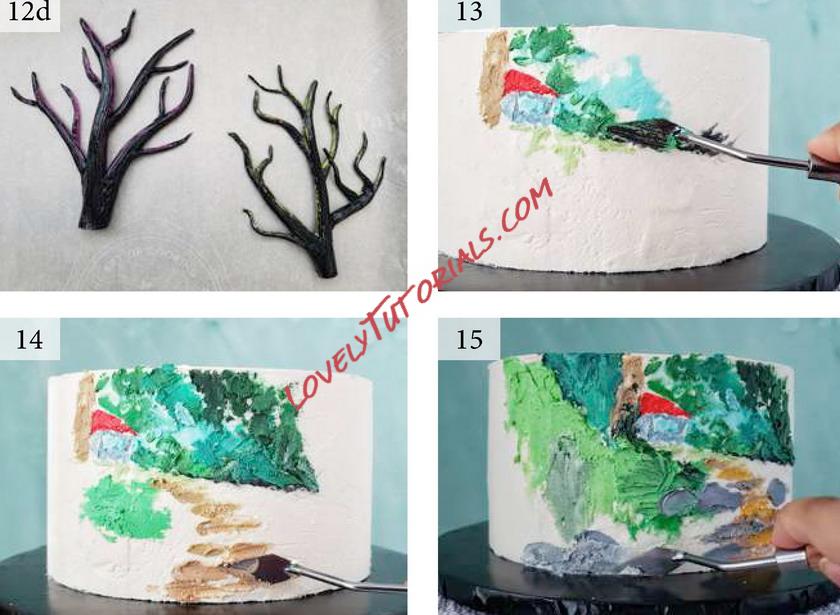
Create smaller branches and join to the larger. Dry for 24 hours. Create a few more and set aside. Prepare a few spares. Insert toothpicks into smaller branches to place into the cake at different angles. Harden overnight, with 24 hours before handling. Dilute green gel with a little water and brush on one side. Brush gently so as not to break any smaller branches. Paint the rest of the branch in black edible paint. Repeat using purple gel in place of green on some branches.
Cabin in the Woods Painting
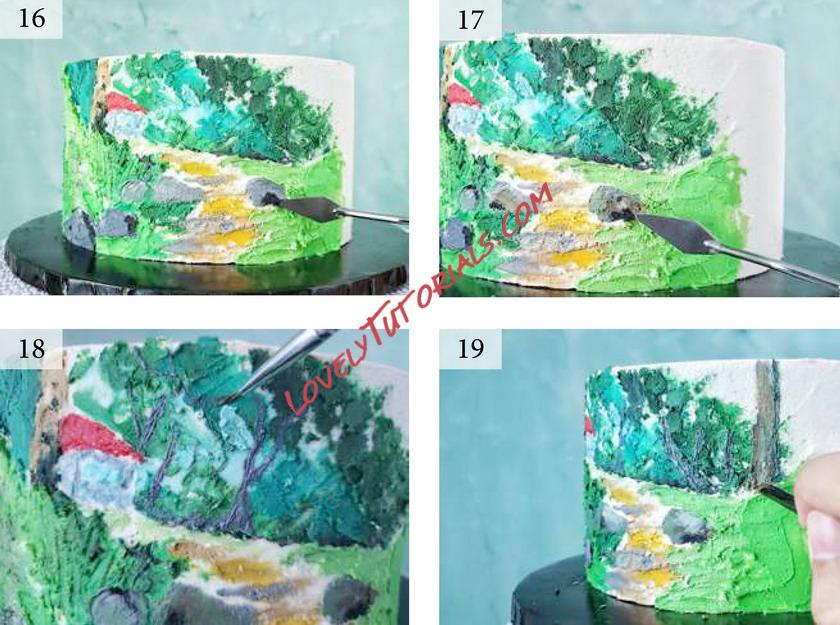
Step 13.
Make a diagonal horizon line with the dresden tool. With a flat angled brush, paint black buttercream along the line.
Add a smear of blue above. Trace a cabin with the dresden tool then paint a blue window. Use the brush to press the buttercream in. Colour the cabin with a different blue then the roof with red. With a palette knife, fill light green mixed with white below the horizon and dab dark green above. Add a tree trunk to the left.
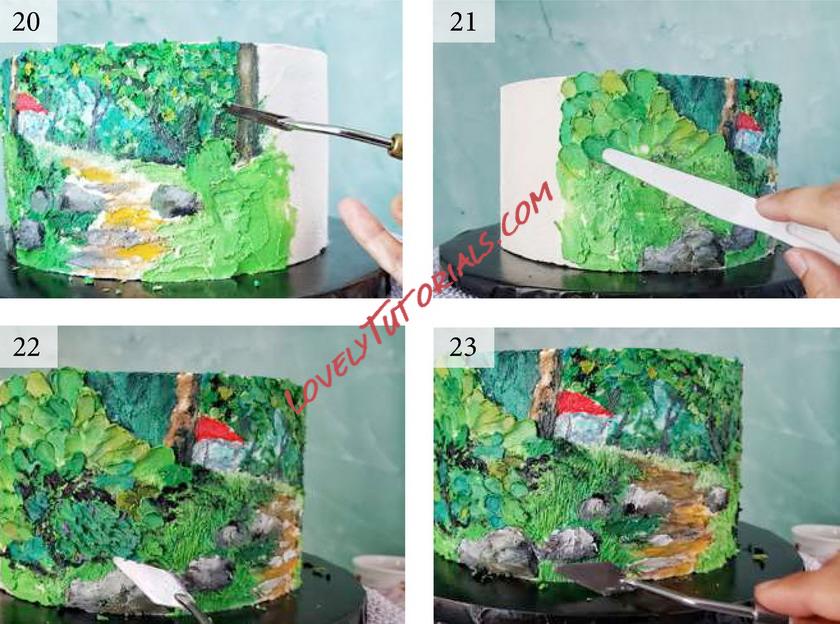
Step 14.
Add dabs of greens and blues above the horizon to give the impression of sky and trees. Paint a light green shrub below the cabin. Use a pointed palette knife to paint horizontal brown lines for a cobbled path.
Step 15.
Paint a green shrub to the left of the cabin and connect to the one below. Brush dark green up the trunk. Paint yellow lines on the path connecting the brown. Switching between round and pointed palette knives, paint grey stones on the path. Add darker blue to the left of the cabin.
Step 16.
Fill the rest of the area either side of the path and stones with shades of green.
Paint small black lines to the left of each stone using the pointed palette knife.
Step 17.
Apply light smears of brown and olive buttercream on the left of each stone. Holding the palette knife above each stone, drag down barely touching the cake.
Step 18.
Mix grey and blue buttercream. Using a small round brush, apply along the horizon. When painting small lines, add water to buttercream so it has a runny glaze consistency. Paint small crooked trees. Pull the brush upward for texture.
Step 19.
Paint a large trunk using grey and brown. Step 20.
Create shades of green, blue and yellow. The consistency of each should be like runny glaze. Dab these above the trees.
Step 21.
Use a rounded palette knife to pick up shades of green. Pulling down diagonally, apply to the cake to create texture.
Step 22.
Using a pointed palette knife, dab black
under the shrub to frame smaller shrubs. Take a rounded palette knife and paint more shrubs in shades of green and blue.
Step 23.
Take the scribe and using short vertical strokes, texture the remaining green until it looks like grass. Take a pointed palette knife and smear a small amount of white buttercream on top of each rock.
Step 24.
Paint another shrub on the right. Add blue and green above the horizon.
Step 25.
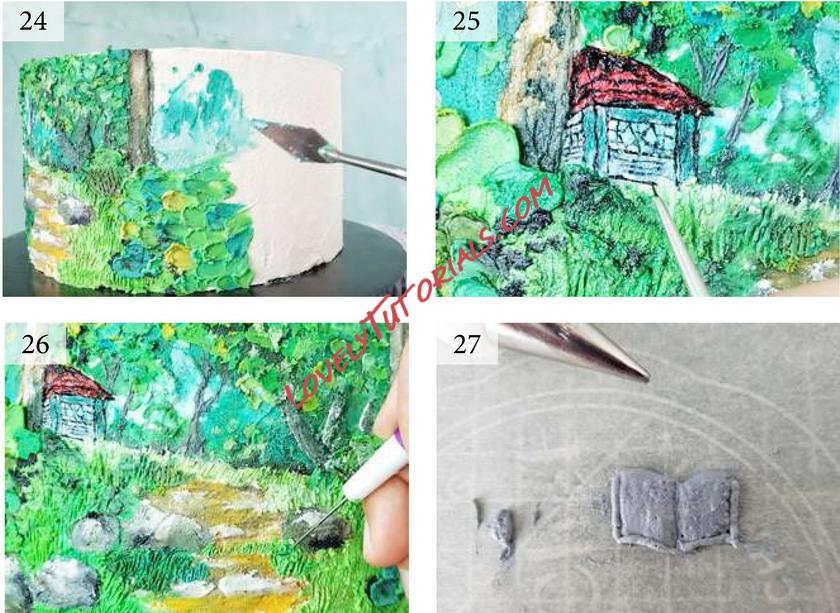
Using a fine tip brush and black paint, outline the cabin. Dab some bright blue.
Step 26.
Add water to white buttercream then pick up with a flat angled brush and add against the left of the larger trees. Add a little extra green in the centre of the path and use the scribe to texture like grass.
Bas Relief Buttercream Painting
Step 27.
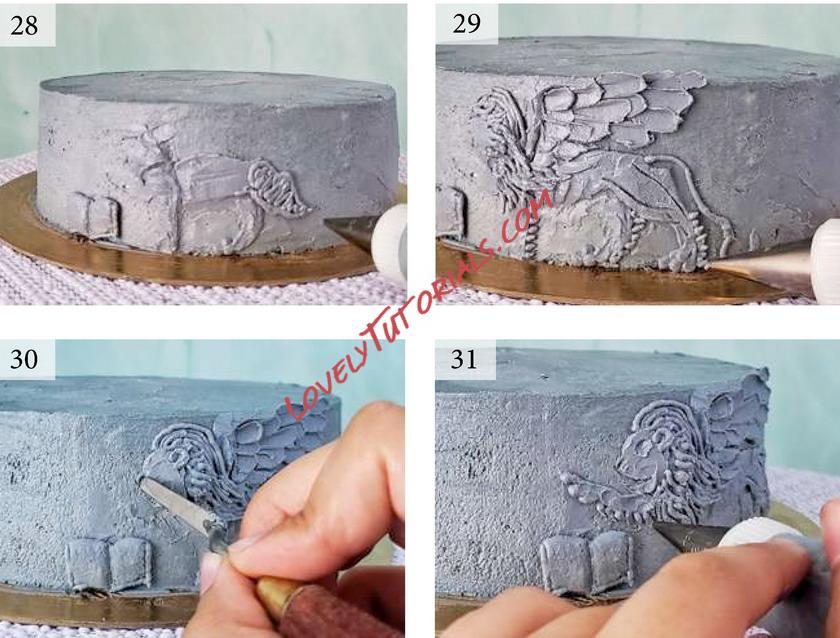
Using the #105 tip, pipe a shape to create a book. Clean up the edges with the scribe. Using the #2 tip, pipe small lines along the bottom and sides. Place the book in the freezer. Once frozen, adhere to the centre of the 6" tier.
Step 28.
Using the #11 tip, pipe the head and neck of the first chimera which will have the body of a lion and wings of an eagle. Take a thin palette knife and smooth. Pipe a leg under the head of the chimera, smooth, then repeat for the body and hind legs.
Step 29.
Carve ribs with the dresden tool. Create lines along the hind leg. Very little pressure is needed. Take the thin rounded palette knife and pick up a little grey. Apply to the cake in horizontal strokes to create feathers. Pipe and smooth the portion of the wing that connects to the chimera's back using the #2 tip and a palette knife. Pipe lines to create a mane. Pipe a tail then horizontal lines behind each leg.
Step 30.
Pipe a small c for the ear. Create a small indent using a palette knife for the nose.
Step 31.
Carve a small circle for the eye. Using the #2 tip, pipe an arm reaching over the book and connect to the mane. Smooth the arm then pipe small vertical lines below.
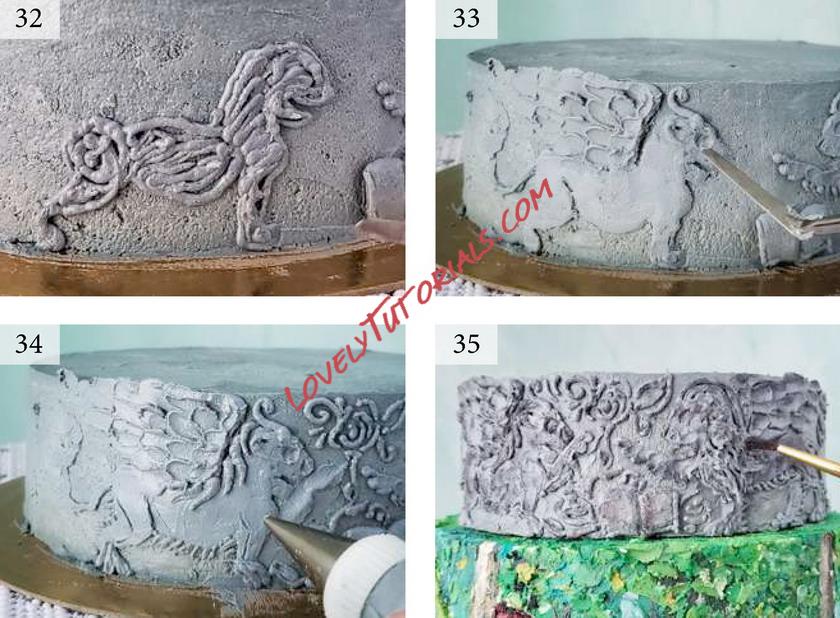
Step 32.
Pipe and smooth the body of the second chimera using the #2 tip, a cross between an eagle, goat and jaguar.
Step 33.
Pipe the tail. Create wings. Pipe the horn curves and a c for the ear. Carve the eye.
Step 34.
Pipe and smooth the arm then fill space between and around the chimeras with small swirls and leaf shapes. Pipe small lines along the neck to create the mane.
Step 35.
Chill the cake until the buttercream is set then brush black dust on the 'stone' tier.
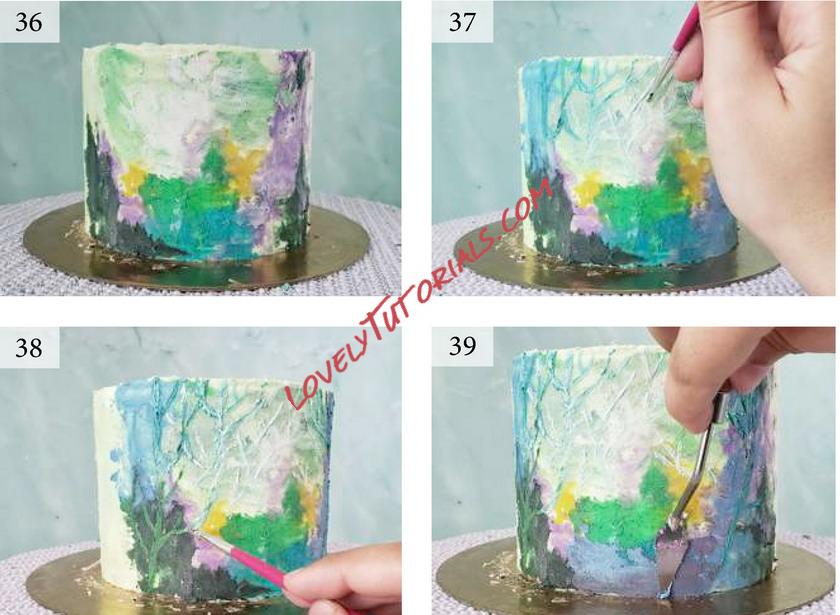
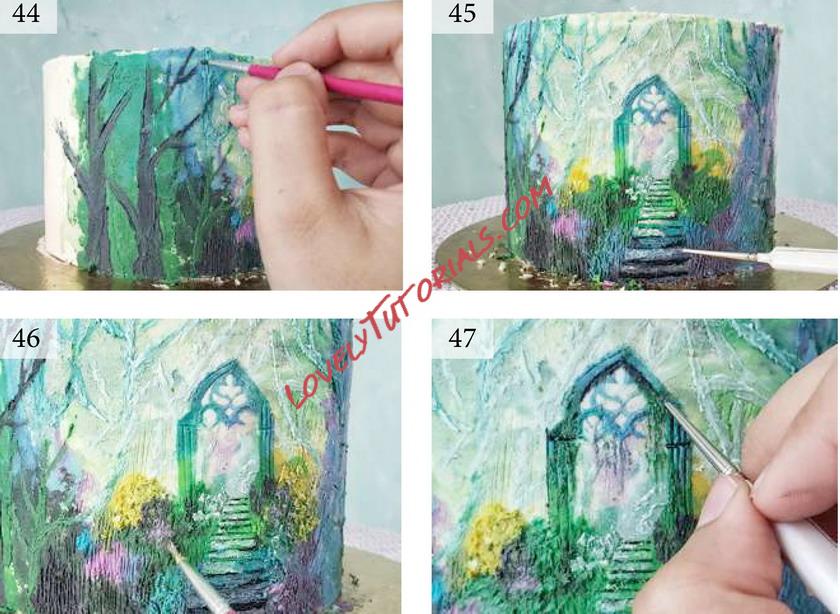
Magic Arch Painting
Step 36.
Build buttercream. Start with a pale green then layer purple, blue, yellow and shades of green. Keep the centre bright and edges darker. Picture a horizon halfway down and paint white above this in the centre.
Step 37.
Take runny blue buttercream and paint branches on the left with a small round brush in upward strokes. Take a lighter blue and paint more branches reaching towards the centre, then take white and paint more branches into the centre.
Step 38.
Paint darker branches on the other side, lighter blue branches towards the centre and green branches on the lower left.
Step 39.
Using a palette knife, paint sky blue buttercream along the bottom centre. Chill the cake completely before continuing.
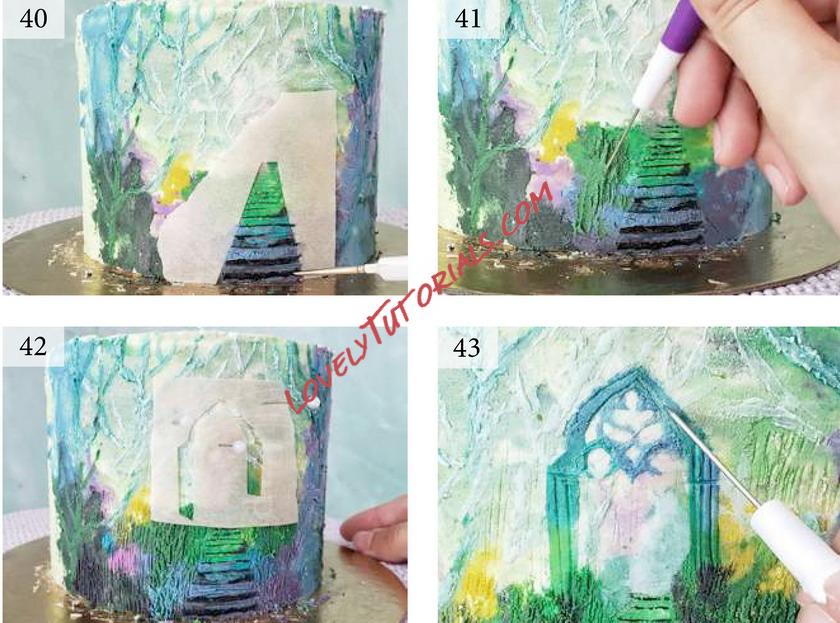
Step 40.
Cut a triangle out of parchment but cut a line that blunts the top. Stick to the centre then take a palette knife with a flat edge and press into the buttercream to create horizontal lines 2-3mm apart all the way down. Take black edible paint and paint the indented lines to create a staircase.
Step 41.
Using the scribe, create vertical lines to texture around the stairs like grass.
Step 42.
Take a piece of parchment and use the X-acto knife to cut out an uneven arch. Allow the buttercream to chill completely before this step. Apply the parchment above the stairs, pin in place and smear shades of blue and green into the arch.
Step 43.
Remove the parchment then paint curves and circles in the centre. With the flat edge of a palette knife, indent the pillars. Use the scribe to carve more details.
Step 44.
Paint black branches on both sides using a flat angled brush and a small round brush.
Step 45.
Paint white along the top of the stairs.
Step 46.
Taking a round brush, pick up green, purple and yellow buttercream and dab in circles next to the staircase on either side.
Step 47.
Using black edible paint, fill the indented lines of the arch with a fine tip brush.
Pick up small amounts of watered down buttercream and create vines in greens and blues by dabbing small uneven lines.
Step 48.
Paint branches framing the arch either side with runny black buttercream and a round brush. Paint one across the staircase. Take a fine tip brush and edible paint and paint finer branch details either side.
Step 49.
Paint a small figure near the top of the staircase by painting a small triangle with a ball on top. Dip the fine tip brush in white gel and paint a slanted line to the right of the figure for the light across a sword.
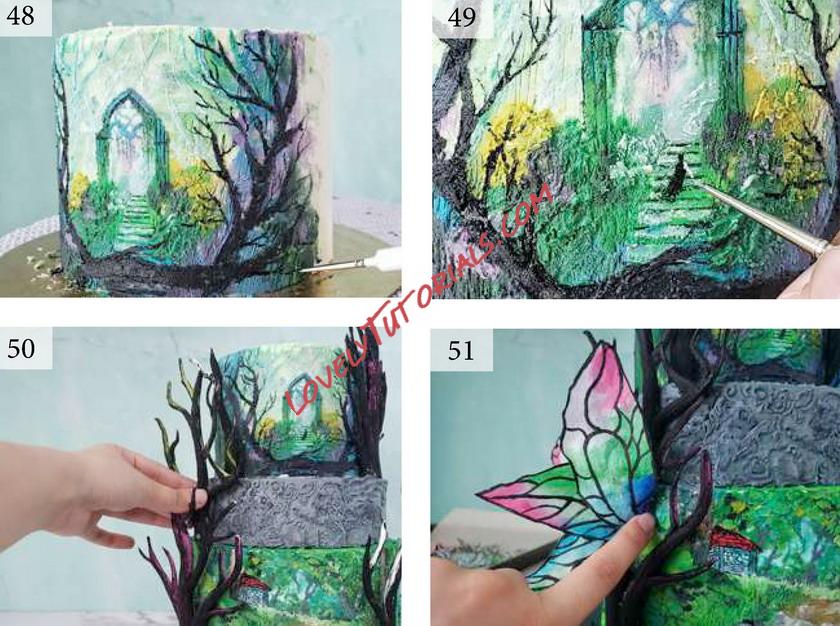
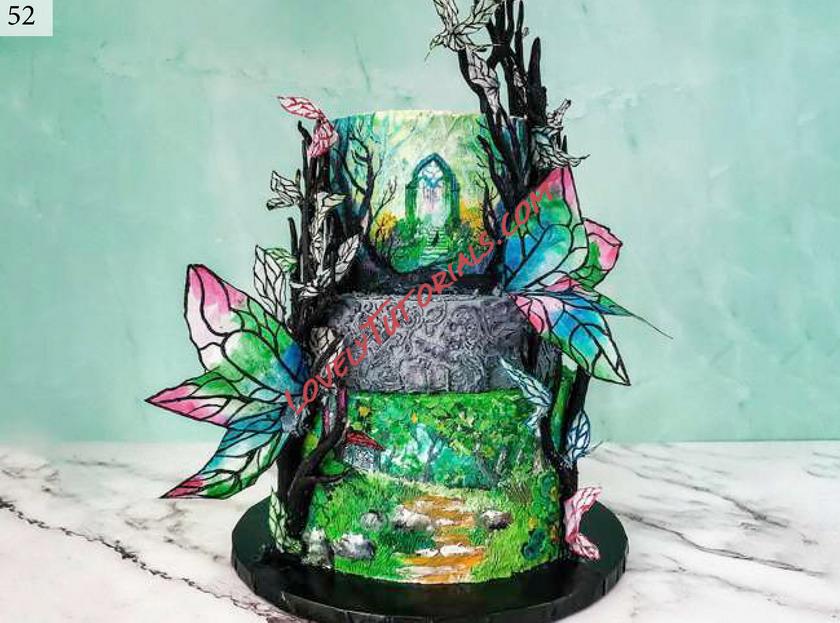
Finishing Touches
Step 50.
Stack the cakes, then use buttercream to attach branches along the sides. Touch up branches with black as needed.
Step 51.
Pipe buttercream next to the branches on the right and push wafer wings in. Hold to secure. Repeat for the branches to the left.
Step 52.
Secure smaller fairy wings in different areas along the branches by piping small balls of buttercream. Hold until secure.


