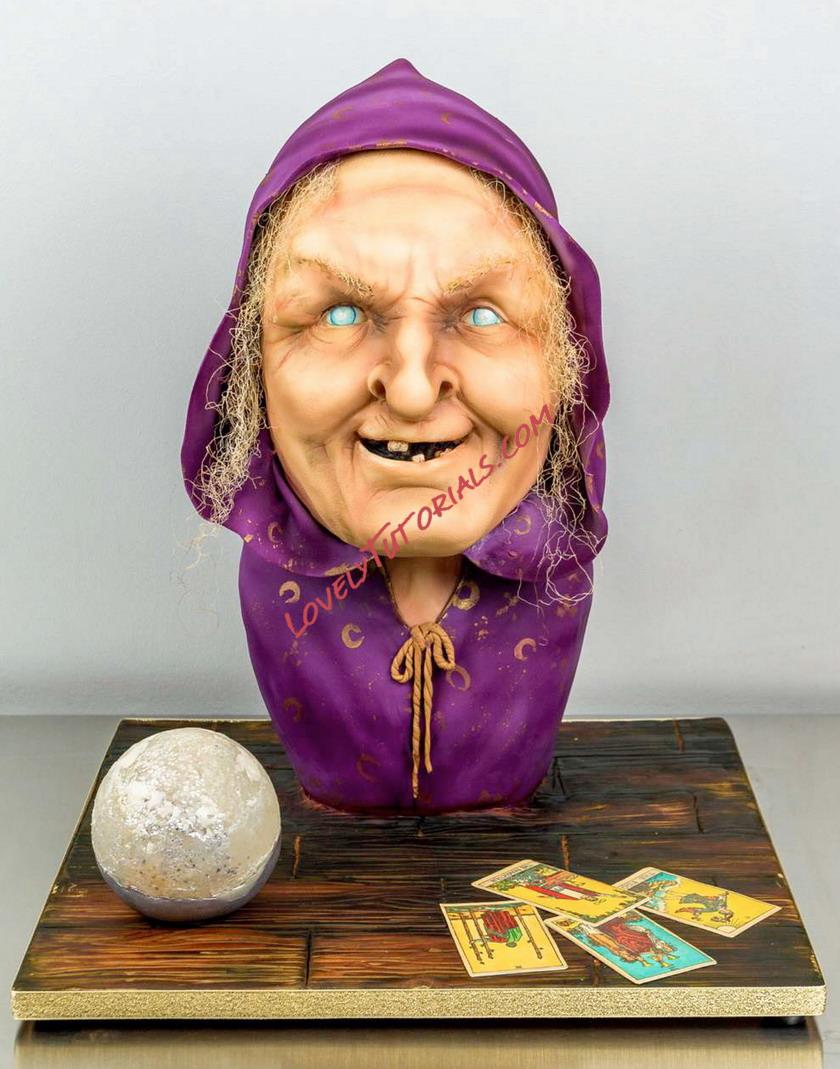
Огромная благодарность Автору Verity Malinowska за Мастер-класс
 Cakes: 2
 6
" round, 7" round, 8
" round,
6
" halfsphere
Buttercream
Ganache
THE SUGAR PASTE™: 2kg White, 2kg Ivory
lOOg THE MODELLING PASTE™
Sugar Street Studios Candy Clay Squires Kitchen Ready-tempered Isomalt Corn silk
Spectrum Flow Airbrush Spectrum Flow Wipeouts Spectrum Flow matt airbrush paints: White, Black, Purple, Coral Spectrum Flow Light Skin Tone Colours: Light Pores, Light Base Layer, Light Shadows
Colour Splash Violet gel
Rainbow Dust Powder Dusts: Shadow
Grey, Baby Blue
Roxy & Rich Midnight Black Hybrid Petal Dust
Roxy & Rich Fondusts: Chocolate
Brown, Gold
CK Squares silver edible glitter squares
Reju vena tor
Dresden tool
Veining tool
Large ball tool
Clay tools
Small piping tip
Medium round plunger cutter
Rolling pins
Small knife
Craft knife
Brushes
Clay Smoothing Rubber Kidney
Smoothers
Sponge
Large sphere mould 16" square MDF board M10 15" thread bar 5" MDF round head board 8x4" MDF shoulder board 6
M10 washers 6
M10 nuts
4 15mm rubber feet and screws
2 adjustable/17mm spanners Philips screwdriver Foil tape
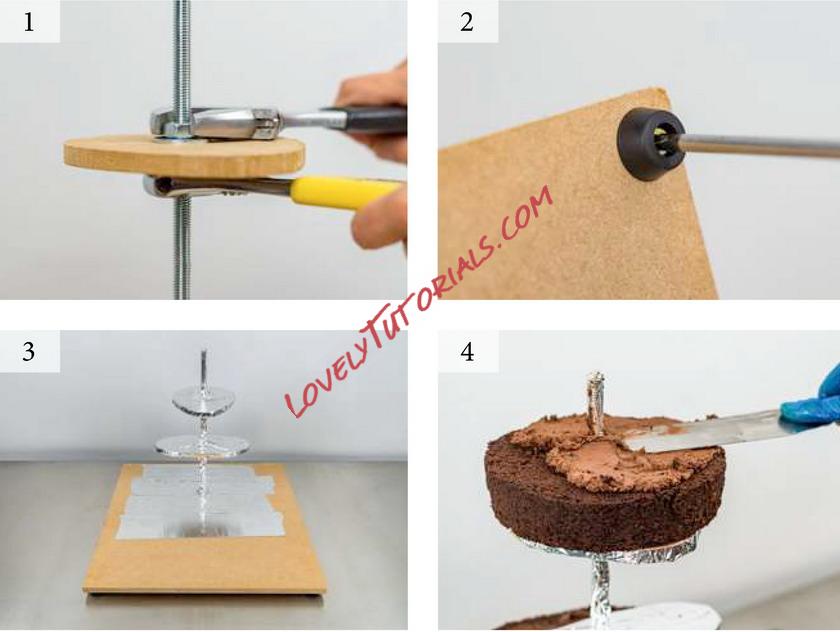
Step 1.
Build the wooden framework positioning the shoulder board approximately 6" from the base board and the head board 4" from the shoulders. Adjust to suit.
Step 2.
Add the rubber feet to the corners of the bottom board allowing clearance for the nut to secure the thread bar.
Step 3.
Use foil tape to cover all framework that will come into contact with the cake.
Step 4.
Stack and layer the cakes using buttercream or ganache. Start with the torso placing the 7" cake first, followed by the 8", up to the bottom of the shoulder board. A small slit will be required to fit these around the thread bar.
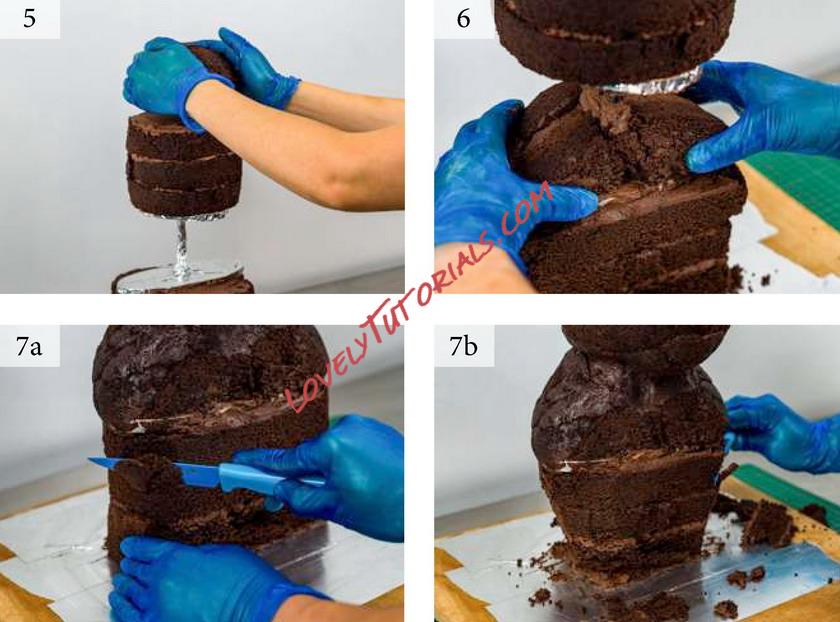
Step 5.
Stack the 6" cakes on top of the head board and add the half sphere cake to round off the top of the head.
Step 6.
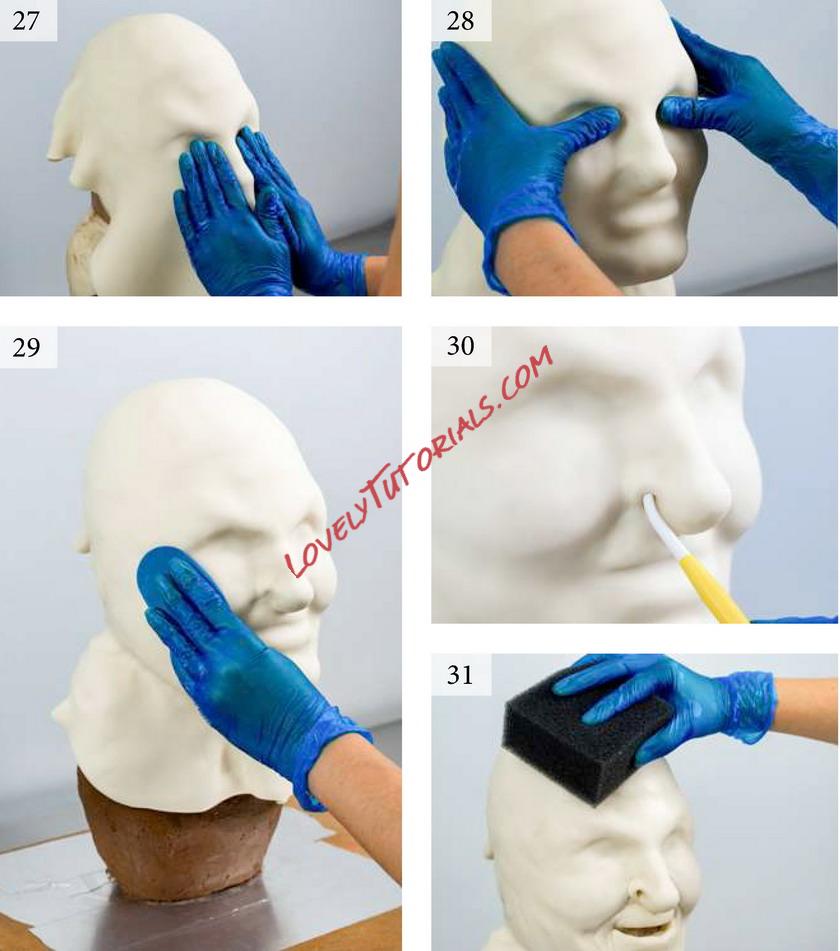
Trim excess cake on the front and back of the torso and use offcuts to create the shape of the shoulders.
Steps 7a & b.
Carve the torso pulling the shape gradually inwards toward the bottom board.
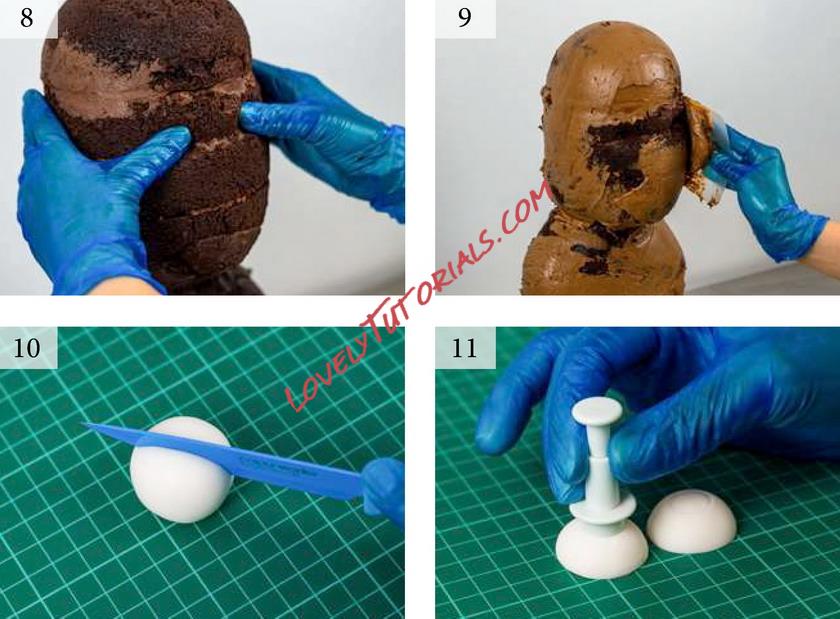
Step 8.
Carve small eye sockets and use your thumbs to round out the shape.
Step 9.
Ganache the entire structure using smoothers to apply.
Step 10.
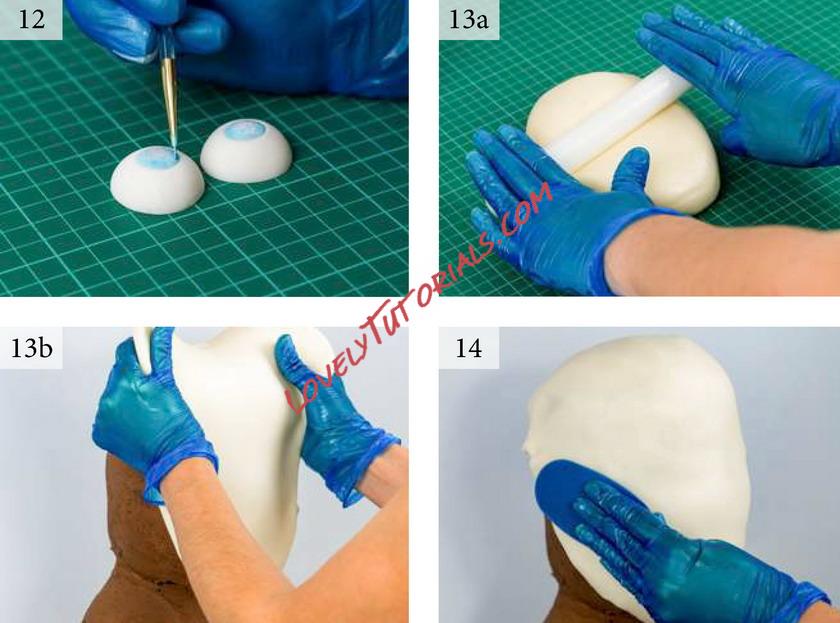
Roll a 3cm ball of modelling paste and use the small knife to cut into two halfspheres.
Step 11.
Using the plunger cutter, lightly mark the shape of the iris as a guide.
Step 12.
Mix blue powder with rejuvenator and paint the iris using the guide. A little grey can be added toward the centre to enhance the cataract look.
Steps 13a & b.
Roll out the modelling chocolate (Candy
Clay), mist the cake lightly in water and
apply to the head.
13b
Step 14.
Smooth the modelling chocolate using the rubber kidney.
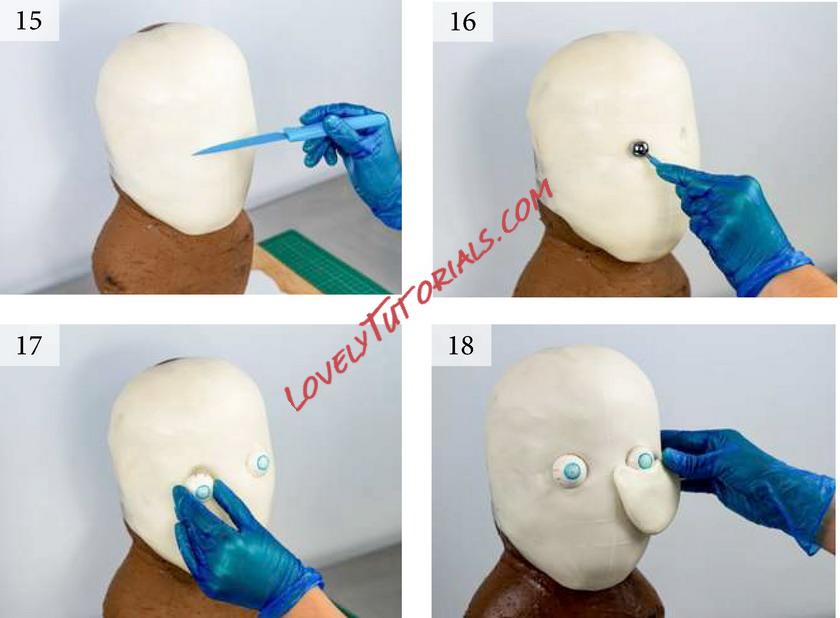
Step 15.
Gently feel for the eye sockets created in Step 8 and use as a guide to lightly score the face vertically and horizontally marking the intended areas for the eyes, nose and mouth.
Step 16.
Using the ball tool, gently push into the modelling chocolate to create the eye sockets.
Step 17.
Once the eyeballs have hardened, use a little water to add to the sockets.
Step 18.
Flatten halfspheres of modelling chocolate and apply under the eyes to create the cheeks.
Step 19. 19
Flatten smaller semicircles and apply over the eyeballs to create the eyebrows.
Blend using a smoother.
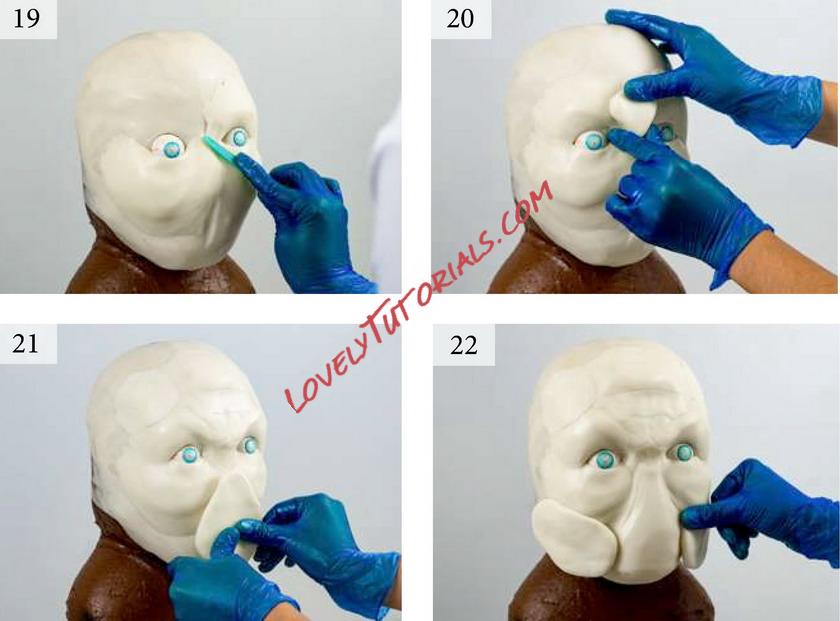
Step 20.
Add a triangular shape to build up the bridge of the nose.
Step 21.
Create a large teardrop to create mass for 21 the mouth. Blend with your fingers or the rubber kidney beneath the cheekbones.
Step 22.
Apply two ovals to add bulk to the jawline and blend.
Step 23.
Use the ball tool to mark the corners of the mouth.
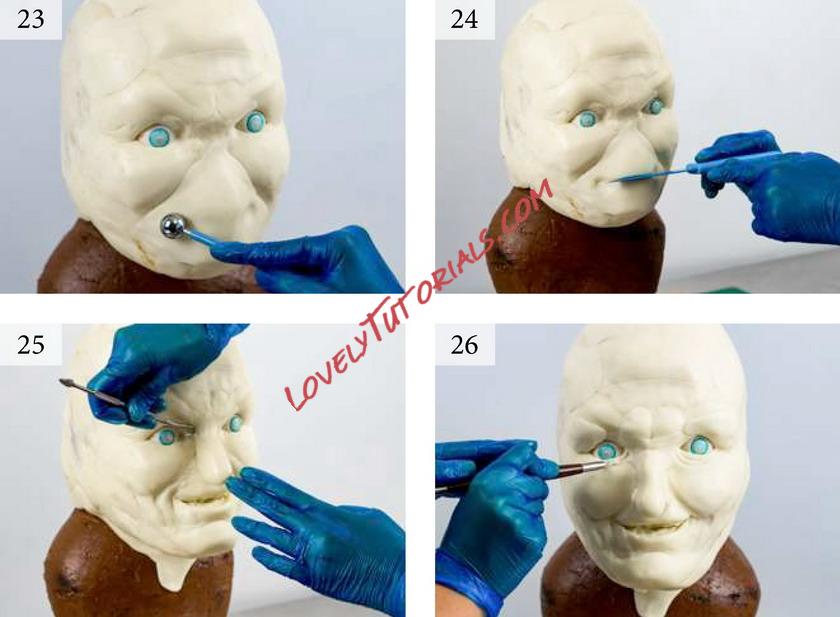
Step 24.
Take the small knife and cut a slit between the indents to create an opening for the mouth. Using the knife, pry open.
Step 25.
Add a small sausage for the nose blending the top part only to create a bulbous shape for the end.
Step 26.
Carve lines underneath the eyes to add a little depth.
Step 27.
Roll out ivory sugarpaste. Lightly mist with water and apply entirely over the sculpted face.
Step 28.
Using your fingers, ensure the paste has adhered to all sculpted areas.
Step 29.
Use the rubber kidney to remove unwanted lumps and bumps.
Step 30.
Use the dresden tool to refine the facial features. Using the flat edge, create the nostrils, reopen the mouth and create depth underneath the cheekbones.
Step 31.
Take the sponge and pat lightly across the paste to add a skin like texture.
Step 32.
Using the craft knife, carefully cut out small holes over the eyeballs.
Step 33.
Push the edges of the sugarpaste back to create the desired shape and form the eyelids.
Step 34.
Use the veining tool to create fine lines and wrinkles around the eyes, mouth and forehead.
Step 35.
Cover the eyes with two small pieces of modelling chocolate. Airbrush the face using Light Pores ensuring it fills the deeper lines and crevices.
Step 36.
Take a Wipeout and lightly dab the face to remove surface colour and leave behind filled texture lines only.
Step 37.
Once dry enough, airbrush the face entirely with Light Base Layer.
Step 38.
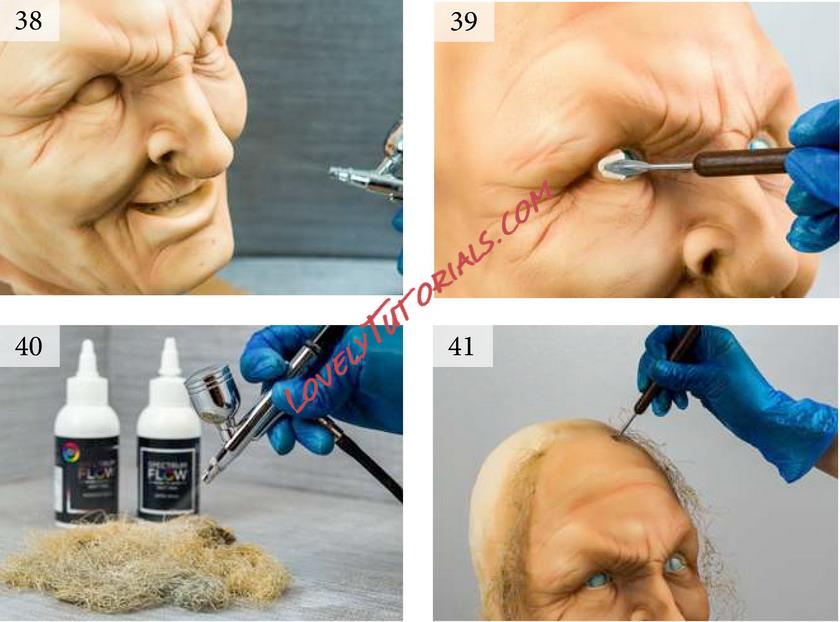
Using Light Shadows, begin to contour/ shadow the areas around the eyes, nose and mouth.
Step 39.
Gently remove the modelling chocolate cover from the eyes.
Step 40.
Mix white and black airbrush paints to create a light grey and sparsely airbrush the corn silk providing a dusting of colour.
Step 41.
Push the corn silk into the top of the head in sections using a fine tool to create a hairline.
Step 42.
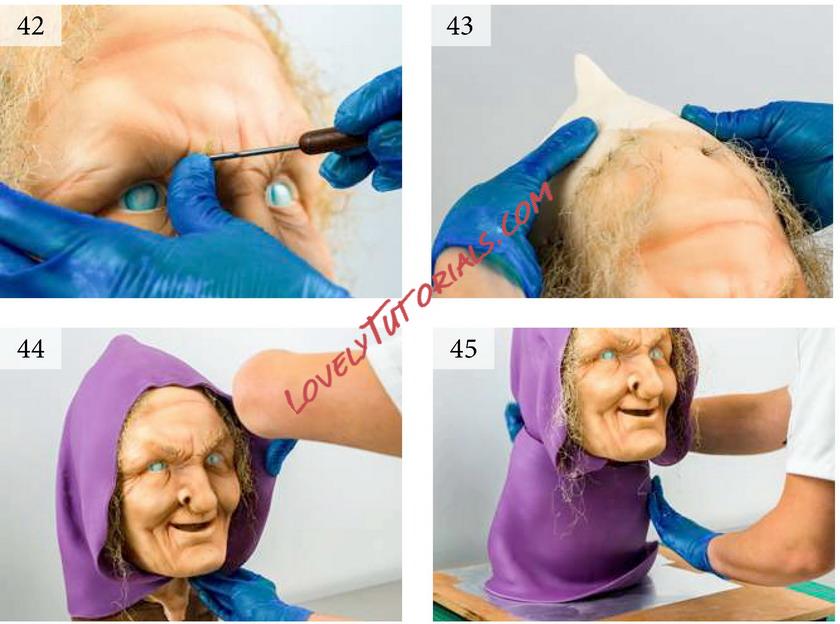
Cut smaller pieces and push into the eyebrow area in bunches.
Step 43.
Apply a small point of sugarpaste at the crown of the head to create the hood.
Step 44.
Colour white sugarpaste using purple gel.
Mist the top of the head with water and apply fixing under the chin to create a 44
hood. Cut off excess around the neck.
Step 45.
Repeat to cover the torso and blend into the hood with a smoothing tool.
Step 46.
Mix gold dust with rejuvenator and paint the cape with small moons. To add fill pattern/texture, flick a wet brush to gently spatter gold spots in empty areas.
Step 47.
Mist the board with water then mix brown dust into white sugarpaste and apply.
Step 48.
Using a veining tool, create wood grain lines across the board.
Step 49.
Dust with brown and black powders to create darker areas around the edges of the wooden boards.
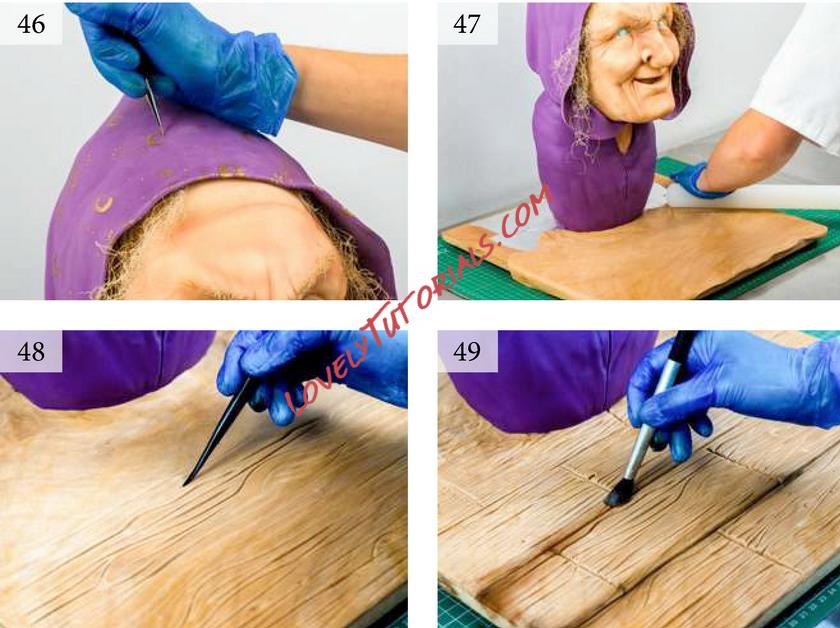
Step 50.
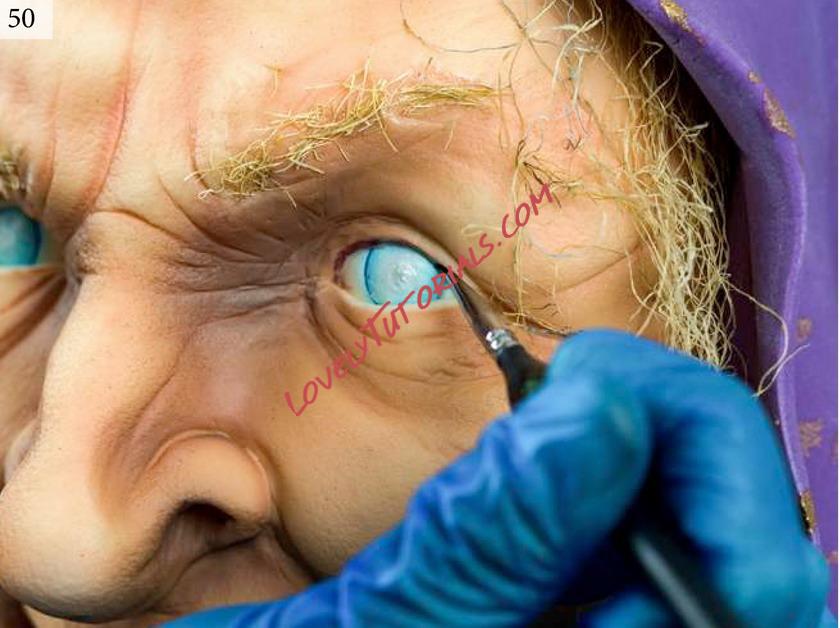
Line the upper eye lid using brown to make the eyes pop a little more.
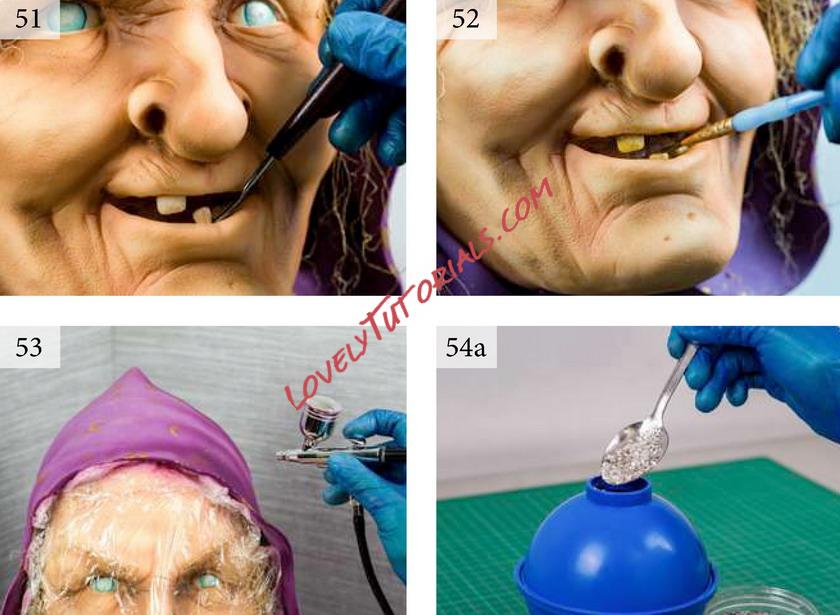
Step 51.
Using modelling paste, make three small squares/rectangles and attach inside the mouth using a little water. Using the dresden tool, push into shape then flatten and texture the edges to create the teeth.
Step 52.
Paint using a combination of brown, white and black airbrush paints. Darken the inside of the mouth using black.
Step 53.
Gently cover the face in cling film tucking under the hood in preparation for airbrushing. Apply purple between the creases and shadowed areas of the cloak to create depth/shading.
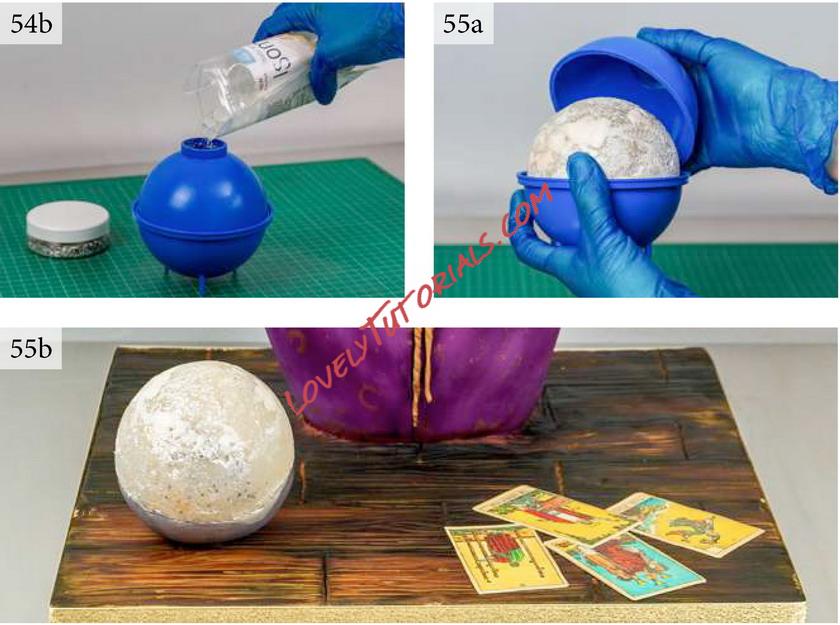
Steps 54a & b.
Using the sphere mould, add roughly two teaspoons of glitter and fill around a third full with isomalt.
Steps 55a & b.
Heat in the microwave in 30 second intervals until melted. Slowly rotate in all directions as it is cooling to create a sphere. Remove from the mould and apply the to board using a little modelling paste.


 1Likes


