Огромная благодарность Автору Sophia Fox за Мастер-класс
Equipment Required
• Cakes: 16cm round x 20cm high, 12cm round x 16cm high
• Sugarpaste: white, red, coffee, yellow, black
• Magic Colours Petal Dusts: Chocolate, Petal Rouge, Forest Green, Summer Yellow, Fuchsia, Coal Black, Snow White, Riding Hood, Lemon Yellow, Pumpkin, Indigo Blue, Aubergine
• Magic Colours Apple Green Lustre Dust
• Magic Colours Pros: Skin Tone, Black Extra
• Magic Colours Bling Bling Gold
• Rolling pin
• Tylo
• Piping gel
• Renshaw White Royal Icing
• Spatula
• Metal scraper
• Katy Sue Designs Flower Pro Ultimate Filler Flowers Silicone Mould
• Cosmos flower veiner or similar
• Cosmos flower centre mould
SK Great Impressions Silicone Veiner
Dipping solution • New non-toxic nail file
Edible gold leaf Floral tape: white, light green White floral wires: 18 gauge, 20 gauge,
28 gauge
24 gauge green floral wire Scissors Cutter pliers Nose pliers Scalpel Toothpicks Spiked sticks Wafer paper sheets Cerart tools: Blue Diamonds, 301,
K2220 Difficulty Rating
Ball tools Brushes Ribbon cutter Plastic cups Bowls
• Grated coconut
Rose-Tea • Cornstarch
Vodka • Paper towel
Cakes
Step 1.
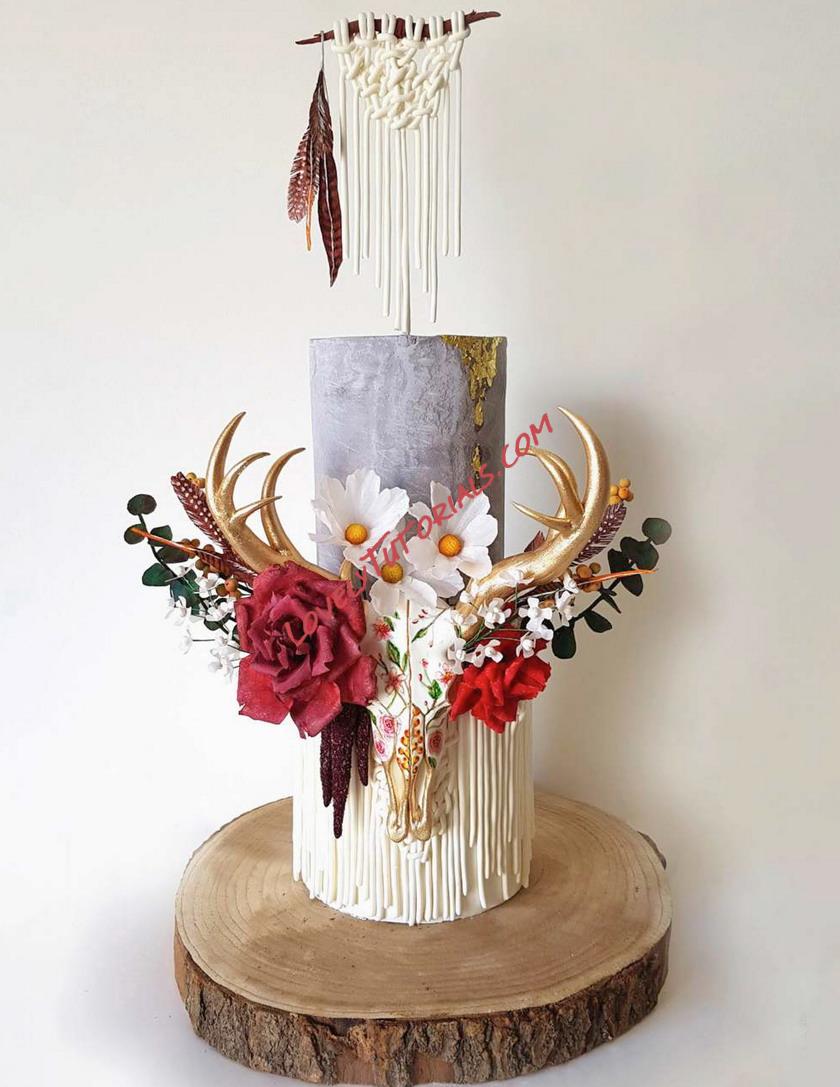
Cover cakes with white sugarpaste.
Step 2.
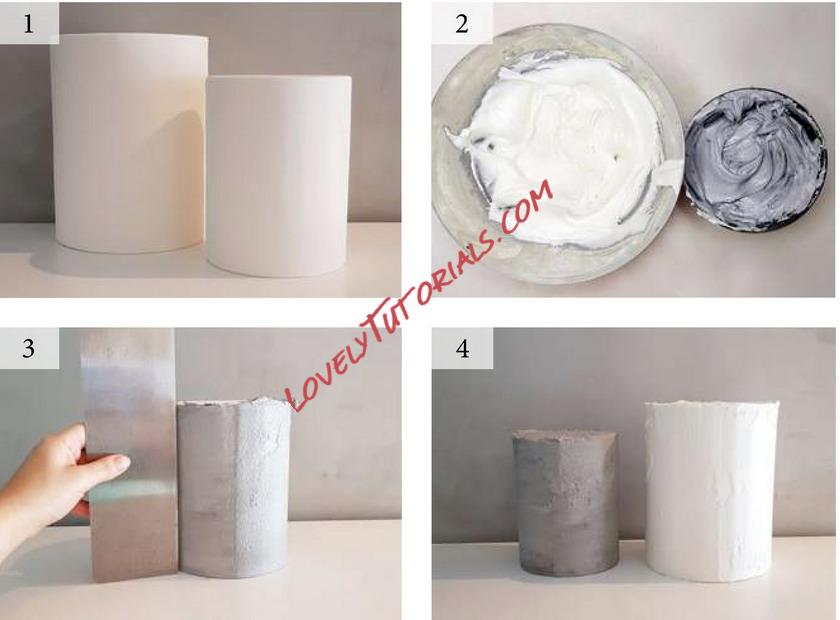
Divide royal icing between two bowls with more in one than the other. Beat well and add a little black gel to the bowl with less royal icing. Incorporate but don't beat too much for a grey marble/concrete effect.
Step 3.
Cover the smaller cake with the grey royal icing and smooth with the scraper.
Step 4.
Repeat on the bigger cake with white royal icing. Let both cakes dry for 12-24 hours.
Step 5.
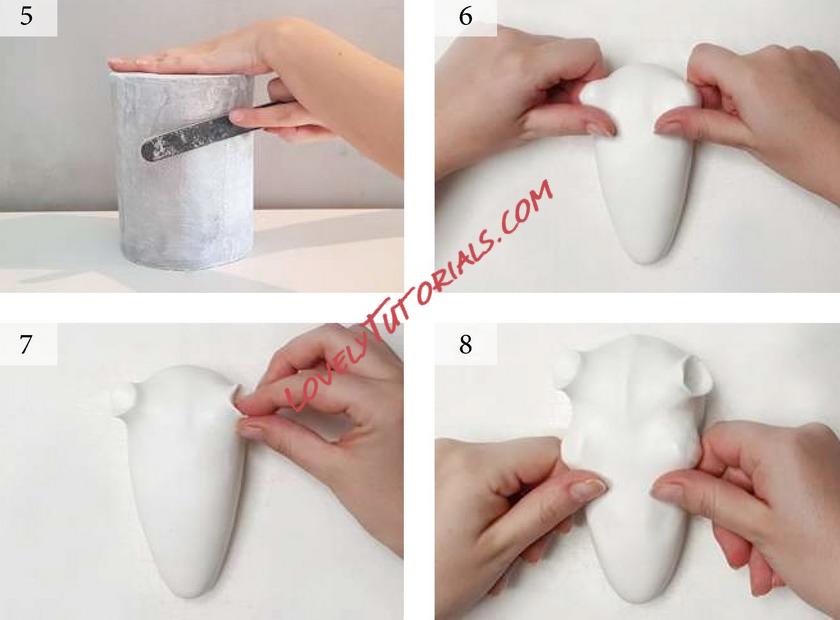
Once dry, smooth all around the cakes and on the edges with the nail file to give a beautiful decoupage effect. Set aside while we start doing the decoration.
Skull
Step 6.
For the skull, blend white sugarpaste well and make a cone. Start to sculpt the horns by gently pushing the sugarpaste.
Step 7.
With your fingers, fine tune the upper parts on both sides.
Step 8.
Pull the sugar paste with your fingers to define where the eyes will be.
Step 9.
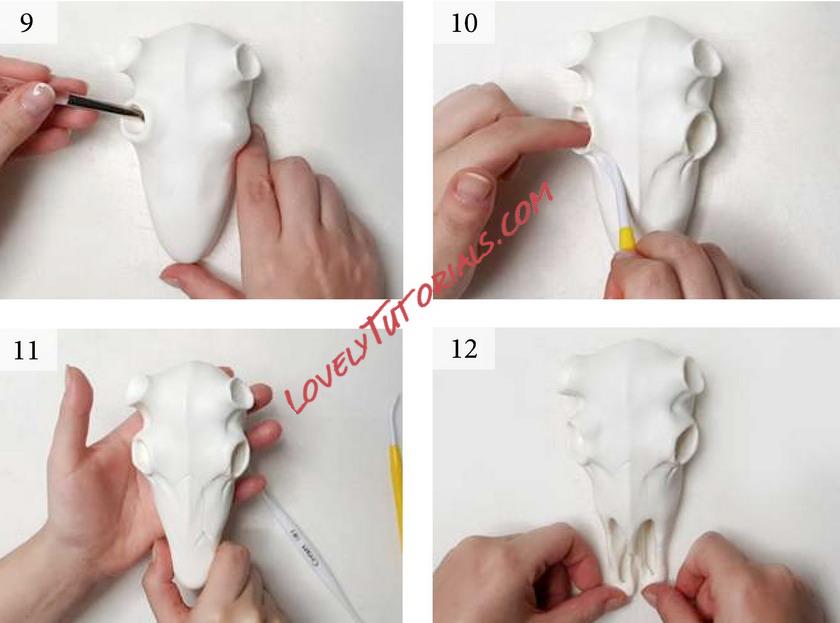
With a large ball tool, make the holes for the eyes.
Step 10.
Using the 301 tool, make the impressions of the bones.
Step 11.
Fine tune the bottom part of the skull with your hands.
Step 12.
Using the scalpel, cut holes in the bottom of the skull. Cut between the holes to define the two parts. Gently shape them.
Step 13.
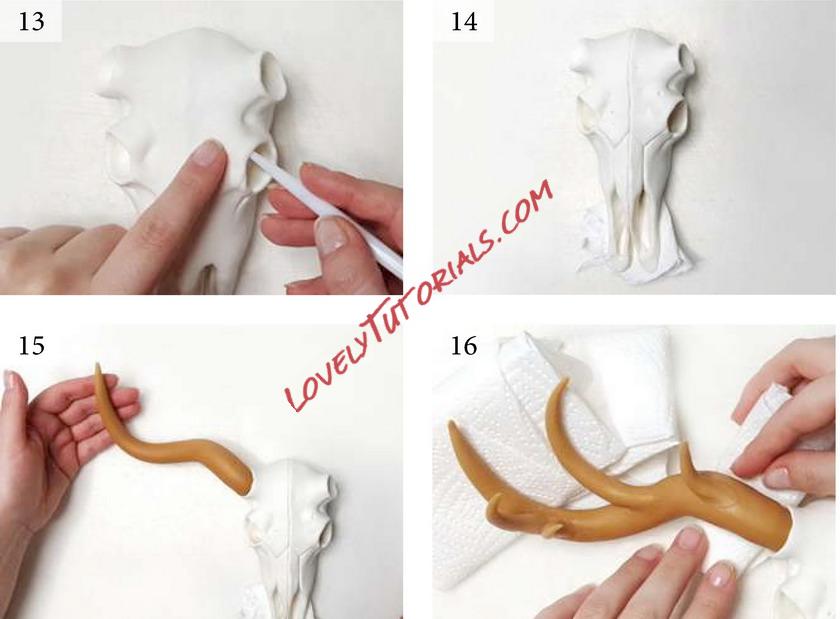
With the 301 tool, sculpt the eye sockets.
Step 14.
Still using the 301 tool, draw lines between the bones. Let dry.
Step 15.
Add tylo powder to coffee sugarpaste and combine. Roll into a long cone. Place the cone in the hole for the horns and shape.
Step 16.
For the smaller horn, roll a little coffee sugarpaste as with the bigger horn. Cut diagonally so it fits. Apply edible glue. Glue to the big horn and blend with the 301 tool. Add as many horns as you like. Dry with paper towels to keep the shape.
Step 17.
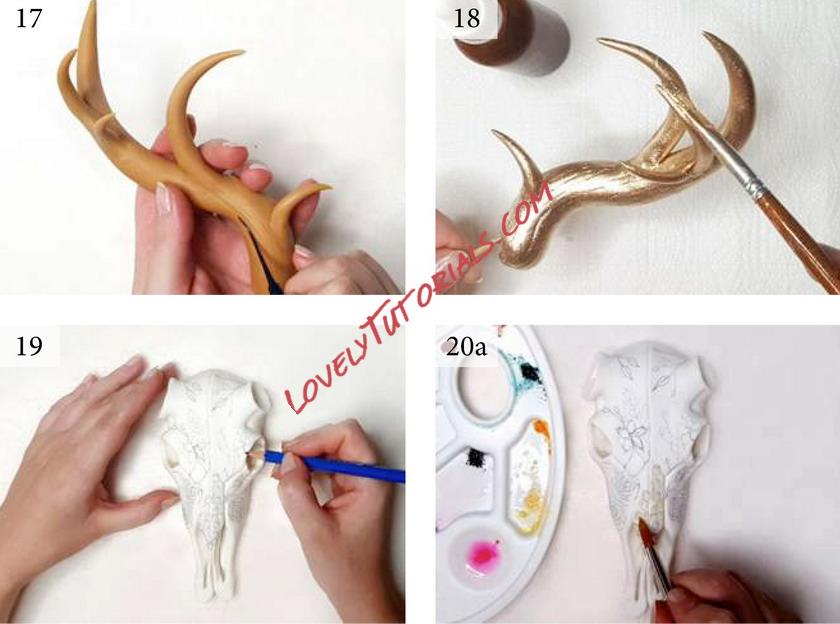
Once dry, use the Blue Diamond 500 tool to add impressions to give texture. Let dry.
Step 18.
Add a little vodka to the Bling Bling and use a brush to paint the horn. Let dry.
Step 19.
Draw how you want to paint the skull. Steps 20a-f.
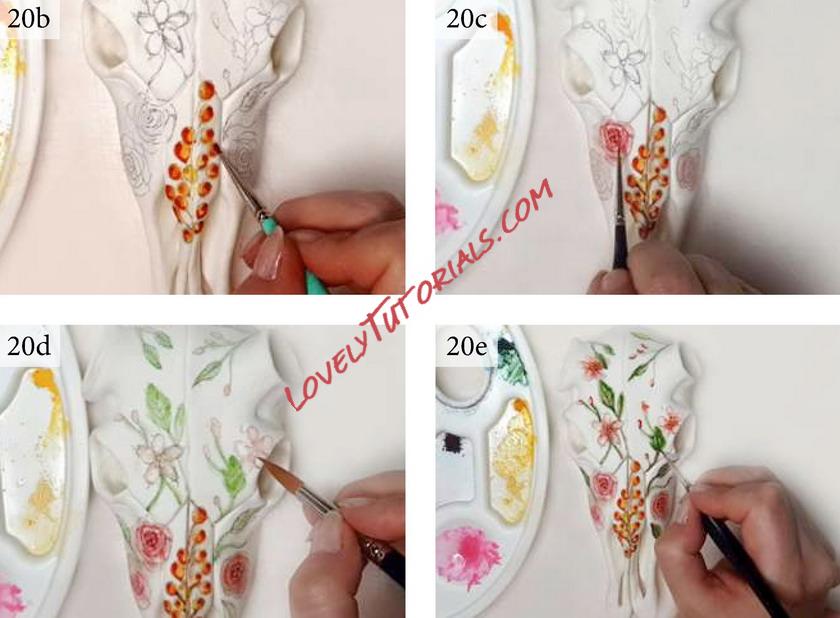
Start painting with a watercolour brush and Lemon Yellow. Add dipping solution and paint the berries on the front. Mix all the colours used for this section with dipping solution.
Paint with Summer Yellow for the berry shadows. With Pumpkin, add saturation.
Use Petal Rouge to paint the roses. With Fuchsia, paint the shadows. With Riding Hood, add further saturation.
Paint the leaves with Apple Green. With Petal Rouge, paint the little flowers.
With Pumpkin, paint the shadows of the little flowers. With Chocolate, paint lines in the leaves. With Forest Green, add shadows to the leaves.
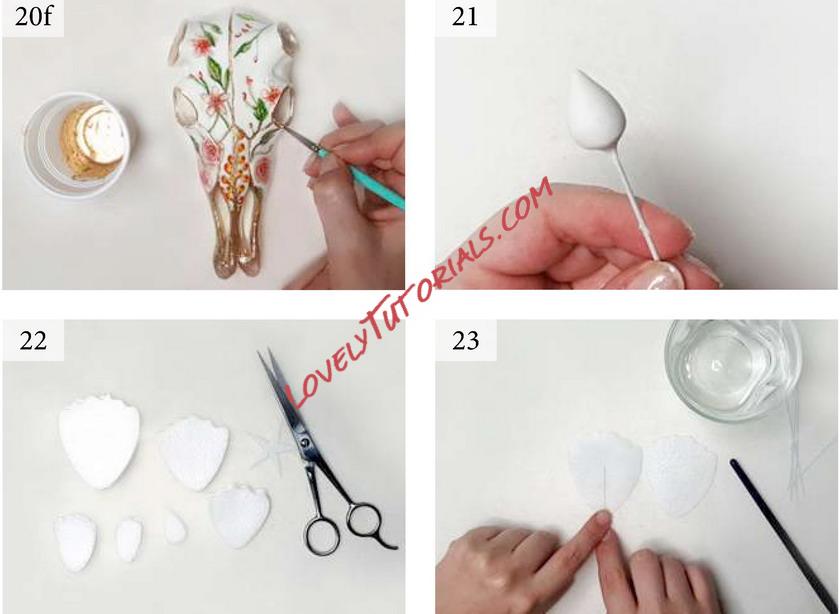
Paint with Bling Bling Gold mixed with a little vodka on the edge of the eyes to define the bones and bottom of the skull.
Roses
Step 21.
Add tylo to white sugarpaste and incorporate. Make a ball and then a cone. Bend the tip of an 18 gauge white wire.
Put edible glue on the wire and insert in the cone. With your fingers, press the cone to the wire and blend the sugarpaste.
Step 22.
Draw petals on wafer paper and cut into rectangles. Cut all petals and the calyx. For bigger rose petals, cut double so you can put a wire between. Cut six of each size, six bigger double petals and one calyx.
Step 23.
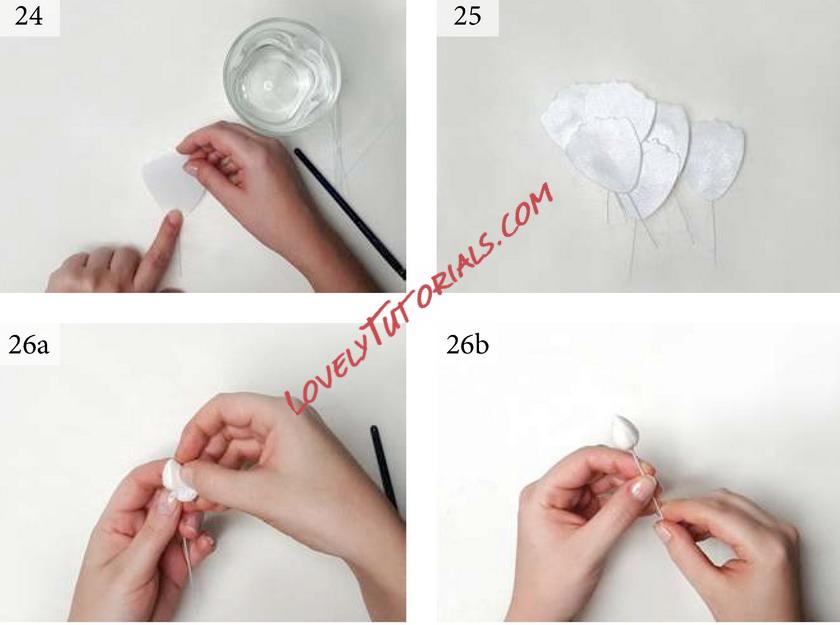
Cut six 28 gauge white wires 9cm long. With a brush, add water on the plain part of the petal, the textured part should be outside. Put the wire on the petal.
Step 24
Glue the other petal over and press well so the wire sticks to both petals. Let dry.
Step 25.
Repeat for the other six petals.
Steps 26a & b.
Put water on the smaller petal and glue to the centre starting at the back going to the bottom. Repeat for all petals overlapping the previous until the centre is covered.
Steps 27a & b.
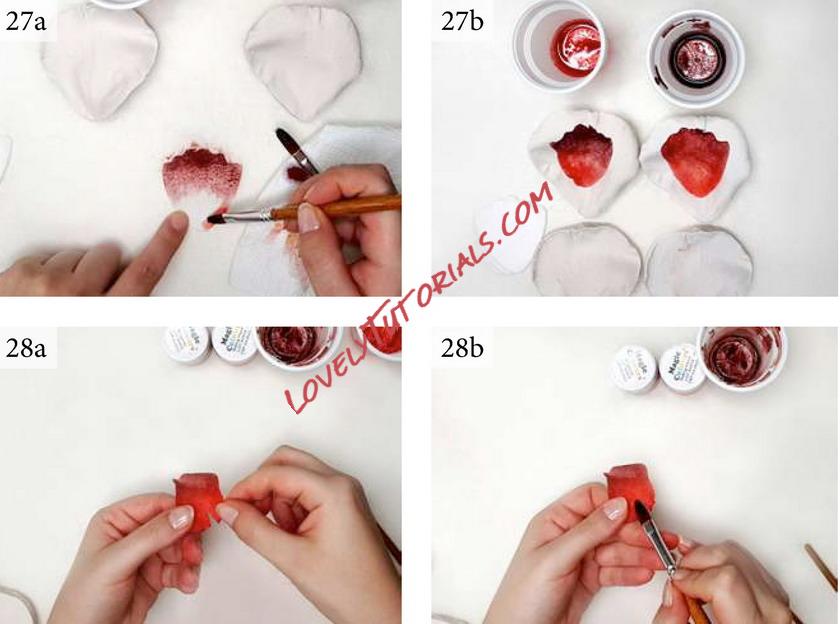
Paint the top of the petal with Aubergine mixed with vodka. Paint the bottom with Riding Hood mixed with vodka. Put the petal in the veiner and press. Let dry.
Steps 28a & b.
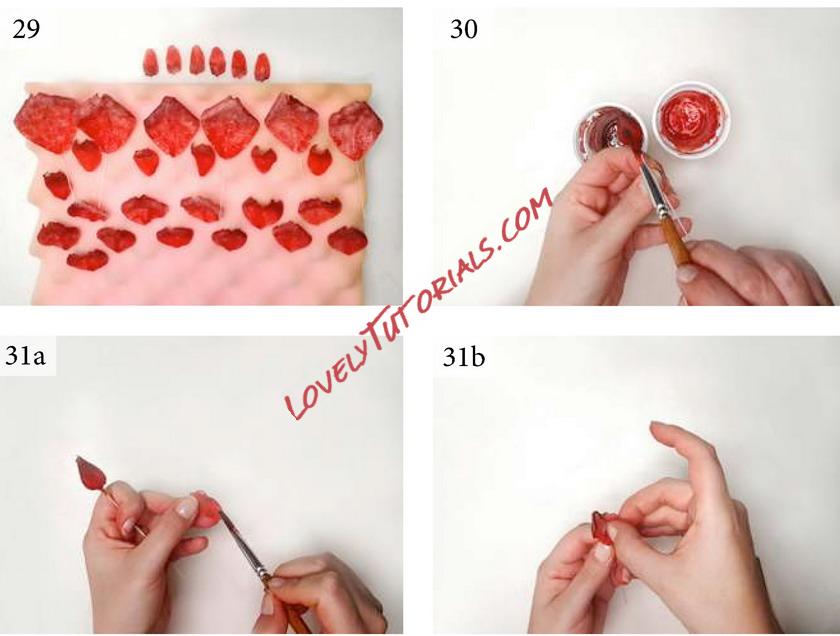
Once dry, cut into the bottom part of the petal up to the middle. Put water on one side and glue the other side over. For the rolled edges, use a brush handle. With your fingers, gently shape.
Step 29.
Repeat for all petals.
Step 30.
Paint the centre with Aubergine mixed with vodka on the back. Paint the bottom with Riding Hood mixed with vodka.
Steps 31a-c.
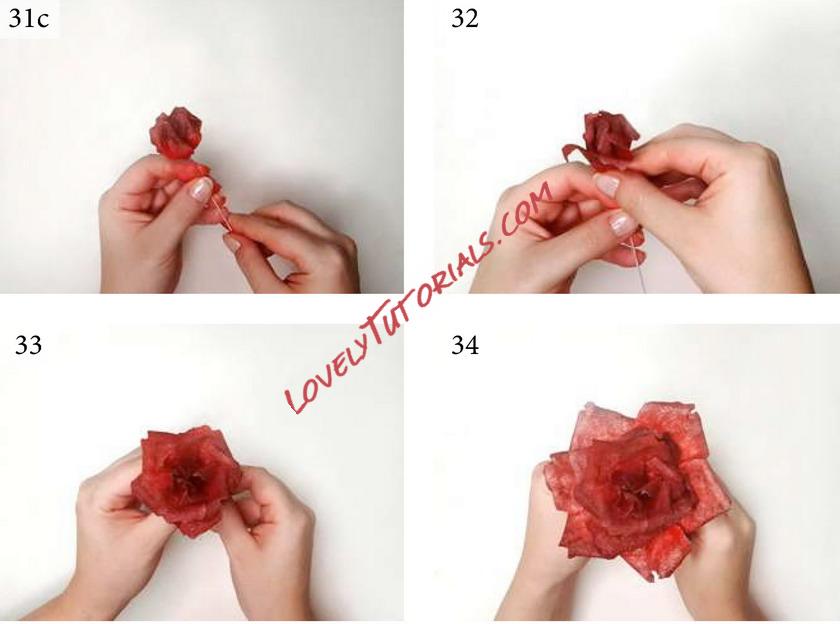
Put water on one edge of a smaller petal and glue to the centre. Repeat for all petals of this size around the centre. Repeat for the next size. For these, roll the edge. For the next size, put water just on the bottom and glue on that point. Repeat for all petals.
Steps 32-24. Step 35.
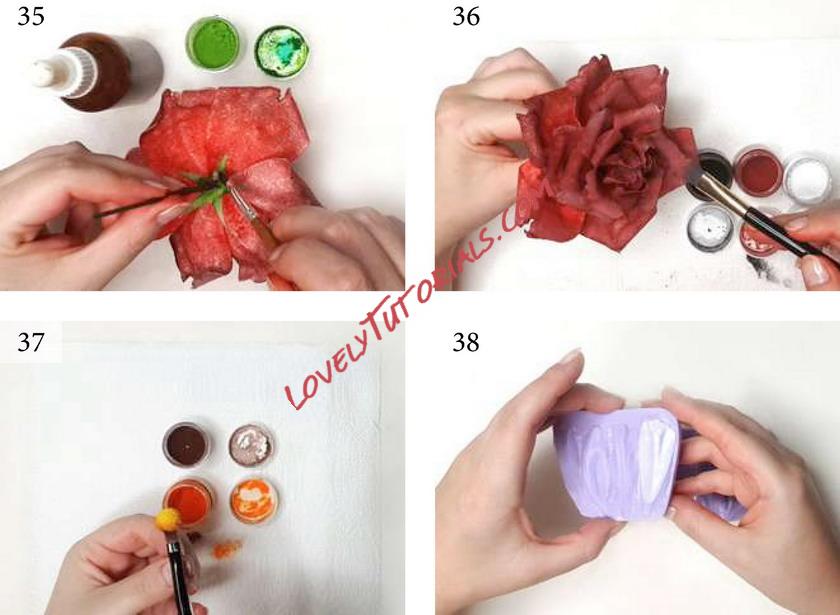
With a wet brush, brush over the centre tip of the larger petals to form teardrops. Let dry. Pass the calyx through the centre wire and glue to the bottom of the flower. Paint with Apple Green mixed with vodka.
Step 36.
Paint the edges of the petals with Snow White and Coal Black in the shadows.
Cosmos
Step 37.
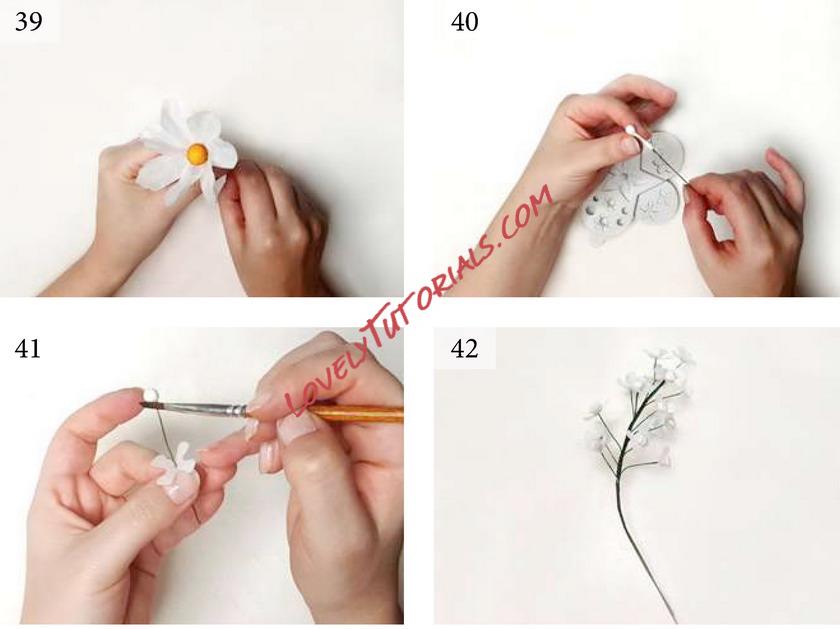
Mix yellow sugarpaste with tylo. Put a ball of sugarpaste in the cosmos centre mould. Remove and glue to 18 gauge white wire. Take excess off. Paint the centre with Pumpkin and the edges with Chocolate.
Step 38.
Brush the petals with vodka on both sides and put in the veiner. Press gently and leave to dry. Repeat to make eight petals.
Step 39.
Put water on the bottom of the petal and glue in the centre. Do this for all petals overlapping the next petal just a little over the previous. You need four flowers.
White Flowers
For the bigger petals, double the wire. Put the petal on the flower and wrap green tape around the centre. Repeat. Wrap the tape to the end of the wire.
Step 40.
Mix tylo with white paste and make a ball. Put in the filler flowers mould. Put the centre on 24 gauge green wire and glue.
Steps 41 & 42.
Cut flowers from wafer paper. Put water on the sugarpaste ball and glue the petals. Make 15 flowers for each arrangement.
Eucalyptus Branches
Step 43.
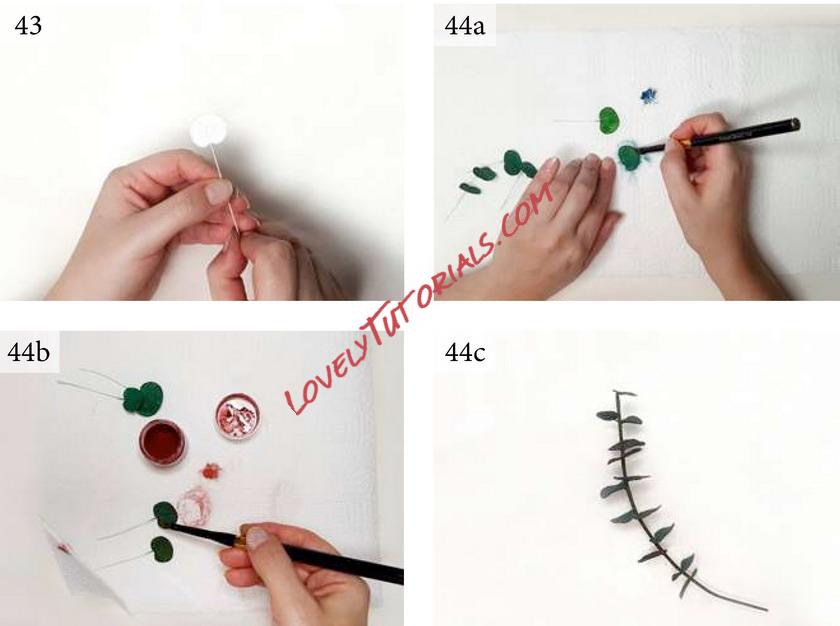
Cut double the amount of leaves. Cut 28 gauge white wires and glue each between the leaves. Make three smaller leaves and ten bigger leaves for each branch.
Steps 44a-c.
Paint both sides of the leaves with Forest Green mixed with vodka. Paint over the green with Indigo Blue. Paint the petals with Burgundy. Arrange with floral tape.
Berries
Step 45.
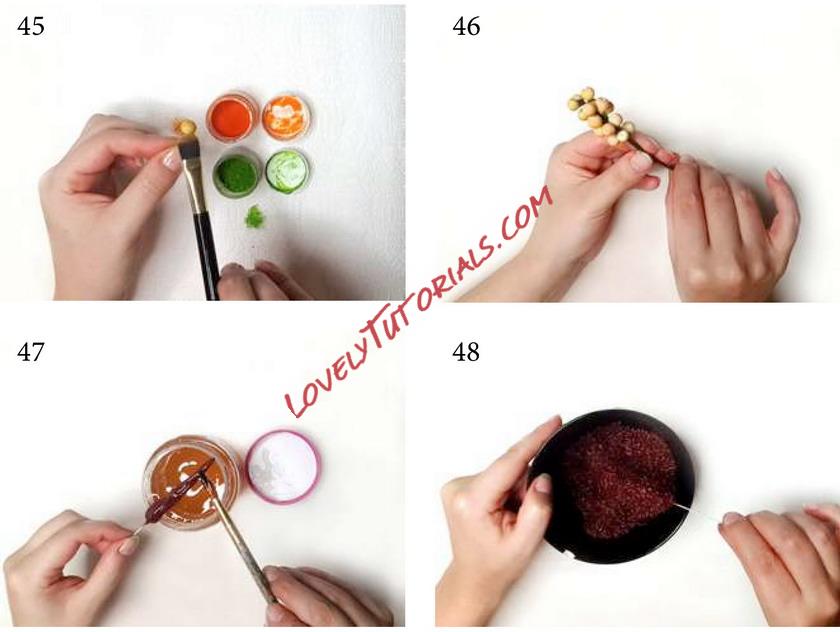
Use white paste mixed with tylo to make a ball and add to a wire. With the K2220 tool, make a hole in the middle. Paint the berries with Pumpkin on the top and Apple Green on the bottom.
Step 46.
Arrange the branch with floral tape.
Fills
Step 47.
Use red paste with a little black paste, add tylo and mix. Roll into a cone and insert a 20 gauge white wire. Brush with piping gel.
Step 48.
Add Burgundy and a little Coal Black to grated coconut and mix. Put the fills covered with piping gel in the mixture.
Macrame
Step 49.
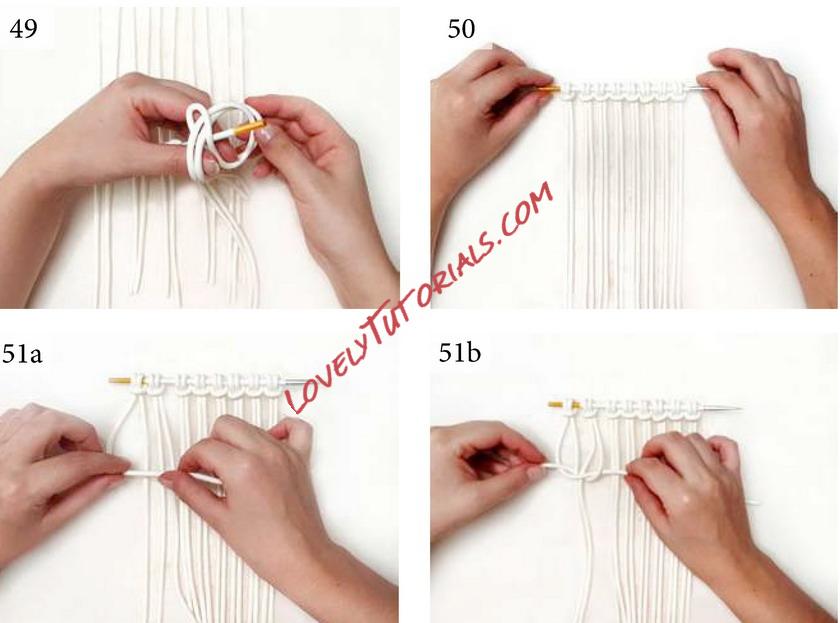
Mix white paste with tylo. Make eight 50cm long rolls. Double at the middle, knot and fix to a brush.
Step 50.
Repeat for each knot.
Steps 51a-c.
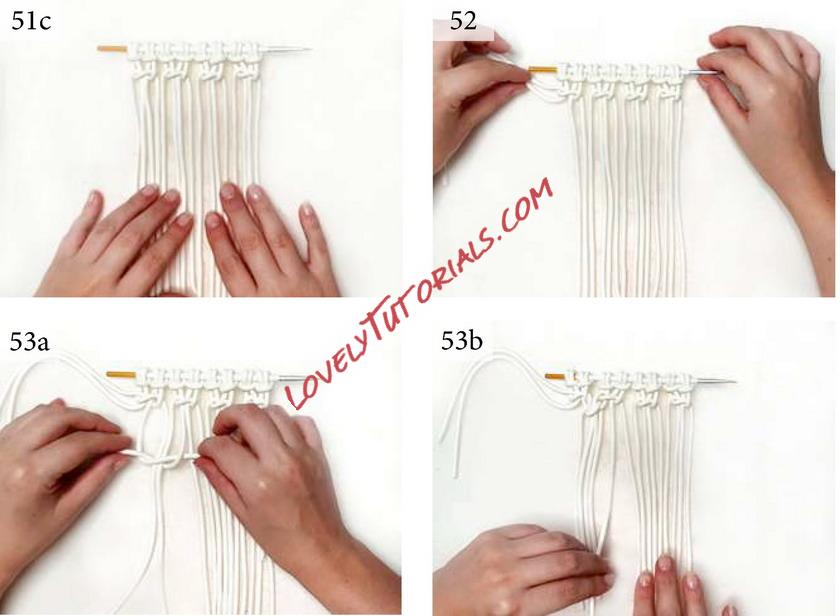
Pick up the first line of sugarpaste, pass over the second and third lines. With the fourth line, pass back over the first and behind the third and second then make a knot as shown. Repeat for the others.
Step 52.
Put those lines aside and repeat but starting at the third line. Each knot is always done with the fourth line.
Steps 53a & b.
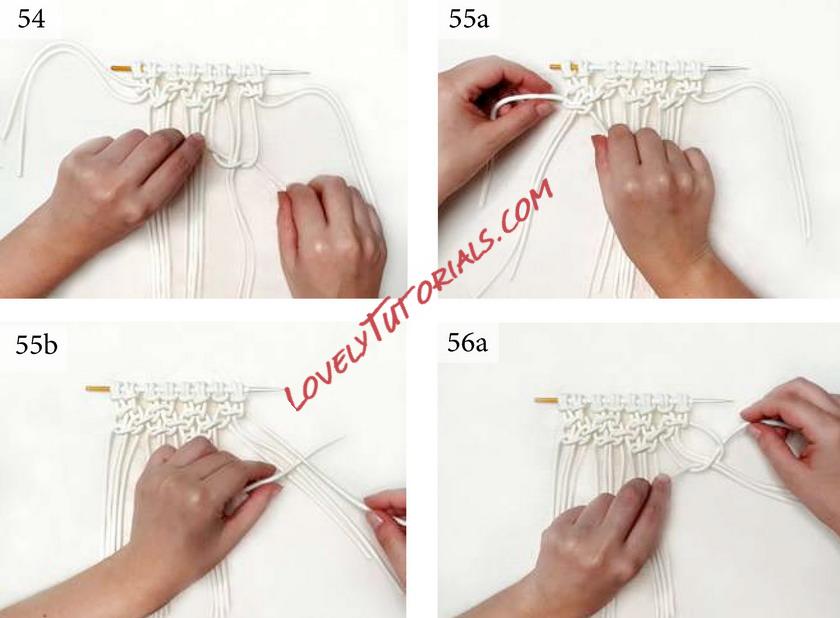
Repeat until at the end of the sequence leaving the two final lines free.
Step 54.
Repeat again but starting in the first line not used previous.
Steps 55a & b.
Repeat until the end.
Step 56a & b.
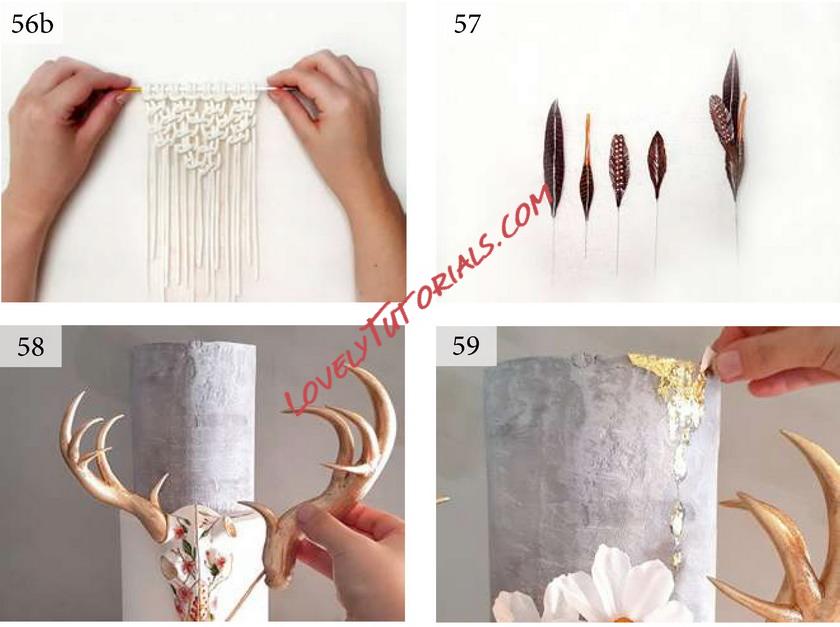
Create one more sequence the line after. Make six like this and one for the topper.
Feathers
Step 57.
Glue wafer paper feathers to 28 gauge wires and paint with Chocolate, Coal Black and Snow White mixed with vodka.
Assembling
Step 58.
Stack the cakes. Fix the skull with icing and toothpicks. Attach the horns. Glue the macrame decorations around the bottom.
Step 59.
Pipe royal icing on the top tier. Let dry slightly and glue edible gold leaf. Add the rest of the decorations as you wish.

