Огромная благодарность Автору rosebakes за Мастер-класс First up, don’t you hate it when you read a recipe all the way to the end to find out something is going to take exponentially longer than you planned? I do! So, let me say up front that generally speaking, you cannot do this in a single day! You will need at least one day of dry time, but 2-3 days is better!
So, let’s get started! Here’s a list of what you’ll need. Everything is
not in the picture and you can probably substitute for some of these items, but this is everything
Iused.
- Fondant with Tylose powder or gum paste (about 1 pound)
- Rolling Pin
- Ribbon Cutter
- Shortening
- Sugar Glue (Water with a tiny amount Tylose powder added), or you can just use plain water, but the glue works better!
- Paint Brush
- White Chocolate (optional)
- Round Cookie Cutter (about 3.5″)
- Pastry Wheel or Pizza Cutter
- Ruler
- Plastic Wrap
- Cookie Sheet, dusted with corn starch
Today I wanted to share a tutorial on how to make a pretty poofy bow with fondant or gum paste. For this post I’ll be using Wilton gum paste (and referring to it), but you could also do homemade fondant with Tylose powder added. Note: I don’t usually measure, but my estimate is that you’ll need 2-3 tsp. of Tylose per pound of fondant.
My first step is to make a round base for my bow. I roll out a small piece of gum paste, then cut a 3.5″ circle. This is a super easy step.. just cut it and set it on your cookie sheet to dry.
You do not want this gum paste paper thin… maybe an 1/8th”.
After you’ve done that, take about half of your remaining gum paste and knead it until it’s soft and pliable (keep the other half wrapped so it doesn’t dry out). Then roll it out pretty thin – large enough so that you can cut strips 7″ long.
I roll mine out on a flexible cutting board (I bought this cheap set of 5 and use them all the time!) with a thin layer of shortening on it to prevent sticking! Any smooth surface will work. After it’s rolled out, trim it on all sides – but again, make sure it’s at least 7″ long in one direction.
Cut as many strips from it as I could (balling back up and re-kneading, then re-rolling until it runs out) then moved on to the other half.
Note: I made lots of red and green fondant before doing this bow, hence my hands are green and red. In addition (as if the red and green were not enough), apparently I have freakish, non-photogenic hands… yikes!
If you don’t have a ribbon cutter, you could do all of this cutting with a pastry wheel and a ruler. My ribbons are each 1.5″ wide. I do 3-4 strips at a time and make my loops, then roll out again, do 3-4 more, etc.
Note: the 7″ long loops give you a bow that is about 6″ in diameter. You can see this on a cake in part 2 of the poofy bow tutorial!
Back to your ribbons…
So, after I get a few strips of ribbon cut, I flip one over and paint each end with sugar glue. As I stated above, you can use water, but the glue is thicker and doesn’t drip as easily (ie., I don’t make nearly as big of a mess with it)! After it’s painted, I pinch the ends to make them stick.
I try do a special little tri-fold. I don’t know how to explain it, but I think you can see it in these pictures…
Once both ends are pinched, you’re going to fold the loop over and pinch the ends to each other. There should be enough sugar glue there to make them stick, but if you need to, paint a little more on.
Now, if you leave this loop as it, it’ll sag and be flat before drying. To prevent that, simply wad up a ball of plastic wrap and place it inside the loop… like this.
This bow can have either 11 or 12 loops. For the bottom layer, you’ll definitely want six loops (you’ll see why in part 2). For those, I set them down flat and push them against the side of my (corn starch dusted) cookie sheet to keep them good and poofy…
I usually do at least one extra, if not two extra loops like this, just in case one or two crack or break.
After you have at least 6-8 laid flat, you’ll repeat the above process and do another 5-8 loops (I recommend at least 6), except this time, you’ll lay them on their sides. That way they are “poofy” with no flat sides for the top layers of the bow.
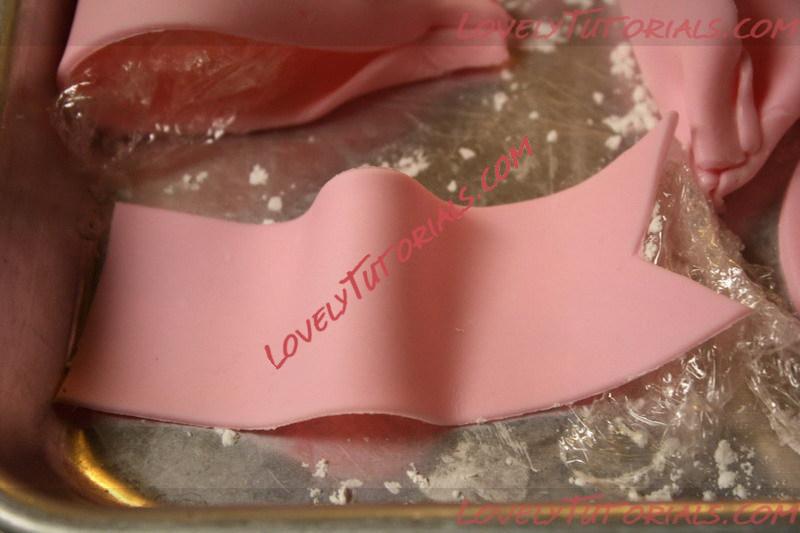
Lastly, you’ll want to make some “tails” for your bow. I only made 2 for this bow, but you can add up to 5 or 6. These are super easy! Just roll out some more strips, but this time they only need to be about 4-5″ long. Then cut them to make the pointy ends.
Transfer them over to your cookie sheet, and wrinkle them up however you like. I placed a little piece of plastic wrap under the end to make it curl a little. *NOTE* The one thing I forgot to do was pinch the ends of the tails. You will want to pinch them just like the ends of the loop ribbons… this makes them much easier to put in your bow!!