08.12.2020, 10:34
|
|
Администратор
|
|
Регистрация: 10.03.2016
Сообщений: 1,002
|
|
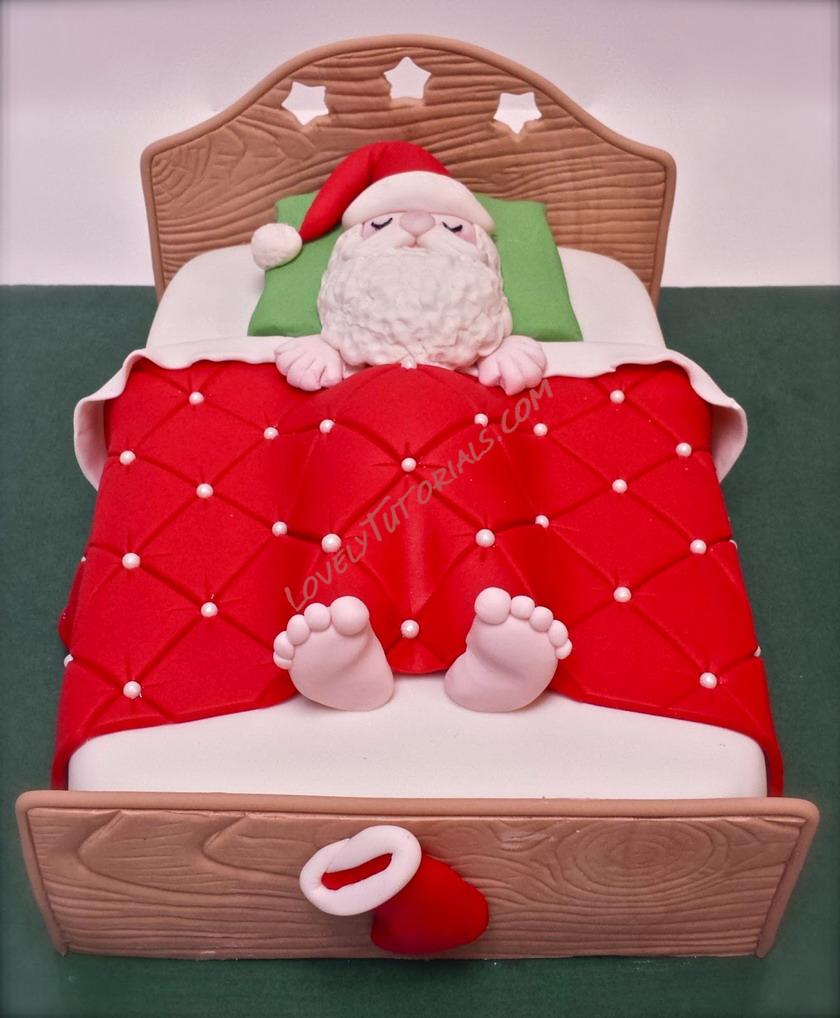
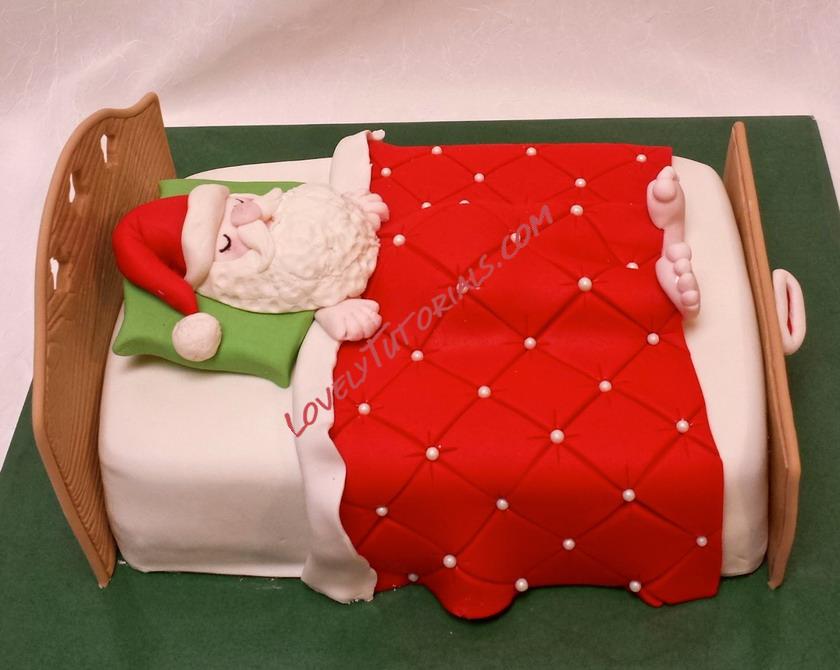
 Sleeping Santa Cake TUTORIAL
Огромная благодарность Автору laceyjakescakes за Мастер-класс
I saw a super cute sleeping Santa cake on Cake Central, so I really wanted to make something similar. Luckily, my Secret Santa was a chocolate lover, so I used her as an excuse to make this cake (Thanks, Meg!). It was very quick and simple to make, so it would make a great last-minute Christmas gift for anyone who loves cake!
To start, I baked two eight-inch square cake layers (I ended up cutting one side of the cake so that the finished product was 8x6 inches). While the cake was baking, I made all of the "cake parts," with the exception of the blanket. I made the headboard/footboard first so that it would have time to harden before adhering it to the cake.
To create the headboard, I googled "headboard outline" and found an outline that I liked:
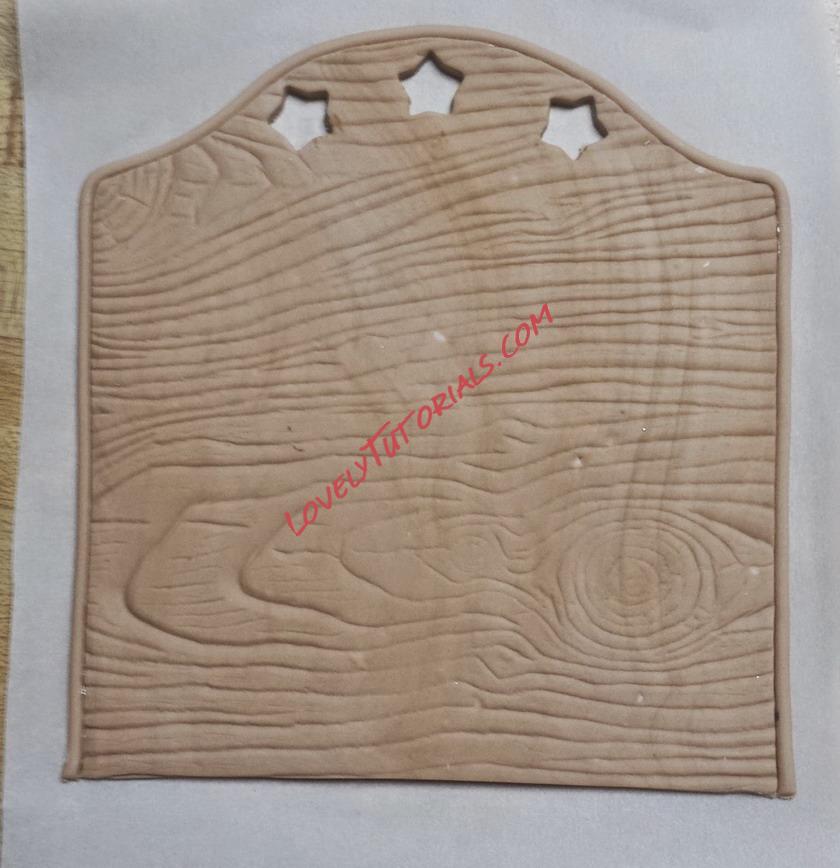
I adjusted the width of the picture to six inches and then printed it onto a piece of cardstock. Then I mixed some Tylose powder (Gum-Tex) into some white fondant and added a little bit of brown food coloring, kneading it until the brown was mostly incorporated but still slightly swirly. Then I rolled out the fondant, laid the template over it, and cut it out (I ended up cutting off the pointed parts of the headboard). I left the bottom longer than the template because I wasn't sure how tall my cake would end up being. I ended up using the leftover bottom portion of the headboard as the footboard later on.
Next, I pressed my wood grain impression mat onto the headboard (although this design could also be achieved with a knife), and then I used my mini star cookie cutter to cut star shapes into the headboard. Then I used my clay extruder to create a border for the headboard and attached it with piping gel.
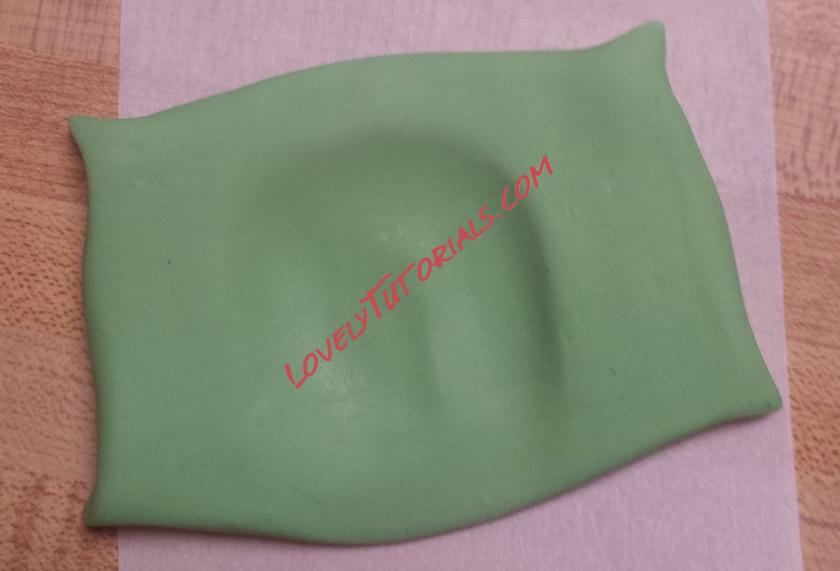
I set the headboard aside and began working on Santa and his pillow. For the pillow, I used Leaf Green food coloring with a tiny bit of black to achieve the color. I rolled the fondant out so that it was about a half of an inch thick, and then I shaped it a little bit with my fingers, pinching the corners and softening the edges. I also made an indentation where Santa's head was going to rest.
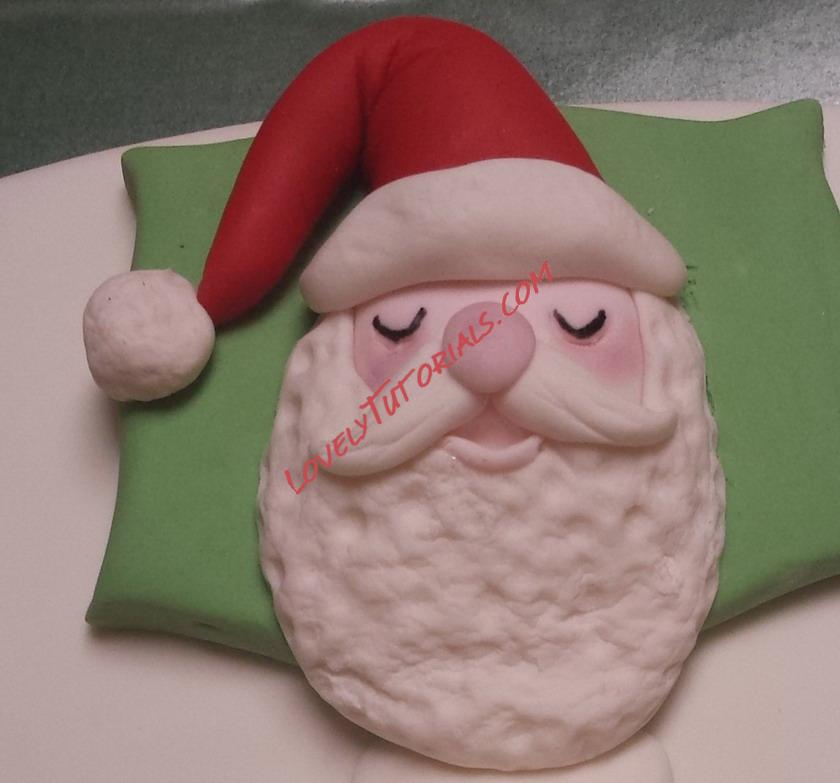
Next, I made Santa's skin by adding a little bit of pink food coloring to my white fondant. To make his head, I rolled out a ball of fondant and pressed it down so that the top was rounded, but the back was mostly flat. Then I cut off the top portion of his head so that the top was flat. Next, I used a little bit of red fondant, rolled it into a cone shape, and pressed it down on top of his head. I bent the "tail" of his hat and used a knife to create crease marks in the bend of his hat.
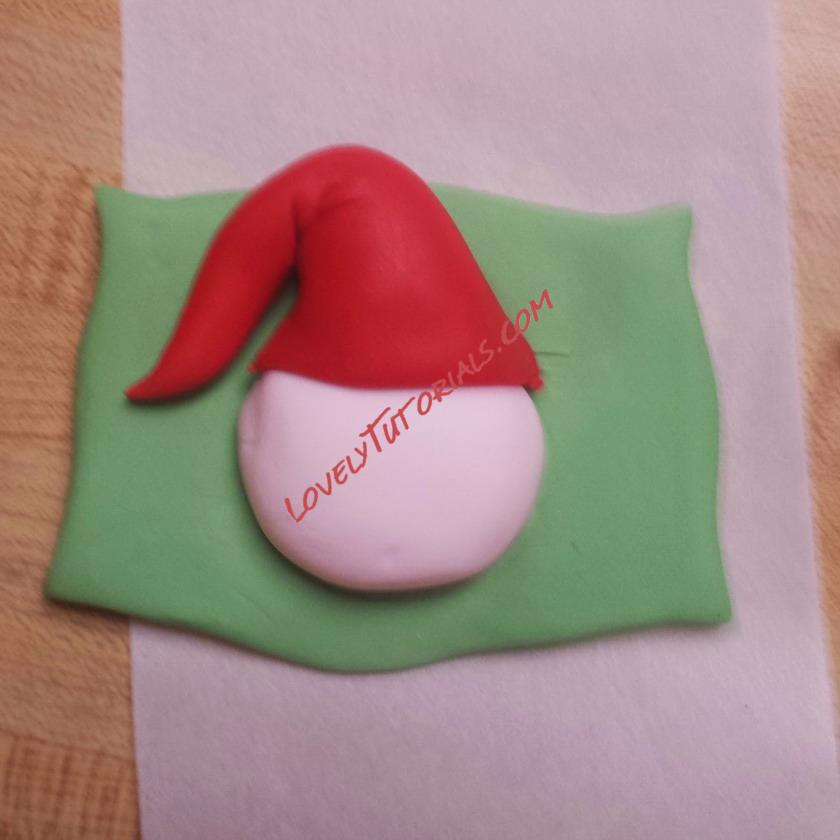
I molded some white fondant around the bottom and sides of his head to make his beard. Then I used a small ball tool to create texture by making small indentations all over his beard (I actually ended up adding more fondant to his beard in the end to make it fuller). Once his beard was in place, I added a couple of small elongated triangles for his moustache, attaching them in the center of his face, and then I used the back of my knife to create lines in his moustache. Then I pressed a ball of pink-tinted fondant onto the center of the moustache for his nose. In the gap between his moustache and his beard, I added a tiny strip of fondant for Santa's bottom lip. Then I pressed a frosting tip into his skin to make indentations for his closed eyelids. I used an edible black marker to draw his eyelashes, and I brushed a little bit of pink luster dust onto his cheeks and nose.
I finished his face and hat by adding a little ball of white fondant to the tip of his hat and a strip of fondant to the brim. I used a toothbrush (clean and unused, I promise!) to create the texture on the brim and the ball of his hat.
Like I mentioned before, I ended up adding more fondant to Santa's beard in the end to make it fuller. This is what it looked like after:
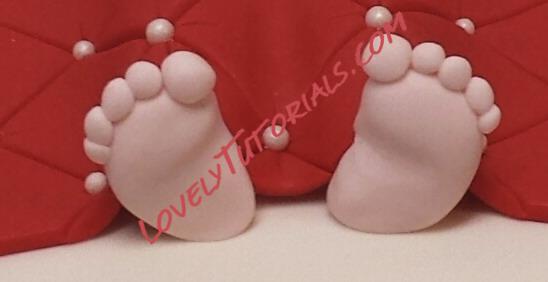
To make Santa's hands, I rolled two small balls of fondant and flattened them slightly. Then I made four cuts, creating his fingers, and I smoothed the edges of his fingers. For his feet, I created two jelly bean-shaped pieces of fondant, flattened them slightly, and made an indentation on each foot with my finger to create an arch. Then I added five tiny balls of fondant to each foot for his toes.
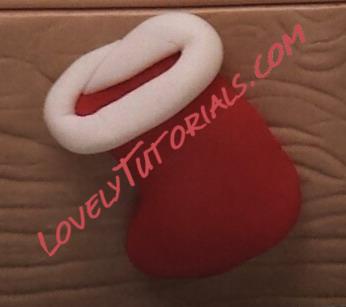
For the stocking, I created another jelly-bean shaped piece of fondant and flattened it slightly on the back. Then I cut the top so that it was flat, and added a ring of white fondant.
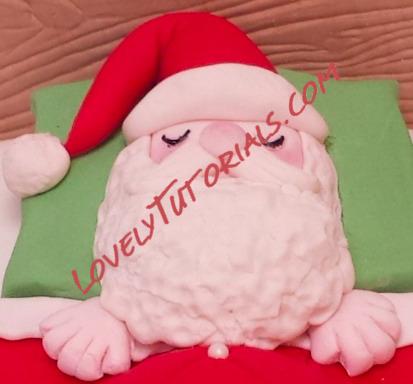
By this time, the cake had finished baking and cooling, so I leveled it, trimmed one side so that it was six inches wide and eight inches long (instead of 8"x8"). Then I filled it, frosted it, and covered it with white fondant. I placed the pillow and Santa's head on the cake and began working on his body. I didn't attach his head and the pillow to the cake at that time, because I knew that I would need to remove it later on.
To make Santa's body, I rolled out a thick cylinder of fondant, cut the bottom section in half lengthwise to create his legs, and used my fingers to shape his legs and belly. This part didn't need to be perfect or precise because I knew that it would be covered by the blanket. In hindsight, I should have made his belly a little bit bigger... Santa does love cookies, after all. :-)
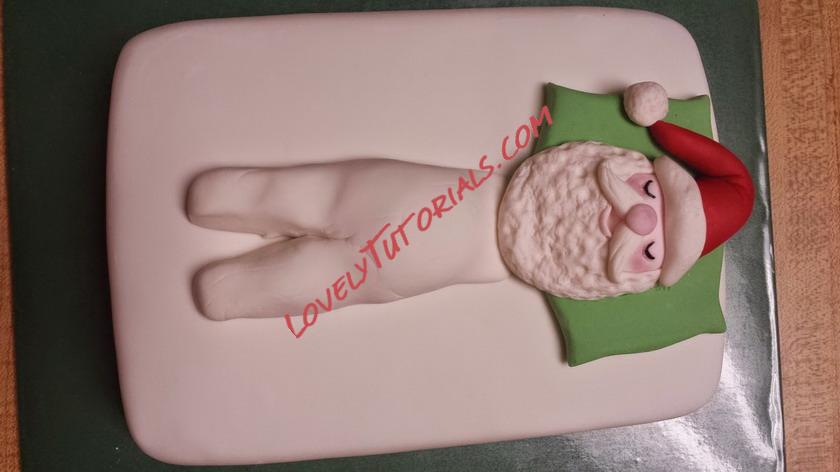
The last piece I made was the blanket. I rolled out a piece of red fondant 8 inches wide by 6 inches long (the opposite dimensions of the bed). I used my quilting tool to create the quilted effect, but a knife or a pizza cutter would work well for this, too. Then I covered Santa with the blanket (just down to his ankles) and used my fingers to make ripples in the sides of the blanket that were draped over the edges of the bed. Next, I took the pillow and head off of the bed so that I could add a strip of white fondant over the top of the blanket, creating ruffles with my fingers, and then I attached the pillow/head, hands, and feet to the cake. I also added some sugar pearls to the blanket.
The last pieces I added were the headboard and footboard. I attached the stocking to the footboard with a little bit of piping gel and that was it!
Merry Christmas!
|