|
|
ذںذ¸ذ¾ذ½, Pivoإˆka, peony, pivoine, Pfingstrose, peonia ,peonأa
|

14.07.2011, 07:04
|
|
ذگذ´ذ¼ذ¸ذ½ذ¸رپر‚ر€ذ°ر‚ذ¾ر€
|
|
ذ ذµذ³ذ¸رپر‚ر€ذ°ر†ذ¸رڈ: 07.09.2010
ذ،ذ¾ذ¾ذ±ر‰ذµذ½ذ¸ذ¹: 7,940
|
|

رپذ؟ذ°رپذ¸ذ±ذ¾ ذ¾ذ³ر€ذ¾ذ¼ذ½ذ¾ذµ Kikina ذ·ذ° ذœذڑ
رپذ»ذ¾ذ²ذ° ذ¸ ر„ذ¾ر‚ذ¾ ذ°ذ²ر‚ذ¾ر€ذ°
Jأ، bych tomuto kvؤ›tu nأ،zev ,,pivoإˆka" nepإ™isoudila,ale dؤ›vؤچata kterأ، tento kvؤ›t vidؤ›la na mأ©m dortu,tak mi psala jak jsem dؤ›lala tuto pivoإˆku a jakou vykrajovaؤچkou.Tak teda tady to je.
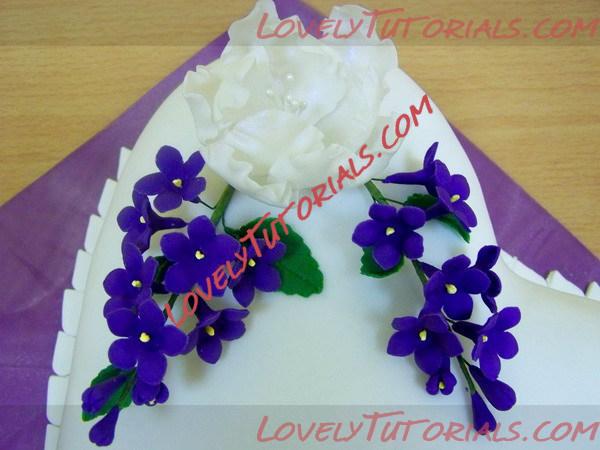
potإ™ebnأ© nأ،stroje a hlavnؤ› vykrajovaؤچka,pإ¯vodnؤ› vؤ›jأإ™ek zmأ،ؤچkly do oblouؤچku a je vykrajovaؤچka na svؤ›tؤ›
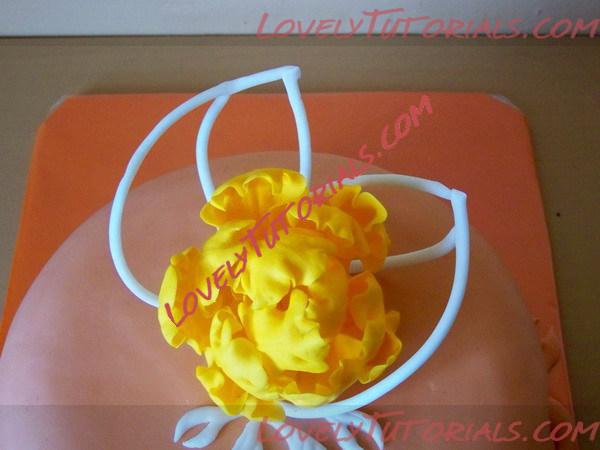
pإ¯vodnؤ› jsem zaؤچأnala dؤ›lat tento kvؤ›t touto vykrajovaؤچkou a jde to takأ©
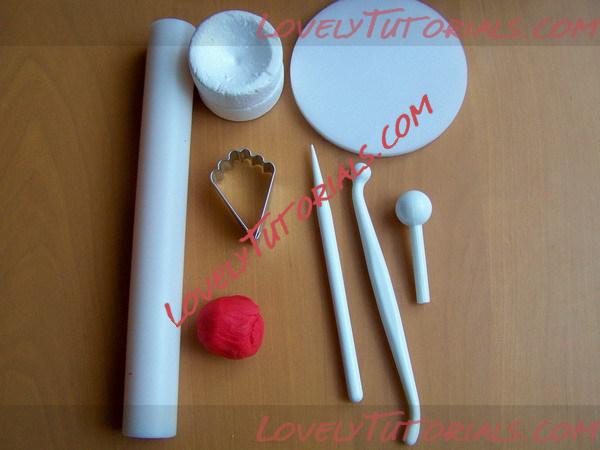
po vykrojenأ si lأstek kosticأ jeإ،tؤ› roztأ،hnu,lأstek vpravo je pإ™ed أ؛pravou pro porovnأ،nأ
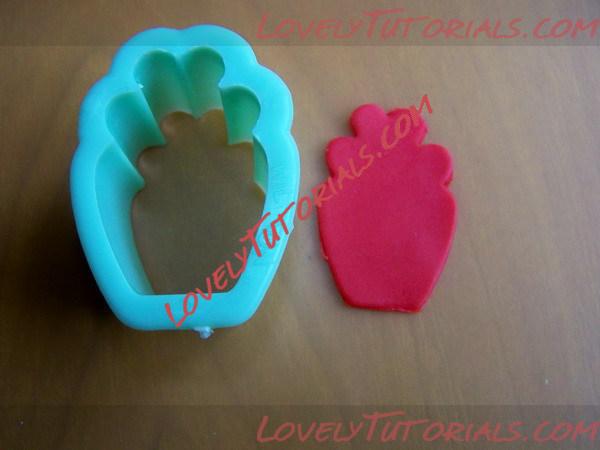
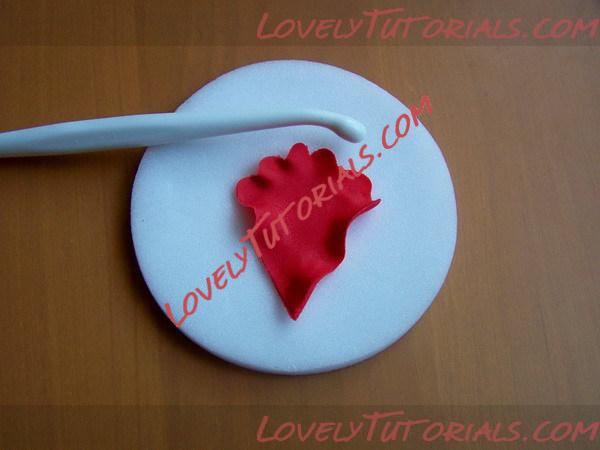
pak okraje zjemnأm co nejvأce
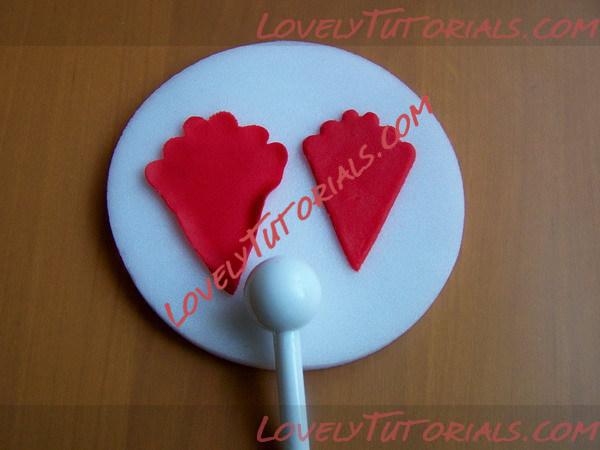
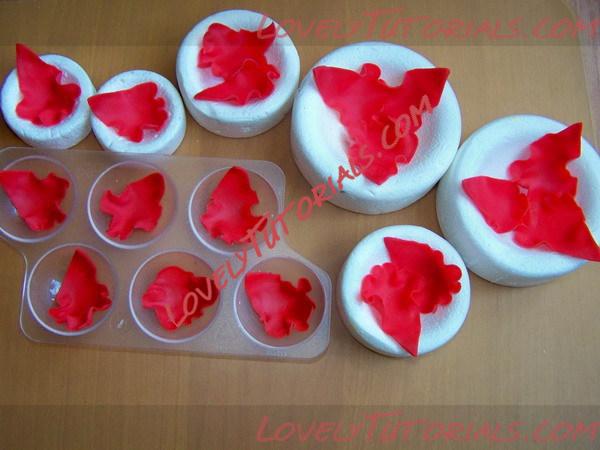
takto posklأ،dأ،m a uloإ¾أm do misek dأ،m suإ،it a mأ،m do druhأ©ho dne volno
no a po vysuإ،enأ takto sklأ،dأ،m na malinkأ© a tenkأ© koleؤچko hmoty potإ™enأ© alkoholem 1 patro 6 lأstkإ¯
zase koleؤچko hmoty druhأ© patro 4 lأstky
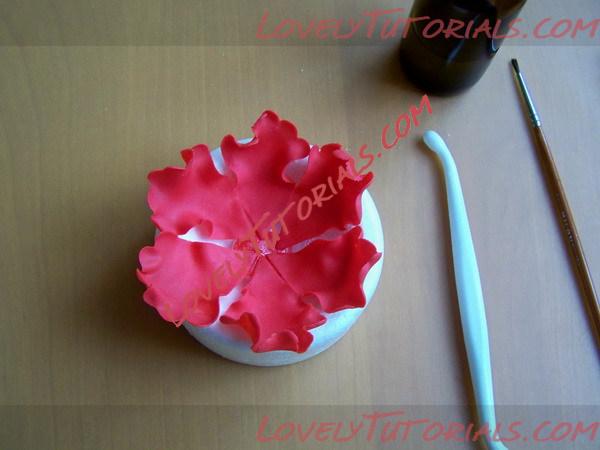
tإ™etأ patro 3 lأsky a pak jeإ،tؤ› doprostإ™ed jeden a hotovo a zase mأ،m volno aby to zaschlo
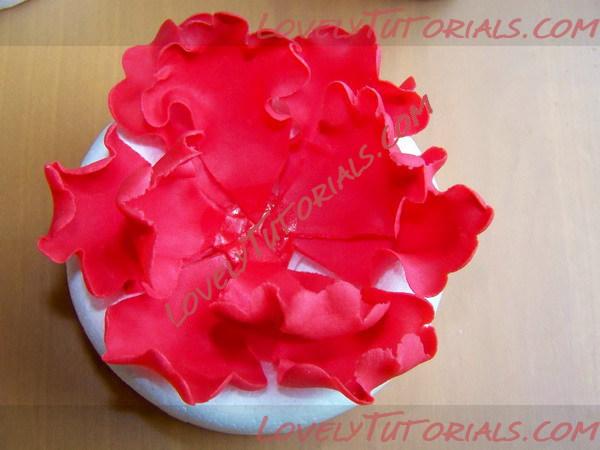
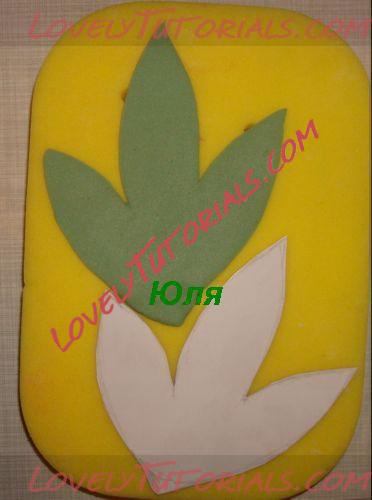
tady ve إ¾lutأ©m provedenأ jeإ،tؤ› z zelenأ© vykrajovaؤچky od Wiltona
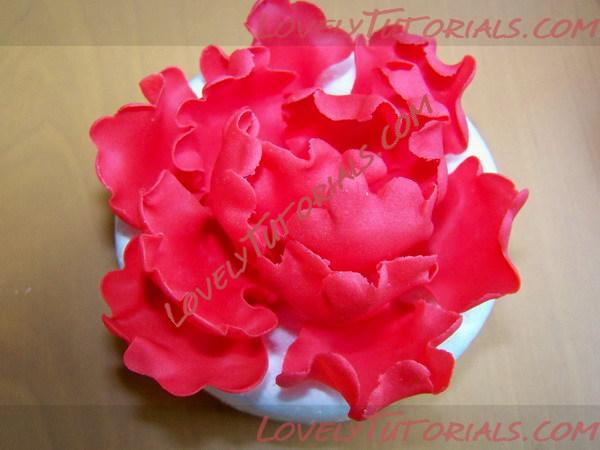
a tady bأlأ،
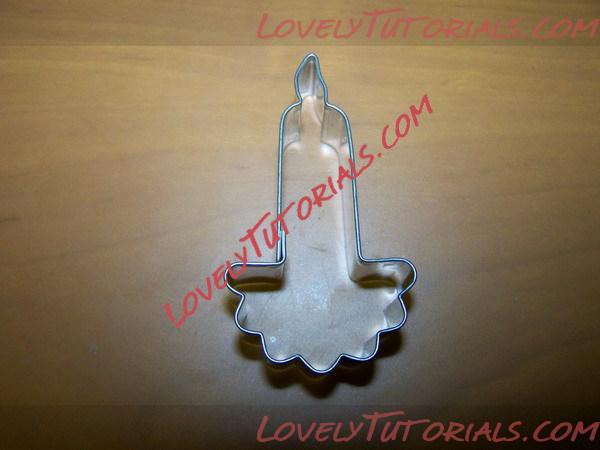
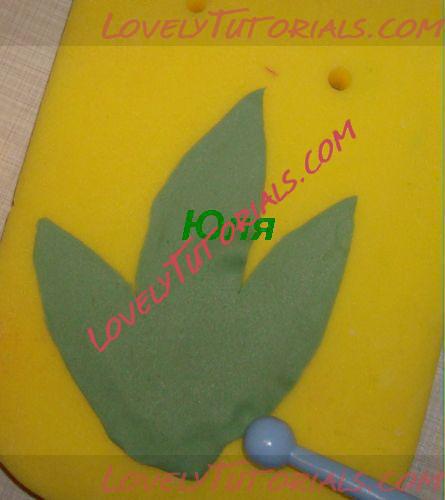
Tady je dalإ،أ moإ¾nost pouإ¾itأ neoriginأ،lnأ vykrajovaؤچky na pivoإˆku pإ¯vodnؤ› to byla vأ،noؤچnأ svأؤچka
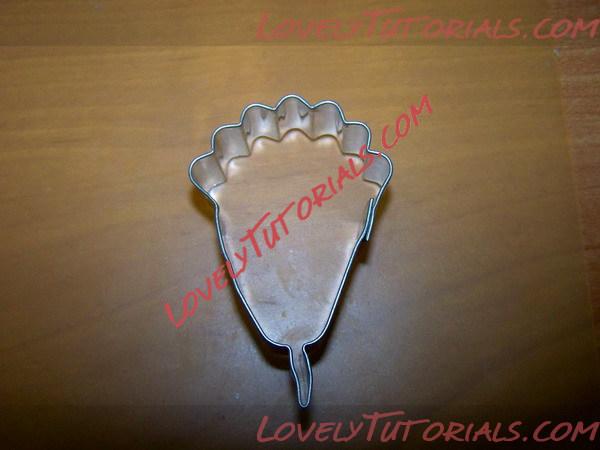
tady je po mأ©m zأ،kroku
|

27.07.2011, 11:38
|
|
ذگذ´ذ¼ذ¸ذ½ذ¸رپر‚ر€ذ°ر‚ذ¾ر€
|
|
ذ ذµذ³ذ¸رپر‚ر€ذ°ر†ذ¸رڈ: 07.09.2010
ذ،ذ¾ذ¾ذ±ر‰ذµذ½ذ¸ذ¹: 7,940
|
|
|

31.07.2011, 13:37
|
|
ذگذ´ذ¼ذ¸ذ½ذ¸رپر‚ر€ذ°ر‚ذ¾ر€
|
|
ذ ذµذ³ذ¸رپر‚ر€ذ°ر†ذ¸رڈ: 07.09.2010
ذ،ذ¾ذ¾ذ±ر‰ذµذ½ذ¸ذ¹: 7,940
|
|

رپذ؟ذ°رپذ¸ذ±ذ¾ ذ¾ذ³ر€ذ¾ذ¼ذ½ذ¾ذµ ذ®ذ»ذ¸ذ¸ ذ’ذ°ذ³ذ½ذµر€ ذ·ذ° ذœذڑ
ذœذگذ،ذ¢ذ•ذ -ذڑذ›ذگذ،ذ،. ذ¦ذ’ذ•ذ¢ذذڑ ذںذکذذذگ ذ±ذµذ· رپذ؟ذµر†ذ¸ذ°ذ»رŒذ½ر‹ر… ر„ذ¾ر€ذ¼ذ¾ر‡ذµذ؛.
ذ،ذ´ذµذ»ذ°ذµذ¼ ر†ذ²ذµر‚ذ¾ذ؛ ذ؟ذ¸ذ¾ذ½ذ° ذ؟ر€ذ¸ ذ؟ذ¾ذ¼ذ¾ر‰ذ¸ ذ¾ذ±ر‹ر‡ذ½ذ¾ذ¹ ر„ذ¾ر€ذ¼ذ¾ر‡ذ؛ذ¸ ذ´ذ»رڈ ذ؟ذµر‡ذµذ½رŒرڈ ذ² ذ²ذ¸ذ´ذµ رپذµر€ذ´ذµر‡ذ؛ذ°, ذ° ر‚ذ°ذ؛ذ¶ذµ ذ¾ذ±ر‹ر‡ذ½ر‹ر… ر‚ر€ذ°ر„ذ°ر€ذµر‚ذ¾ذ² ذ¸ذ· ذ¾ذ±ر‹ر‡ذ½ذ¾ذ¹ ذ؟ذ»ذ¾ر‚ذ½ذ¾ذ¹ ذ±رƒذ¼ذ°ذ³ذ¸. ذر‚ذ¸ذ¼ ذ¶ذµ رپذµر€ذ´ذµر‡ذ؛ذ¾ذ¼ رپر€ذµذ·ذ°ذµذ¼ ذ؟ذ¾ ذ؛ر€ذ°رژ ذ؛رƒرپذ¾ر‡ذ؛ذ¸ ذ¼ذ°رپر‚ذ¸ذ؛ذ¸, ذ؛ذ°ذ؛ ذ؟ذ¾ذ؛ذ°ذ·ذ°ذ½ذ¾ ذ½ذ° ر„ذ¾ر‚ذ¾.
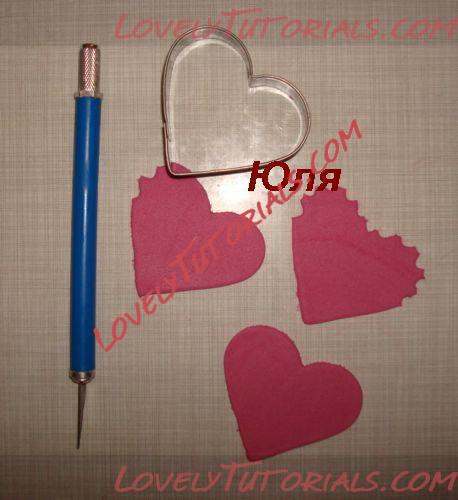
ذ”ذ»رڈ ذ؟ذµر€ذ²ذ¾ذ³ذ¾ رپذ»ذ¾رڈ ذ¼ذ¾ذ¶ذ½ذ¾ ذ½ذµذ¼ذ½ذ¾ذ³ذ¾ ذ؟ذ¾ذ´ر€ذµذ·ذ°ر‚رŒ ذ»ذµذ؟ذµرپر‚ذ؛ذ¸( ذ¼ذ¾ذ¶ذ½ذ¾ ذ¸ ذ½ذµ ذ؟ذ¾ذ´ر€ذµذ·ذ°ر‚رŒ), ذ؛ذ¾ذ¼رƒ ذ؛ذ°ذ؛ رƒذ³ذ¾ذ´ذ½ذ¾.
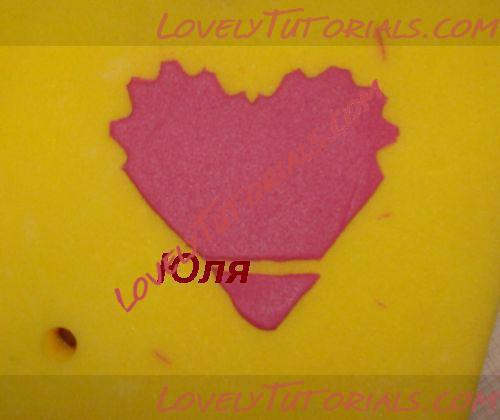
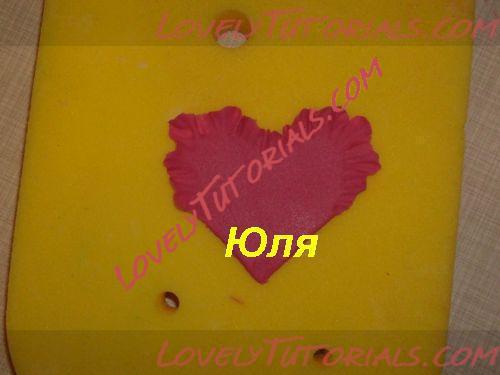
ذںر€ذ¸ ذ؟ذ¾ذ¼ذ¾ر‰ذ¸ ذ؟ذ°ذ»ذ¾ر‡ذ؛ذ¸ ذ²ذ¾ر‚ ر‚ذ°ذ؛ذ¾ذ¹ ذ¸ذ»ذ¸ ذ¾ذ±ر€ذ°ر‚ذ½ذ¾ذ¹ رپر‚ذ¾ر€ذ¾ذ½ذ¾ذ¹ ر€رƒر‡ذ؛ذ¸ ذ؛ذ¸رپر‚ذ¾ر‡ذ؛ذ¸, ذ³ذ´ذµذ¾ذ؛ر€رƒذ³ذ»ذ°رڈ ذ؟ذ¾ذ²ذµر€ر…ذ½ذ¾رپر‚رŒ ذ´ذµذ»ذ°ذµذ¼ ر‚ذ°ذ؛ذ¸ذµ ر€ذ°ذ·ذ³ذ»ذ°ذ¶ذ¸ذ²ذ°رژر‰ذ¸ذµ ذ´ذ²ذ¸ذ¶ذµذ½ذ¸رڈ ذ؟ذ¾ ذ؛ر€ذ°رڈذ¼, ذ؟ذ¾ذ»رƒر‡ذ°ذµذ¼ ر‚ذ°ذ؛ذ¸ذµ "ر€رژرˆذ¸".
[attachment=196  2.JPG]
ذ’ذ¾ر‚ ر‡ر‚ذ¾ ذ؟ذ¾ذ»رƒر‡ذ¸ذ»ذ¾رپرŒ ذ² ذ¸ر‚ذ¾ذ³ذµ.
ذ”ذµذ»ذ°ذµذ¼ ر€ذµذ»رŒذµر„ ذ؟ر€ذ¸ ذ؟ذ¾ذ¼ذ¾ر‰ذ¸ رپذ¸ذ»ذ¸ذ؛ذ¾ذ½ذ° ذ¸ذ»ذ¸ ذ²ذ¾ر‚ ر‚ذ°ذ؛ذ¾ذ¹ رˆر‚رƒر‡ذ؛ذ¸.
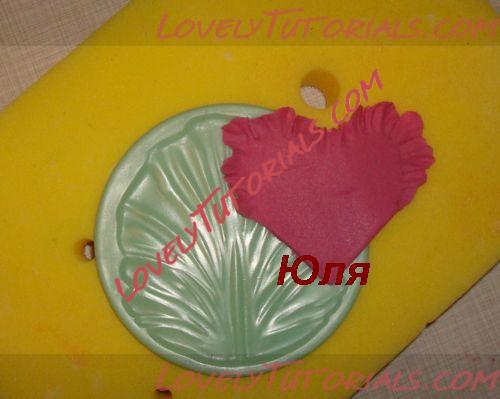
ذ،ذ²ذµر€ر…رƒ ذ؟ذ°ذ»ذ¾ر‡ذ؛ذ¾ذ¹ ذ´ذµذ»ذ°ذµذ¼ ر‚ذ¾ذ¶ذµ ذ±ذ¾ر€ذ¾ذ·ذ´ذ؛ذ¸, ذ؟ر€ذ¸ذ´ذ°ذ²ذ°رڈ ر€ذµذ»رŒذµر„.
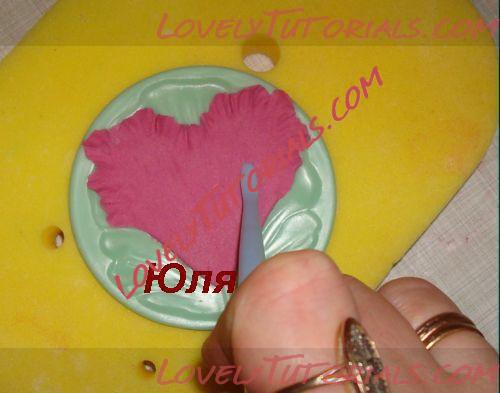
ذ’ذ¾ر‚ ر‡ر‚ذ¾ ذ؟ذ¾ذ»رƒر‡ذ°ذµر‚رپرڈ( رپ ذ´ذ²رƒر… رپر‚ذ¾ر€ذ¾ذ½ ذ±رƒذ´ذµر‚ ر€ذµر„ذ»ذµذ½ذ°رڈ ذ؟ذ¾ذ²ذµر€ر…ذ½ذ¾رپر‚رŒ.
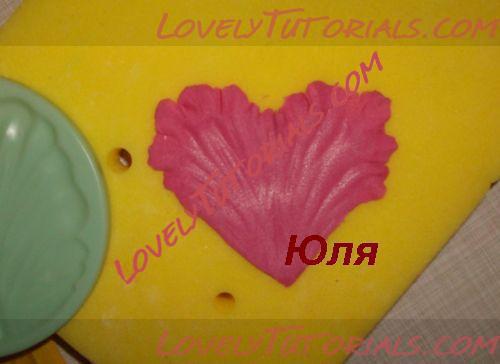
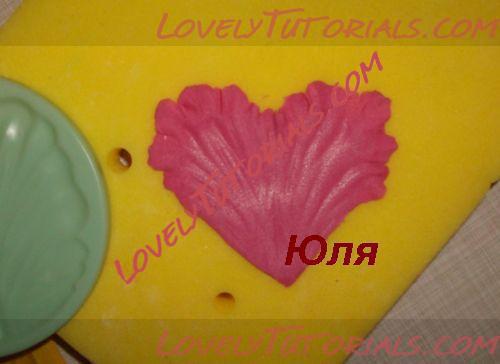
ذ—ذ°ر€ذ°ذ½ذµذµ رپذ´ذµذ»ذ°ذµذ¼ ذ·ذ°ذ³ذ¾ر‚ذ¾ذ²ذ؛رƒ, رپذ؛ذ°ر‚ذ°ذµذ¼ رˆذ°ر€ذ¸ذ؛ ذ¸ذ· ذ¼ذ°رپر‚ذ¸ذ؛ذ¸, ذ؛ر€ذ°ذ¹ ذ؟ر€ذ¾ذ²ذ¾ذ»ذ¾ذ؛ذ¸ ذ·ذ°ذ³ذ½ذµذ¼ ذ² ذ؛ر€رژر‡ذ¾ذ؛, ذ²رپر‚ذ°ذ²ذ¸ذ¼ ذ² رˆذ°ر€ذ¸ذ؛ ذ¸ ذ±رƒذ´ذµذ¼ رپرƒرˆذ¸ر‚رŒ رپرƒر‚ذ؛ذ¸-ذ´ذ²ذ¾ذµ!
ذںذ¾ر‚ذ¾ذ¼ رپذ¼ذ°ذ¶ذµذ¼ ذ±ذµذ»ذ؛ذ¾ذ¼ ذ¸ذ»ذ¸ ذ²ذ¾ذ´ذ¾ذ¹ ذ¸ذ»ذ¸ ذ؛ذ»ذµذµذ¼ ذ،ذœذ، رچر‚ذ¾ر‚ رˆذ°ر€ذ¸ذ؛ ذ¸ ذ±رƒذ´ذµذ¼ ذ؟ر€ذ¸ذ؛ذ»ذµذ¸ذ²ذ°ر‚رŒ ذ»ذµذ؟ذµرپر‚ذ؛ذ¸.
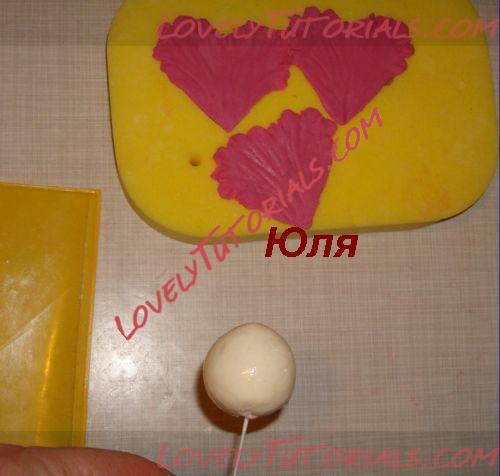
ذر‚ذ´ذµذ»رŒذ½ذ¾ رپذ´ذµذ»ذ°ذµذ¼ ذ´ذµر‚ذ°ذ»ذ¸ ذ´ذ»رڈ ذ½ذ°ر€رƒذ¶ذ½ذµذ³ذ¾ رپذ»ذ¾رڈ ذ»ذµذ؟ذµرپر‚ذ؛ذ¾ذ² ذ؟ذ¸ذ¾ذ½ذ°. ذ’ذ¾ر‚ذ؛ذ½ذµذ¼ ذ°ذ؛ذ؛رƒر€ذ°ر‚ذ½ذ¾ ذ؟ر€ذ¾ذ²ذ¾ذ»ذ¾ذ؛رƒ, ذ²ر‹رپرƒرˆذ¸ر‚رŒ ذ¸ذ»ذ¸ ذ½ذ° رپذ»ذ¾ذ¶ذµذ½ذ½ر‹ر… ذ²ذ¾ر‚ ر‚ذ°ذ؛ذ¸ذ¼ ذ¾ذ±ر€ذ°ذ·ذ¾ذ¼ رپذ°ذ»ر„ذµر‚ذ؛ذ°ذ¼ ذ¸ذ»ذ¸ ذ½ذ° ر‡ذµذ¼-ر‚ذ¾ ذ´ر€رƒذ³ذ¾ذ¼, ذ؟ر€ذ¸ذ´ذ°ذ´ذ¸ذ¼ رپذ»ذµذ³ذ؛ذ° ذ¸ذ·ذ¾ذ³ذ½رƒر‚رƒرژ ر„ذ¾ر€ذ¼رƒ, ذ؛ذ°ذ؛ ذ؟ذ¾ذ؛ذ°ذ·ذ°ذ½ذ¾ ذ½ذ° ر„ذ¾ر‚ذ¾. ذ‘رƒذ´ذµذ¼ رپرƒرˆذ¸ر‚رŒ رپرƒر‚ذ؛ذ¸!! ذ§ذµذ¼ ذ´ذ¾ذ»رŒرˆذµ رپذ¾ر…ذ½رƒر‚ ذ´ذµر‚ذ°ذ»ذ¸, ر‚ذµذ¼ ذ»رƒر‡رˆذµ!
ذ¥ذ¾ر€ذ¾رˆذ¾ ذ²ر‹رپذ¾ر…رˆذ¸ذµ ذ´ذµر‚ذ°ذ»ذ¸ ذ±رƒذ´ذµذ¼ ر‚ذ¾ذ½ذ¸ر€ذ¾ذ²ذ°ر‚رŒ ذ؟ذ¾ر€ذ¾رˆذ؛ذ¾ذ¼ ( ذ؛ر€ذ°رڈ ذ¸ ذ½ذµذ¼ذ½ذ¾ذ³ذ¾ ذ؟ذ¾رپذµر€ذµذ´ذ¸ذ½ذµ ذ»ذµذ؟ذµرپر‚ذ؛ذ°), رڈ ذ²ذ·رڈذ»ذ° ذ¾ر‚ر‚ذµذ½ذ¾ذ؛ ذ½ذµذ¼ذ½ذ¾ذ³ذ¾ ر‚ذµذ¼ذ½ذµذµ, ر‡ذµذ¼ ر†ذ²ذµر‚ رپذ°ذ¼ذ¾ذ³ذ¾ ذ»ذµذ؟ذµرپر‚ذ؛ذ°. ذںذ¾ر‚ذ¾ذ¼ ذ¾ذ±رڈذ·ذ°ر‚ذµذ»رŒذ½ذ¾ ذ·ذ°رˆذ؟ذ°ر€ذ¸ذ¼ ذ½ذ°ذ´ رپر‚ر€رƒذµذ¹ ذ؟ذ°ر€ذ° ذ¸ ذ¾رپر‚ذ°ذ²ذ¸ذ¼ رپرƒرˆذ¸ر‚رŒ ذ´ذ¾ ذ؟ذ¾ذ»ذ½ذ¾ذ³ذ¾ ذ²ر‹رپر‹ر…ذ°ذ½ذ¸رڈ!!!
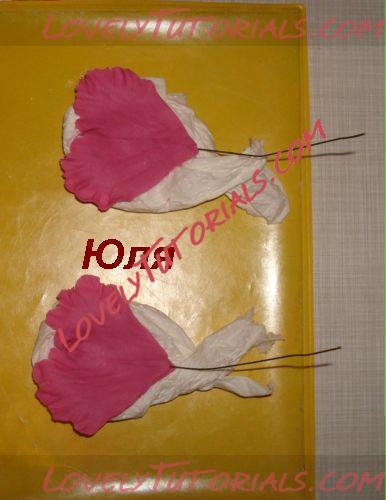
ذ’ذ¾ر‚ ذ؛ذ°ذ؛ ذ²ر‹ذ³ذ»رڈذ´رڈر‚ ذ·ذ°رˆذ؟ذ°ر€ذµذ½ذ½ر‹ذµ ذ»ذµذ؟ذµرپر‚ذ؛ذ¸.
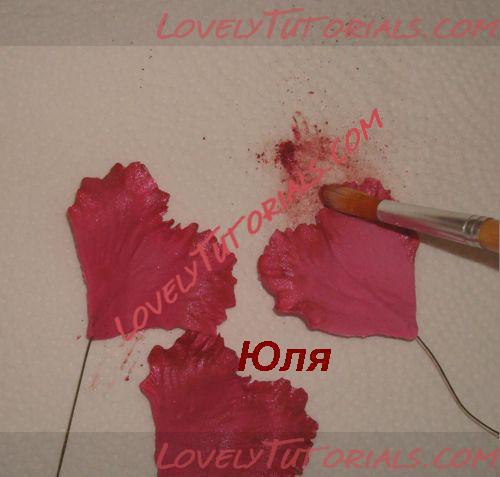
ذ”ذ»رڈ ذ؟ذµر€ذ²ذ¾ذ³ذ¾ رپذ»ذ¾رڈ ذ½ذ°ذ¼ ذ؟ذ¾ذ½ذ°ذ´ذ¾ذ±ذ¸ر‚رپرڈ ر‚ر€ذ¸ ذ»ذµذ؟ذµرپر‚ذ؛ذ°, ذ½ذ°ذ؛ذ»ذ°ذ´ر‹ذ²ذ°ذµذ¼ ذ¾ذ´ذ¸ذ½ ذ½ذ° ذ´ر€رƒذ³ذ¾ذ¹ , ذ؛ذ°ذ؛ ذ؟ذ¾ذ؛ذ°ذ·ذ°ذ½ذ¾ ذ½ذ° ر„ذ¾ر‚ذ¾ ذ¸ ذ¾ذ±ذ²ذ¾ر€ذ°ر‡ذ¸ذ²ذ°ذµذ¼ ذ½ذ°رˆ رˆذ°ر€ذ¸ذ؛ ذ¸ذ· ذ¼ذ°رپر‚ذ¸ذ؛ذ¸, ذ؛ر€ذ°رڈ ذ»ذµذ؟ذµرپر‚ذ؛ذ¾ذ¼ رپذ¼ذ°رˆذµذ¼ ذ²ذ¾ذ´ذ¾ذ¹ ذ¸ذ»ذ¸ ذ±ذµذ»ذ؛ذ¾ذ¼ ذ¸ذ»ذ¸ ذ؛ذ»ذµذµذ¼ ذ،ذœذ،.
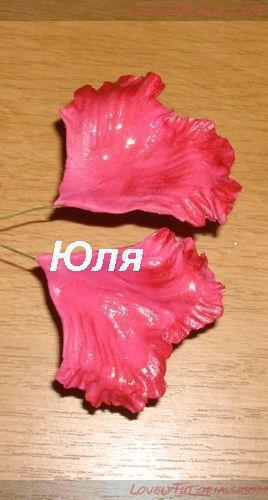
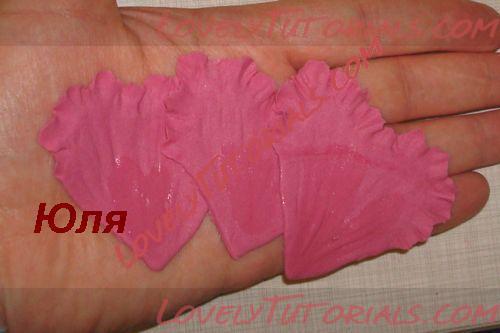
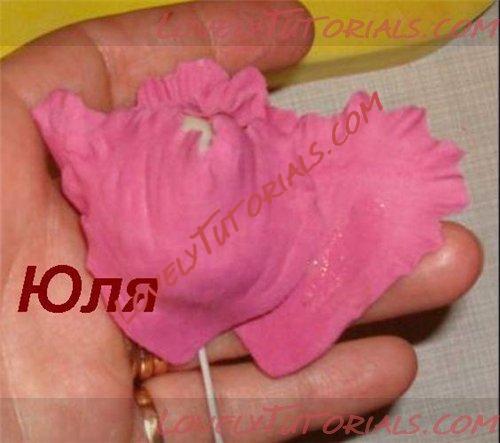
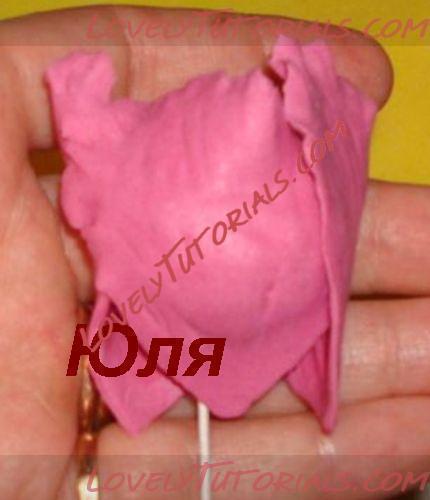
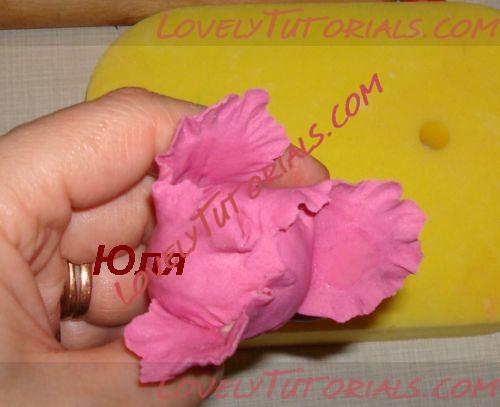
ذ”ذ»رڈ ذ²ر‚ذ¾ر€ذ¾ذ³ذ¾ رپذ»ذ¾رڈ ذ؟ذ¾ذ½ذ°ذ´ذ¾ذ±ذ¸ر‚رپرڈ 4 ذ»ذµذ؟ذµرپر‚ذ؛ذ°, ذ²رپذµ ذ´ذµذ»ذ°ذµذ¼ ذ؟ذ¾ ر‚ذ°ذ؛ذ¾ذ¼رƒ ذ¶ذµ ذ؟ر€ذ¸ذ½ر†ذ¸ذ؟رƒ . ذںر€ذ¸ذ؛ذ»ذµذ¸ذ²ذ°رڈ ذ»ذµذ؟ذµر‚ذ؛ذ¸, ر€ذ°رپذ؟ر€ذ°ذ²ذ»رڈذµذ¼ ذ؛ر€ذ°رڈ ذ² ر€ذ°ذ·ذ½ر‹ذµ رپر‚ذ¾ر€ذ¾ذ½ر‹, ذ؟ر€ذ¸ذ´ذ°ذ²ذ°رڈ ذ¸ذ·ذ¾ذ³ذ½رƒر‚ذ¾رپر‚رŒ ذ² ر€ذ°ذ·ذ½ر‹ر… ذ½ذ°ذ؟ر€ذ°ذ²ذ»ذµذ½ذ¸رڈر….
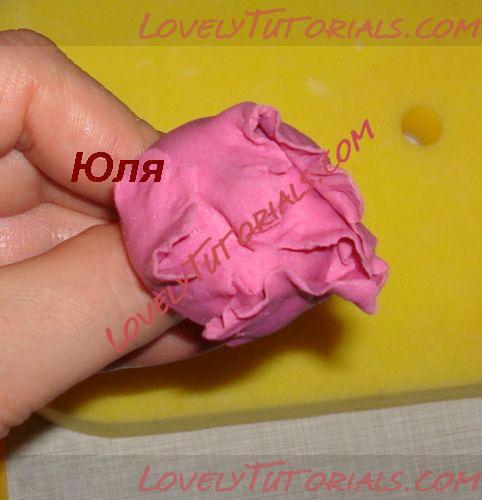
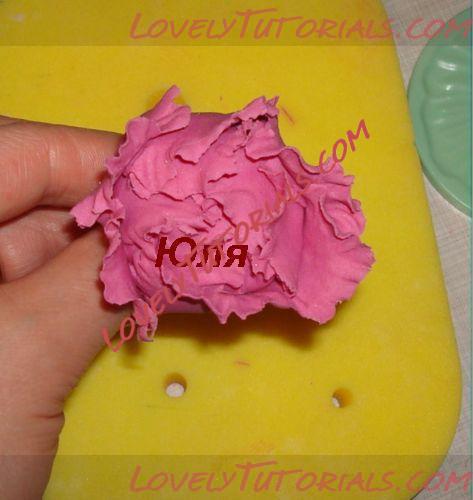
ذ”ذ»رڈ ر‚ر€ذµر‚رŒذµذ³ذ¾ رپذ»ذ¾رڈ ذ؟ذ¾ذ½ذ°ذ´ذ¾ذ±ذ¸ر‚رپرڈ 5 ذ»ذµذ؟ذµرپر‚ذ؛ذ¾ذ², ذ´ذ»رڈ ذ؟ذ¾رپذ»ذµذ´ذ½ذµذ³ذ¾ ذ½ذ¸ذ¶ذ½ذµذ³ذ¾ رڈ ذ´ذµذ»ذ°ذ»ذ° 6 ذ»ذµذ؟ذµرپر‚ذ؛ذ¾ذ² ذ½ذ° ذ؟ر€ذ¾ذ²ذ¾ذ»ذ¾ذ؛ذµ.
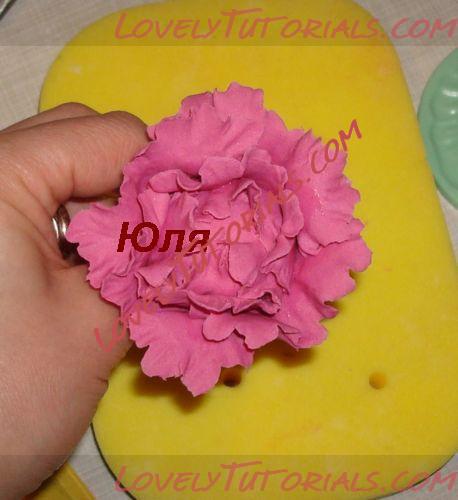
ذڑذ¾ذ³ذ´ذ° ذ؟ر€ذ¸ذ؛ر€ذµذ؟ذ¸ذ»ذ¸ 3 رپذ»ذ¾رڈ ذ»ذµذ؟ذµرپر‚ذ؛ذ¾ذ² ,ذ¾رپر‚ذ°ذ²ذ¸ذ¼ ذ½ذ°رˆ ر†ذ²ذµر‚ذ¾ذ؛ رپذ¾ر…ذ½رƒر‚رŒ ذ½ذ° رپرƒر‚ذ؛ذ¸. ذںذ¾ر‚ذ¾ذ¼ ذ²ر‹رپذ¾ر…رˆذ¸ذ¹ ذ·ذ°ر‚ذ¾ذ½ذ¸ر€رƒذµذ¼ ذ؟ذ¾ر€ذ¾رˆذ؛ذ¾ذ²ذ¾ذ¹ ذ؛ر€ذ°رپذ؛ذ¾ذ¹ ذ؟ر€ذ¸ ذ؟ذ¾ذ¼ذ¾ر‰ذ¸ ذ؛ذ¸رپر‚ذ¾ر‡ذ؛ذ¸ ( ذ؛ر€ذ°رڈ ذ¸ رپذ»ذµذ³ذ؛ذ° رپذµر€ذ´ر†ذµذ²ذ¸ذ½ذ؛رƒ). ذ—ذ°رˆذ؟ذ°ر€ذ¸ذ¼ ذ½ذ°ذ´ ذ؟ذ°ر€ذ¾ذ¼ ذ¸ ذ¾ذ؟رڈر‚رŒ ذ¾رپر‚ذ°ذ²ذ»رڈذµذ¼ رپذ¾ر…ذ½رƒر‚رŒ ذ´ذ¾ ذ؟ذ¾ذ»ذ½ذ¾ذ³ذ¾ ذ²ر‹رپر‹ر…ذ°ذ½ذ¸رڈ. ذ—ذ°ر‚ذµذ¼ ذ؟ر€ذ¸ذ؛ر€رƒر‚ذ¸ذ¼ 6 ذ»ذµذ؟ذµر‚رپذ؛ذ¾ذ² ذ½ذ° ذ؟ر€ذ¾ذ²ذ¾ذ»ذ¾ذ؛ذµ ذ؛ ذ½ذ°رˆذµذ¼رƒ ذ؟ذ¸ذ¾ذ½رƒ ذ؟ر€ذ¸ ذ؟ذ¾ذ¼ذ¾ر‰ذ¸ ر„ذ»ذ¾ر€ذ¸رپر‚ذ¸ر‡ذµرپذ؛ذ¾ذ¹ ذ»ذµذ½ر‚ر‹( رƒ ذ؛ذ¾ذ³ذ¾ ذ½ذµر‚ ذµذµ, ذ¼ذ¾ذ¶ذ½ذ¾ ذ²ذ·رڈر‚رŒ ذ¼ذµذ´ذ¸ر†ذ¸ذ½رپذ؛ذ¸ذ¹ ذ±ذµذ»ر‹ذ¹ ذ»ذµذ¹ذ؛ذ¾ذ؟ذ»ذ°رپر‚ر‹ر€رŒ, ذ½ذ°ر€ذµذ·ذ°ر‚رŒ ذ½ذ° ذ¼ذµذ»ذ؛ذ¸ذµ ذ؟ذ¾ذ»ذ¾رپذ؛ذ¸ ذ¸ ذ؟ر€ذ¸ ذ؟ذ¾ذ¼ذ¾ر‰ذ¸ ذ¸ر… ذ؟ر€ذ¸ذ؛ر€رƒر‚ذ¸ر‚رŒ ذ»ذµذ؟ذµرپر‚ذ؛ذ¸, ذ؟ذ¾ذ؛ر€ذ°رپذ¸ر‚رŒ ذ»ذµذ¹ذ؛ذ¾ذ؟ذ»ذ°رپر‚ر‹ر€رŒ رپذ²ذµر€ر…رƒ ذ·ذµذ»ذµذ½ذ¾ذ¹ ذ؛ر€ذ°رپذ؛ذ¾ذ¹, ذ´ذ°ذ¶ذµ ذ·ذµذ»ذµذ½ذ؛ذ¾ذ¹ ذ¼ذ¾ذ¶ذ½ذ¾).
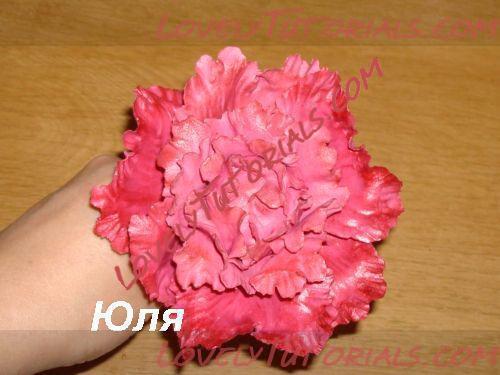
ذ›ذ¸رپر‚رŒرڈ ذ´ذ»رڈ ذ؟ذ¸ذ¾ذ½ذ°:
ذ’ر‹ر€ذµذ·ذ°ذµذ¼ ذ½ذ°رˆ ذ»رژذ±ذ¸ذ¼ر‹ذ¹ ر‚ر€ذ°ر„ذ°ر€ذµر‚.

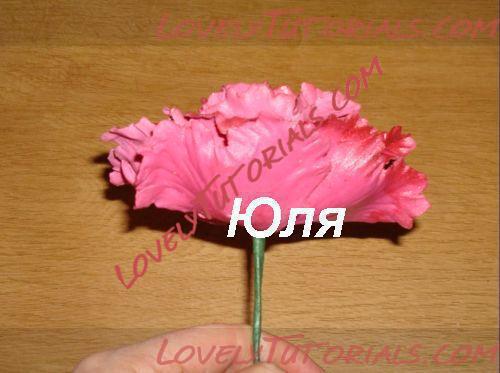
ذںر€ذ¸ ذ؟ذ¾ذ¼ذ¾ر‰ذ¸ ذ·رƒذ±ذ¾ر‡ذ¸رپر‚ذ؛ذ¸ ذ´ذµذ»ذ°ذµذ¼ (ذ¾رپر‚ذ¾ر€ذ¾ذ¶ذ½ذ¾ , ر‡ر‚ذ¾ذ±ر‹ ذ½ذµ ذ؟ر€ذ¾ر‚ذ؛ذ½رƒر‚رŒ!)ر‚ذ°ذ؛ذ¸ذµ" ذ؟ر€ذ¾ذ¶ذ¸ذ»ذ؛ذ¸".
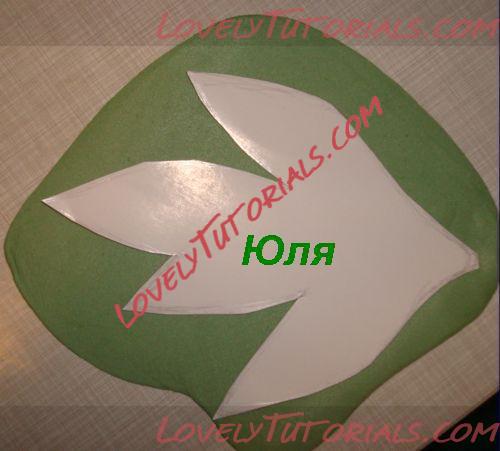
ذ¨ذ°ر€ذ¸ذ؛ذ¾ذ¼ ذ²ر‹ذ؛ذ°ر‚ر‹ذ²ذ°ذµذ¼ ذ؛ر€ذ°رڈ ( رƒ ذ؛ذ¾ذ³ذ¾ ذ½ذµر‚ رپذ؟ذµر†ذ¸ذ°ذ»رŒذ½ذ¾ذ¹ ذ؟ذ°ذ»ذ¾ر‡ذ؛ذ¸, رڈ ذ±ر€ذ°ذ»ذ° ذ؟ذ°ذ»ذ¾ر‡ذ؛رƒ ذ¾ر‚ ذ´ذµر‚رپذ؛ذ¾ذ³ذ¾ ذ±ذ°ر€ذ°ذ±ذ°ذ½ذ°) ذ½ذ° ذ؟ذ°ر€ذ¾ذ»ذ¾ذ½ذµ ذ¸ذ»ذ¸ ر‡ذµذ¼-ر‚ذ¾ ذ¼رڈذ³ذ؛ذ¾ذ¼, رƒر‚ذ¾ذ½ر‡ذ°رڈ ذ¸ر… ذ¸ ذ؟ر€ذ¸ذ´ذ°ذµذ¼ ذ½ذµذ±ذ¾ذ»رŒرˆرƒرژ ذ²ذ¾ذ»ذ½ذ¸رپر‚ذ¾رپر‚رŒ.
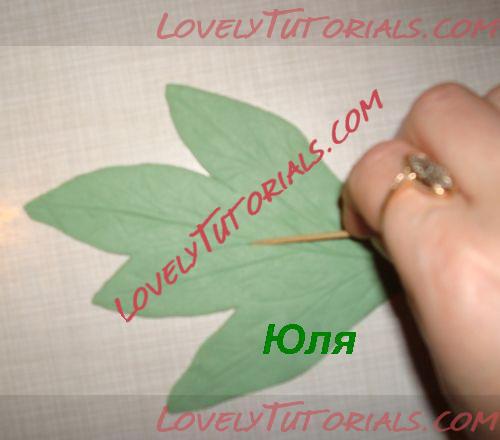
ذ”ذµذ»ذ°ذµذ¼ ر€ذ°ذ·ذ½ذ¾ذ¹ ر„ذ¾ر€ذ¼ر‹ ذ»ذ¸رپر‚ذ¾ر‡ذ؛ذ¸, ذ²رپذµ ذ؟ذ¾ ذ¾ذ´ذ½ذ¾ذ¼رƒ ذ؟ر€ذ¸ذ½ر†ذ¸ذ؟رƒ. ذںذ¾ر‚ذ¾ذ¼ ذ¾رپر‚ذ¾ر€ذ¾ذ¶ذ½ذ¾ ذ²ر‚ر‹ذ؛ذ°ذµذ¼ ذ؟ر€ذ¾ذ²ذ¾ذ»ذ¾ذ؛رƒ( 20 ذ½ذ¾ذ¼ذµر€), رƒذ؛ذ»ذ°ذ´ر‹ذ²ذ°ذµذ¼ رپرƒرˆذ¸ر‚رŒ ذ½ذ°رˆذ¸ ذ»ذ¸رپر‚رŒرڈ ذ½ذ° رپذ¾ذ»ذ¾ذ¼ذ؛رƒ ر„ذ»ذ¾ر€ذ¸رپر‚ذ¸ر‡ذµرپذ؛رƒرژ ذ¸ذ»ذ¸ رپذ¼رڈر‚ر‹ذµ رپذ°ذ»ر„ذµر‚ذ؛ذ¸ ذ½ذ° رپرƒر‚ذ؛ذ¸!
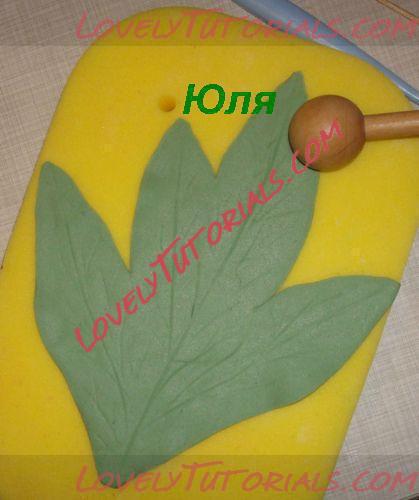
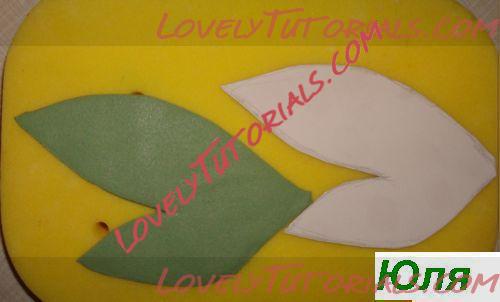
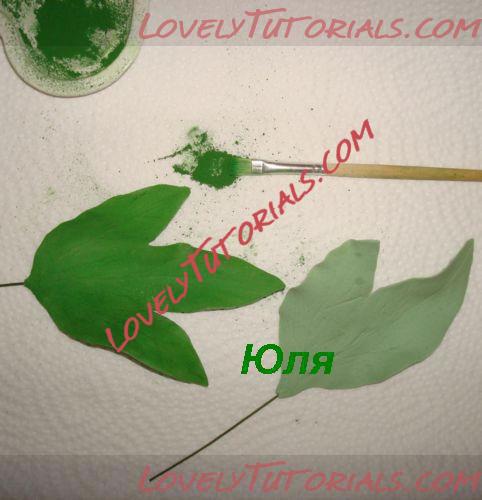
ذ¥ذ¾ر€ذ¾رˆذ¾ ذ²ر‹رپذ¾ر…رˆذ¸ذµ ذ»ذµذ؟ذµرپر‚ذ؛ذ¸ رڈ ر‚ذ¾ذ½ذ¸ر€ذ¾ذ²ذ°ذ»ذ° رپذ²ذµر€ر…رƒ ذ؟ذ¾ر€ذ¾رˆذ؛ذ¾ذ²ذ¾ذ¹ ذ؛ر€ذ°رپذ؛ذ¾ذ¹ ذ±ذ¾ذ»ذµذµ رڈر€ذ؛ذ¾ذ³ذ¾ ذ·ذµذ»ذµذ½ذ¾ذ³ذ¾ ذ¾ر‚ر‚ذµذ½ذ؛ذ° ذ؟ر€ذ¸ ذ؟ذ¾ذ¼ذ¾ر‰ذ¸ ذ؛ذ¸رپر‚ذ¾ر‡ذ؛ذ¸. ذںذ¾ر‚ذ¾ذ¼ ذ·ذ°رˆذ؟ذ°ر€ذ¸ذ»ذ° ( ذ¾ذ±رڈذ·ذ°ر‚ذµذ»رŒذ½ذ¾! ) ذ¾رپر‚ذ¾ر€ذ¾ذ¶ذ½ذ¾ ذ½ذ°ذ´ ذ؟ذ°ر€ذ¾ذ¼( ذ½ذµرپذ؛ذ¾ذ»رŒذ؛ذ¾ رپذµذ؛رƒذ½ذ´, ذ½ذ° ر€ذ°رپرپر‚ذ¾رڈذ½ذ¸ذ¸ 15-20 رپذ¼ ذ¾ر‚ ذ½ذ¾رپذ¸ذ؛ذ° ر‡ذ°ذ¹ذ½ذ¸ذ؛ذ°) ذ¸ ذ¾رپر‚ذ°ذ²ذ¸ذ»ذ° رپرƒرˆذ¸ر‚رŒ ذ´ذ¾ ذ؟ذ¾ذ»ذ½ذ¾ذ³ذ¾ ذ²ر‹رپر‹ر…ذ°ذ½ذ¸رڈ.

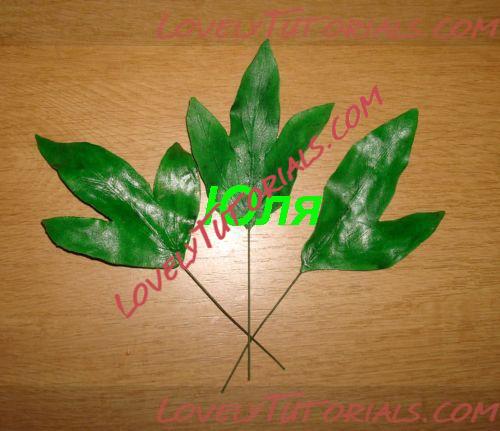
ذ’ذ¾ر‚ ر‡ر‚ذ¾ ذ؟ذ¾ذ»رƒر‡ذ¸ذ»ذ¾رپرŒ رƒ ذ½ذ°رپ.
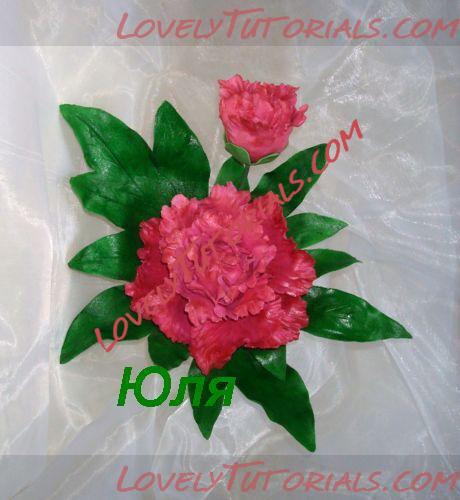
ذ،ذ¾ذ±ذ¸ر€ذ°ذµذ¼ ذ±رƒذ؛ذµر‚ذ¸ذ؛.
|

03.08.2011, 15:07
|
|
ذگذ´ذ¼ذ¸ذ½ذ¸رپر‚ر€ذ°ر‚ذ¾ر€
|
|
ذ ذµذ³ذ¸رپر‚ر€ذ°ر†ذ¸رڈ: 07.09.2010
ذ،ذ¾ذ¾ذ±ر‰ذµذ½ذ¸ذ¹: 7,940
|
|
|

08.11.2011, 18:30
|
|
ذگذ´ذ¼ذ¸ذ½ذ¸رپر‚ر€ذ°ر‚ذ¾ر€
|
|
ذ ذµذ³ذ¸رپر‚ر€ذ°ر†ذ¸رڈ: 07.09.2010
ذ،ذ¾ذ¾ذ±ر‰ذµذ½ذ¸ذ¹: 7,940
|
|
|

29.01.2012, 18:01
|
|
ذگذ´ذ¼ذ¸ذ½ذ¸رپر‚ر€ذ°ر‚ذ¾ر€
|
|
ذ ذµذ³ذ¸رپر‚ر€ذ°ر†ذ¸رڈ: 07.09.2010
ذ،ذ¾ذ¾ذ±ر‰ذµذ½ذ¸ذ¹: 7,940
|
|

ذذ³ر€ذ¾ذ¼ذ½ذ°رڈ ذ±ذ»ذ°ذ³ذ¾ذ´ذ°ر€ذ½ذ¾رپر‚رŒ Cristy ذ·ذ° ذœذڑ
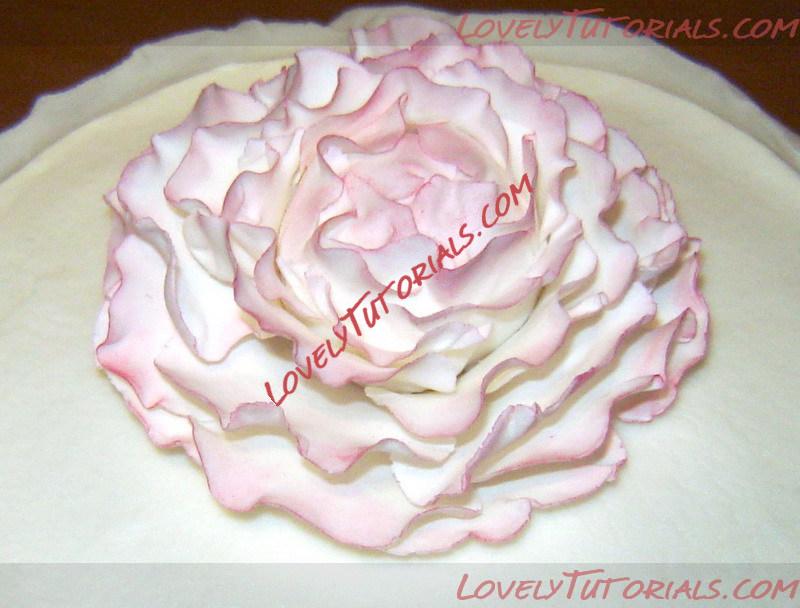
I call this a “whimsical†peony because it’s not a true peony. I did not wire the petals, use the special “peony†cutters or anything fancy like that. Basically I just winged it using the cutters and materials I had on hand.
Supplies:
Gumpaste – white
Pink or Red Petal Dust- I used Poppy Red petal dust. When applied lightly it makes a hot pink.
Stencil brush or stiff paint brush - dedicated to cake decorating
Small rolling pin
Paint brushes – dedicated to cake decorating
Pasta attachment for KA – optional but helpful
Small Bowl
Corn starch puff
Ball Tool
Foam piece – I use the one that came in the Wilton Gumpaste flower kit
Gum glue – gumtex powdered dissolved in hot water
Instructions:
Begin by deciding what size flower you would like to make. This will determine the size of the center of your flower and which size 5 petal cutter you will need to use. In my case I used the 75 mm FMM 5 petal cutter but any 5 petal cutter will do.
Step 1: Roll a ball slightly bigger than the center of your 5 petal cutter. I accidently rolled the ball a bit too big and struggled to g 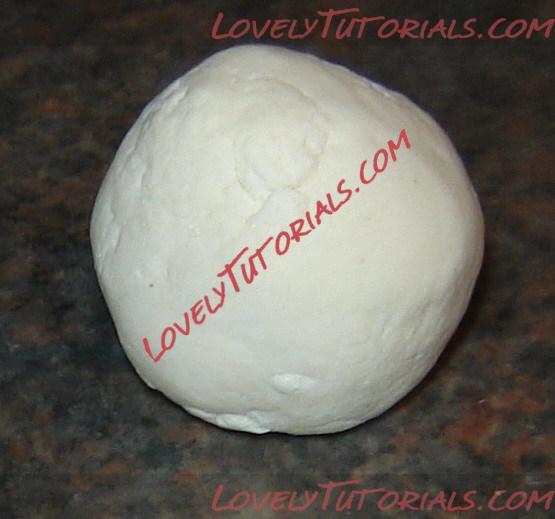 et the petals to wrap all the way around to the top (you’ll see my make shift solution to this later on). Let the ball dry. In a perfect world you would let it dry overnight. I didn’t have that much time so I used the tip below:
Tip of the week: To dry fondant or gumpaste cutouts and figures quickly, place them on a cookie sheet lined with parchment paper and turn the oven light on. The oven light makes just enough heat to dry out the gumpaste or fondant but not melt your figures. Just be careful noone turns the oven on while you’re drying your items.
While the ball 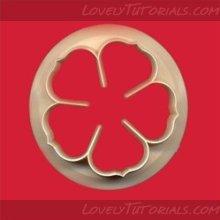 is drying, roll out a piece of remaining gumpaste very thin. I use my pasta attachment on a setting 4 for flowers. This makes very delicate petals. Using the 5 petal cutter, cut out one layer of petals and place the remaining gumpaste under plastic wrap to keep it from drying out. Place the petal cutout on a thin piece of foam, and using the ball tool thin out the edges of each petal. This is done by running the ball tool along the edge of the petal (with the ball being half on the foam and half on the petal). 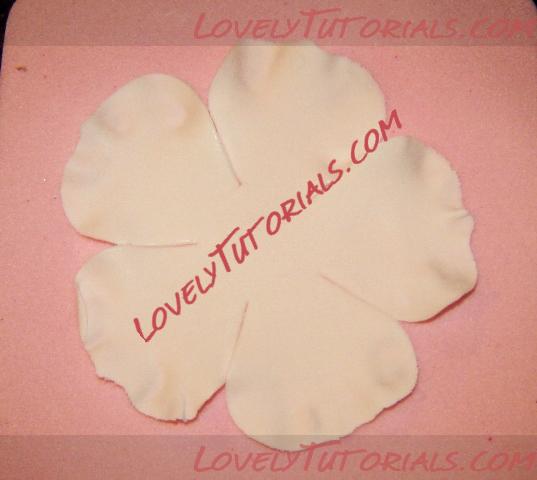 If your ball tool sticks, tap it on your corn starch puff and try again. Peonies have very ragged edges so I was really really hard on the petals. I kept thinning them until they were ruffled and ragged. For the first few rounds of petals I also applied the ball tool in a circular motion, to the center of the petal cutout. This makes the petal cutout have a wider center. To attach the first layer of petals, paint a very thin amount of gum glue on the center and up the sides of each petal. Place the gumpaste ball in the middle and gently pull the petals over the top sides of the ball. Leave a little bit of the ball exposed so it looks like the Peony is opening. The petals should overlap one another in the beginning. Be gentle when pulling the petals up…they are quite thin. It’s ok it they rip because the next layer will cover most of the mistakes 
Repeat the above with another two layer of 5 petals. As I continued to apply petals, I realized that my ball was too fat for the size cutter I was using. Because of this for the 3rd and 4th layer of petals, I actually used individual petals. I made them the same way as above but after I ruffled them, I cut the 5 petals apart and placed them on plastic spoons to dry a bit. This helped them hold their shape. Because they were individual petals, I could place them exactly where I wanted them to help the petals look like they were opening up. I placed them a little lower down the ball and made sure to ruffle the edges outward.
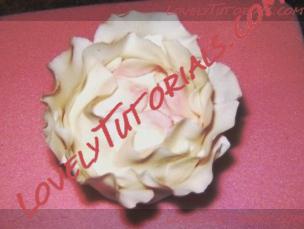 I set the partial peony in a bowl to set up while I worked on the next layers. Because I wanted the rest of the flower to be more, I created the next layers separate from the ball. Using the same petal cutter (a larger one would have been better but I didn’t have one handy), I created a new layer and ruffled the edges and expanded the center just a bit. This layer will be the bottom of the flower so I had to be more gentle. I placed that layer into a bowl that would help hold the shape of the flower. Be sure and dust the bowl with a bit of corn starch before placing the bottom petals in. Put a small dab of gum glue in the middle and apply the next layer of petals. Be su 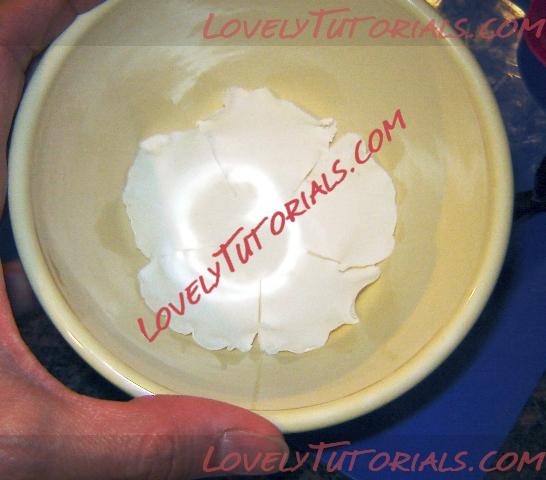 re that each layer is placed so that the new petals are between the previous petals (just like when you make roses). I applied 3 layers of petals directly in the bowl. Then applied more gum glue to the center and placed my partially complete peony into the middle. At this point the petals are still quite soft and will want to droop. Take a small amounts of wax paper, parchment paper or saran wrap and place it between the petals to give the flower the shape you want. (Don’t use paper towel or tissue as it tends to stick to the gumpaste). Leave your flower to dry overnight.
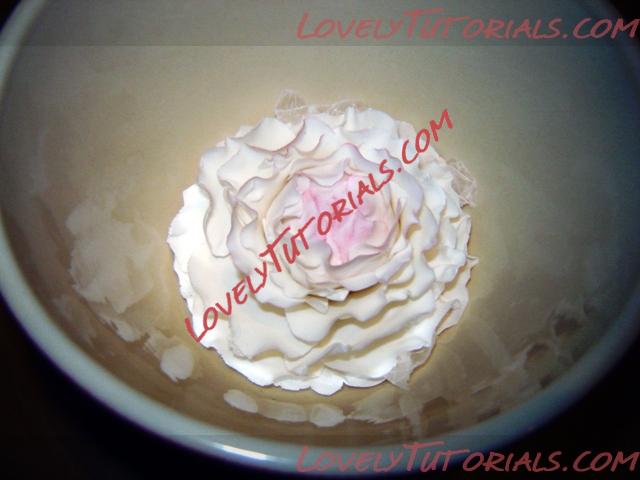 If you look closely you can see little pieces of wax paper sticking out
Once the flower has completely dried, gently remove it from the bowl.
Using a stencil brush or stiff paint brush, dip your brush into the petal dust and tap off the excess. I dusted the center just by running my stencil brush in a circular motion of the center of the flower. For the individual petals, gently scrape the edge of the petals with your brush. These petals are quite fragile so be gentle. It is better to apply multiple light coats than to have too much dust on your brush because you don’t want dust to goes everywhere. And now you have a whimsical peony.
|
 |
|
|
ذœذµر‚ذ؛ذ¸
|
addؤ±m-pion gأ¼l addؤ±m, adؤ±m إںakayؤ±k أ§iأ§ek adؤ±m, aglaophotis, aglaophotis flos gradatim, anlegget, anlأ¤ggning, armado de los ramos, arranjo, artesanatos passo a passo, augalas, babarأ³zsa, baking, bazsarأ³zsa virأ،g, bijإ«nas, bijإ«nas gؤ—lؤ— إ¾ingsnis po إ¾ingsnio, biljka, bitki, blad, blade, blader, bladeren, blatt, bloem, bloemen, blomma, blommor, blomst, blomster, blume, blumen, blأ¼ten, blأ¼tenpaste, blأ¤tter, boeket, bouquet, bozhure, boإ¾ur, boإ¾ur cvijet, buchet, bujor, bujor flori pas cu pas, buket, bukett, bukiet, bunga peony langkah demi langkah, buquأھ, cake decorating, cake decorating techniques, cam blodau peony wrth gam, cerأ¢mica plأ،stica, chiodi di garofano, clavo de olor, clous de girofle, cloves, cold porcelain, cold porcelain figurines, cold porcelain flowers, confeitando bolos, csokor, cukriniإ³ gؤ—liإ³, curso completo de flores, curso de modelado, cvet potonika korak za korakom, cvijet, cvijeؤ‡e, cأ©im blأ،th peony ar chأ©im, decoracion de pasteles, decoraciأ³n de tortas, decorare le torte, decorazioni, deko fondant, dekorace na dort, dekoracija, dekoracije, dekorasyon, dekorأ،cie, el abc del armado de ramos, feuille, feuilles, fimo, fimo flowers, fiore, fiore di peonia passo dopo passo, fiori, fjura peony pass pass, fleurs, floare, flogistica, flor, flor peأ´nia passo a passo, flor peأ³n paso a paso, floral inspirations, flores, flores azucar, flores e folhas, flori, floristics, floristik, floristikk, floristique, florأstica, flower, flower paste, flowering plants, flowers, flowers on a wire, foglia, foglie, folha, folhas, folhas pintadas, fondan, fondant, fondente, fotopostup, frunze, gum pasta, gum paste, gum paste flowers, gumpaste, gumpaste flowers class, gؤ—lؤ—, gؤ—lؤ—s, hand painting, handmodelliert, hap pas hapi bozhure lule, hideg porcelأ،n, hladno porculan, hoa mل؛«u ؤ‘ئ،n, hoa mل؛«u ؤ‘ئ،n hoa tل»«ng bئ°ل»›c, hoja, hojas, how to, how tر†ذ²ذµر‚ر‹ ذ½ذ° ذ؟ر€ذ¾ذ²ذ¾ذ»ذ¾ذ؛ذµ, impianto, kaldt porselen, kallt porslin, kalt porzellan, kasvi, kolde porcelأ¦n, korak po korak, koud porselein, kukka, kukkakimppu, kukkia, kvetina, kvety, kvؤ›tina, kvؤ›tiny, kwiat, kwiat piwonii krok po kroku, kwiaty, kylmأ¤ posliini, kytica, lapai, lapas, leaf, leaves, lehdet, lehti, levelek, levأ©l, list, listأ, liإ،ؤ‡e, liإ›cie, liإ›ؤ‡, lأ©pأ©srإ‘l lأ©pأ©sre, lأstia, lأstky na drأ،tku, making sugar flowers, mazzo, modellierpaste, modellة™إںdirmة™, modelovanie, modelovأ،nأ, modelowanie, montando, motivtorten, nelken, nأ،vody a postupy, nأ،vody na kvؤ›ty a lأstky, nأ¶vأ©ny, oasis o esponja de floristeria, open pioenroos, orchids flower, pap, paso a paso, passo a passo, passo-a-passo, pasta flexible, peon, peon blomst trinnvis, peoni, peoni bulaklak sunud-sunod, peonia, peonia lore urratsez urrats, peonija, peonija ziedu soli pa solim, peony, peony blأ³m skref fyrir skref, peony flor pas a pas, peony flor paso a paso, peony floro paإo post paإo, peony flower step by step, peony flower لƒ”لƒ¢لƒگلƒلƒلƒ‘لƒ لƒ?لƒ•لƒگلƒ“, peony ua hatua kwa hatua, peony àھھàھ—àھ²à«پàھ‚ àھ¦à«چàھµàھ¾àھ°àھ¾ àھ«à«‚àھ² àھھàھ—àھ²à«پàھ‚, peony फूल कदम से कदम, peony ধাà¦ھে ধাà¦ھে ফà§پল, peonyطŒ peony ظ¾ع¾ظˆظ„ ظ‚ط¯ظ… ظ‚ط¯ظ… ع©غŒ ط·ط±ظپ ط³غ’, peonأa, peأ´nia, peأ³n, pfingstrose, pfingstrose schritt fأ¼r schritt, pflanze, pioen, pioen blom stap vir stap, pioenroos bloem stap voor stap, pion, pion blomma steg fأ¶r steg, pioni, pioni kukka askel askeleelta, pivoine, pivonka kvet krok za krokom, pivonky, pivoإˆka, pivoإˆka kvؤ›t krok za krokem, pivoإˆky, pivwan, pivwan etap flأ¨ pa etap, pivأ³nia, piwonia, plant, planta, plante, plantes, plantؤƒ, pocelana fria, pojeng, pojeng lill samm-sammult, polymer clay, polymer clay flowers tutorial, porcelaine froide, porcelana fria, porcelana frأa, porcellana fredda, postup klinؤچek, postupak za ukrasavanje, potonika, puokإ،tؤ—, pأ¼nkأ¶sdi rأ³zsa, pأ¦on, pأ¦on blomst trin for trin, ramo, rastlina, rece porإ£elan, rododendron, rostlina, roإ›lina, schritt fأ¼r schritt anleitung, schritt-fأ¼r-schritt, sculpey flowers, sculpting, simple, soؤںuk porselen, stamens, steg for steg, step by step, step-by-step, strauأں, studenأ½ porcelأ،n, styrofoam, sugar cane flowers, sugar cloves, sugar flower, sugar flowers, sugar flowers for cake decorating, sugar paste flowers, sugarcraft, sugarpaste, sukker art, technique utilisأ©e fleurs en sucre cru, tecnicas de decoracion, tecniche, thai flowers, torte, torte decorate, torten dekorieren, torti, trin for trin, trin-for-trin, trinn for trinn, tutorial, tutorijal, ukraإ،avanje torti, uputstvo za dekoraciju, virأ،g, virأ،gok, wedding cake, wedding cakes, wire, yaprak, yapraklar, zimno porcelany, zuckerblumen, ดà¸à¸پโà¸ڑตั๋น, ดà¸à¸پไà¸،้, ดà¸à¸پไà¸،้ดà¸à¸پโà¸ڑตั๋นขภ±à¹‰à¸™à¸•à¸à¸™à¹‚ดยขั้นตà¸à¸™, à؛ڑà؛²à؛”à؛پ້à؛²à؛§à؛”à؛à؛پ peony ໂà؛”à؛چà؛‚à؛±à»‰à؛™à؛•à؛à؛™, ಹಂತ peony ಹೂವà²؟ನ ಹಂತದ, सजा केक, मॉà¤،लà¤؟ंग, à°…à°،à±پà°—à±پ à°¦à±چవారా peony à°«à±چలవరà±چ దశల, مƒ¢مƒ‡مƒ«, م‚¹مƒ†مƒƒمƒ—مƒگم‚¤ç‰،ن¸¹م€پç‰،ن¸¹مپ®èٹ±مپ®م‚¹مƒ†مƒ ƒمƒ—, أ§iأ§ek, أ§iأ§ek modelleme, أ©tape par أ©tape fleur de pivoine, إ،alto porceliano, إںakayؤ±k, ه»؛و¨،, ç‰،ن¸¹ï¼Œèٹچèچ¯èٹ±و¥و¥, ç‰،ن¸¹ï¼Œèٹچè—¥èٹ±و¥و¥, è£é£¾è›‹ç³•, ëھ¨ë€ 단계ë،œ ëھ¨ë€ 꽃 단계, ى§„달ë?, خ؛دپدچخ± د€خ؟دپدƒخµخ»خ¬خ½خ·, خ¼د€خ؟د…خ؛خد„خ؟, خ±خ¶خ±خ»خخ±, خ»خ؟د…خ»خ؟دچخ´خ¹, خ»خ؟د…خ»خ؟دچخ´خ¹خ±, د€خ±خ¹د‰خ½خ¯خ±, د€خ±خ¹د‰خ½خ¯خ± خ»خ؟د…خ»خ؟دچخ´خ¹ خ²خ®خ¼خ± د€دپخ؟د‚ خ²خ®خ¼خ±, د„خ± د†دچخ»خ»خ±, د†دچخ»خ»خ±, د†د…د„دŒ, ذ؛ذ²ذµر‚ذ؛ذ°, ذ؛ذ²ذµر‚ذ؛ذ° ذ؟ر–ذ²ذ¾ذ½ر– ذ؛ر€ذ¾ذ؛ ذ·ذ° ذ؛ر€ذ¾ذ؛ذ°ذ¼, ذ؛ذ²ذµر‚ذ؛ر–, ذ؛ذ²ر–ر‚ذ¸, ذ؛ذ²ر–ر‚ذ؛ذ°, ذ؛ذ²ر–ر‚ذ؛ذ° ذ؟ر–ذ²ذ¾ذ½ر–ر— ذ؛ر€ذ¾ذ؛ ذ·ذ° ذ؛ر€ذ¾ذ؛ذ¾ذ¼, ذ؛ذµر€ذ°ذ¼ذ¸ر‡ذµرپذ؛ذ°رڈ ر„ذ»ذ¾ر€ذ¸رپر‚ذ¸ذ؛ذ°, ذ؛رƒرپر‚, ذ³ذ²ذ¾ذ·ذ´ذ¸ذ؛ذ°, ذ؟ذ¸ذ¾ذ½, ذ؟ذ¾ذ»ذ¸ذ¼ذµر€ذ½ذ°رڈ ذ³ذ»ذ¸ذ½ذ°, ذ؟ذ¾ذ»ذµذ²ر‹ذµ ر†ذ²ذµر‚ر‹, ذ؟ذ¾رˆذ°ذ³ذ¾ذ²ذ¾, ذ؟ر€ذ¸ر€ذ¾ذ´ذ°, ذ؟ر–ذ¾ذ½, ذ؟ر–ذ²ذ¾ذ½رڈ, ذ؟ر–ذ²ذ¾ذ½ر–رڈ, ذ¼ذ؛, ذ¼ذ¾ذ´ذµذ»ذ¸ر€ذ°ذ½ذµ, ذ¼ذ°ذ¹رپر‚ذµر€-ذ؛ذ»ذ°رپذ¸, ذ¼ذ°ر€رˆذ¼ذµذ»ذ»ذ¾رƒ, ذ¼ذ°رپر‚ذ¸ذ؛ذ°, ذ¼ذ°رپر‚ذµر€-ذ؛ذ»ذ°رپرپ, ذ¼ذ°رپر‚ذµر€-ذ؛ذ»ذ°رپرپ ذ؟ذ¾ ذ»ذµذ؟ذ؛ذµ, ذ°ذ·ذ°ذ»ذ¸رڈ, ذ°ذ·ذ°ذ»ر–رڈ, ذ±ذ¾ذ¶رƒر€, ذ±ذ¾ذ¶رƒر€ ر†ذ²ذµر‚ ر‡ذµذ؛ذ¾ر€ ذ؟ذ¾ ر‡ذµذ؛ذ¾ر€, ذ±ذ¾ذ¶رƒر€ ر†ذ²ذµر‚ذµ رپر‚رٹذ؟ذ؛ذ° ذ؟ذ¾ رپر‚رٹذ؟ذ؛ذ°, ذ±ذ¾ذ¶رƒر€ ر†ذ²ذµر›ذµ ذ؛ذ¾ر€ذ°ذ؛ ذ؟ذ¾ ذ؛ذ¾ر€ذ°ذ؛, ذ±رƒذ؛ذµر‚, ذ·ذ°ذ²ذ¾ذ´, ذ»ذ¸رپر‚ذ°, ذ»ذ¸رپر‚رŒرڈ, ذ»ذ¸رپر‚رڈ, ذ»ذµذ؟ذ¸ذ¼ ر†ذ²ذµر‚ر‹, ذ»ذµذ؟ذ؛ذ°, ذ»ذµذ؟ذ؛ذ° ذ¸ذ· ذ³ذ»ذ¸ذ½ر‹, ذ»ذµذ؟ذ؛ذ° ذ¸ذ· ذ؟ذ»ذ°رپر‚ذ¸ذ؛ذ¸, ذ»ذµذ؟ذ؛ذ° ر†ذ²ذµر‚ذ¾ذ², ذ»ر–ذ؟ذ»ذµذ½ذ½رڈ, ذ»ر–رپر†ذµ, ر€ذ¾رپذ»ذ¸ذ½ذ°, ر€ذ°رپر‚ذµذ½ذ¸ذµ, ر€ذ°رپر‚ذµذ½ذ¸رڈ, رƒذ؛ر€ذ°رˆذµذ½ذ¸ذµ ر‚ذ¾ر€ر‚ذ¾ذ², رƒذ؛ر€ذ°رˆذµذ½ذ¸ذµ ر‚ذ¾ر€ر‚ذ°, رپذ²ذ°ذ´ذµذ±ذ½ر‹ذ¹ ر‚ذ¾ر€ر‚, رپذ°ر…ذ°ر€ذ½ذ°رڈ ذ¼ذ°رپر‚ذ¸ذ؛ذ°, رپذ°ر…ذ°ر€ذ½ر‹ذ¹ ذ؛ذ»ذµذ¹, رƒر€ذ¾ذ؛ذ¸ ذ؟ر€ذ¸ذ؛ر€ذ°رˆذ°ذ½ذ½رڈ, رپر‚رƒذ´ذµذ½ ذ؟ذ¾ر€ر†ذµذ»ذ°ذ½, ر‚ذ¾ر€ر‚, ر„ذ¸ذ¼ذ¾, ر„ذ»ذ¾ر€ذ¸رپر‚ذ¸ذ؛ذ°, ر„ذ»ذ¾ر€ذ°, ر…ذ¾ذ»ذ¾ذ´ذ½ذ¾ذ³ذ¾ ذ؟ذ¾ر€ر†ذµذ»رڈذ½ذ¸, ر…ذ¾ذ»ذ¾ذ´ذ½ذ¾ذ³ذ¾ ر„ذ°ر€ر„ذ¾ر€ذ°, ر…ذ¾ذ»ذ¾ذ´ذ½ر‹ذ¹ ر„ذ°ر€ر„ذ¾ر€, ر…ذ°ذ»ذ¾ذ´ذ½ذ°ذ³ذ° ر„ذ°ر€ر„ذ¾ر€رƒ, ر†ذ²ذµر‚ذ¾ذ؛, ر†ذ²ذµر‚ذ¾ذ؛ ذ؟ذ¸ذ¾ذ½ذ° رˆذ°ذ³ ذ·ذ° رˆذ°ذ³ذ¾ذ¼, ر†ذ²ذµر‚ذ¾ر‡ذ½ذ°رڈ ذ؟ذ°رپر‚ذ°, ر†ذ²ذµر‚ذµ, ر†ذ²ذµر‚رڈ, ر†ذ²ذµر‚ر‹, ر†ذ²ذµر‚ر‹ ذ¸ذ· ذ؟ذ¾ذ»ذ¸ذ¼ذµر€ذ½ذ¾ذ¹ ذ³ذ»ذ¸ذ½ر‹, ر†ذ²ذµر‚ر‹ ذ¸ذ· ر…ذ¾ذ»ذ¾ذ´ذ½ذ¾ذ³ذ¾ ر„ذ°ر€ر„ذ¾ر€ذ°, ر†ذ²ذµر‚ر‹ ذ½ذ° ر‚ذ¾ر€ر‚, ر†ذ²ذµر‚ر‹ ر€رƒر‡ذ½ذ¾ذ¹ ر€ذ°ذ±ذ¾ر‚ر‹, رˆذ°ذ³ ذ·ذ° رˆذ°ذ³ذ¾ذ¼, ×گד××•× ×™, פض¼×™×گض·× ×™, פض¼×™×گض·× ×™ ×‘×œ×•× ×©×¨×™×? דור×ڑ שרי×?, פרח ×گד××•× ×™ צעד ×گחר צעד  |
| ذذ؟ر†ذ¸ذ¸ ر‚ذµذ¼ر‹ |
ذںذ¾ذ¸رپذ؛ ذ² رچر‚ذ¾ذ¹ ر‚ذµذ¼ذµ |
|
|
|
|

