|
|
–Ь–Ъ –њ–Њ —Е—А–Є–Ј–∞–љ—В–µ–Љ–µ –Я–∞—Г–Ї -Gumpaste (fondant, polymer clay) Spider Chrysanthemum flower making tutorial V1
|

28.11.2011, 20:41
|
|
–Р–і–Љ–Є–љ–Є—Б—В—А–∞—В–Њ—А
|
|
–†–µ–≥–Є—Б—В—А–∞—Ж–Є—П: 07.09.2010
–°–Њ–Њ–±—Й–µ–љ–Є–є: 7,940
|
|
 –Ь–Ъ –њ–Њ —Е—А–Є–Ј–∞–љ—В–µ–Љ–µ –Я–∞—Г–Ї -Gumpaste (fondant, polymer clay) Spider Chrysanthemum flower making tutorial V1

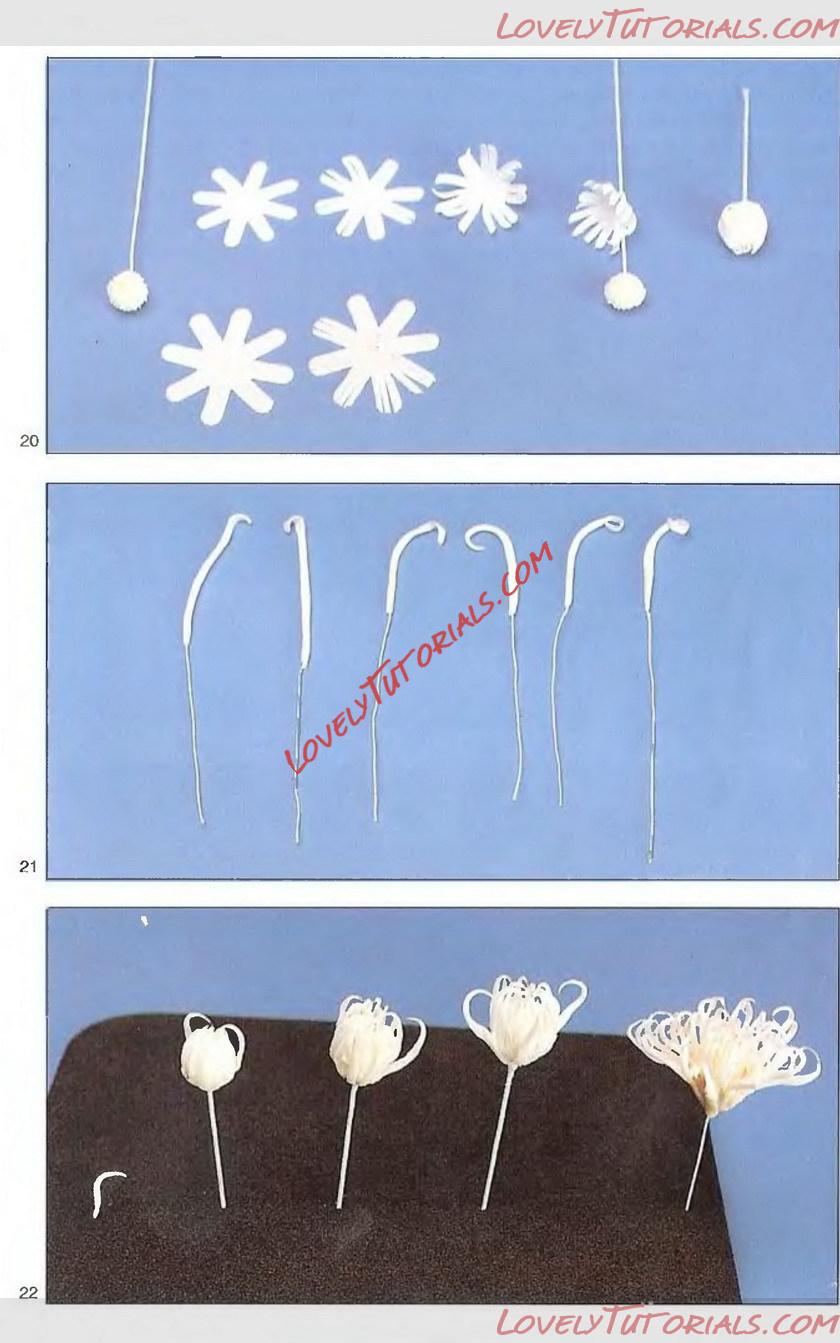
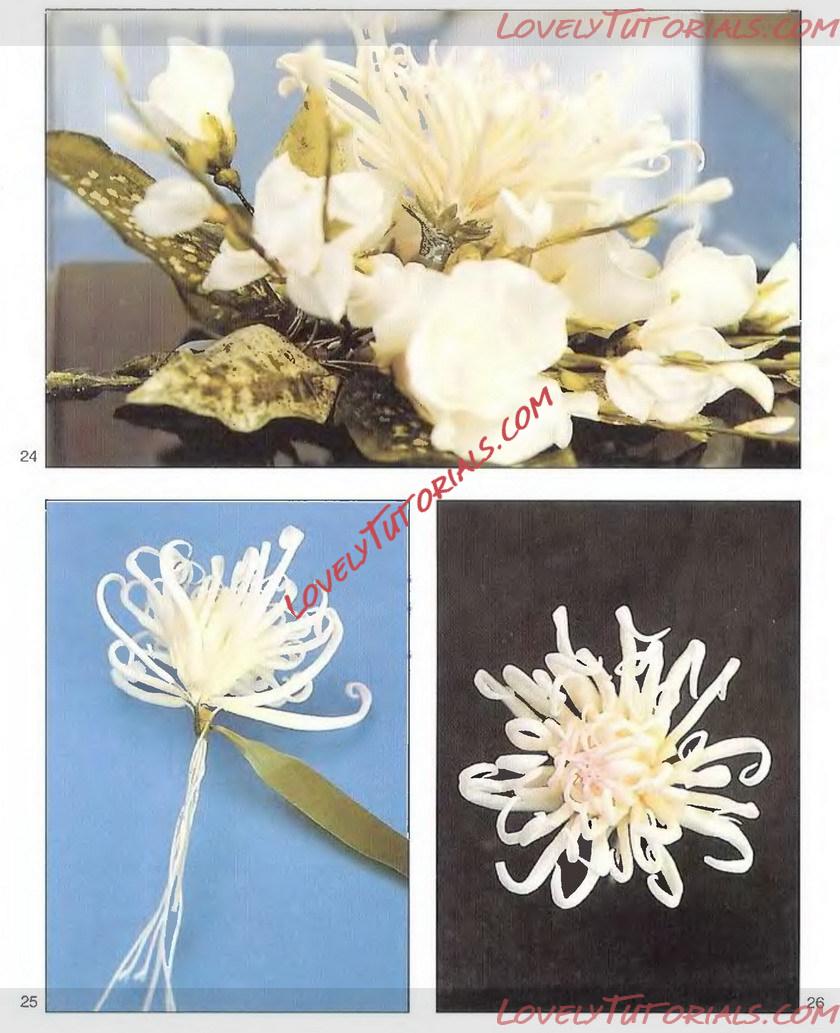
Spider Chrysanthemum (by Kath Swansbra) (see Illustration 19)
1. Attach a pea sized ball of White flowerpaste to the hooked end of a 20 gauge wire*. Paint Tylose glue onto the top half of the ball and dip into Yellow semolina. Leave to dry.
V
2. Roll out White Flowerpaste and cut out 1 - DY5 daisy. Cut each petal in half lengthways. Transfer to the Orchard Pad (PD1) and ball each petal from the outside in (see Illustration 20).
Transfer to a soft sponge and cup in the centre by pressing with the balling tool.
3. 'Glue' lower half of the dried centre from Step 1 and thread the set of petals up the wire and curl closely round the centre.
4. Repeat Steps 2 and 3 with 1 more DY5, glueing the whole of the outside of the first DY5 and interleaving the petals.
* Hint: When you paint Tylose glue onto the end of your wires, leave the tip dry so that it does not unravel.
5. Repeat Step 2 with DY4, but cut each petal lengthways twice. Glue the outside of the DY5 in Step 4 and thread the DY4 up the wire and wrap round, interleaving the petals.
6. Take a very small ball of White flowerpaste and roll out on your hand into a thin sausage shape, about 1 1/2" long. Glue one side of it and press into position on the side of the centre from Step 5, with the top bent over in towards the top of the centre. This is easier if the sausage is a little too long. Nip off the excess at the bottom with a cocktail stick. Avoid getting a clump of paste on the underside of the flower (see Illustration 21).
7. Repeat Step 6 with 3 more symmetrically round the base, and then about 15 more, positioning them all round the centre, more or less symmetrically filling in the gaps, keeping the tops level.
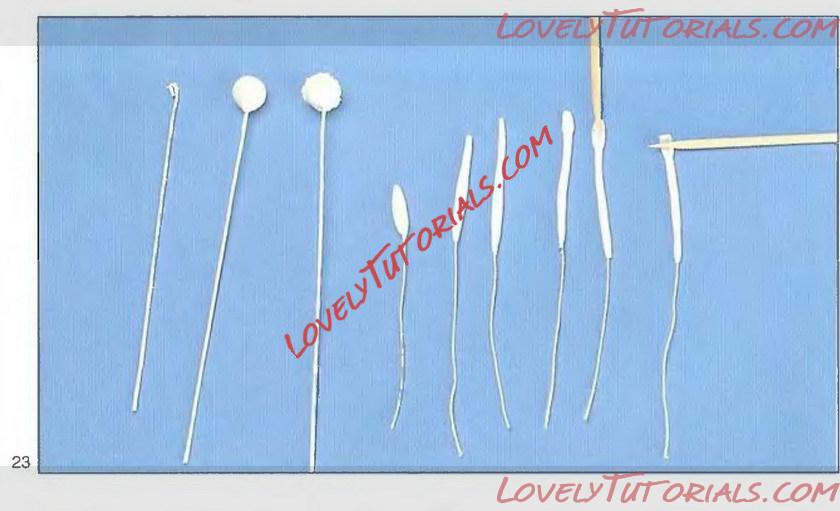
8. Ray-florets (see Illustration 22). 'Glue' a small log of White flowerpaste onto the end of a piece of Scientific wire (about 36 gauge 2 1/4 long), and roll out into a thin sausage shape over the end of the wire. The wire is only about 1/1 into the paste. Roll it as thin as you can between 1" and 1 1/4 long, without letting the wire show through. Flatten about '/.," of the end with a cocktail stick. About 15 should be just bent over at the lop. and a curve put in the wire, so that, when taped to the centre, they curve out a little.
9. About 15 others, after flattening, should have the cocktail stick pressed along the length at the end, to give the illusion of hollowing out, and the wire bent out as before. Curl tip forwards over a cocktail stick.
10. Repeat Step 9 for about 18 more, but 1 1/2 long and the wire a little straighter. Curl tip back (see Illustration 23).
11. Colour all the items from Steps 8 to 10 with a touch of Rose Leaf Green petal dust at the base and Pale Pink at the tips.
12. Commence wiring the wires of the ray-florets to the centre 20 gauge wire with rose wire, binding them in one place to hold them steady, for when you tape them together with V2 width Green florists tape, leaving about VV1 of bare wire on the ray-florets immediately below the centre. Place the shorter ones near the centre and the longer ones curling out. Some can be bent back (see Illustrations 25 & 26).
|

19.05.2012, 09:25
|
|
–Р–і–Љ–Є–љ–Є—Б—В—А–∞—В–Њ—А
|
|
–†–µ–≥–Є—Б—В—А–∞—Ж–Є—П: 07.09.2010
–°–Њ–Њ–±—Й–µ–љ–Є–є: 7,940
|
|
 –Ь–Ъ –њ–Њ —Е—А–Є–Ј–∞–љ—В–µ–Љ–µ –Я–∞—Г–Ї -Gumpaste (fondant, polymer clay) Spider Chrysanthemum flower making tutorial V2
–Ю–≥—А–Њ–Љ–љ–∞—П –±–ї–∞–≥–Њ–і–∞—А–љ–Њ—Б—В—М –Э–∞–є–і—С–љ–Њ–≤–∞ –У–∞–ї–Є–љ–∞ –Ј–∞ –Ь–∞—Б—В–µ—А-–Ї–ї–∞—Б—Б.
–Ь–Ъ –њ–Њ —Е—А–Є–Ј–∞–љ—В–µ–Љ–µ –Я–∞—Г–Ї
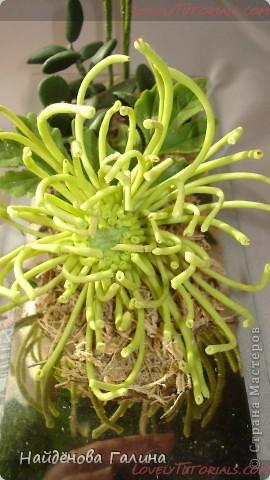
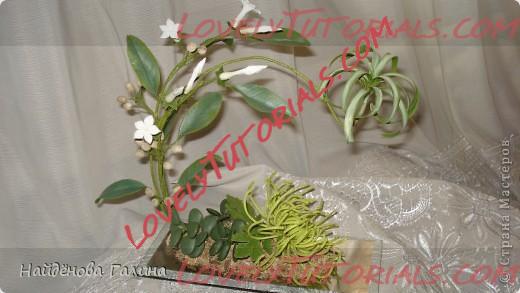
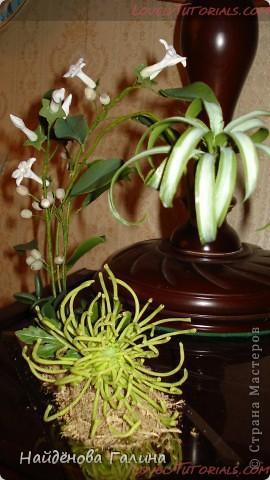
–Ш—Б–њ–Њ–ї—М–Ј–Њ–≤–∞–ї–∞ —Е—А–Є–Ј–∞–љ—В–µ–Љ—Г –≤–Њ—В –≤ —В–∞–Ї–Њ–є –Ї–Њ–Љ–њ–Њ–Ј–Є—Ж–Є–Є, –Ї–Њ—В–Њ—А—Г—О –љ–∞–Ј–≤–∞–ї–∞¬ї–Т –Є–Ј—Г–Љ—А—Г–і–љ—Л—Е —В–Њ–љ–∞—Е¬ї.
 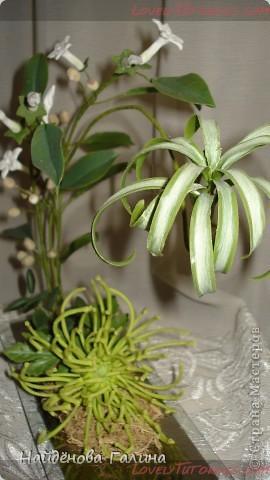
–Ч–∞—А–∞–љ–µ–µ –Ј–∞–њ–∞—Б–Є—В–µ—Б—М –њ—А–Њ–≤–Њ–ї–Њ–Ї–Њ–є —В–Њ–љ–Ї–Њ–є –Є —В–µ—А–њ–µ–љ–Є–µ–Љ.
–Ш —В–∞–Ї –њ—А–Є—Б—В—Г–њ–Є–Љ. –Ф–µ–ї–∞–µ—В–µ –≤–Њ—В —В–∞–Ї—Г—О —Б–µ—А–µ–і–Є–љ–Ї—Г 3 —Б–Љ. –†–∞–Ј–Љ–µ—А—Л –њ—А–Є–≤–Њ–ґ—Г –њ—А–Є–±–ї–Є–Ј–Є—В–µ–ї—М–љ–Њ, –∞ —В–∞–Љ –≤–∞—И–µ –і–µ–ї–Њ, –Ї–∞–Ї–Є—Е —А–∞–Ј–Љ–µ—А–Њ–≤ –±—Г–і–µ—В –≤–∞—И –Я–Р–£–І–Ю–Ъ. –Ъ–∞—В–∞–µ–Љ –Љ–∞–ї–µ–љ—М–Ї–Є–µ –Ї–Њ–ї–±–∞—Б–Ї–Є-20 —И—В. –Є –Њ–±–Ї–ї–µ–Є–≤–∞–µ–Љ –Є–Љ–Є –љ–∞—И—Г —Б–µ—А–µ–і–Є–љ–Ї—Г. –Я—Г—Б—В—М –≤—Б–µ –•–Ю–†–Ю–®–Ю –≤—Л—Б–Њ—Е–љ–µ—В. –Ю–С–ѓ–Ч–Р–Ґ–Х–Ы–ђ–Э–Ю! –Я–Њ—В–Њ–Љ—Г, —З—В–Њ –Ї –љ–µ–є –±—Г–і–µ–Љ –њ—А–Є–Љ–∞—В—Л–≤–∞—В—М 80 –ї–µ–њ–µ—Б—В–Ї–Њ–≤. –Ф–∞, –і–∞, –і–∞! –Ь–Њ–ґ–љ–Њ –Є –±–Њ–ї—М—И–µ, –∞ –≤–Њ—В –Љ–µ–љ—М—И–µ –љ–µ —Б–Њ–≤–µ—В—Г—О вАФ —Ж–≤–µ—В–Њ–Ї –±—Г–і–µ—В –њ—Г—Б—В–Њ–≤–∞—В, –љ–µ –±—Г–і–µ—В –њ—Л—И–љ–Њ—Б—В–Є. –Я—А–Њ–і–Њ–ї–ґ–Є–Љ. –Я–Њ–Ї–∞ —Б—Г—И–Є—В—Б—П —Б–µ—А–µ–і–Є–љ–Ї–∞, –і–µ–ї–∞–µ–Љ –ї–µ–њ–µ—Б—В–Ї–Є вАУ –Њ–±–Ї–∞—В—Л–≤–∞–µ–Љ –њ—А–Њ–≤–Њ–ї–Њ–Ї—Г —Е—Д, –∞ –љ–∞ –Ї–Њ–љ—Ж–µ –і–µ–ї–∞–µ–Љ –Ј—Г–±–Њ—З–Є—Б—В–Ї–Њ–є —Г–≥–ї—Г–±–ї–µ–љ–Є–µ( —Б–Љ —Д–Њ—В–Њ). –І–µ—В—Л—А–µ —А–∞–Ј–Љ–µ—А–∞-4-5-6-7—Б–Љ –њ–Њ 20 —И—В—Г–Ї. –°—А–∞–Ј—Г –њ—А–Є–і–∞–µ–Љ —Д–Њ—А–Љ—Г –ї–µ–њ–µ—Б—В–Ї—Г –Є —Б—Г—И–Є–Љ –≤ –њ–Њ–і–≤–µ—И–µ–љ–љ–Њ–Љ —Б–Њ—Б—В–Њ—П–љ–Є–Є.
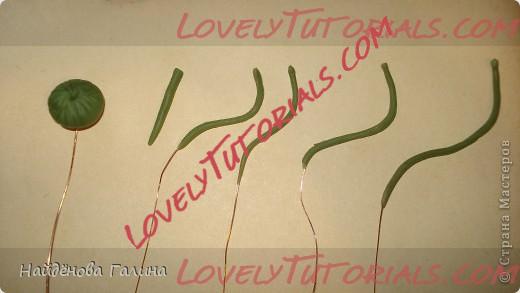
–Р —В–µ–њ–µ—А—М —Б–∞–Љ–Њ–µ –Є–љ—В–µ—А–µ—Б–љ–Њ–µ вАФ —Н—В–Њ —Б–±–Њ—А–Ї–∞. –Ч–і–Њ—А–Њ–≤–Њ –≤–Є–і–µ—В—М, –Ї–∞–Ї –≤ —В–≤–Њ–Є—Е —А—Г–Ї–∞—Е —А–Њ–ґ–і–∞–µ—В—Б—П —В–∞–Ї–Њ–µ —З—Г–і–Њ!
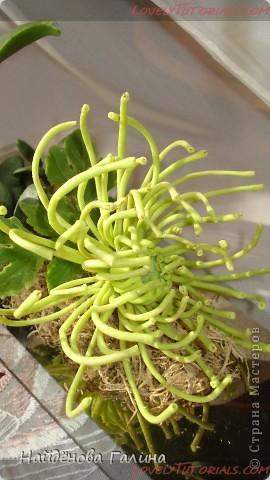
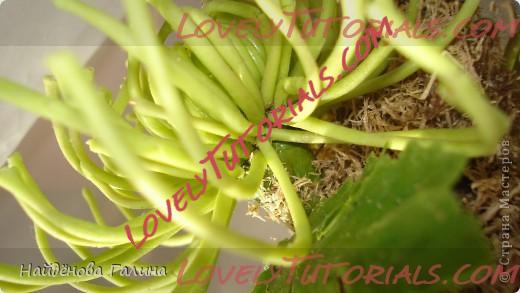
–†—П–і –Ј–∞ —А—П–і–Њ–Љ, —В–µ–є–њ –ї–µ–љ—В–Њ–є, –њ—А–Є–Ї—А—Г—З–Є–≤–∞–µ–Љ –ї–µ–њ–µ—Б—В–Ї–Є. –°–љ–∞—З–∞–ї–∞ 20 —И—В. –њ–Њ 4 —Б–Љ, –Ј–∞—В–µ–Љ 20 —И—В. –њ–Њ 5 —Б–Љ –Є —В. –і.
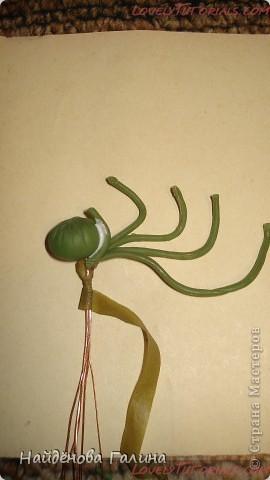
–°—А–∞–Ј—Г –њ—А–µ–і—Г–њ—А–µ–ґ–і–∞—О, –љ–Њ–ґ–Ї–∞ –±—Г–і–µ—В –Њ—З–µ–љ—М —В–Њ–ї—Б—В–Њ–є. –І—В–Њ–± —Б–і–µ–ї–∞—В—М —Б—В–µ–±–µ–ї—М, –ї–Є—И–љ—О—О –њ—А–Њ–≤–Њ–ї–Њ–Ї—Г –љ–µ–Њ–±—Е–Њ–і–Є–Љ–Њ –∞–Ї–Ї—Г—А–∞—В–љ–Њ –Њ–±—А–µ–Ј–∞—В—М, –Њ—Б—В–∞–≤–ї—П—П —А–∞–Ј–љ–Њ–є –і–ї–Є–љ–љ—Л –Ї–Њ–љ—З–Є–Ї–Є, —З—В–Њ–± –љ–µ –±—Л–ї–Њ –њ–µ—А–µ–њ–∞–і–∞ –≤ —В–Њ–ї—Й–Є–љ–µ. –Т—Б–µ –Њ–±–Љ–Њ—В–∞—В—М —В–µ–є–њ –ї–µ–љ—В–Њ–є –Є –Њ–±–Ї–∞—В–∞—В—М —Е—Д. –Э–Њ –Љ–љ–µ —Н—В–Њ –љ–µ –љ—Г–ґ–љ–Њ –±—Л–ї–Њ.
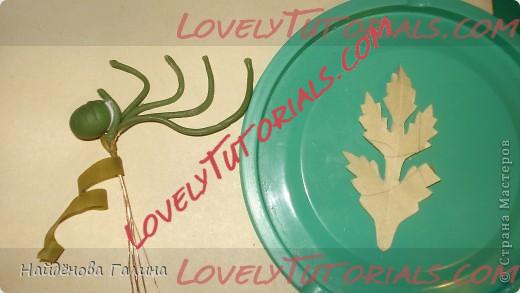
–Ы–Є—Б—В–Є–Ї–Є –і–µ–ї–∞–ї–∞ –≤–Њ—В –њ–Њ —В–∞–Ї–Њ–Љ—Г —И–∞–±–ї–Њ–љ—Г.
|

29.09.2012, 18:24
|
|
–Р–і–Љ–Є–љ–Є—Б—В—А–∞—В–Њ—А
|
|
–†–µ–≥–Є—Б—В—А–∞—Ж–Є—П: 07.09.2010
–°–Њ–Њ–±—Й–µ–љ–Є–є: 7,940
|
|
 How to make Spider Mums Sugar Flower
–Ю–≥—А–Њ–Љ–љ–∞—П –±–ї–∞–≥–Њ–і–∞—А–љ–Њ—Б—В—М –Р–≤—В–Њ—А—Г donnadol –Ј–∞ –Ь–∞—Б—В–µ—А-–Ї–ї–∞—Б—Б
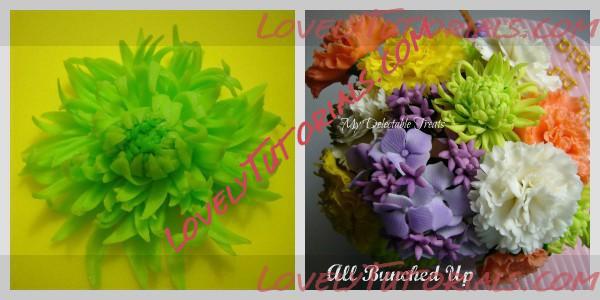
Spider mums belongs to the chrysanthemum family. They are also known as football mums in the United States. IвАЩve always been fascinated with this flower. They always look good on flower arrangements. This sugar flower is easy to make. Most of the techniques IвАЩve used has been used in other sugar flowers. I hope you will enjoy making them as much as I did.
List of Materials
- Daisy cutters, ball tool, veiner tool, leaf sculpting tool, sharp craft knife, rolling pin, foam pad, scissors,
- cutting mat, edible glue, florist wires and floral tape.
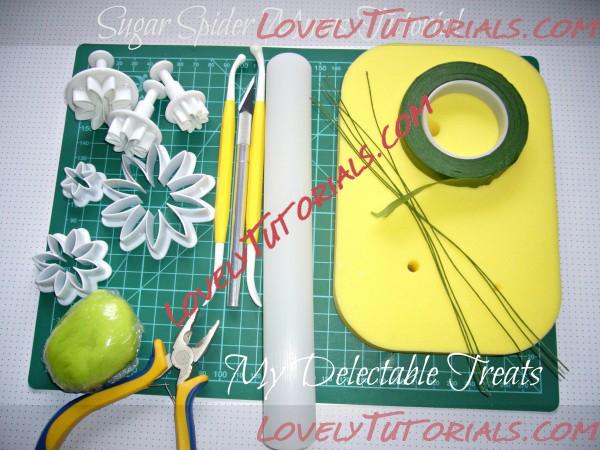
To start, here are the things needed to make this flower. colored gumpaste, Daisy cutters, ball tool, veiner tool, leaf sculpting tool, sharp craft knife, rolling pin, foam pad, scissors, cutting mat, florist wires, floral tape, and water or edible glue.
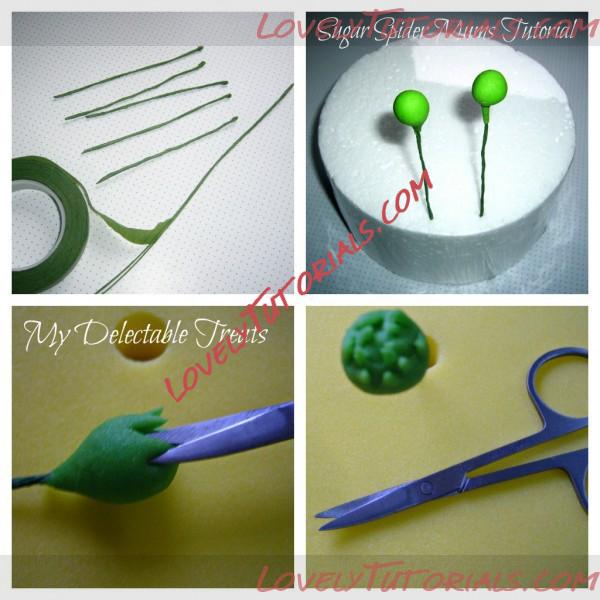
This flowers is heavy. Therefore, you need a thick wire to support its weight. Since I donвАЩt have a #20 gauge at hand, I made used of 4 #22 gauge floral wires and wrap it with a green floral tape. Make a loop on one end and set aside. Make a small ball of green gumpaste to make a bud and, inset floral wire. Snip half way thru gumpaste to create the flowerвАЩs bud features. Let it dry overnight.
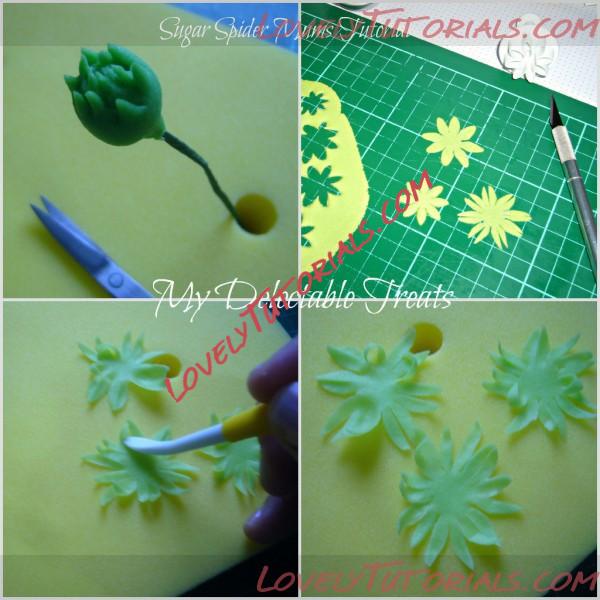
When the bud has dried, cut out 4 daisy petals, choose a size that will cover 3/4 of your bud. Cut each petal into two. Thin down petals if needed by rolling it out with a rolling pin. To create the cupped/curled look of the petals, apply pressure from the tip of the petal down to the base. Repeat to all petals.
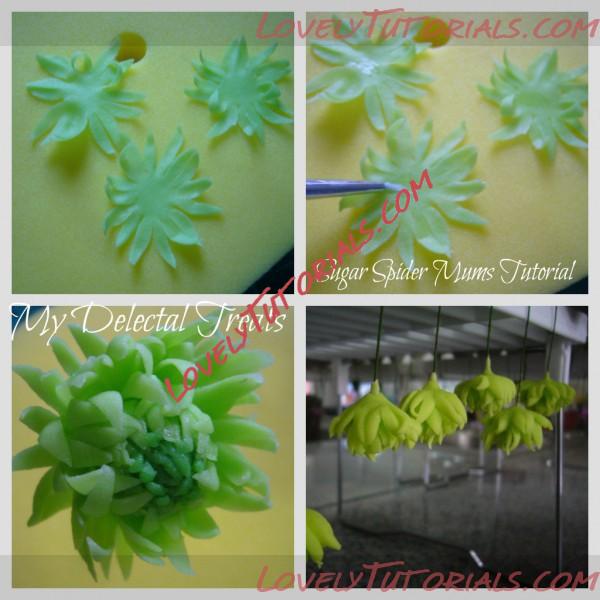
Dab a small amount of edible glue and thread it through the wire and attach it on the dried bud. Arrange petals, pinch lightly. Hang it upside down to dry.
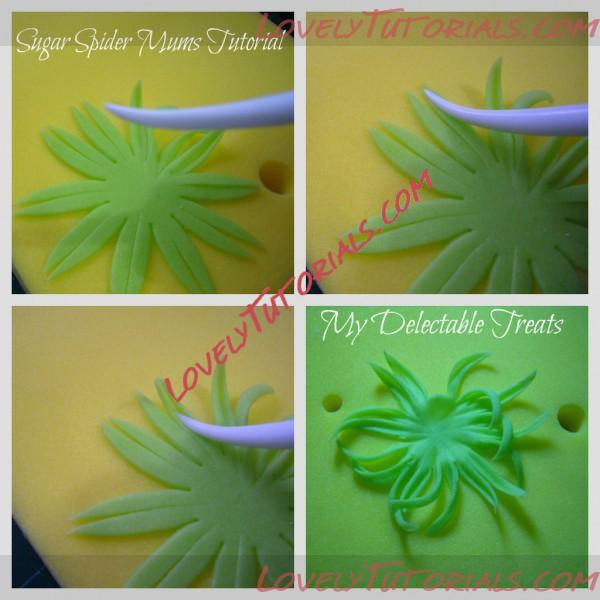
Using the next larger size, Cut another 4 daisy flowers. Cut each petal into 2 and this time use the veiner tool. Run it through the petal starting from the tip down to the base. Be careful not to push too hard or your petals will tear. DonвАЩt worry if you lost a petal or two, it will be concealed by the next petal.
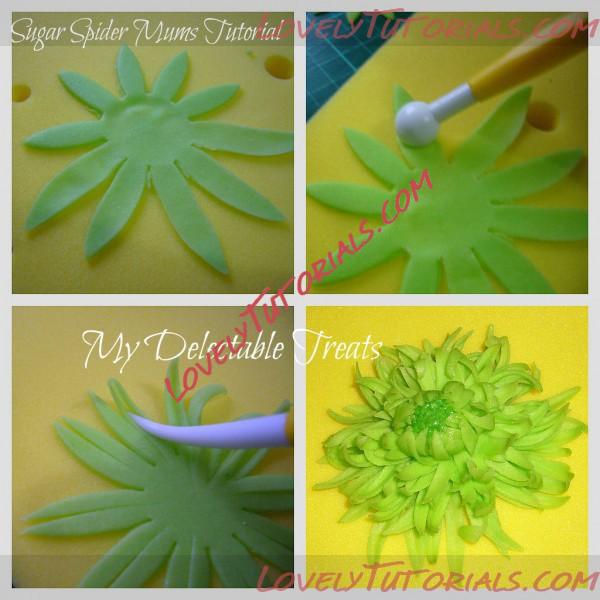
For the last set of petals, you need a larger cutter. If you donвАЩt have one  donвАЩt worry, just use the previous cutter you used and thin it out using your ball tool to stretch out each petal. Again, cut it into 2 and do the same just like the second batch of flowers. Dry flowers either by hanging it on a drying rack or on a flower former. Or you may improvise by using a crumpled foil and lay it on an egg carton.
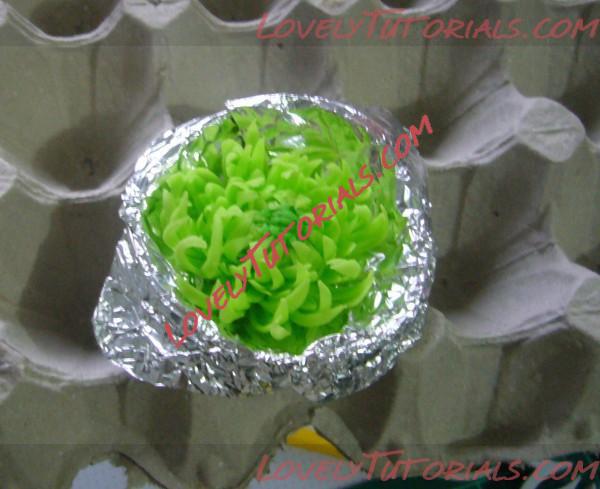
HereвАЩs an example of an improvised flower former using aluminum foil and an egg carton.
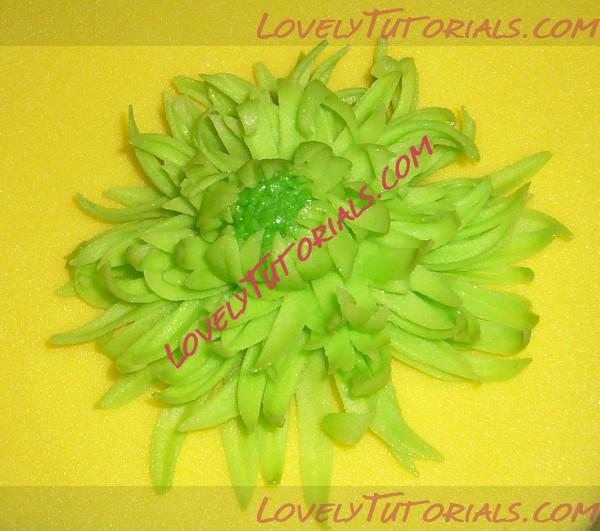
A closer look of the finished Spider Mum. For a fuller look, may add more petals (bigger in size for the last set of petals).
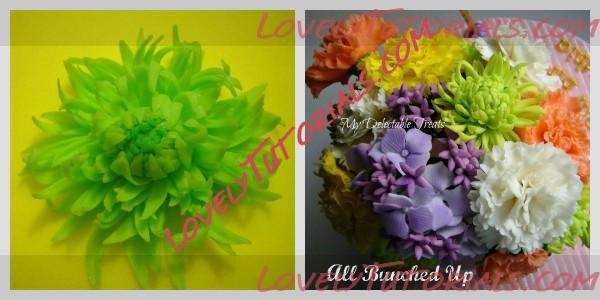
|
 |
|
–Ь–µ—В–Ї–Є
|
anlegget, anl√§ggning, armado de los ramos, arranjo, artesanatos passo a passo, augalas, baking, biljka, bitki, blad, blade, blader, bladeren, blatt, bloem, bloemen, blomma, blommor, blomst, blomster, blume, blumen, bl√Љten, bl√Љtenpaste, bl√§tter, boeket, bouquet, buchet, buket, bukett, bukiet, buqu√™, cake decorating, cake decorating techniques, cer√Ґmica pl√°stica, chiodi di garofano, chrizantema, chrysant, chrysantheme, chrysanthemum, chrysanth√®me, chryzantema, chryzant√©ma, clavo de olor, clous de girofle, cloves, cold porcelain, cold porcelain figurines, cold porcelain flowers, confeitando bolos, crisantemo, cris√Ґntemo, crizantemƒГ, csokor, cukrini≈≥ gƒЧli≈≥, curso completo de flores, curso de modelado, cvijet, cvijeƒЗe, decoracion de pasteles, decoraci√≥n de tortas, decorare le torte, decorazioni, deko fondant, dekorace na dort, dekoracija, dekoracije, dekorasyon, dekor√°cie, el abc del armado de ramos, feuille, feuilles, fimo, fimo flowers, fiore, fiori, fleurs, floare, flogistica, flor, floral inspirations, flores, flores azucar, flores e folhas, flori, floristics, floristik, floristikk, floristique, flor√≠stica, flower, flower paste, flowering plants, flowers, flowers on a wire, foglia, foglie, folha, folhas, folhas pintadas, fondan, fondant, fondente, fotopostup, frunze, gum pasta, gum paste, gum paste flowers, gumpaste, gumpaste flowers class, gƒЧlƒЧ, gƒЧlƒЧs, hand painting, handmodelliert, hideg porcel√°n, hladno porculan, hoja, hojas, how t—Ж–≤–µ—В—Л –љ–∞ –њ—А–Њ–≤–Њ–ї–Њ–Ї–µ, hrizantema, impianto, kaldt porselen, kallt porslin, kalt porzellan, kasvi, kolde porcel√¶n, koud porselein, krizantem, krizant√©m, krysanteemi, kukka, kukkakimppu, kukkia, kvetina, kvety, kvƒЫtina, kvƒЫtiny, kwiat, kwiaty, kylm√§ posliini, kytica, lapai, lapas, leaf, leaves, lehdet, lehti, levelek, lev√©l, list, list√≠, li≈°ƒЗe, li≈Ыcie, li≈ЫƒЗ, l√≠stia, l√≠stky na dr√°tku, mazzo, modellierpaste, modell…Щ≈Яdirm…Щ, modelovanie, modelov√°n√≠, modelowanie, montando, motivtorten, nelken, n√°vody a postupy, n√°vody na kvƒЫty a l√≠stky, n√ґv√©ny, oasis o esponja de floristeria, pap, paso a paso, passo a passo, passo-a-passo, pasta flexible, pflanze, plant, planta, plante, plantes, plantƒГ, pocelana fria, polymer clay, polymer clay flowers tutorial, porcelaine froide, porcelana fria, porcelana fr√≠a, porcellana fredda, postup klinƒНek, postupak za ukrasavanje, puok≈°tƒЧ, ramo, rastlina, rece por≈£elan, rododendron, rostlina, ro≈Ыlina, schritt f√Љr schritt anleitung, schritt-f√Љr-schritt, sculpey flowers, sculpting, simple, soƒЯuk porselen, stamens, steg for steg, step by step, step-by-step, strau√Я, studen√љ porcel√°n, styrofoam, sugar cane flowers, sugar cloves, sugar flower, sugar flowers, sugar flowers for cake decorating, sugar paste flowers, sugarcraft, sugarpaste, sukker art, technique utilis√©e fleurs en sucre cru, tecnicas de decoracion, tecniche, thai flowers, torte, torte decorate, torten dekorieren, torti, trin for trin, trin-for-trin, trinn for trinn, tutorial, tutorijal, ukra≈°avanje torti, uputstvo za dekoraciju, vir√°g, vir√°gok, wedding cake, wedding cakes, wire, yaprak, yapraklar, zimno porcelany, zuckerblumen, аЄФаЄ≠аЄБаєДаЄ°аєЙ, а§Єа§Ьа§Њ а§Ха•За§Х, а§Ѓа•Йа§°а§≤а§ња§Ва§Ч, гГҐгГЗгГЂ, √Іi√Іek, √Іi√Іek modelleme, ≈°alto porceliano, еїЇж®°, и£Эй£ЊиЫЛз≥Х, мІДлЛђлЮ?, ќЇѕБѕНќ± ѕАќњѕБѕГќµќїќђќљќЈ, ќЉѕАќњѕЕќЇќ≠ѕДќњ, ќ±ќґќ±ќїќ≠ќ±, ќїќњѕЕќїќњѕНќіќє, ќїќњѕЕќїќњѕНќіќєќ±, ѕДќ± ѕЖѕНќїќїќ±, ѕЖѕНќїќїќ±, ѕЖѕЕѕДѕМ, ѕЗѕБѕЕѕГќђќљќЄќµќЉќњ, –Є–љ—Б—В—А—Г–Љ–µ–љ—В—Л –і–ї—П –ї–µ–њ–Ї–Є, –Є–љ—Б—В—А—Г–Љ–µ–љ—В—Л –і–ї—П –ї–µ–њ–Ї–Є –Є–Ј –њ–Њ–ї–Є–Љ–µ—А–љ–Њ–є –≥–ї–Є–љ—Л, –Ї–≤–µ—В–Ї–∞, –Ї–≤–µ—В–Ї—Ц, –Ї–≤—Ц—В–Є, –Ї–≤—Ц—В–Ї–∞, –Ї–µ—А–∞–Љ–Є—З–µ—Б–Ї–∞—П —Д–ї–Њ—А–Є—Б—В–Є–Ї–∞, –Ї—Г—Б—В, –Њ—Д–Њ—А–Љ–ї–µ–љ–Є–µ —Ж–≤–µ—В–Њ—З–љ—Л—Е –Ї–Њ–Љ–њ–Њ–Ј–Є—Ж–Є–є, –≥–≤–Њ–Ј–і–Є–Ї–∞, –њ–Њ–ї–Є–Љ–µ—А–љ–∞—П –≥–ї–Є–љ–∞, –њ–Њ–ї–µ–≤—Л–µ —Ж–≤–µ—В—Л, –њ–Њ—И–∞–≥–Њ–≤–Њ, –њ—А–Є—А–Њ–і–∞, –њ—А–Њ–≤–Њ–ї–Њ–Ї–∞ –і–ї—П —Ж–≤–µ—В–Њ–≤, –Љ–Ї, –Љ–Ї –њ–Њ —Е—А–Є–Ј–∞–љ—В–µ–Љ–µ –њ–∞—Г–Ї, –Љ–Њ–і–µ–ї–Є—А–∞–љ–µ, –Љ–∞–є—Б—В–µ—А-–Ї–ї–∞—Б–Є, –Љ–∞—А—И–Љ–µ–ї–ї–Њ—Г, –Љ–∞—Б—В–Є–Ї–∞, –Љ–∞—Б—В–µ—А –Ї–ї–∞—Б—Б—Л, –Љ–∞—Б—В–µ—А –Ї–ї–∞—Б—Б—Л –њ–Њ —Д–ї–Њ—А–Є—Б—В–Є–Ї–µ, –Љ–∞—Б—В–µ—А-–Ї–ї–∞—Б—Б, –∞–Ј–∞–ї–Є—П, –∞–Ј–∞–ї—Ц—П, –±—Г–Ї–µ—В, –Ј–∞–≤–Њ–і, –Ј–µ–ї–µ–љ—М –і–ї—П —Ж–≤–µ—В–Њ—З–љ—Л—Е –Ї–Њ–Љ–њ–Њ–Ј–Є—Ж–Є–є, –ї–Є—Б—В–∞, –ї–Є—Б—В—М—П, –ї–Є—Б—В—П, –ї–µ–њ–Є–Љ —Ж–≤–µ—В—Л, –ї–µ–њ–Ї–∞, –ї–µ–њ–Ї–∞ –Є–Ј —Е–Њ–ї–Њ–і–љ–Њ–≥–Њ —Д–∞—А—Д–Њ—А–∞, –ї–µ–њ–Ї–∞ —Е—А–Є–Ј–∞–љ—В–µ–Љ—Л –њ–∞—Г–Ї, –ї–µ–њ–Ї–∞ —Ж–≤–µ—В–Њ–≤ –Є–Ј –њ–Њ–ї–Є–Љ–µ—А–љ–Њ–є –≥–ї–Є–љ—Л, –ї—Ц–њ–ї–µ–љ–љ—П, –ї—Ц—Б—Ж–µ, —А–Њ—Б–ї–Є–љ–∞, —А–∞—Б—В–µ–љ–Є–µ, —А–∞—Б—В–µ–љ–Є—П, —Г–Ї—А–∞—И–µ–љ–Є–µ —В–Њ—А—В–Њ–≤, —Г–Ї—А–∞—И–µ–љ–Є–µ —В–Њ—А—В–∞, —Б–≤–∞–і–µ–±–љ—Л–є —В–Њ—А—В, —Б–∞—Е–∞—А–љ–∞—П –Љ–∞—Б—В–Є–Ї–∞, —Б–∞—Е–∞—А–љ—Л–є –Ї–ї–µ–є, —Г—А–Њ–Ї–Є –њ—А–Є–Ї—А–∞—И–∞–љ–љ—П, —Б—В—Г–і–µ–љ –њ–Њ—А—Ж–µ–ї–∞–љ, —В–Њ—А—В, —В–µ–є–њ –ї–µ–љ—В–∞, —Д–Є–Љ–Њ, —Д–ї–Њ—А–Є—Б—В–Є–Ї–∞, —Д–ї–Њ—А–∞, —Е–Њ–ї–Њ–і–љ–Њ–≥–Њ –њ–Њ—А—Ж–µ–ї—П–љ–Є, —Е–Њ–ї–Њ–і–љ–Њ–≥–Њ —Д–∞—А—Д–Њ—А–∞, —Е–Њ–ї–Њ–і–љ—Л–є —Д–∞—А—Д–Њ—А, —Е–∞–ї–Њ–і–љ–∞–≥–∞ —Д–∞—А—Д–Њ—А—Г, —Е—А–Є–Ј–∞–љ—В–µ–Љ–∞, —Е—А–Є–Ј–∞–љ—В–µ–Љ–∞ –њ–∞—Г–Ї, —Е—А—Л–Ј–∞–љ—В—Н–Љ–∞, —Ж–≤–µ—В–Њ–Ї, —Ж–≤–µ—В–Њ—З–љ–∞—П –њ–∞—Б—В–∞, —Ж–≤–µ—В–µ, —Ж–≤–µ—В—П, —Ж–≤–µ—В—Л, —Ж–≤–µ—В—Л –Є–Ј –њ–Њ–ї–Є–Љ–µ—А–љ–Њ–є –≥–ї–Є–љ—Л, —Ж–≤–µ—В—Л –Є–Ј —Е–Њ–ї–Њ–і–љ–Њ–≥–Њ —Д–∞—А—Д–Њ—А–∞, —Ж–≤–µ—В—Л –љ–∞ —В–Њ—А—В, —И–∞–≥ –Ј–∞ —И–∞–≥–Њ–Љ  |
|

