|
|
МК лепка "Бакуган" -A Bakugan making tutorial
|

26.04.2012, 09:18
|
|
Администратор
|
|
Регистрация: 07.09.2010
Сообщений: 7,669
|
|
 МК лепка "Бакуган" -A Bakugan making tutorial
Огромная благодарность Jacque за Мастер-класс
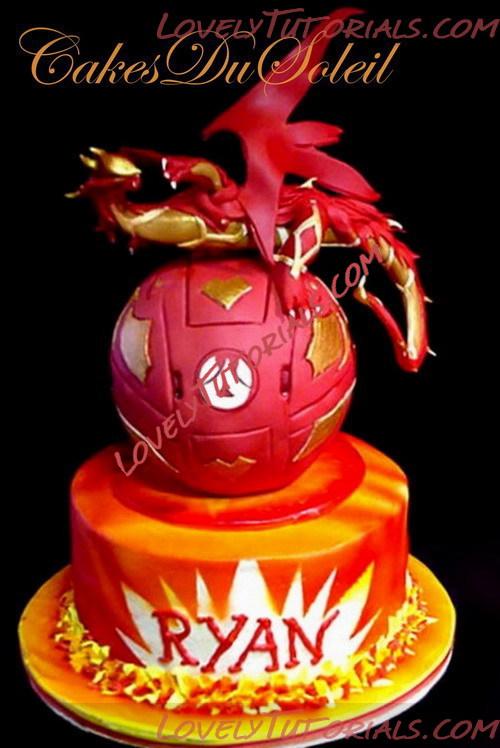
Here is the process I used; and hope it can save you a few scars in battling your own sugar dragon.
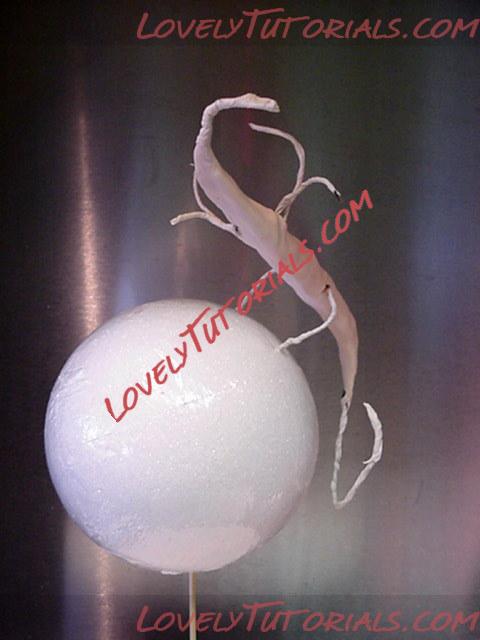
1. Cut one 9" wire, one 7" wire and two 4" wires. Wrap each wire with floral tape, the twist wires together, as shown below using the 9" as the body, the 7" as the legs and the two 4" wires for the wings and arms. Place a 5" bamboo skewer in the center and re-wrap wires again with floral tape, securing skewer and twisted wires in place. ( This is very important. It keeps the structure from bending until completely dried)
2.Moisten body with gumglue and cover body with white gumpaste.
Set aside to dry.

3. Roll out red gumpaste very thinly and cut out wings using the pattern above..
Lay over an empty wax paper roll ( or flower former ) to give curve to the wings.
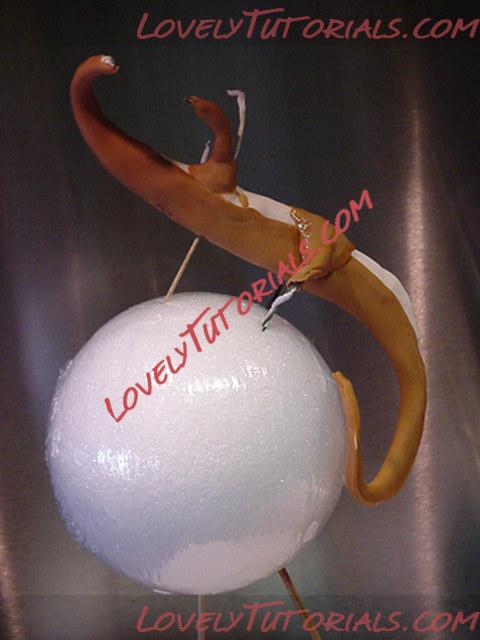
4.When body is dry, using golden brown gumpaste, cover the underbody of the dragon from the tail to the head. Cover the upper legs and all of the arms.
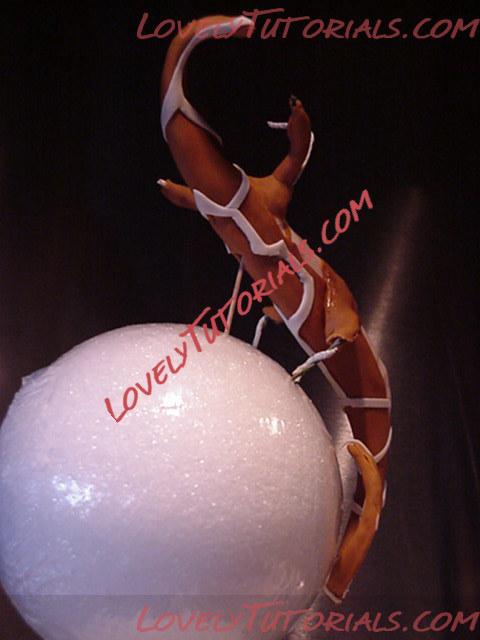
5.Cut strips of white and overlay in a honeycomb pattern over the golden brown under body.
6.Then make white spikes and place on top of the upper body, securing with gumglue.
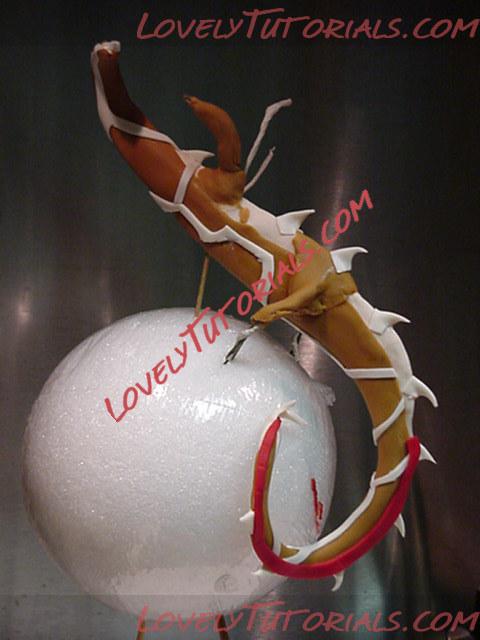
7. Form legs and feet using red gumpaste. Remember to leave wire extending from the feet so bamboo skewers can be taped to them. This will secure them into the cake.
8. Make the head from red gumpaste and secure in place with gum glue.
9. Cut little strips of red and begin covering the topside of the dragon, starting at the tail and move up to the head, overlaying the strips like scales.
10.Roll out red gumpaste and cut another set of wings.
Sandwich the newly cut wings and the dry wings over the wires
securing with gumglue.
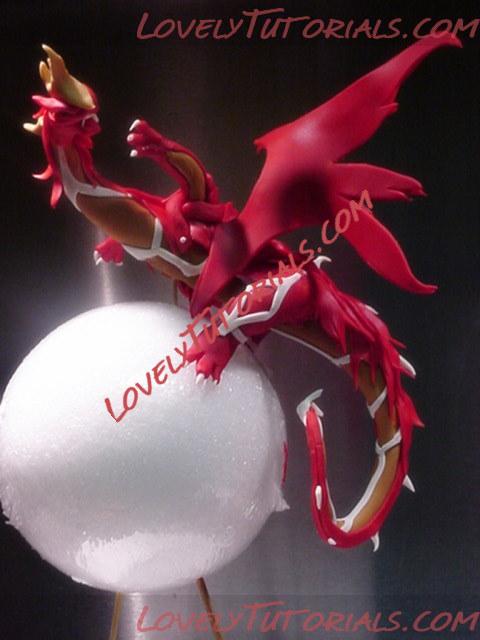
11. Finish detailing your dragon by adding claws, teeth, eyes and horned head using white gumpaste.
Touch up with gold luster dust mixed with Everclear alchohol.

Once completely dry, secure the wires extending from the legs to bamboo skewers using floral tape. Insert straws into your cake where the dragon's feet will be located. Insert the skewers into the straws on your Bakugan Ball Cake.
This dragon is rather heavy, so be sure your cake is a dense texture.
You can also make your Bakuball from Fondant covered Rice Crispie Treats.
|
26.04.2012, 09:32
|
|
Администратор
|
|
Регистрация: 07.09.2010
Сообщений: 7,669
|
|
Огромная благодарность carlbayercakes за Мастер-класс
  Sculpting Tip Sculpting Tip
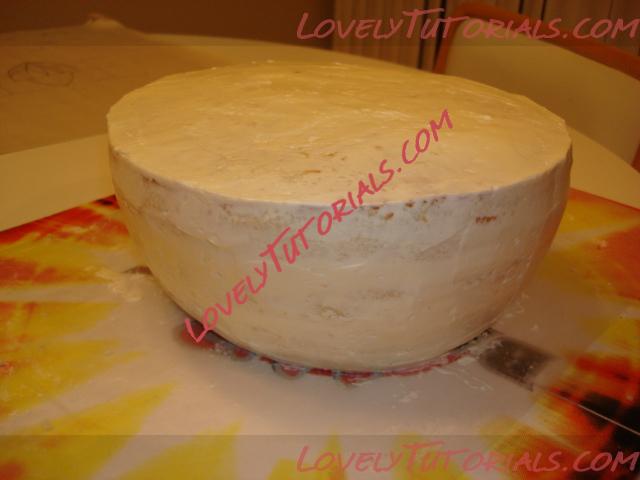
When any cake calls for shaping or sculpting, you should always have a template to guide you. In this case, I created a circle template for the bakugan body so I had a guide to keep the sphere circular.
Creating a circle template is as easy as using a compass, or a circular object to create a perfect circle. I like to use a compass so I can create any size circle I like. You can get a compass at any office supply store.
Once you create the circle with your preferred object, simply cut out the circle and you are ready to go. One final note… use a piece of wax paper between the template and frosting, otherwise you will have a sticky mess on your hands.
Now you can sculpt the cake with confidence because you took the time to create a nice template to follow.
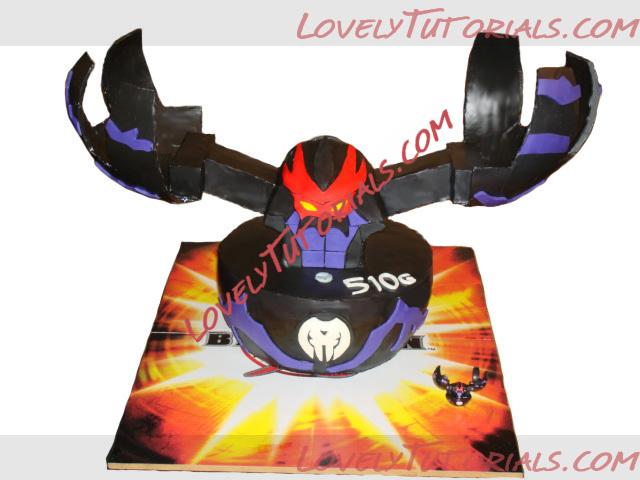
How To Build A Bakugan Cake
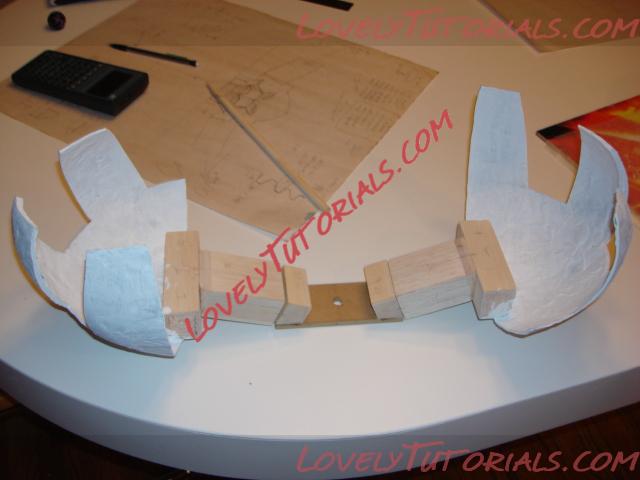
Constructing the bakugan cake took lots of planning to determine what it would take to build and actually make the cake look realistic. I knew that I would need to build a support for the arms and claws of the bakugan.
Now there are many ways that you could build this, but I like to build the parts myself and you have to factor in the time for this as well. I would recommend that if you are going to build the cake parts you should give yourself a couple of days before you start the cake, otherwise you will be building and baking at the same time, not a good way to manage your time.
As you can see here, there are several parts that make up the arms and claws for the bakugan cake. In the background you can see the drawings that I made for building the cake. Building any cake takes planning. You need to take the time to draw up plans and figure out dimensions for your cake. If you have trouble with this, you can always look online for some help with your design idea. Sometimes I like to search google for pictures of the object I am going to draw. This helps me visualize the object and get a better idea of how to design it.
 Building The Claws For The Cake
I always go through the same process when I am going to build a cake. First, I have an idea, but then I stare blankly at a piece of paper while I try to come up with some design ideas. Then the inspiration hits me and I begin working on the parts for the cake. First, I need to decide what size to make the cake, then I can figure out how big the whole cake will be and start drawing it out.
Use Paper Mache To Build Parts For Your Cakes
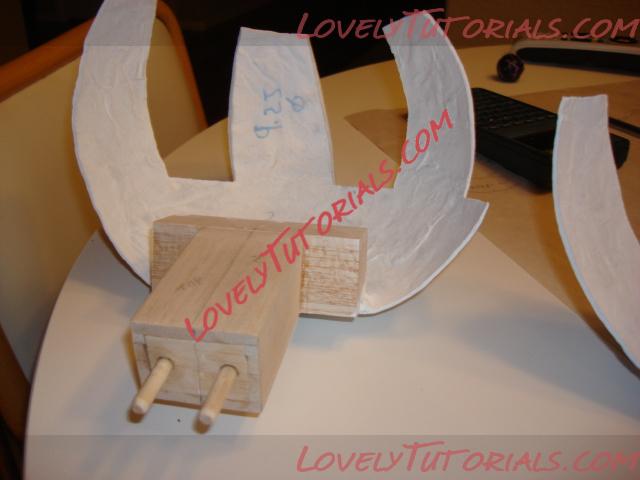
For the bakugan cake, I would need a big sphere to make the claws (the claws are the big white things in the picture above). The best sphere I could think of was a basketball, so I raided my kids sport organizer and found one. I decided that paper mache would be the best solution for making the claws, it is easy to get supplies (paper, flour, glue and water) and it would be rigid and strong when it dried. Fondant would have been a poor choice. I think that foam would have worked also, but it would have been a lot of cutting, shaping and sanding.
This was a fun project to make the paper mache parts and my kids joined in to layer the ball with strips of paper dipped in the “glue”. Always have a plan for building your parts and you will enjoy success with your cakes.
Building The Claws From Paper Mache
When I last left you it was with using paper mache to build the arms for the Bakugan cake (check out the picture below to see what I am talking about).
Now you might wonder… how do I build something like this? Well the simple answer is… if this is your first cake, then maybe try something a little less technical, but if you want to go for it then let’s go!
|
26.04.2012, 09:32
|
|
Администратор
|
|
Регистрация: 07.09.2010
Сообщений: 7,669
|
|
Paper Mache for bakugan cake
Огромная благодарность carlbayercakes за Мастер-класс
Paper Mache Recipe
3 – 6 Cups White Flour (Get the cheapest brand, it does not matter)
1 – 3 Cups Water (add more or less until the mixture is a soupy paste)
1 Bottle Wood Glue (again cheap is fine)
Mix It All Together
You will need either a large bowl or a bucket to mix in. If you are going to make a large scuplture, you will need about 6 cups of flour to make enough paste.
Place the flour in your bowl and make a well in the middle. Pour the water in the well (start with 1 cup) and use your mixer or whisk to start stirring. If it looks very thick, start adding more water to thin it out.
Continue stirring until the mixture is like a thick soup. You want it to be like wall paper paste. Remember, you are going to be dipping your strips of paper in it, and you want it to be thick enough to stay in place while it dries.
Now add the wood glue, you will need about 1/3 of the bottle for a small batch of paste (2-3 cups of flour). This step is optional as it only aids in helping prevent cracking of the paper mache, but flour and water by itself works just fine.
Cover the paste with a piece of plastic wrap to keep it from drying out on the top.
When you are ready to paper mache, you will need the following items….
Lots of newspaper
Paint Brush (helps smooth paste)
Rubber Gloves (optional)
First, you may want to either do this in your garage or outside, it can get messy. Wherever you choose to do it, lay out lots of newspaper, or a plastic tarp on the floor or table you are working on.
Tear up your newspaper into lots of strips, you may want to have a variety of widths. Make some of them 1/2 inch wide and others can be 1, 2 or 3 inches wide.
Now grab your paste and get ready to get messy.
Prepare For Success With The Right Tools
Before you dive into dipping your paper in the paste, you need to make sure you have the necessary tools. If you want to build a sphere for instance, you will need something to lay the paper and paste onto until it dries.
You can either use a ball or balloon. I don’t like balloons because you cannot get a perfect sphere and they can pop and that makes a big mess. Instead use a sports ball (basketballs work great for large spheres).
When you have the necessary tool, you can move on to adding the paper mache and paste.
Start Papering and Pasting
Ok, now get your paste and paper strips and begin dipping the paper strips into your paste. You only want a thin layer of paste, so use the brush to evenly coat the paper.
(you may want to use plastic wrap around the object you use the paper mache on so that it is easier to remove later. Make sure it is smooth though)
Keep adding layers, make sure to overlap each strip to create a continual piece of paper. For a half sphere, make sure to add paper beyond the halfway point, you will cut off the excess later).
You are finished when you have added enough layers of paper and paste to a thickness of 1/8 inch. You can get away with less thickness for more delicate, smaller parts.
Let it dry completely, either in a 200 degree oven for 1/2 hour, or next to a heat source. Bigger parts will take up to a day to dry throughout.
When it is dry, you can sand it smooth, drill it or cut it just like wood.
|
14.07.2012, 13:50
|
|
Администратор
|
|
Регистрация: 07.09.2010
Сообщений: 7,669
|
|
|
 |
|
Метки
|
3d figures, a bakugan making tutorial, addım-addım təlimat, adım, adım adım yönergeler, artesanatos passo a passo, bemutató, birthday cake, biscuit, bolando bolos, bolos decorados, cake decorating, cake decorating techniques, cake topper, cake toppers, cake tops, cerâmica plástica, character figures, characters, children's cake, cold porcelain, confeitando bolos, curso de modelado, decoracion de pasteles, decoración de tortas, decorada en fondant, decorare le torte, decorazioni, deko fondant, dekorace na dort, dekoracija, dekoracije, dekorasyon, dekorácie, especializada em modelagem de biscuit, fender, figur kager, figuras, figure making tutorials, figuren, figures, figurice, figurice od fondana, figurine on the cake, figurines, figurinhas, figurky, figúrky, figür modelleme, fimo, fixando a cabencinha, flower paste, fondan, fondant, fondente, fondente di zucchero, fotopostup, foundant, gebak, glazuur, gum pasta, gum paste, gumpaste, hand-made, handmade, how to, how-to's, instrucţiuni, instrukcijas, instrukcje, jak na, kage dekoration, kagedekoration, kakebaking, korak, korak za korakom navodila, korak-po-korak upute, koristeet ja koristelu, krok, krok po kroku, krok za krokem, krok-za-krokem, la modélisation, las instrucciones, las técnicas, le tecniche, les techniques, lukie, marcipanové figurky, marshmallow, marsipanfigurer, masa flexible, master-class, master-klasse, master-klasy, meistras klasės, metodikas, mistr třídy, modelado, modelagem, modelando a barriga, modelando a cabencinha, modelando a perninha, modelando as maozinhas, modelando o cabelinho, modelando o corpinho, modelando os bracinhos, modelando os pezinhos, modelare, modelerte figurer, modeling, modeling paste, modeliranje, modellazione, modelleme, modellering, modellieren, modellierpaste, modelling, modelling past, modelləşdirmə, modelovanie, modelování, modelowanie, motivtorten, návod, opplæringen, orelhas, ozdoby, pamoka, pap, pas, pas-cu-pas, paso, paso a paso, passo, passo a passo, passo-a-passo, passo-passo le istruzioni, pasta de goma, pasta de miel, pasta flexible, pasta laminada, pintura dos olhos, pocelana fria, polymer clay, postupak za ukrasavanje, pravljenje figurica za torte, pâtisserie, předměty z marcipánu, schmelzend, schritt für schritt anleitung, schritt-für-schritt, schritt-für-schritt-anleitungen, sculpting, soggetti, souvenirs, stap, stap-voor-stap, stap-voor-stap instructies, steg for steg, steg-för-steg-instruktion, step, step by step, step-by-lépésre, step-by-step, step-by-step instructions, styrofoam, sugarcraft, sugarpaste, suikerglazuur, technieken, techniken, techniki, techniky, technikák, techniques, tecnicas de decoracion, tecniche, tehnici, tehnike, teknikker, teknikler, telgopor, topo de bolo, topo do bolo, topos de bolo, torte, torte decorate, torten dekorieren, torti, trin, trin for trin, trin-for-trin, trin-for-trin instruktioner, trinn, trinn for trinn, trinn-for-trinn-instruksjoner, tutorial, tutoriale, tutorias, tutorias/ideas para decorar los bizcochos, tutoriel, tutorijal, técnicas, udžbenik, ukrašavanje torti, uputstvo za dekoraciju, zuckerfigürchen, zuckermasse, सजा केक, ट्यूटोरियल मास्टर वर्ग, कदम, कदम दर कदम निर्देश, तकनीक, मॉडलिंग, モデル, étape, étape par étape les instructions, öğretici, 一步, 一步一步的指示術, žingsnis, žingsnis po žingsnio, 宗師級教程, 建模, 裝飾蛋糕, βήμα, βήμα προς βήμα οδηγίες, οδηγίες βήμα βήμα, παντεσπάνι art, τεχνικές, φροντιστήριο, инструкция, как сделать, крок за кроком, крок за крокам, покроково, полимерная глина, пошагово, пошаговые фотки, пакрокава, персонажи, миниатюра, мк, мк лепка "бакуган", моделиране, майстор-класа урок, майстар-клас, майстер-клас, майстер-класи, маршмеллоу, мастика, мастер-класс, лепка, ліплення, ручной работы, ручная работа, украшение тортов, сахарная мастика, уроки прикрашання, стъпка, стъпка по стъпка инструкции, техники, техника, техніка, туториал, туторіал, тэхніка, фигурки, фигурка на торт, фимо, фігурки, фігуркі, холодный фарфор, шаг за шагом, інструкцыя, інструкція  |
|


