Огромная благодарность
carlbayercakes за Мастер-класс
 Sculpting Tip
When any cake calls for shaping or sculpting, you should always have a template to guide you. In this case, I created a circle template for the bakugan body so I had a guide to keep the sphere circular.
Creating a circle template is as easy as using a compass, or a circular object to create a perfect circle. I like to use a compass so I can create any size circle I like. You can get a compass at any office supply store.
Once you create the circle with your preferred object, simply cut out the circle and you are ready to go. One final note… use a piece of wax paper between the template and frosting, otherwise you will have a sticky mess on your hands.
Now you can sculpt the cake with confidence because you took the time to create a nice template to follow.
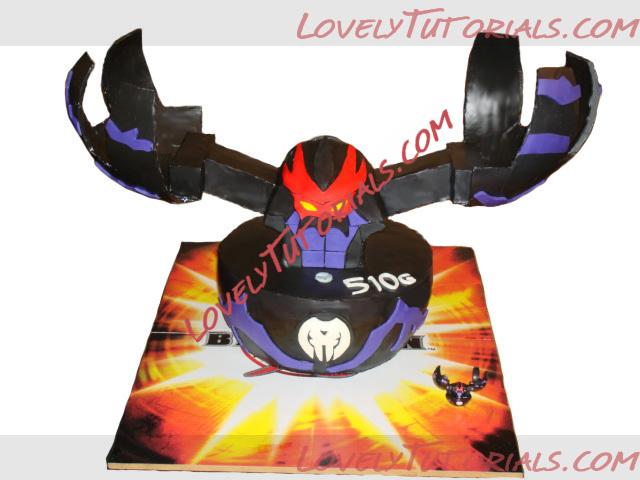
How To Build A Bakugan Cake
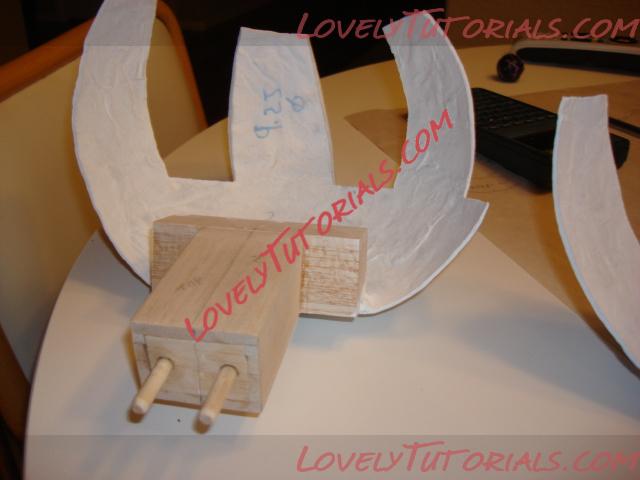
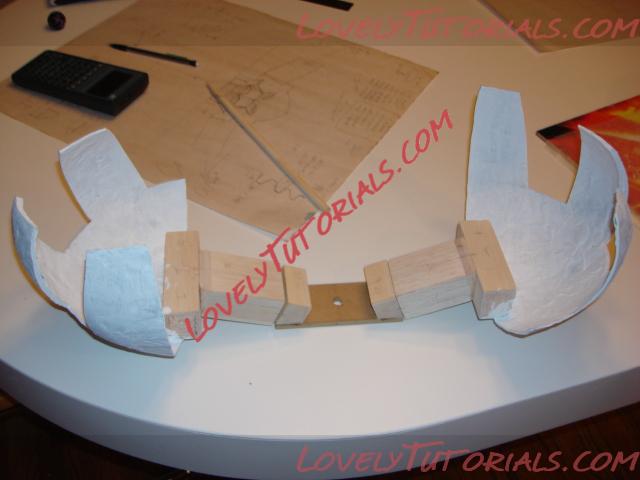
Constructing the bakugan cake took lots of planning to determine what it would take to build and actually make the cake look realistic. I knew that I would need to build a support for the arms and claws of the bakugan.
Now there are many ways that you could build this, but I like to build the parts myself and you have to factor in the time for this as well.
I would recommend that if you are going to build the cake parts you should give yourself a couple of days before you start the cake, otherwise you will be building and baking at the same time, not a good way to manage your time.
As you can see here, there are several parts that make up the arms and claws for the bakugan cake. In the background you can see the drawings that I made for building the cake. Building any cake takes planning. You need to take the time to draw up plans and figure out dimensions for your cake. If you have trouble with this, you can always look online for some help with your design idea. Sometimes I like to search google for pictures of the object I am going to draw. This helps me visualize the object and get a better idea of how to design it.
 Building The Claws For The Cake
I always go through the same process when I am going to build a cake. First, I have an idea, but then I stare blankly at a piece of paper while I try to come up with some design ideas. Then the inspiration hits me and I begin working on the parts for the cake. First, I need to decide what size to make the cake, then I can figure out how big the whole cake will be and start drawing it out.
Use Paper Mache To Build Parts For Your Cakes
For the bakugan cake, I would need a big sphere to make the claws (the claws are the big white things in the picture above). The best sphere I could think of was a basketball, so I raided my kids sport organizer and found one. I decided that paper mache would be the best solution for making the claws, it is easy to get supplies (paper, flour, glue and water) and it would be rigid and strong when it dried. Fondant would have been a poor choice. I think that foam would have worked also, but it would have been a lot of cutting, shaping and sanding.
This was a fun project to make the paper mache parts and my kids joined in to layer the ball with strips of paper dipped in the “glue”. Always have a plan for building your parts and you will enjoy success with your cakes.
Building The Claws From Paper Mache
When I last left you it was with using paper mache to build the arms for the Bakugan cake (check out the picture below to see what I am talking about).
Now you might wonder… how do I build something like this? Well the simple answer is… if this is your first cake, then maybe try something a little less technical, but if you want to go for it then let’s go!