|
|
ذ“ذ¾ر€ر‚ذµذ½ذ·ذ¸رڈ,ذ”ذ°ر„ذ½ذ°, Hydrangea, hortenzie, Dafna flower,Hortensie, ortensia, hortensia
|

16.09.2010, 08:01
|
|
ذگذ´ذ¼ذ¸ذ½ذ¸رپر‚ر€ذ°ر‚ذ¾ر€
|
|
ذ ذµذ³ذ¸رپر‚ر€ذ°ر†ذ¸رڈ: 07.09.2010
ذ،ذ¾ذ¾ذ±ر‰ذµذ½ذ¸ذ¹: 7,940
|
|
 ذ“ذ¾ر€ر‚ذµذ½ذ·ذ¸رڈ,ذ”ذ°ر„ذ½ذ°, Hydrangea, hortenzie, Dafna flower,Hortensie, ortensia, hortensia
|

01.10.2011, 07:15
|
|
ذگذ´ذ¼ذ¸ذ½ذ¸رپر‚ر€ذ°ر‚ذ¾ر€
|
|
ذ ذµذ³ذ¸رپر‚ر€ذ°ر†ذ¸رڈ: 07.09.2010
ذ،ذ¾ذ¾ذ±ر‰ذµذ½ذ¸ذ¹: 7,940
|
|
|

24.02.2012, 15:00
|
|
ذگذ´ذ¼ذ¸ذ½ذ¸رپر‚ر€ذ°ر‚ذ¾ر€
|
|
ذ ذµذ³ذ¸رپر‚ر€ذ°ر†ذ¸رڈ: 07.09.2010
ذ،ذ¾ذ¾ذ±ر‰ذµذ½ذ¸ذ¹: 7,940
|
|
|

09.03.2012, 07:49
|
|
ذگذ´ذ¼ذ¸ذ½ذ¸رپر‚ر€ذ°ر‚ذ¾ر€
|
|
ذ ذµذ³ذ¸رپر‚ر€ذ°ر†ذ¸رڈ: 07.09.2010
ذ،ذ¾ذ¾ذ±ر‰ذµذ½ذ¸ذ¹: 7,940
|
|

ذœذڑ ذ²ذ·رڈر‚ رپ رپذ°ذ¹ر‚ذ° petalsweet.blogspot.com
ذذ³ر€ذ¾ذ¼ذ½ذ°رڈ ذ±ذ»ذ°ذ³ذ¾ذ´ذ°ر€ذ½ذ¾رپر‚رŒ ذگذ²ر‚ذ¾ر€رƒ Jacqueline Butler ذ·ذ° ذœذڑ
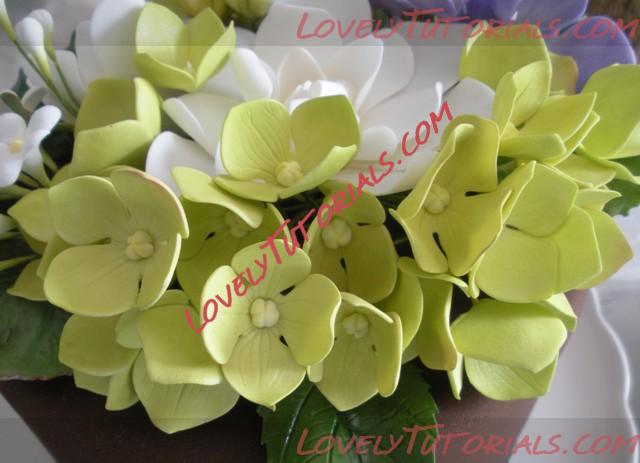
I get a lot of questions about the filler flowers I use in my gumpaste floral bouquets. I frequently use hydrangea and/or small pulled blossoms because they are quick and easy to make, and go well with many of the color schemes for my cake designs. They are also easy to group into any size bouquet to fill spaces between larger flowers, and I think they help to make the final bouquets look full and lush.
I wanted to share my steps for making both of these filler flowers...starting with the hydrangea. I've created this tutorial with a series of photos, but PLEASE let me know if they don't convey the information clearly enough. I know video is the direction to go with future tutorials, but until I have all of the right equipment, I'm sorry the photos will have to do! I have also broken it down into quite a few steps...I don't know who is reading this blog, and I just want to make sure all of the little things are covered. When I started making gumpaste flowers, I know the littlest tips were always so helpful.
A NOTE ABOUT WIRE: For both the hydrangea and pulled blossoms, I use green cotton-covered wires. They are usually packaged in 12" lengths, and come in many gauges...the higher the gauge number, the finer the wire:
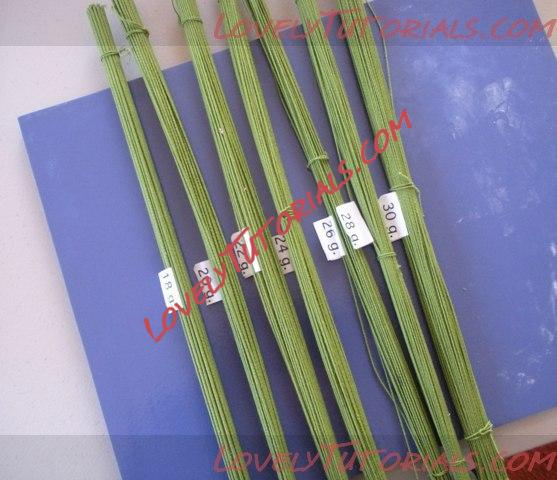
You can also use white cotton-covered wire, but you will eventually need to wrap each wire with green floral tape to make it look like a stem, a timely step I like to skip if possible. I purchase my wire from a local cake decorating store, and online from the talented Scott Clark Woolley, who offers wonderful supplies on his site Cakes by Design. Of course, you can also make either of these flowers without wire, and attach them directly to your cake. If so, you may want to forgo the gumpaste hydrangea centers and just pipe small centers with royal icing.
HYDRANGEA TUTORIAL PART ONE
For the hydrangea CENTERS, here are the tools I use:
* 26g wire
* Tweezers
* Needle tool (or you can use a toothpick or pin)
* Wire cutters
* Gumpaste (white)
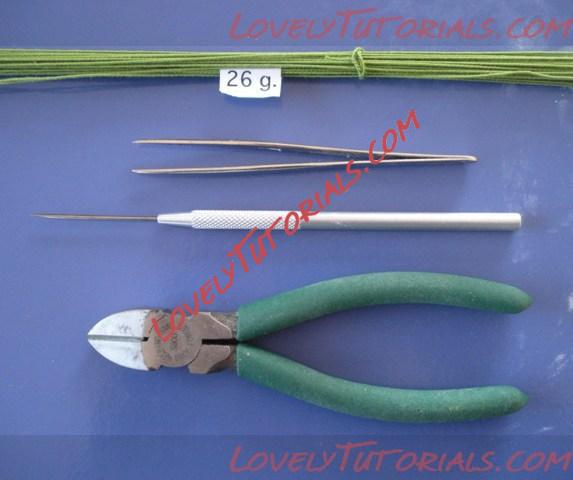 Step 1:
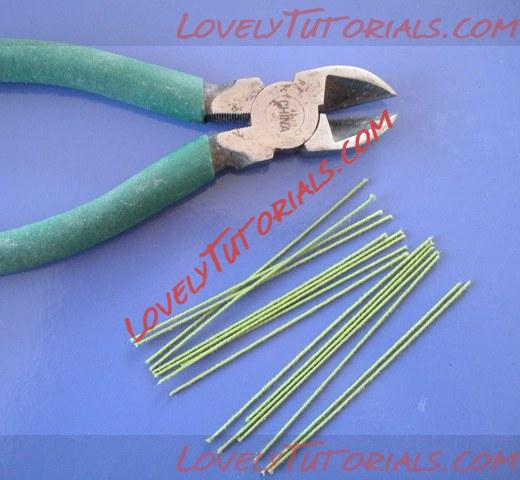
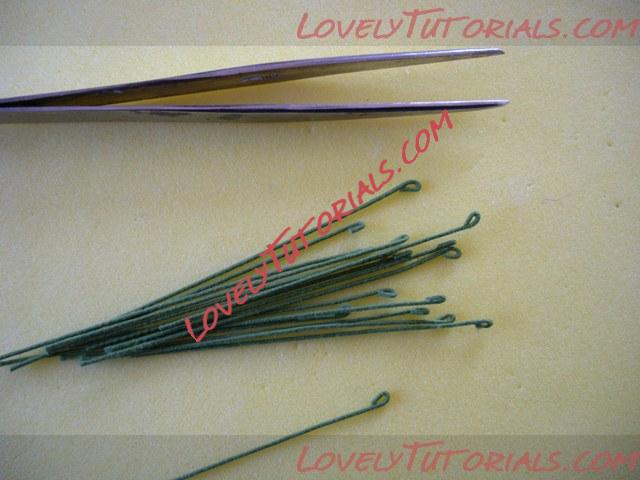
 Cut your wires into fourths with the wire cutters. Don't worry about making them exact...I like my wire lengths to vary a bit as they help to give the final bouquet a more life-like appearance. Too exact, and you get a stiff and unnatural look:
 Step 2:
 Using your tweezers, bend the very top of your wires, making as small a loop as possible:
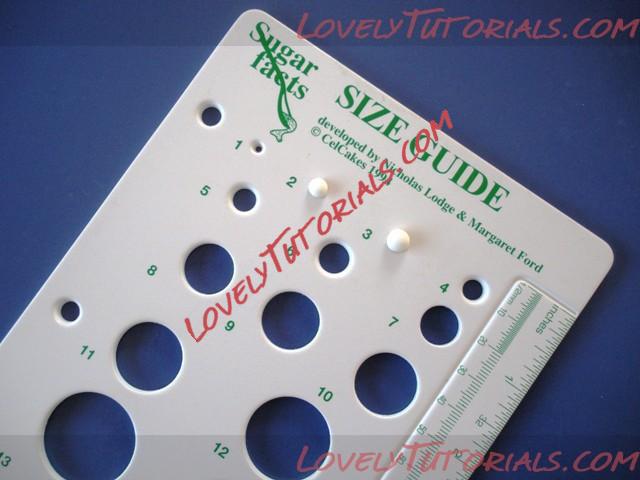
I like to make the centers as small as I can, and having made so many hydrangea, I don't use a size guide. But, I thought I would add some photos with the guide for those of you who do like to use it. Again, try to vary the size of your centers a tiny bit so they do not all look exactly the same. There are two sizes of hydrangea cutters, and I like to have a mix of centers for both. The gumpaste balls I use sit comfortably in #2 and #3 of Nicholas Lodge's size guide, but keep in mind this amount of gumpaste will be more than the final size of the center. Some of the gumpaste will be pinched off once the center is formed around the wire loop:
 Step 3:
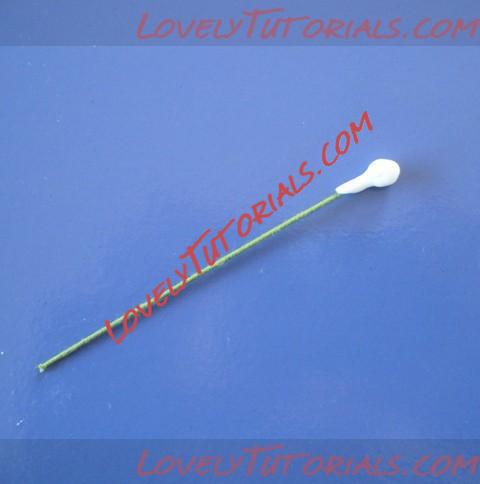
 Working with one ball at a time, insert the wire loop into the center of the ball and gently shape the gumpaste down around it to cover the loop completely. Don't pull the gumpaste tight around the loop, you want to have a bit of padding on top to score with lines. The excess gumpaste will be pulled down below the loop and be pinched off to secure the paste to the wire:
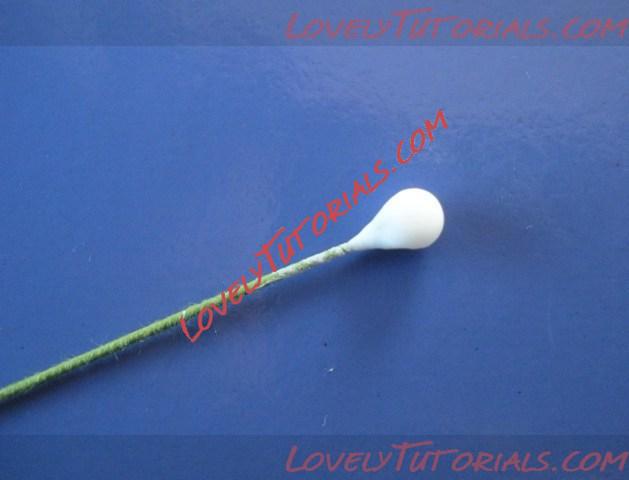
To pinch off the excess paste, twist the wire between your thumb and first finger, right below the base of the loop. Your goal is to end up with a neat and clean little "bud" on the end of your wire:
 Step 4:
 Using your needle tool (or toothpick or pin), mark four lines starting from the center of the ball, and outwards down the sides. You are now making your bud look like a "hot cross bun"! I prefer to make four lines starting from the center (versus two across the top like an "X") because you end up with a nicely shaped center instead of a flattened ball. Just turn your center a quick quarter turn between each line marking:
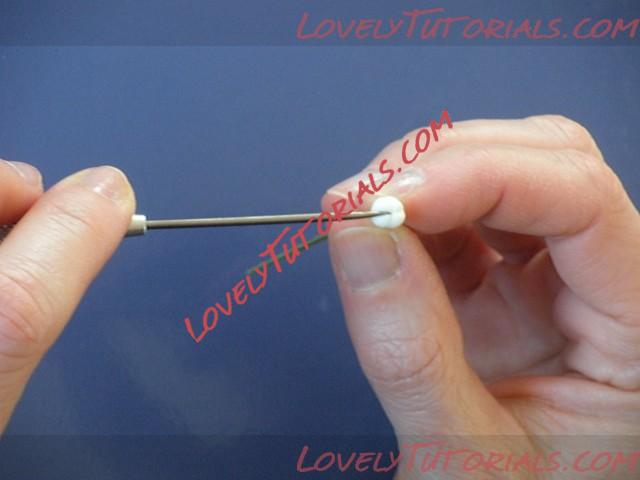
The completed center:
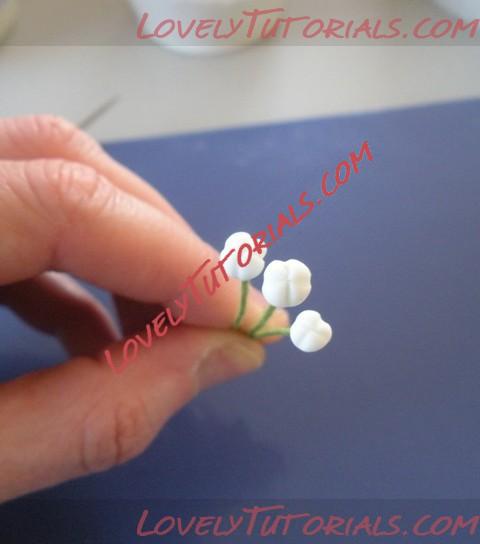
And a photo of several centers together with a glass-headed pin for size reference:
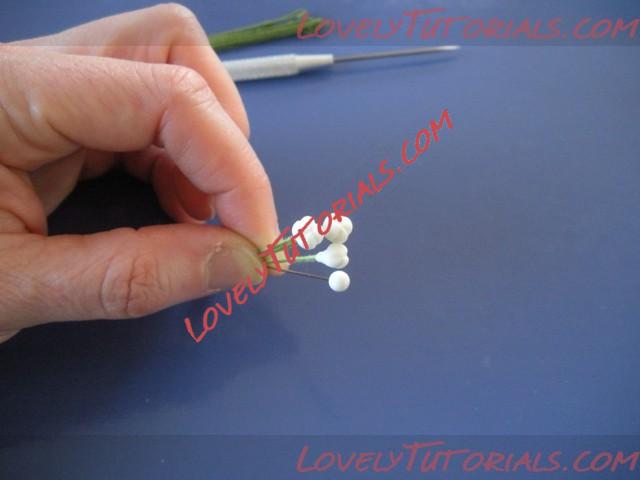
Once you have all of your centers made, let them dry overnight.
For the hydrangea PETALS, here are the tools I use:
* Rolling/cutting board
* Rolling pin (or pasta machine if making large quantities)
* Foam pad
* Ball tool
* Hydrangea cutters/veiners
* Gumpaste (in color of choice)
* Drying rack (there are a lot of different drying forms you can purchase online, but I also use clothes hangers for drying flowers upside down, and egg cartons to dry them face up)
* Sugar glue and small brush for application
* Dry hydrangea centers
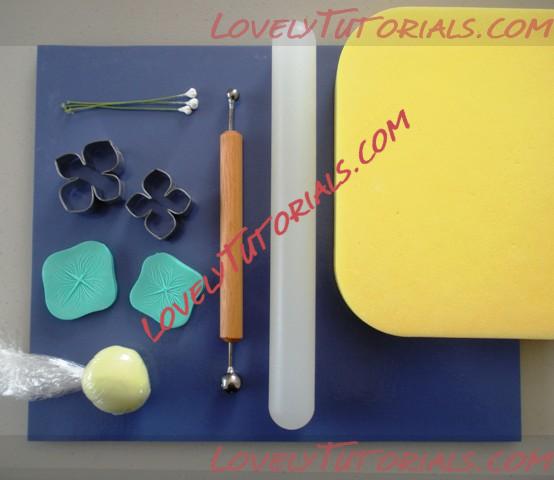
A NOTE ABOUT GUMPASTE COLOR: I use a very pale base color for my hydrangea unless the finished flowers are going to be white. I think it gives the flowers a nice glow of color underneath the final addition of dusting colors. For the green hydrangea in this tutorial, I colored my gumpaste with a mix of AmeriColor gels in Avocado and Lemon Yellow.
Step 1: Roll out paste thin and press veiner into it, being careful to not press down too hard or veiner may cut through paste:
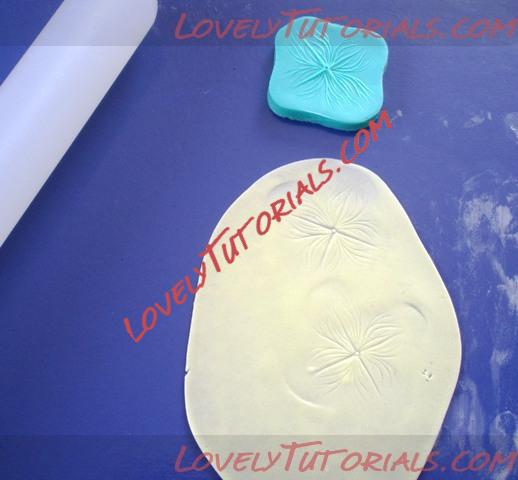 Step 2:
 Cut out flowers using cutters, making sure to align shorter and longer petals on the cutter, with the shorter and longer veins from the veiner:
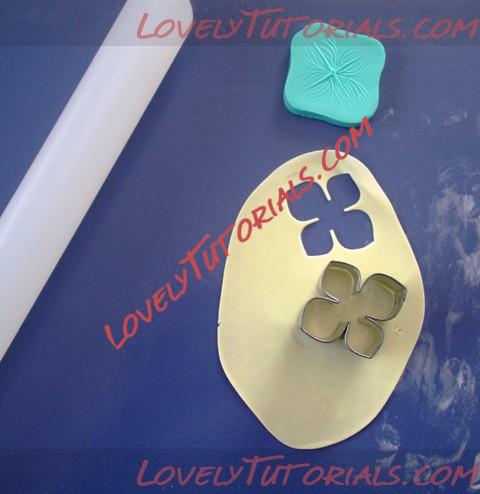 Step 3:
 Using your ball tool, thin edges of the cut out flowers, making sure to follow the contours of the petals. With these flowers, I always work from the middle of the flower outward to the tips, along both sides of the individual petals. Additionally, you can "cup" the individual petals by making tiny circles with the ball tool in the middle of each petal. I like to make a mixture of both for my bouquets so the hydrangea look more varied:
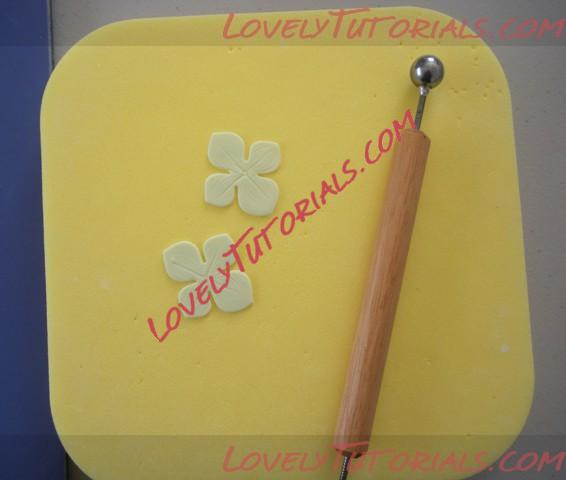
Thin edges with ball tool:
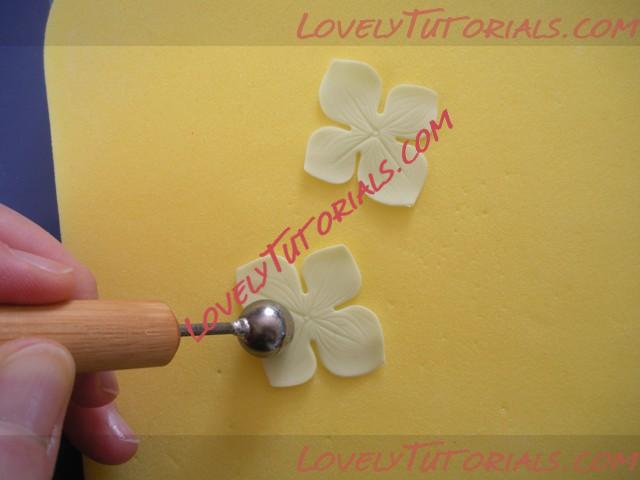
Examples of thinned edges only (in back) versus thinned edges and cupped with ball tool (in front):
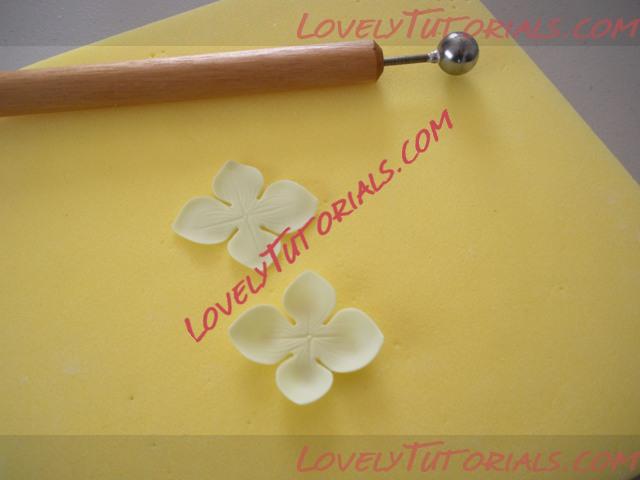 Step 4:
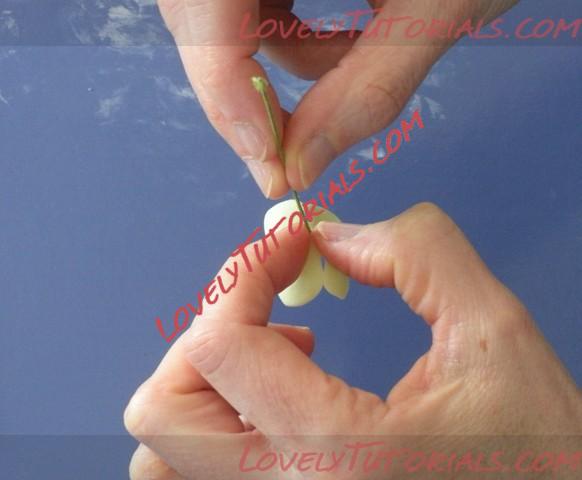
 Lightly dab the back of the center with sugar glue, and thread the wire down through the top of the flower until the center meets the flower. Turn the flower upside down and pinch/press lightly to adhere the flower to the center:
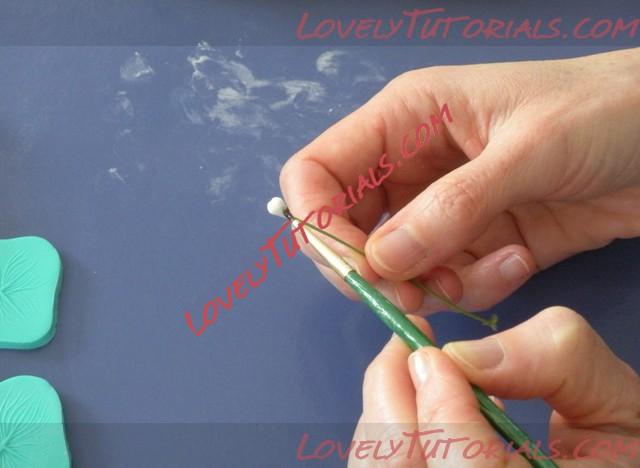
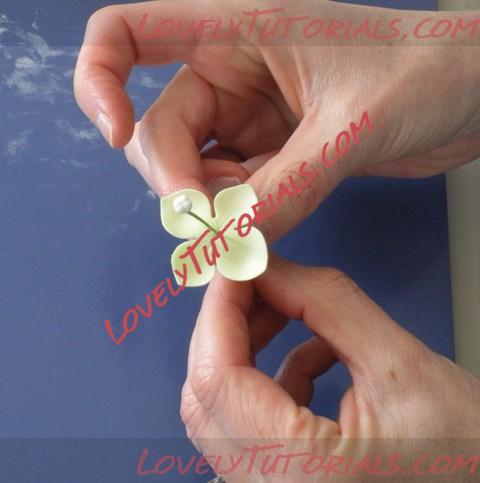
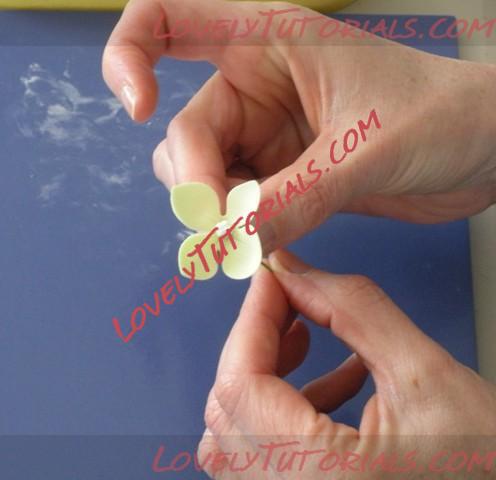
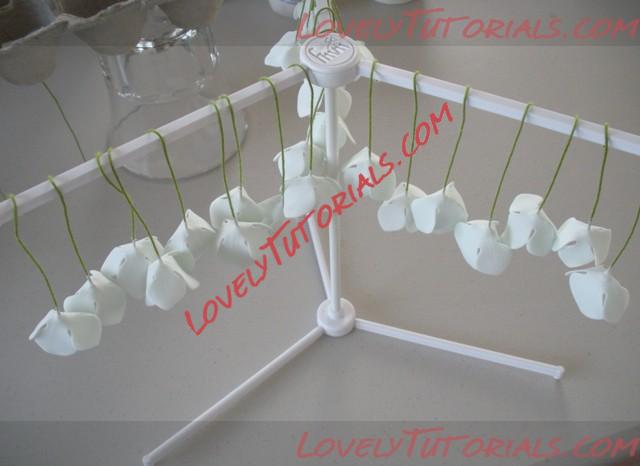
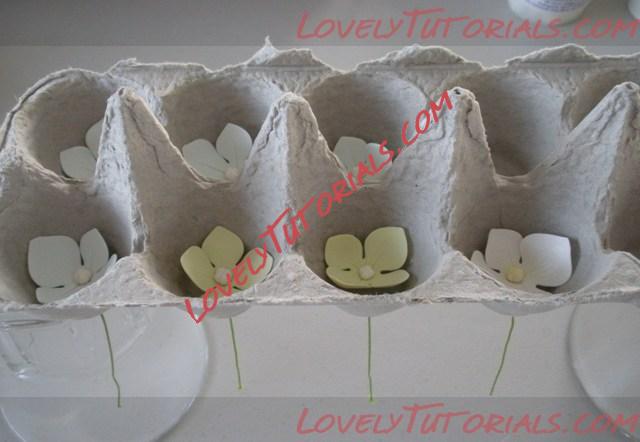
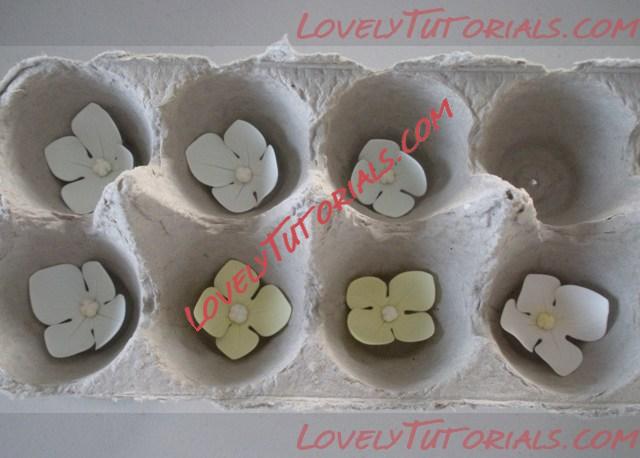
Hang upside down to dry, or poke holes in the bottom of an egg carton and rest the flowers in the egg cups to dry facing up (rest the carton on top of some coffee mugs to allow space below for the wires to hang below). A mix of these drying methods will give you a great blend of open and closed flowers for your final bouquet.
Here are some blue hydrangea hanging to dry:
And a mix of blue, green and white hydrangea drying in an egg carton:
And just a couple of suggestions:
1. When you sit down to make these, make A LOT of them!! I use hydrangeas in many of my flower arrangements...I love the way they look and how easily they compliment other colors. And they are a great way to fill space around large, focal flowers.
2. I make hydrangea in variations of pink, green, white, blue and purple. I recommend making a stash of your flowers in the pale version of the final color, then saving them and coloring them as needed, rather than coloring them all at the same time. I don't always need a deep, dark purple hydrangea...so I adjust my dusting colors accordingly as I am planning the final bouquet of flowers.
|

09.03.2012, 07:50
|
|
ذگذ´ذ¼ذ¸ذ½ذ¸رپر‚ر€ذ°ر‚ذ¾ر€
|
|
ذ ذµذ³ذ¸رپر‚ر€ذ°ر†ذ¸رڈ: 07.09.2010
ذ،ذ¾ذ¾ذ±ر‰ذµذ½ذ¸ذ¹: 7,940
|
|

Get comfortable...this post is a bit of a beast! It's long and detailed...so thank you ahead of time for sticking around to the end!
Alright...with all of your hydrangea flowers made and dried, it's time for Part Two of the tutorial, including coloring and arranging! Just so you know, I do all of my coloring by hand with petal dusts and brushes. I know a lot of fabulous sugar artists who use an airbrush effectively and end up with beautiful results. I don't have enough experience with an airbrush (yet!) to create the effect I like on my flowers, so this tutorial will only cover using dusts.
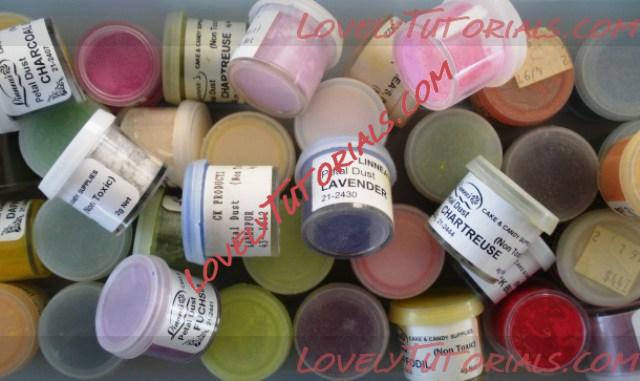
SOME NOTES ABOUT PETAL DUSTS: There are many different brands of dusts on the market, and I haven't used all of them, so I will only be featuring the brands I have used with success here. I rarely use a color straight out of the jar, except for very small accents on particular flowers...I frequently blend them, or make them lighter or darker before using. Also, I always have greens and yellows on hand, as they both bring life and brightness to any flower. I suggest playing around with color variations as much as you can...it can really make a big difference in your final product!
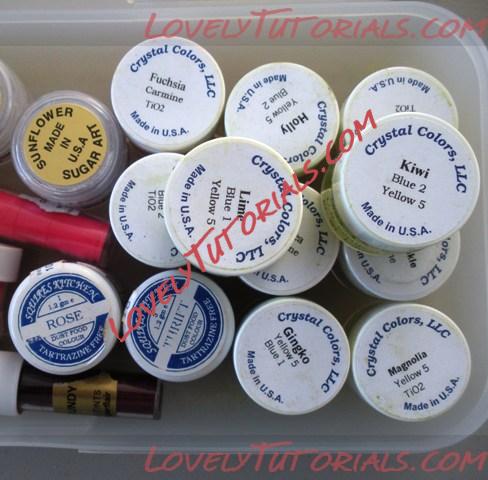
Below are the brands of petal dusts I have used. I buy the Linnea's petal dust at my local cake decorating store, and the rest I have found online. If anyone has used additional brands they really like, I'd love to hear from you!
*Sunflower Sugar Art
*CK Products
*Linnea's Inc.
*Squires Kitchen
*Crystal Colors
*Sugarflair
 SOME NOTES ABOUT THE COLORING PROCESS:
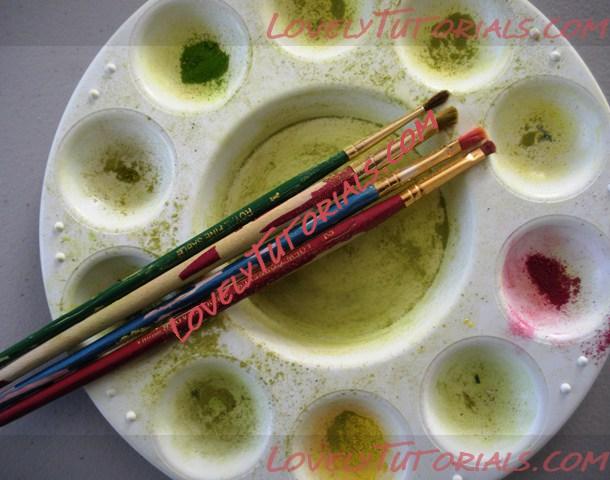
 A tip that has helped make coloring easier for me is using plastic paint palettes (seen in the first photo of the post), or plastic lids from containers, for mixing and saving colors of petal dusts. I have separate palettes for different color families (one for greens, one for pinks, one for purples, etc.) so that I don't accidentally cross colors AND so I can save custom colors that I really like. I simply cover the palette or lid with foil, label it, and save it for the next batch of flowers. I can always add a different hue or lighten/darken the colors before I use them again, so I know the dusts won't be wasted. As an example, I make so many green hydrangea that I have a palette just for those colors...it's a great time-saver. Brushes are the same way...I have different jars for my color families so that I don't accidentally brush a dark mossy green on my pink peony. Finally, I usually approach my dusting as an assembly line...dust all my centers first, move on to do all the base color, add the highlights, then apply pearl dust to all the flowers as the last step.
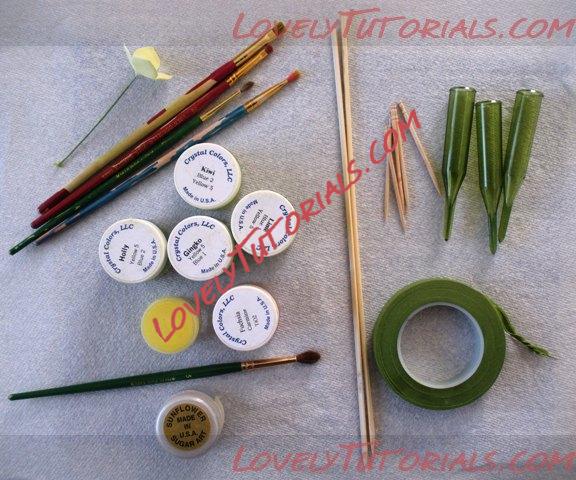
Here are the tools I use when coloring and arranging my hydrangea:
*Dry hydrangea flowers
*Petal dusts
*Pearl dust
*Brushes (two types: soft brushes in small and medium sizes...and firm/flat brushes in small sizes)
*Palette, plastic lid or paper towel for mixing colors
*Moss green florist tape
*Toothpicks or wooden skewers
*Plastic floral tubes/water picks
 COLORING HYDRANGEA:
Step 1:
 Prepare your colors. For this tutorial, I used the following colors:
*Crystal Colors in "Kiwi" (added white and pale yellow for BASE color)
*Crystal Colors in "Lime" (used as is for edges only - see below)
*Crystal Colors in "Holly: (used as is for edges only - see below)
*Crystal Colors in "Ginkgo" (used as is for edges only - see below)
*Crystal Colors in "Fuchsia Carmine" (used as is for edges only - see below)
*Sunflower Sugar Art Pearl Dust in "Super Pearl"
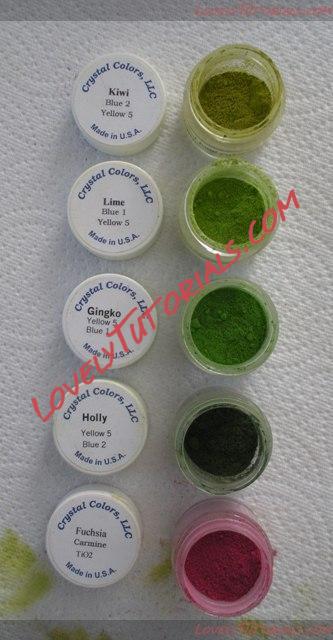
As well as:
*Linnea's "Daffodil" (added white to make a soft lemon yellow for the centers)
*Sunflower Sugar Art in "White" (to lighten the other colors as needed)
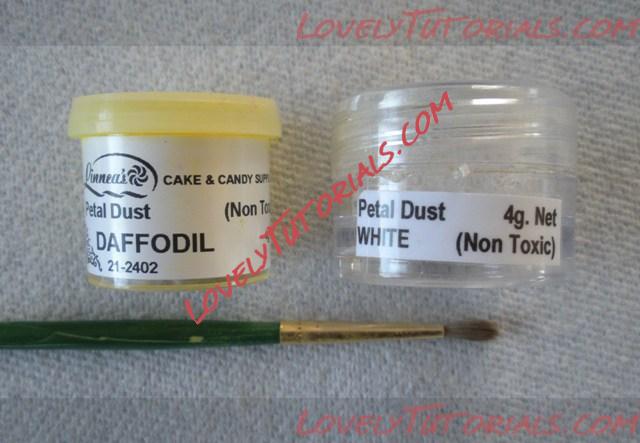 Step 2:
 With your colors mixed, use a small, soft brush to dab the hydrangea center with pale yellow. Don't cover up those gorgeous little white centers you made...just use a touch of the yellow to add some brightness:
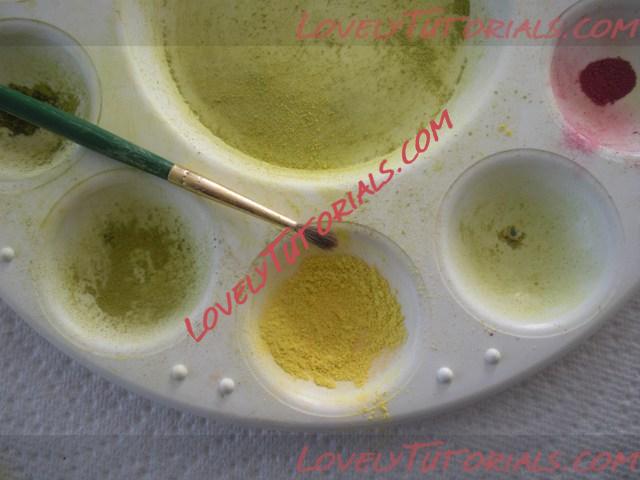 Step 3:
 With one of your flat brushes, dust the front of each flower with your base green color, starting at the edge of the petals and working towards the center. I do not color all the way to the center...I think leaving a little ring of the pale green gumpaste visible is really pretty:
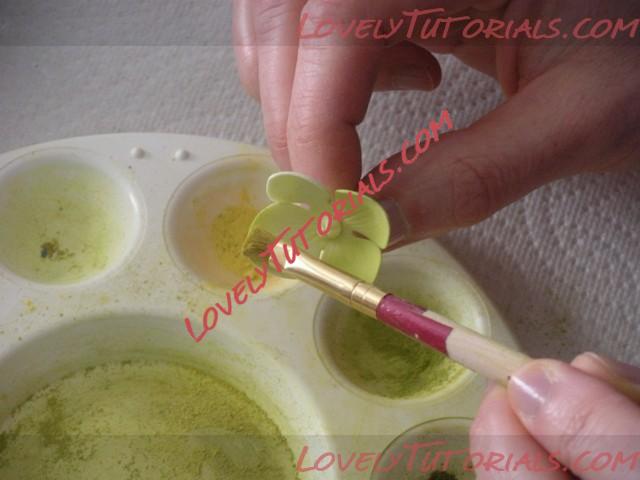
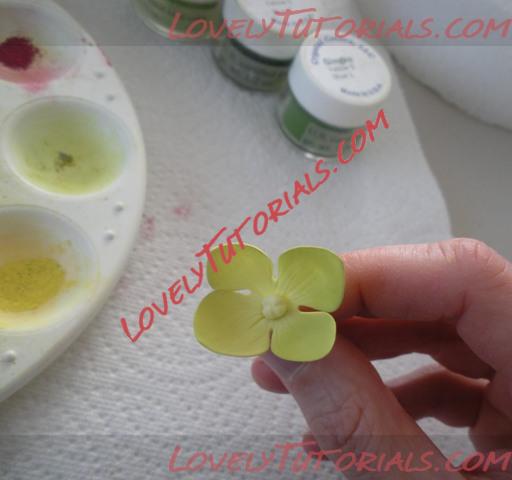 Step 4:
 With your same base green color, turn the flower over and dust the back of the petals, again working from the edges towards the wire. Don't worry about completely covering these petals unless they will be seen. I usually dust about half way down the petals:
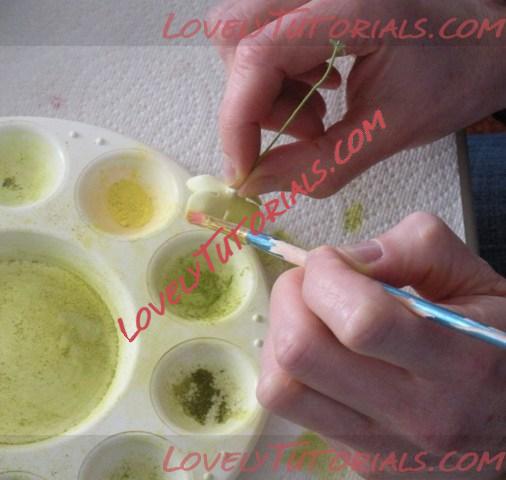 Step 5:
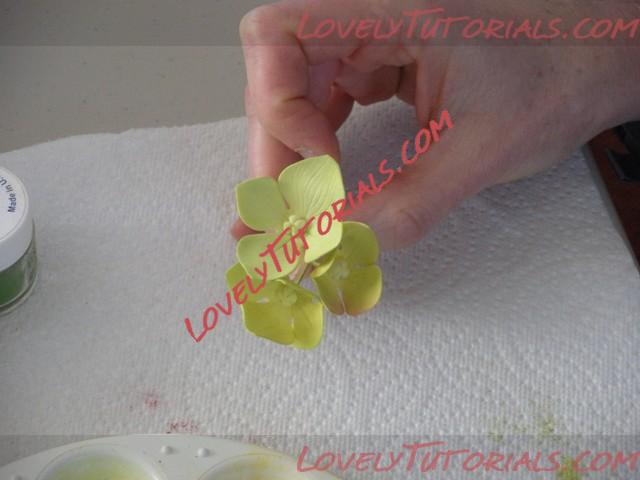
 OK...so here is one of my BEST tips for hydrangea! Once all of your flowers are dusted with your base color, divide them into four equal groups. Pick three new colors of green dust, and a pink dust as well. Pick the first group, and using a flat brush, dust only the edges of the petals of each flower with your first new green color. Try to vary the number of petals you dust so they are not all exactly the same. Finish the first group, then change green colors and start with the second group. Change green colors again and continue with the third group, and then use your pink dust on the fourth group. You are using only ONE new color on each group of flowers, not all four (that would take forever)! AND, you are only dusting the edges of the flowers, not the petals. In this photo, one flower has edges with a lime green, one has edges with a grass green, and one has edges with pink:
And here is a larger group...nice variation in color, and all of the flowers look a little bit different:
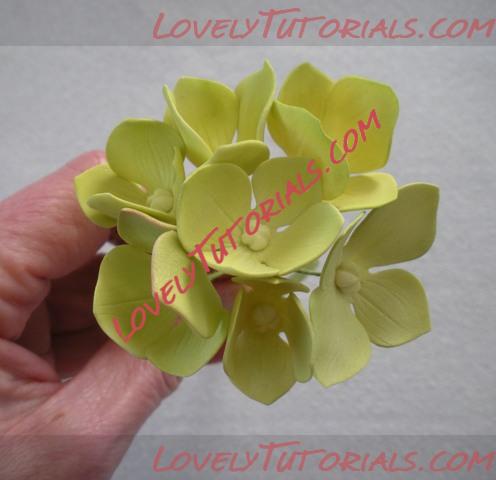
The little extra touch of the different colors will really make the final bouquet look beautiful! This technique can also be re-created when you make the other colors of hydrangea...just pick a variety of colors that are in the same family of your base color and use them on the edges of groups of your flowers. I use a touch of green dust when making all other colors of this flower (white, pink, purple, blue) so that some of the petals still look like they are young and in bloom.
Step 6: Once all of your flowers are dusted with color, use a medium-sized soft brush to dust them lightly with pearl dust, front and back. This will help soften any harsh brush lines, blend the variations in color, reduce the powdery look after dusting, and give the flowers a very delicate and natural appearance:
 NOTE:
NOTE: Please do not be heavy-handed with the pearl dust...if your flowers look frosty or shiny, then you have used too much. We're going for a soft glow! Steaming is another option here...it can be a great way to set and deepen your colors. I prefer the look of the light pearl effect most of the time, but will occasionally use the steaming process. If you want to know more about steaming your flowers, OR you use steaming frequently and love it, please contact me! I'm happy to share my experience, and I'd love to learn more!
ARRANGING HYDRANGEA:
Step 1: Gather a small group of your completed flowers. I always use mine in odd numbers. Due to the different shapes and sizes of your flowers, move them around a bit until they fit together nicely like puzzle pieces. Because they are all individually wired, you can also gently twist and turn the actual flowers as needed.
Also, group your pink-edged flowers together - it will look like a section of your bouquet is in the middle of changing colors!! Your other green-edged flowers should be mixed randomly for the best overall effect:
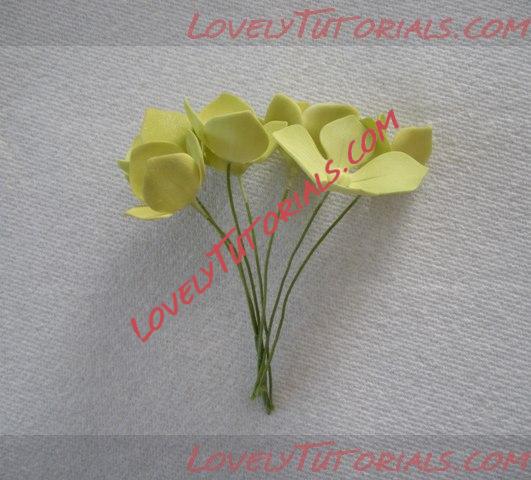 Step 2:
 Begin taping the bottom third of the wires together with your green florist tape. Leaving the top two-thirds of the wires loose allows you to move the individual flowers around easily in a larger bouquet and fill any small openings or holes:
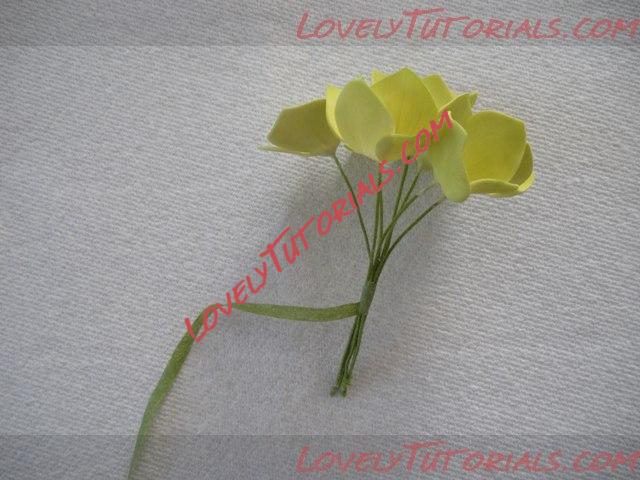 Step 3:
 Once you have the taping started, you can add a toothpick or skewer (if you are using the flowers on a cake), and finish taping by covering the ends of the wires:
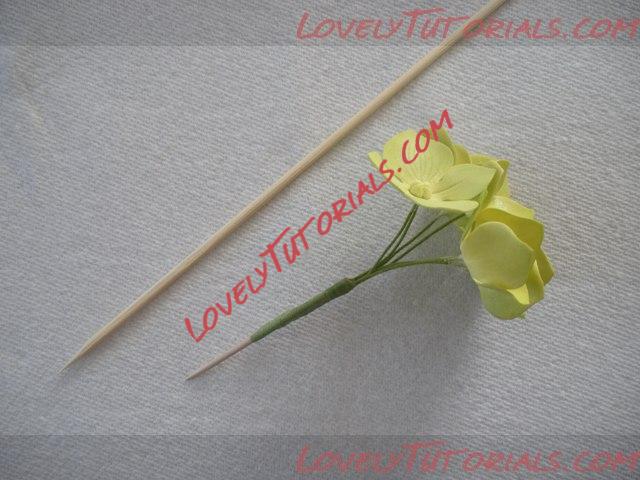 Step 4:
 To arrange hydrangea around another flower, make several small groupings as outlined above, but omit the toothpick until you have all of the hydrangea wires attached to the central wire of your main flower. Once you have your bouquet made, you can tape on a toothpick or skewer as needed:
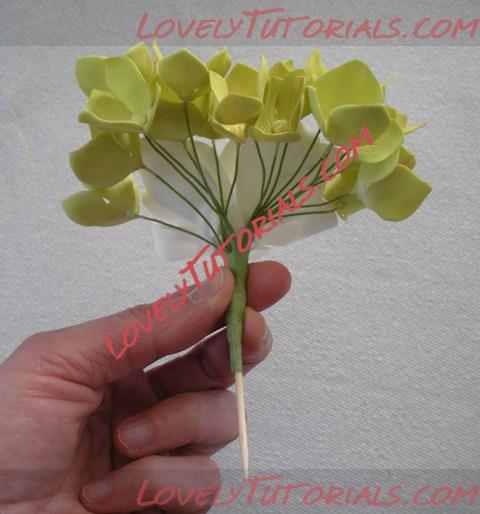
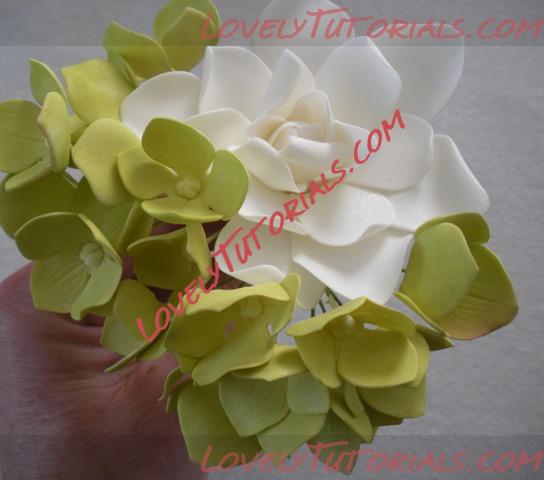
Here is the bouquet from the top...and with the flowers being on individual wires, I was able to turn and bend some of them in different directions to fill the spaces around the gardenia:
If you are making a large bouquet, another great option is to arrange and tape your flowers, and then insert the thick stem of taped wires into a plastic floral tube. This tube can be inserted into your cake:
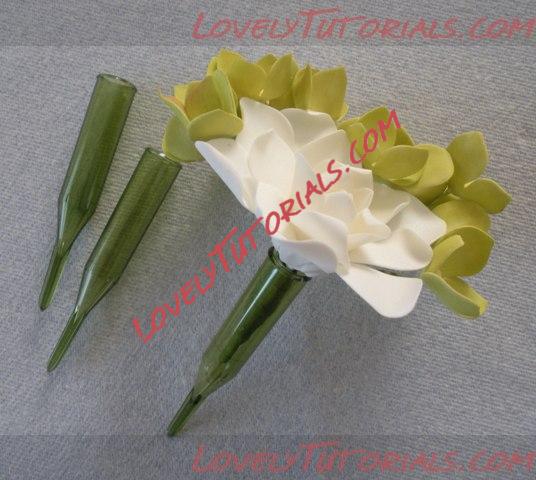
If the bouquet stem is smaller than the floral tube and rattles around in it, you can put some fondant down into the tube and then press the stem into the fondant...it surrounds the stem and keeps it firmly in place.
We're done! For those of you who made it here to the end...thank you for your time!! Please enjoy, and be sure to let me know if you have any questions! Oh...and is anyone interested in hydrangea leaves?
|

09.03.2012, 07:51
|
|
ذگذ´ذ¼ذ¸ذ½ذ¸رپر‚ر€ذ°ر‚ذ¾ر€
|
|
ذ ذµذ³ذ¸رپر‚ر€ذ°ر†ذ¸رڈ: 07.09.2010
ذ،ذ¾ذ¾ذ±ر‰ذµذ½ذ¸ذ¹: 7,940
|
|

Here is the final piece of the tutorial...how to make hydrangea leaves to go with your gorgeous hydrangea flowers! If you thought Part Two was a bit long, prepare yourself now for Part Three...it's a bit lengthy too...but I hope you find it helpful!
MAKING HYDRANGEA LEAVES
Here are the tools I use for making hydrangea leaves:
*CelCakes grooved board
*Rolling pin
*Ball tool
*Hydrangea leaf cutters and veiner
*Foam pad
*26g cotton-covered green wire
*Wire cutters
*Corrugated foam for drying (I also use scrunched up pieces of foil)
*Sugar glue
*Gumpaste (The color I used was made with Spectrum/Ateco Gels in Leaf Green, Avocado and a bit of Warm Brown)
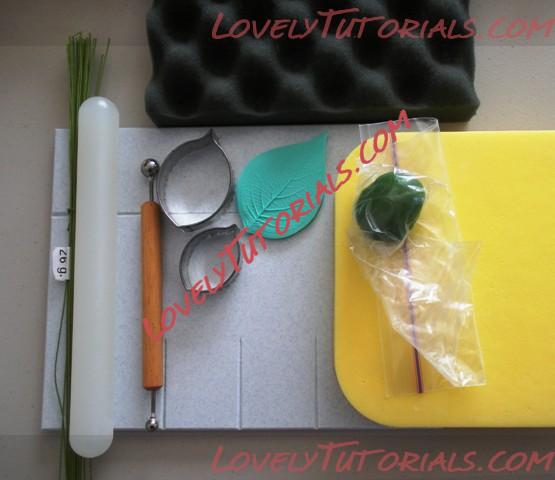 Step 1:
 Cut your 12" wires into thirds. No need to hook them. I like having a little extra length of wire so my leaves can peek out from under finished bouquets of flowers:
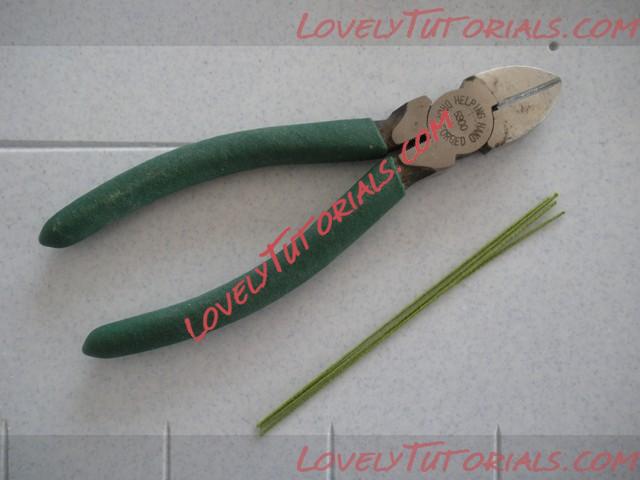 Step 2:
 Roll out paste thin over a groove on the board. I let the excess paste hang over the bottom edge and use it as a tab so I can easily pick up the rolled paste:
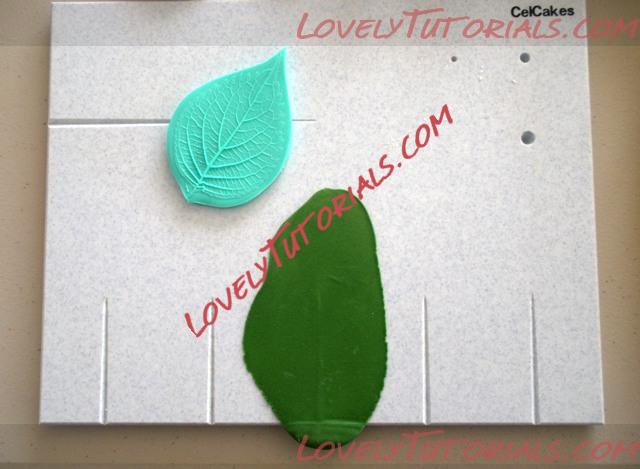 Step 3:
 Imprint with veiner, being careful to line up the bottom of the veiner with the bottom edge of the board (not the overhanging paste):
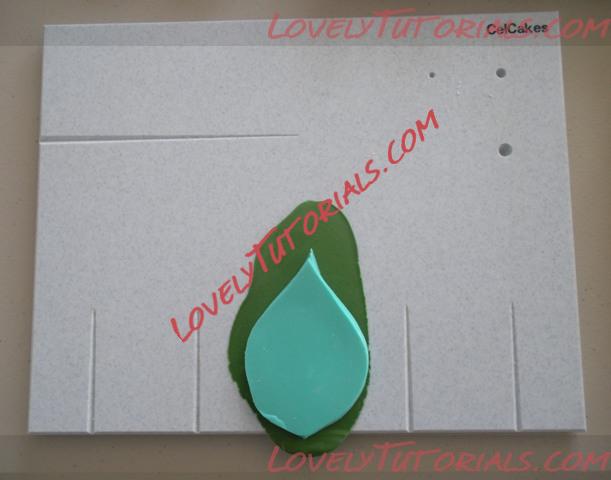 Step 4:
 Pick up imprinted paste, move it to the smooth corner of the board, line up the bottom of the cutter with the bottom of the veining, and cut the leaf:
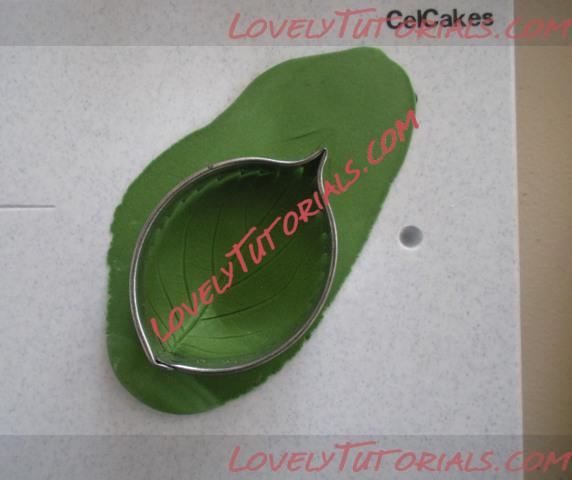
If you want to make MULTIPLE LEAVES at the same time, roll out a larger piece of paste to cover more of the grooves in the CelCake board. If you are cutting many leaves, keep them under some plastic wrap or in a Zip-Loc bag so they don't dry out:
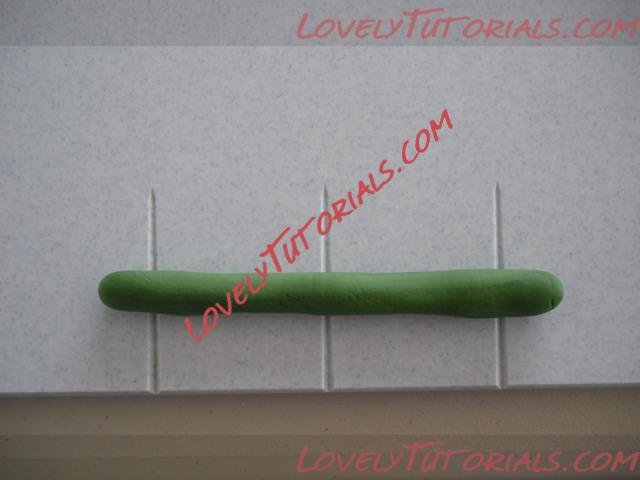
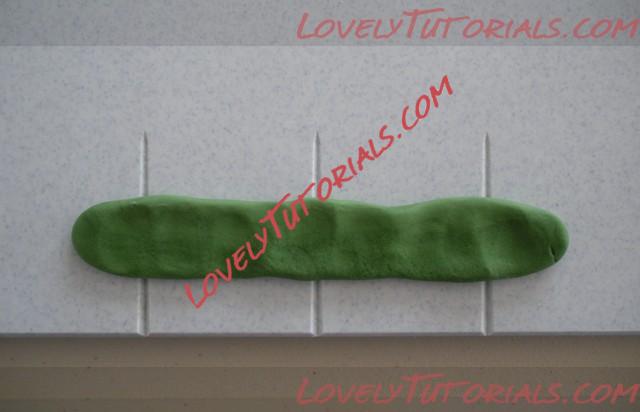
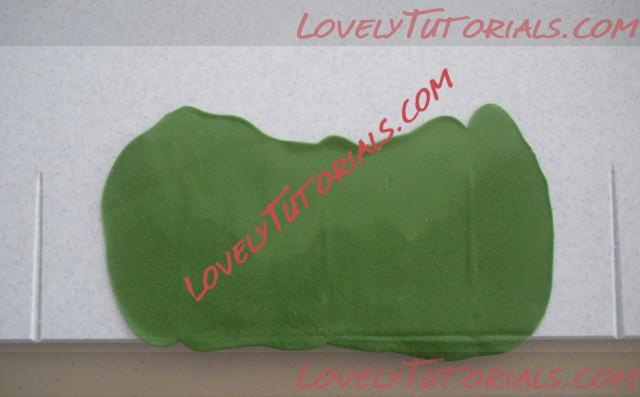
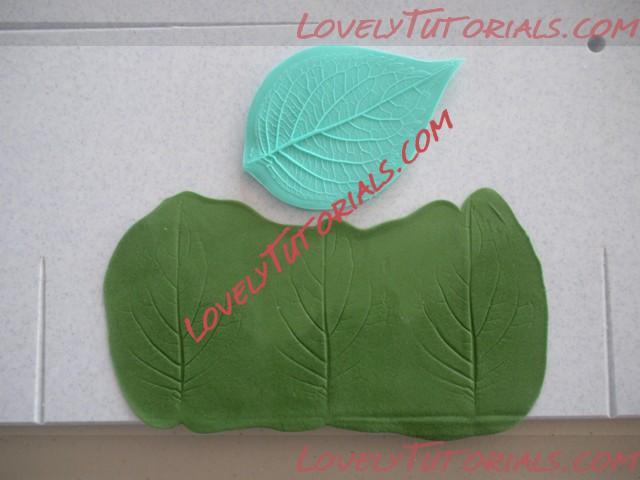
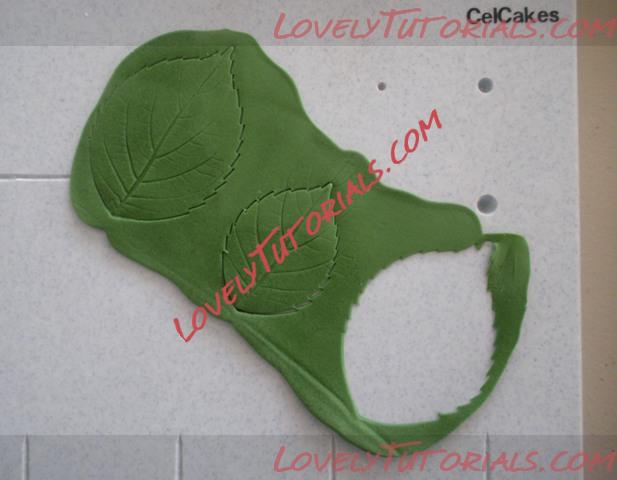
** Whether you are making one leaf at a time, or multiple leaves at a time, the remaining steps will be the same for both **
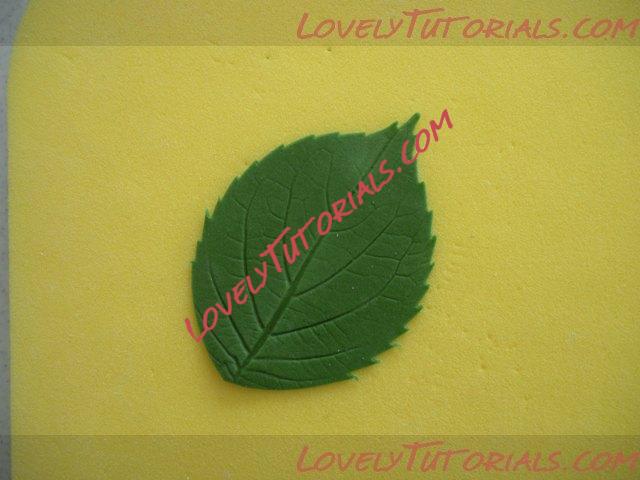
Example of cut leaf front-side:
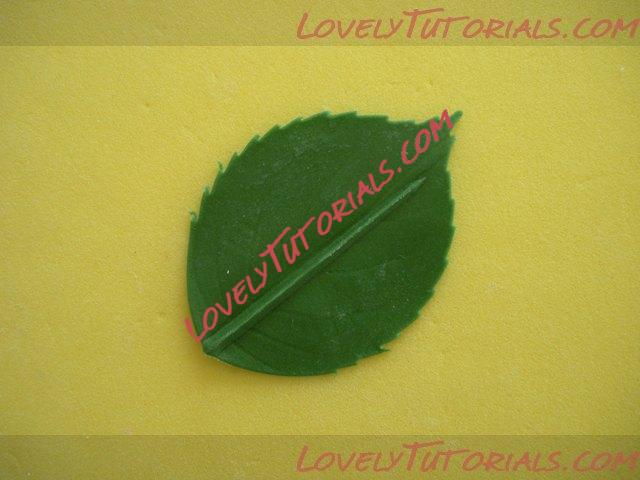
Example of cut leaf back-side with ridge:
 Step 5:
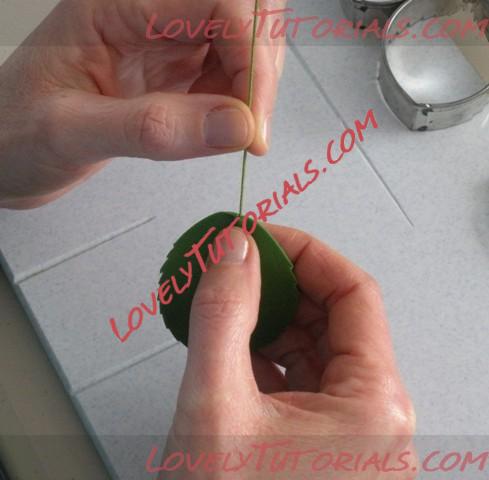
 Dip the tip of the wire into the sugar glue and wipe off any excess. Hold the bottom edge of the leaf between your thumb and first finger, with the wider end of the ridge facing up, and the ridge against your thumb. This set-up will help you feel the wire as it moves through the paste. Gently insert the wire into the center point of the ridge, and then slide it further into the ridge 1/3 to 1/2 of the length of the leaf. Be careful not to poke the wire out through the paste:

Gently pinch the paste at the base of the wire to secure:
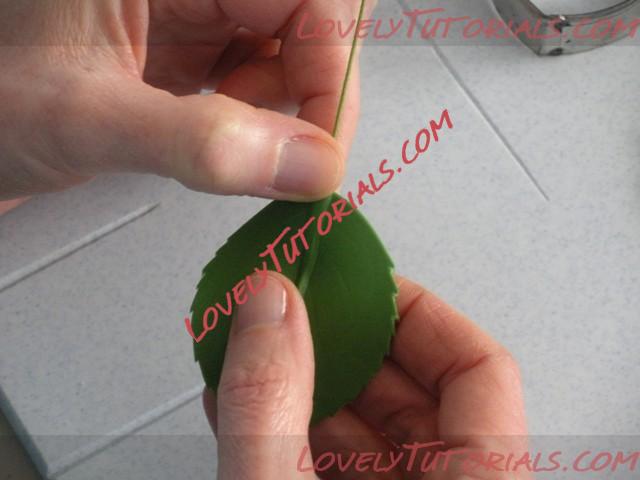
The wired leaf:
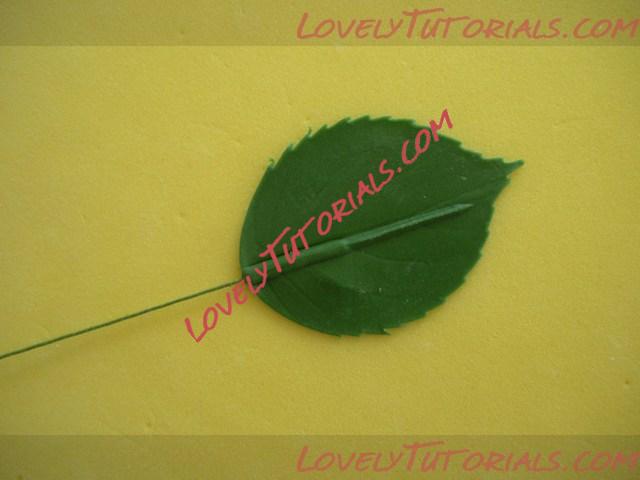 Step 6:
 Place your leaf on the foam pad facing up, and with the tip of the leaf facing towards you. Thin edges with the ball tool, following the contours of the leaf shape. I find if I use the ball tool in one direction, from the bottom edge of the leaf towards the tip, I am less likely to tear the delicate edges and tiny point:
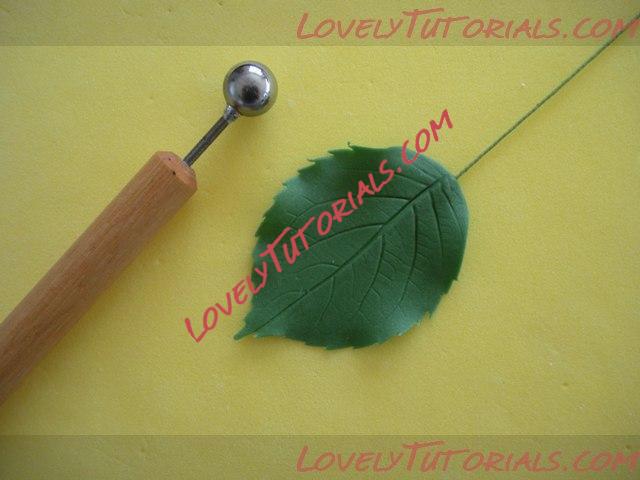
Step 7: Place the leaf on corrugated foam (or scrunched up pieces of foil) to dry, which will allow it to take on a natural shape. Make a nice mix of both large and small sizes, and let them dry overnight:
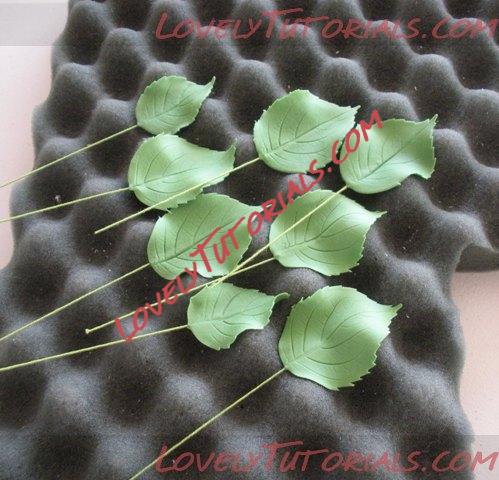 COLORING HYDRANGEA LEAVES
Here are the tools I use for coloring hydrangea leaves:
*Petal dusts in Chartreuse, Moss, Lime and Plum
*Firm brushes and flat brushes
*CK Products Confectioner's Glaze and a small brush for application
*CK Products Confectioner's Glaze Thinner
*Disposable cup for mixing glaze and thinner
*Styrofoam or rack for drying
A QUICK NOTE ABOUT GLAZING: You can find several different glazing products online. They are considered food grade lacquers, and are used to extend the life of chocolate and sugar decorations and showpieces.
1. CK Products Confectioner's Glaze and Thinner (found here or here)
2. Confectionery Arts International Lacquer (found here) They now have lacquer in spray form...which sounds much faster to me...but I have not tried it yet!
3. If you don't want to glaze your leaves, you can steam them after dusting. This will give your leaves a soft sheen, but not the glossy finish of glazing.
Step 1: Prepare the colors of your petal dusts. For these leaves, I use three colors of green (Chartreuse, Moss and Lime), and Plum for the edges, but I don't mix them. I use them one at a time, and dust splotches of all colors on each leaf (kind of like camouflage). When I glaze the leaves, the colors blend a bit and make the leaf look a little more realistic. From left to right...Moss, Chartreuse, Lime and Plum:
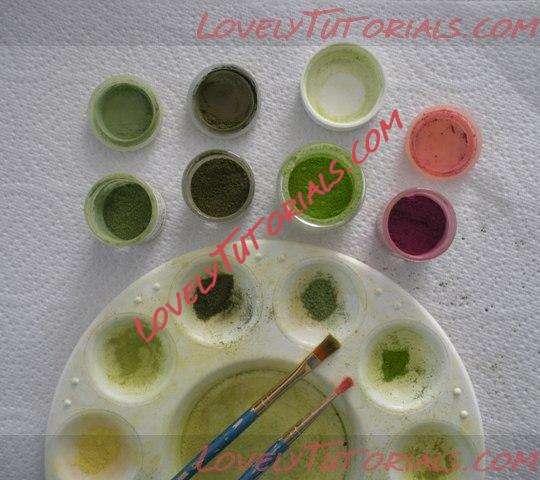 Step 2:
 Using a medium-sized firm brush, dust large random patches of Chartreuse on the leaf:
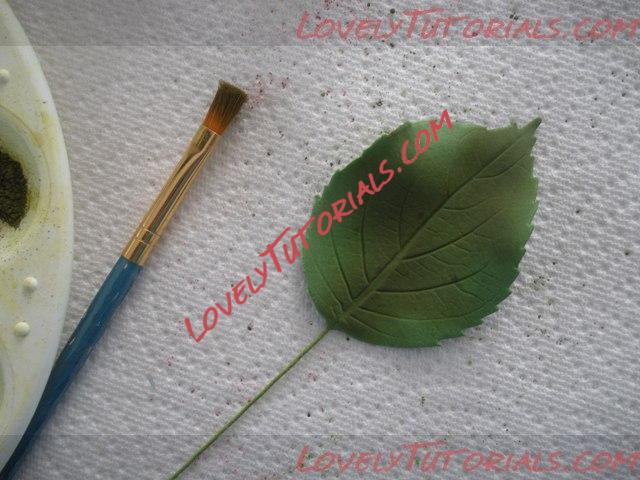
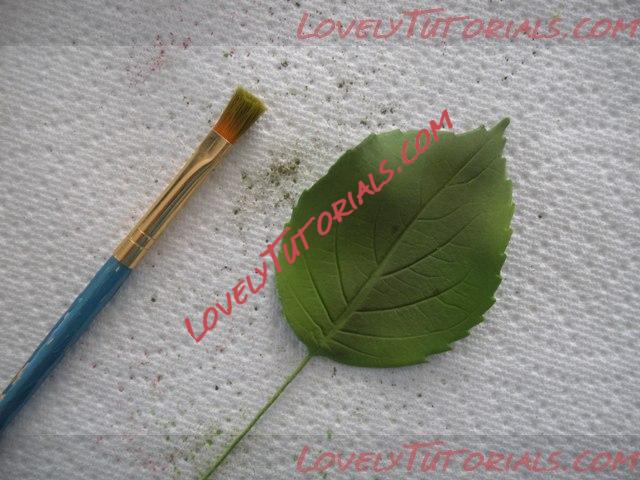
Continue to dust the leaf with splotches of Lime and Moss to cover the leaf surface:
 Step 3:
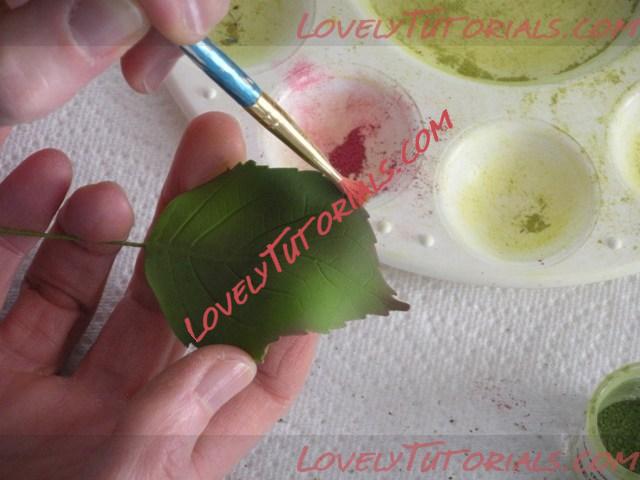
 Using a flat brush, dust parts of the edges of your leaves with Plum, being careful not to break the delicate edges:
Here is a group of dusted leaves:
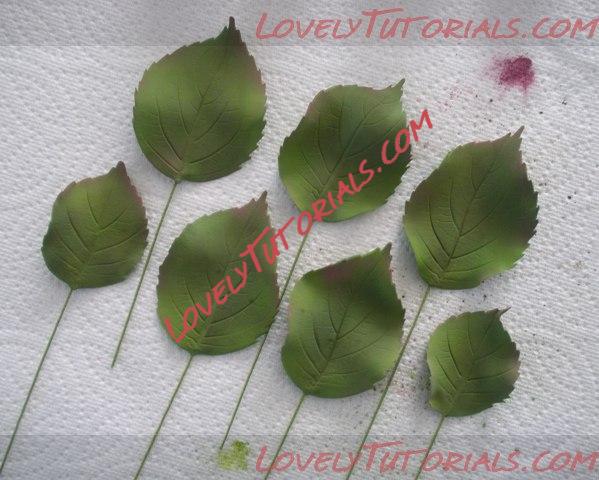
I usually do not dust the back sides of my leaves unless they will be really visible. Most leaves have variations in coloring from top to underneath...so you can decide what is best for your particular project.
Step 4: In a small disposable cup, mix a small amount of glaze and thinner to total about a tablespoon. A little goes a long way, so start with a small amount and add more if you need it. I use a ratio of 50/50...but I live in a pretty dry climate. You may have to adjust the formula where you live in order for the leaves to dry thoroughly. The glaze can be sticky and messy, so I use a disposable cup for easy clean-up! With a small brush, lightly apply the glaze to the TOP only of your leaves with a dabbing motion until they are covered with the glaze. LIGHTLY is the key word here...if your leaves are dripping then you are using way too much glaze. When glazing, do NOT use a painting motion as this will cause streaks in the coloring, rather than blending:
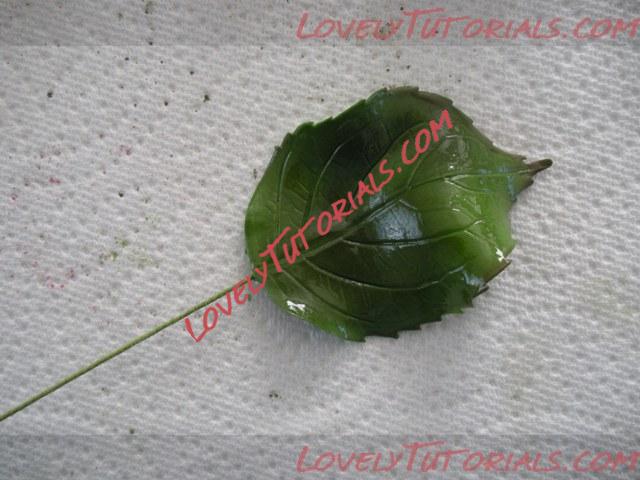
Insert the wires into Styrofoam or hang to dry overnight:
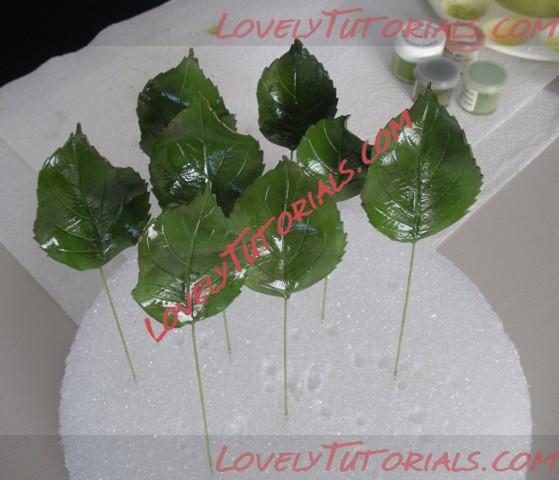
**Many leaves are only glossy on the top, but you can change how you glaze them according to the variety you are making and your preference!
ARRANGING HYDRANGEA LEAVES:
There are many different ways to use leaves...and here are a few examples of how I use them most frequently...
All throughout a bouquet:
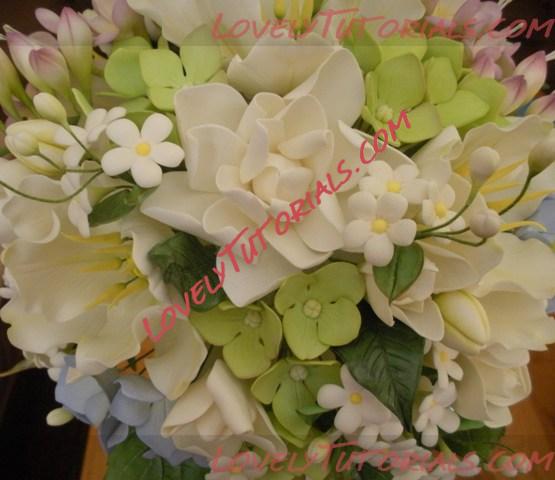
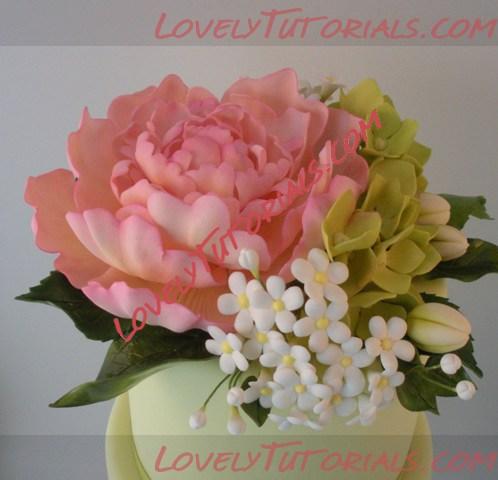
Hydrangea leaves are usually visible from underneath beautiful bunches of their flowers, so here is how to arrange them that way:
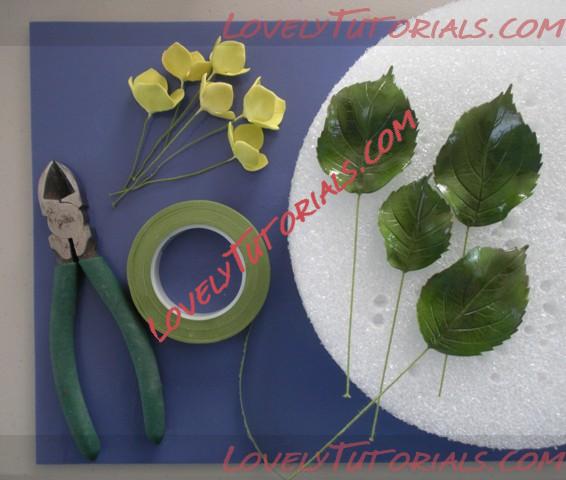
Here are the tools I use when adding leaves to a hydrangea bouquet:
*Florist tape in moss green
*Completed hydrangea flowers
*Completed hydrangea leaves
*Wooden skewers
*Wire cutters
*Styrofoam (to hold bouquet stem while working on the arrangement)
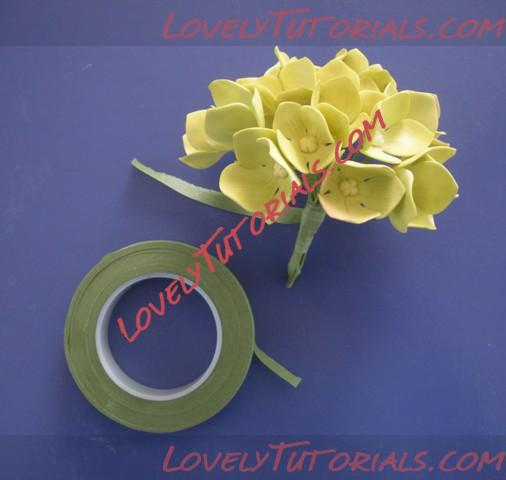
 Step 1:
 Gather your completed flowers into a bouquet, and tape together. I used about 25 hydrangea flowers for this one. To prepare it for using on a cake, you can tape your flower wires to a skewer:
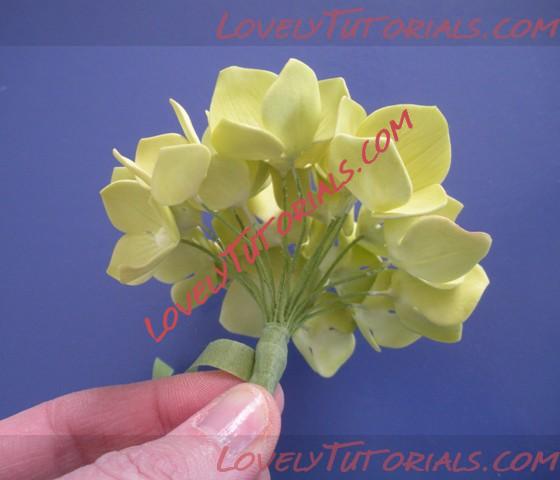
Cut off any extra length of wire from the flowers:
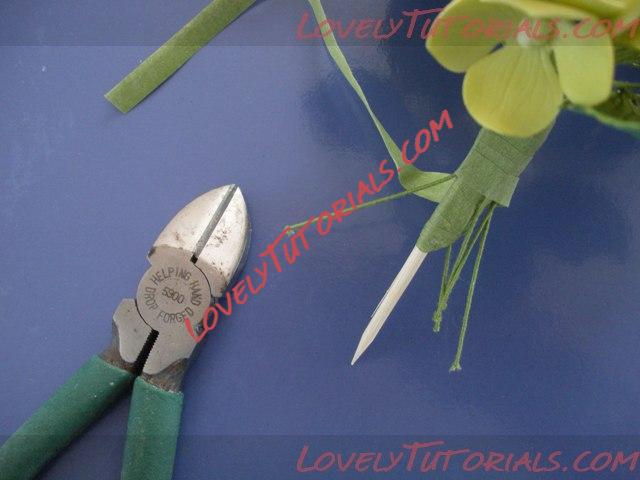
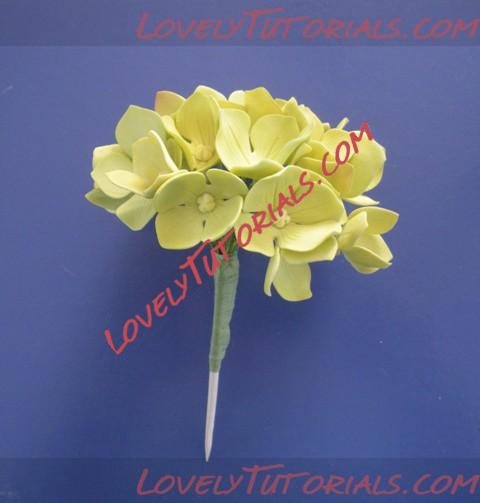 Step 2:
 With the bouquet in the Styrofoam, lay the leaves around the base to visualize where you want them to be added. I tend to use leaves in ODD numbers, and put small groupings of them together instead of making them all perfectly spaced. And keep in mind they can all be moved around however you wish, even after they are taped:
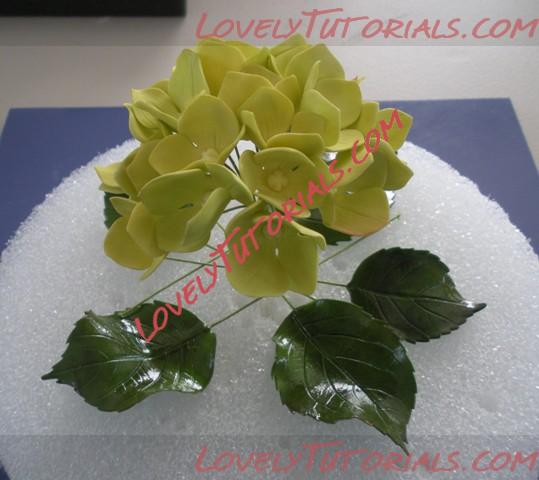
Here's how I want it to look from the top:
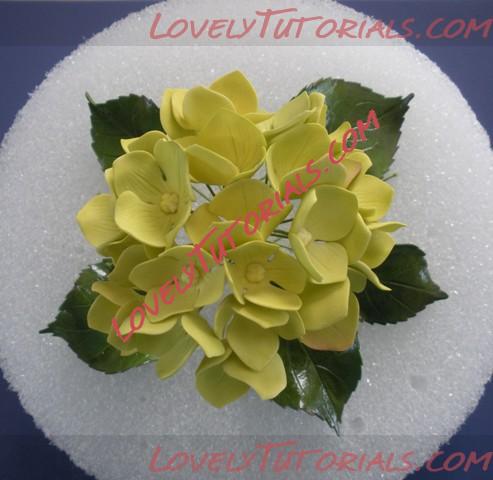 Step 3:
 One at a time, tape the wires of the leaves to the main stem, varying how much leaf is visible from the top:
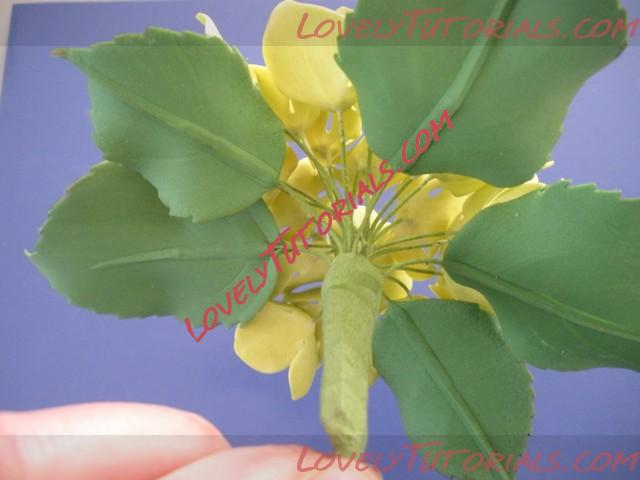
The taping is all completed:
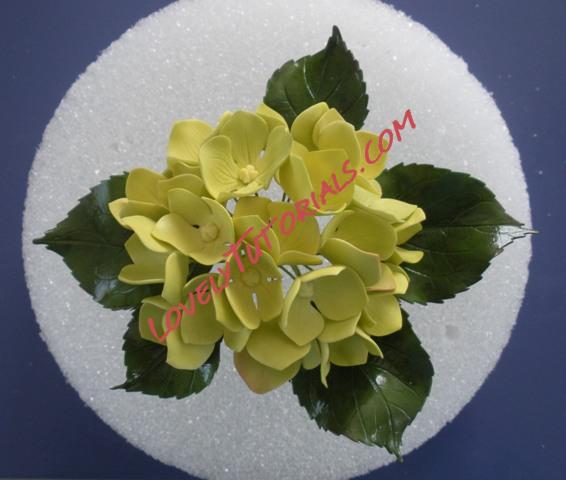
And this bouquet is ready to be used on a cake:
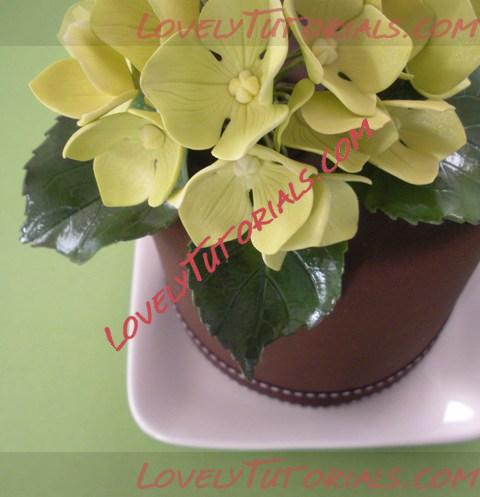
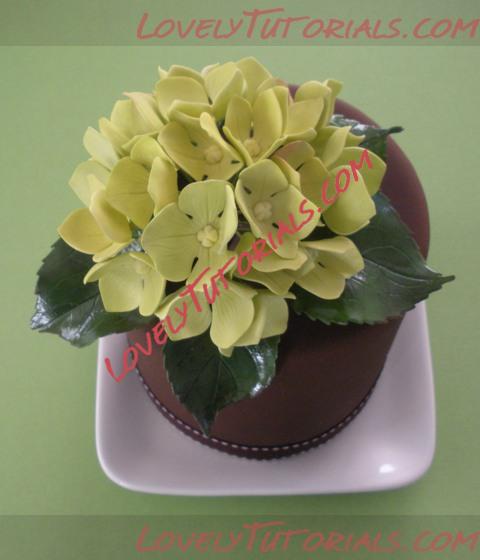
|

21.03.2012, 19:01
|
|
ذگذ´ذ¼ذ¸ذ½ذ¸رپر‚ر€ذ°ر‚ذ¾ر€
|
|
ذ ذµذ³ذ¸رپر‚ر€ذ°ر†ذ¸رڈ: 07.09.2010
ذ،ذ¾ذ¾ذ±ر‰ذµذ½ذ¸ذ¹: 7,940
|
|
ذœذڑ ذ²ذ·رڈر‚ رپ رپذ°ذ¹ر‚ذ° kittiekraft.typepad.com
ذذ³ر€ذ¾ذ¼ذ½ذ°رڈ ذ±ذ»ذ°ذ³ذ¾ذ´ذ°ر€ذ½ذ¾رپر‚رŒ ذگذ²ر‚ذ¾ر€رƒ kittiekraft ذ·ذ° ذœذڑ
Hydrangea Tutorial
Punched Hydrangea Tutorial
|
 |
|
|
ذœذµر‚ذ؛ذ¸
|
addؤ±m-addؤ±m, adؤ±m adؤ±m, anlegget, anlأ¤ggning, armado de los ramos, arranjo, artesanatos passo a passo, askel askeleelta, augalas, baking, biljka, bitki, blad, blade, blader, bladeren, blatt, bloem, bloemen, blomma, blommor, blomst, blomster, blume, blumen, blأ¼ten, blأ¼tenpaste, blأ¤tter, boeket, bouquet, buchet, buket, bukett, bukiet, buquأھ, cake decorating, cake decorating techniques, cerأ¢mica plأ،stica, chiodi di garofano, clavo de olor, clous de girofle, cloves, cold porcelain, cold porcelain figurines, cold porcelain flowers, confeitando bolos, csokor, cukriniإ³ gؤ—liإ³, curso completo de flores, curso de modelado, cvijet, cvijeؤ‡e, cأ©im ar chأ©im, decoracion de pasteles, decoraciأ³n de tortas, decorare le torte, decorazioni, deko fondant, dekorace na dort, dekoracija, dekoracije, dekorasyon, dekorأ،cie, el abc del armado de ramos, etap pa etap, feuille, feuilles, fimo, fimo flowers, fiore, fiori, fleurs, floare, floare hortensie, flogistica, flor, flor hortensia, flor hortأ¨nsia, floral inspirations, flores, flores azucar, flores e folhas, flori, floristics, floristik, floristikk, floristique, florأstica, flower, flower paste, flowering plants, flowers, flowers on a wire, foglia, foglie, folha, folhas, folhas pintadas, fondan, fondant, fondente, fotopostup, frunze, gam wrth gam, gradatim, gum pasta, gum paste, gum paste flowers, gumpaste, gumpaste flowers class, gؤ—lؤ—, gؤ—lؤ—s, hand painting, handmade, handmodelliert, hap pas hapi, hatua kwa hatua, haydrangeya, haydrangeya bulaklak, hideg porcelأ،n, hladno porculan, hoa tأ؛ cل؛§u, hoja, hojas, hortensia, hortensia blomma, hortensia blomst, hortensia fleur, hortensia flor, hortensia أµie, hortensie, hortensie blume, hortensja, hortensja kwiat krok po kroku, hortenzia, hortenzia virأ،g, hortenzie, hortenzie kvetina, hortenzie kvؤ›tina, hortenzija, hortenzija cvijet, hortenzija gؤ—liإ³, hortenzijas, hortenzijas ziedu, hortenzije, hortenzije cvet, hortأ¨nsia, hortأھnsia, hortأھnsia flor, how to, how tر†ذ²ذµر‚ر‹ ذ½ذ° ذ؟ر€ذ¾ذ²ذ¾ذ»ذ¾ذ؛ذµ, how-to's, hydrangea, hydrangea blodau, hydrangea bloem, hydrangea blomst, hydrangea blأ³m, hydrangea blأ،th, hydrangea bunga, hydrangea fjura, hydrangea florem, hydrangea floro, hydrangea flower, hydrangea kukka, hydrangea maua, hydrangea à؛”à؛à؛پ, hydrangea फूल, hydrangea மலரà¯چ, hydrangea à°«à±چలవరà±چ, hydrangea لƒ§لƒ•لƒگلƒ•لƒ?لƒڑلƒ،, hydrangea ر†ذ²ذµر‚, hydrangeaطŒ hydrangea ظ¾ع¾ظˆظ„طŒ ظ‚ط¯ظ… ط¨غپ ظ‚ط¯ظ…, hإ™ebأؤچek, impianto, jak na, kage dekoration, kagedekoration, kakebaking, kaldt porselen, kallt porslin, kalt porzellan, kasvi, kolde porcelأ¦n, korak po korak, korak za korakom, koud porselein, krismisrose, krismisrose blom, krok za krokem, krok za krokom, kukka, kukkakimppu, kukkia, kvetina, kvety, kvؤ›tina, kvؤ›tiny, kwiat, kwiaty, kylmأ¤ posliini, kytica, la modأ©lisation, langkah demi langkah, lapai, lapas, leaf, leaves, lehdet, lehti, levelek, levأ©l, list, listأ, liإ،ؤ‡e, liإ›cie, liإ›ؤ‡, lulebore, lulebore lule, lأ©pأ©srإ‘l lأ©pأ©sre, lأstia, lأstky na drأ،tku, making sugar flowers, marshmallow, masa flexible, mazzo, modelado, modelagem, modelare, modeling, modeling paste, modeliranje, modellazione, modelleme, modellering, modellieren, modellierpaste, modellة™إںdirmة™, modelovanie, modelovأ،nأ, modelowanie, montando, motivtorten, nelken, nأ،vody a postupy, nأ،vody na kvؤ›ty a lأstky, nأ¶vأ©ny, oasis o esponja de floristeria, ortanca, ortanca gأ¼l, ortanca أ§iأ§ek, ortansya, ortansya flأ¨, ortensia, ortensia fiore, pap, pas a pas, pas cu pas, paso a paso, pass pass, passo a passo, passo dopo passo, passo-a-passo, pasta flexible, paإo post paإo, pflanze, plant, planta, plante, plantes, plantؤƒ, pocelana fria, polymer clay, polymer clay flowers tutorial, porcelaine froide, porcelana fria, porcelana frأa, porcellana fredda, postup, postup klinؤچek, postupak za ukrasavanje, puokإ،tؤ—, ramo, rastlina, rece porإ£elan, rododendron, rostlina, roإ›lina, samm-sammult, schritt fأ¼r schritt, schritt fأ¼r schritt anleitung, schritt-fأ¼r-schritt, sculpey flowers, sculpting, semacam bunga, semacam bunga bunga, simple, skref fyrir skref, soli pa solim, soؤںuk porselen, stamens, stap vir stap, stap voor stap, steg for steg, steg fأ¶r steg, step by step, step-by-step, strauأں, studenأ½ porcelأ،n, styrofoam, sugar cane flowers, sugar cloves, sugar flower, sugar flowers, sugar flowers for cake decorating, sugar paste flowers, sugarcraft, sugarpaste, sukker art, sunud-sunod, technique utilisأ©e fleurs en sucre cru, tecnicas de decoracion, tecniche, thai flowers, torte, torte decorate, torten dekorieren, torti, trin for trin, trin-for-trin, trinn for trinn, tutorial, tutorijal, tل»«ng bئ°ل»›c, tأ؛ cل؛§u, ukraإ،avanje torti, uputstvo za dekoraciju, urratsez urrats, virأ،g, virأ،gok, wedding cake, wedding cakes, wire, yaprak, yapraklar, zimno porcelany, zuckerblumen, ดà¸à¸پไà¸،้, à؛‚à؛±à»‰à؛™à؛•à؛à؛™à»‚à؛”à؛چà؛‚à؛±à»‰à؛™à؛•à؛à؛ ™, àھ•à«چàھ°àھ®àھ¶àھƒ, àھ¹àھ¾àھ‡àھ،à«چàھ°à«‡àھœ, àھ¹àھ¾àھ‡àھ،à«چàھ°à«‡àھœ àھ«à«‚àھ²à«‹, ಹಂತ ಹಂತವಾಗà²؟, ಹೈà²،à³چರೇಂಜ, ಹೈà²،à³چರೇಂಜ ಹೂವà²؟ನ, सजा केक, कदम से कदम, मॉà¤،लà¤؟ंग, নীলাবা গোলà¦ھà¦؟ à¦ھà§پষà§چà¦ھà¦ھà§چরসà§پ গà§پলà§چমবà¦؟শেষ, ধাà¦ھে ধাà¦ھে, à®ھà®ںà®؟à®ھà¯چà®ھà®ںà®؟யாக, à°¸à±چà°ںెà°ھà±چ బై à°¸à±چà°ںెà°ھà±چ, ไฮเดรนเยีย, ไฮเดรนเยียดà¸à¸پไà¸،้ภ—ีละขั้นตà¸à¸™, لƒ”لƒ¢لƒگلƒلƒلƒ‘لƒ لƒ?لƒ•لƒگلƒ“, مƒ¢مƒ‡مƒ«, م‚¢م‚¸م‚µم‚¤م€پم‚¢م‚¸م‚µم‚¤مپ®èٹ±م€پن¸€و©ن¸€و©, أ§iأ§ek, أ§iأ§ek modelleme, أ©tape par أ©tape, إ¾ingsnis po إ¾ingsnio, إ،alto porceliano, ه»؛و¨،, ç¹،çگƒèٹ±ï¼Œç¹،çگƒèٹ±ï¼Œن¸€و¥ن¸€و¥, 绣çگƒèٹ±ï¼Œç»£çگƒèٹ±ï¼Œن¸€و¥ن¸€و¥, è£é£¾è›‹ç³•, 단계ى پىœ¼ë،œ, ىˆ?êµ, ىˆ?êµ ê½ƒ, ى§„달ë?, خ؛دپدچخ± د€خ؟دپدƒخµخ»خ¬خ½خ·, خ²خ®خ¼خ± د€دپخ؟د‚ خ²خ®خ¼خ±, خ؟دپد„خ±خ½دƒخ¯خ±, خ؟دپد„خ±خ½دƒخ¯خ± خ»خ؟د…خ»خ؟دچخ´خ¹, خ¼د€خ؟د…خ؛خد„خ؟, خ±خ¶خ±خ»خخ±, خ»خ؟د…خ»خ؟دچخ´خ¹, خ»خ؟د…خ»خ؟دچخ´خ¹خ±, د„خ± د†دچخ»خ»خ±, د†دچخ»خ»خ±, د†د…د„دŒ, ذ؛ذ¾ر€ذ°ذ؛ ذ؟ذ¾ ذ؛ذ¾ر€ذ°ذ؛, ذ؛ذ²ذµر‚ذ؛ذ°, ذ؛ذ²ذµر‚ذ؛ذ° ذ³ذ°ر€ر‚رچذ½ذ·ر–رڈ ذ؛ر€ذ¾ذ؛ ذ·ذ° ذ؛ر€ذ¾ذ؛ذ°ذ¼, ذ؛ذ²ذµر‚ذ؛ر–, ذ؛ذ²ر–ر‚ذ¸, ذ؛ذ²ر–ر‚ذ؛ذ°, ذ؛ذ²ر–ر‚ذ؛ذ° ذ³ذ¾ر€ر‚ذµذ½ذ·ر–رڈ ذ؛ر€ذ¾ذ؛ ذ·ذ° ذ؛ر€ذ¾ذ؛ذ¾ذ¼, ذ؛ذµر€ذ°ذ¼ذ¸ر‡ذµرپذ؛ذ°رڈ ر„ذ»ذ¾ر€ذ¸رپر‚ذ¸ذ؛ذ°, ذ؛رƒرپر‚, ذ³ذ¾ر€ر‚ذµذ½ذ·ذ¸رڈ, ذ³ذ¾ر€ر‚ذµذ½ذ·ر–رڈ, ذ³ذ²ذ¾ذ·ذ´ذ¸ذ؛ذ°, ذ³ذ°ر€ر‚رچذ½ذ·ر–رڈ, ذ؟ذ¾ذ»ذ¸ذ¼ذµر€ذ½ذ°رڈ ذ³ذ»ذ¸ذ½ذ°, ذ؟ذ¾ذ»ذµذ²ر‹ذµ ر†ذ²ذµر‚ر‹, ذ؟ذ¾رˆذ°ذ³ذ¾ذ²ذ¾, ذ؟ر€ذ¸ر€ذ¾ذ´ذ°, ذ¼ذ؛, ذ¼ذ¾ذ´ذµذ»ذ¸ر€ذ°ذ½ذµ, ذ¼ذ°ذ¹رپر‚ذµر€-ذ؛ذ»ذ°رپذ¸, ذ¼ذ°ر€رˆذ¼ذµذ»ذ»ذ¾رƒ, ذ¼ذ°رپر‚ذ¸ذ؛ذ°, ذ¼ذ°رپر‚ذµر€-ذ؛ذ»ذ°رپرپ, ذ¼ذ°رپر‚ذµر€-ذ؛ذ»ذ°رپرپ ذ؟ذ¾ ذ»ذµذ؟ذ؛ذµ, ذ°ذ·ذ°ذ»ذ¸رڈ, ذ°ذ·ذ°ذ»ر–رڈ, ذ±رƒذ؛ذµر‚, ذ·ذ°ذ²ذ¾ذ´, ذ»ذ¸رپر‚ذ°, ذ»ذ¸رپر‚رŒرڈ, ذ»ذ¸رپر‚رڈ, ذ»ذµذ؟ذ¸ذ¼ ر†ذ²ذµر‚ر‹, ذ»ذµذ؟ذ؛ذ°, ذ»ذµذ؟ذ؛ذ° ذ¸ذ· ذ³ذ»ذ¸ذ½ر‹, ذ»ذµذ؟ذ؛ذ° ذ¸ذ· ذ؟ذ»ذ°رپر‚ذ¸ذ؛ذ¸, ذ»ذµذ؟ذ؛ذ° ر†ذ²ذµر‚ذ¾ذ², ذ»ذµذ؟ذ؛ذ°ذ±ذ¼ذ°رپر‚ذµر€-ذ؛ذ»ذ°رپرپ, ذ»ر–ذ؟ذ»ذµذ½ذ½رڈ, ذ»ر–رپر†ذµ, ر€ذ¾رپذ»ذ¸ذ½ذ°, ر€ذ°رپر‚ذµذ½ذ¸ذµ, ر€ذ°رپر‚ذµذ½ذ¸رڈ, رƒذ؛ر€ذ°رˆذµذ½ذ¸ذµ ر‚ذ¾ر€ر‚ذ¾ذ², رƒذ؛ر€ذ°رˆذµذ½ذ¸ذµ ر‚ذ¾ر€ر‚ذ°, رپذ²ذ°ذ´ذµذ±ذ½ر‹ذ¹ ر‚ذ¾ر€ر‚, رپذ°ر…ذ°ر€ذ½ذ°رڈ ذ¼ذ°رپر‚ذ¸ذ؛ذ°, رپذ°ر…ذ°ر€ذ½ر‹ذ¹ ذ؛ذ»ذµذ¹, رƒر€ذ¾ذ؛ذ¸ ذ؟ر€ذ¸ذ؛ر€ذ°رˆذ°ذ½ذ½رڈ, رپر‚رƒذ´ذµذ½ ذ؟ذ¾ر€ر†ذµذ»ذ°ذ½, رپر‚رٹذ؟ذ؛ذ° ذ؟ذ¾ رپر‚رٹذ؟ذ؛ذ°, ر‚ذ¾ر€ر‚, ر„ذ¸ذ¼ذ¾, ر„ذ»ذ¾ر€ذ¸رپر‚ذ¸ذ؛ذ°, ر„ذ»ذ¾ر€ذ°, ر…ذ¾ذ»ذ¾ذ´ذ½ذ¾ذ³ذ¾ ذ؟ذ¾ر€ر†ذµذ»رڈذ½ذ¸, ر…ذ¾ذ»ذ¾ذ´ذ½ذ¾ذ³ذ¾ ر„ذ°ر€ر„ذ¾ر€ذ°, ر…ذ¾ذ»ذ¾ذ´ذ½ر‹ذ¹ ر„ذ°ر€ر„ذ¾ر€, ر…ذ¾ر€ر‚ذµذ½ذ·ذ¸رڈ, ر…ذ¾ر€ر‚ذµذ½ذ·ذ¸رڈ ر†ذ²ذµر‚ذµ, ر…ذ¾ر€ر‚ذµذ½ذ·ذ¸ر?ذ°, ر…ذ¾ر€ر‚ذµذ½ذ·ذ¸ر?ذ° ر†ذ²ذµر‚ذ°, ر…ذ°ذ»ذ¾ذ´ذ½ذ°ذ³ذ° ر„ذ°ر€ر„ذ¾ر€رƒ, ر†ذ²ذµر‚ذ¾ذ؛, ر†ذ²ذµر‚ذ¾ذ؛ ذ³ذ¾ر€ر‚ذµذ½ذ·ذ¸رڈ رˆذ°ذ³ ذ·ذ° رˆذ°ذ³ذ¾ذ¼, ر†ذ²ذµر‚ذ¾ر‡ذ½ذ°رڈ ذ؟ذ°رپر‚ذ°, ر†ذ²ذµر‚ذµ, ر†ذ²ذµر‚رڈ, ر†ذ²ذµر‚ر‹, ر†ذ²ذµر‚ر‹ ذ¸ذ· ذ؟ذ¾ذ»ذ¸ذ¼ذµر€ذ½ذ¾ذ¹ ذ³ذ»ذ¸ذ½ر‹, ر†ذ²ذµر‚ر‹ ذ¸ذ· ر…ذ¾ذ»ذ¾ذ´ذ½ذ¾ذ³ذ¾ ر„ذ°ر€ر„ذ¾ر€ذ°, ر†ذ²ذµر‚ر‹ ذ½ذ° ر‚ذ¾ر€ر‚, ر†ذ²ذµر‚ر‹ ر€رƒر‡ذ½ذ¾ذ¹ ر€ذ°ذ±ذ¾ر‚ر‹, ر‡ذµذ؛ذ¾ر€ ذ؟ذ¾ ر‡ذµذ؛ذ¾ر€, رˆذ°ذ³ ذ·ذ° رˆذ°ذ³ذ¾ذ¼, הידר×گض·× ×’×¢×گض·, הידר×گض·× ×’×¢×گض· בלו×, הידר×گ× ×’×گ×”, הידר×گ× ×’×گ×” פרח, צעד ×گחר צעד, שרי×? ביי שרי×?  |
|

