|
|
–Ь–Ъ —В–µ–љ–µ–≤–Њ–є —Ж–≤–µ—В–Њ–Ї –Є–Ј –њ–ї–∞—Б—В–Є–Ї–Є –≤ —В–µ—Е–љ–Є–Ї–µ "–Ї–Њ–ї–±–∞—Б–∞" -Shady Flower Cane tutorial
|

02.08.2012, 10:38
|
|
–Р–і–Љ–Є–љ–Є—Б—В—А–∞—В–Њ—А
|
|
–†–µ–≥–Є—Б—В—А–∞—Ж–Є—П: 07.09.2010
–°–Њ–Њ–±—Й–µ–љ–Є–є: 7,669
|
|
 –Ь–Ъ —В–µ–љ–µ–≤–Њ–є —Ж–≤–µ—В–Њ–Ї –Є–Ј –њ–ї–∞—Б—В–Є–Ї–Є –≤ —В–µ—Е–љ–Є–Ї–µ "–Ї–Њ–ї–±–∞—Б–∞" -Shady Flower Cane tutorial
–Ю–≥—А–Њ–Љ–љ–∞—П –±–ї–∞–≥–Њ–і–∞—А–љ–Њ—Б—В—М –Р–≤—В–Њ—А—Г Naama Zamir –Ј–∞ –Ь–∞—Б—В–µ—А-–Ї–ї–∞—Б—Б
Materials:
- Two contrasting colors of clay (I'm using Purple and White)
- A third color clay complimentary to the main colors (I'm using Turquoise)
- Pasta Machine
- Tissue Blade or other cutting blade
- Ruler
Directions:
 Step 1:
 I'm using Purple and White to make my cane, but you can choose any two complimentary colors. Start by making a Skinner Blend.
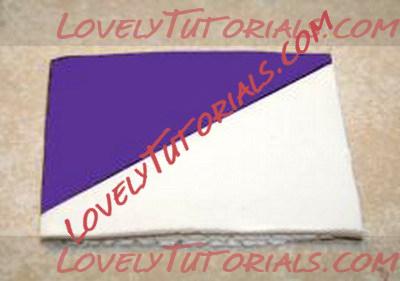
 Step 2:
 After the Skinner Blend is finished, fold it in thirds (as in steps 25-27 of Leigh's lesson) and pass it through the pasta machine on the thickest setting in a direction like shown in the picture. The final result will be a long, thin strip going from white on one side to purple on the other.
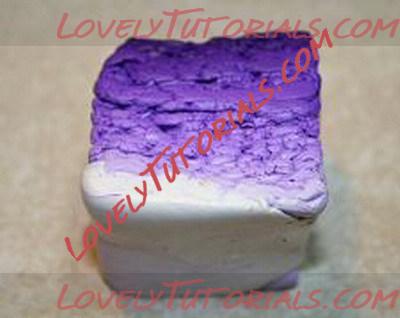 Step 3:
 Fold the strip on itself like an accordion to make a loaf.
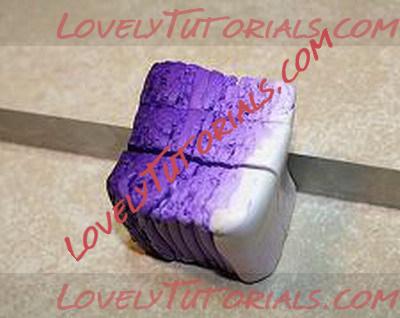 Step 4:
 Cut the block into three equal pieces as shown.
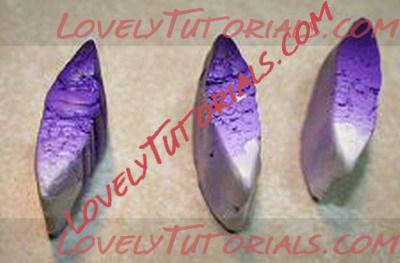 Step 5:
 Pinch the ends of the pieces together, and work the pieces to form the shapes as shown.
 Step 6:
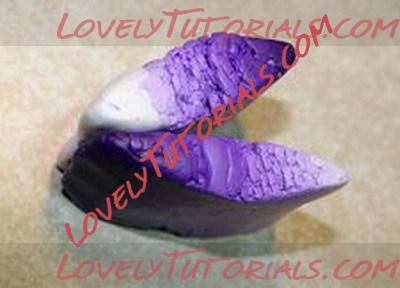
 Turn one piece so the white point faces you. Take the second piece in the opposite direction (purple end facing you) and attach purple point from the second piece to the white point of the first. Gently form the second piece to the first until the other two points meet, as in the right side of the next picture.
 Step 7:
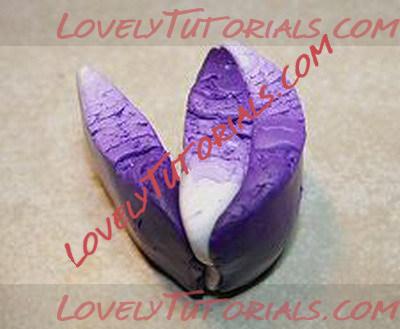
 Repeat the same action on the other side with the remaining piece. Now squeeze it to form a round cane
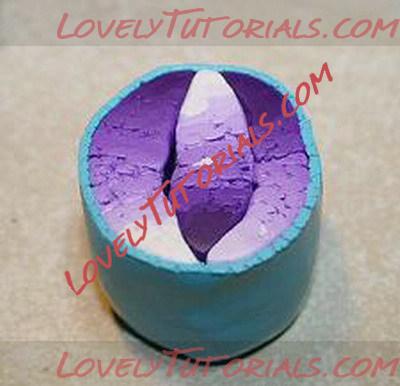 Step 8:
 Now put your third color (turquoise in my example) through your pasta machine at #4, and cut a sheet and wrap the cane as shown.
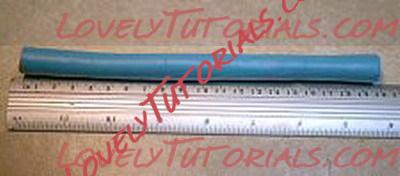 Step 9:
 Reduce the cane until it is 20cm long (approximately 8" - click picture for a larger view). Mark and cut the cane into 5 equal parts.
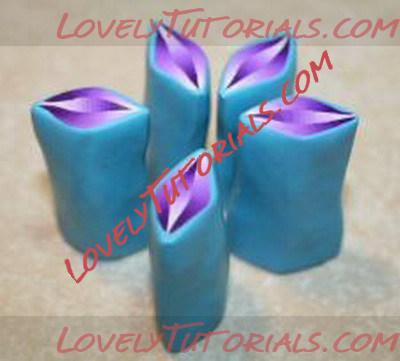 Step 10:
 Pinch each piece to form the 5 shapes as shown in the photo. These will be the petals of your flower.
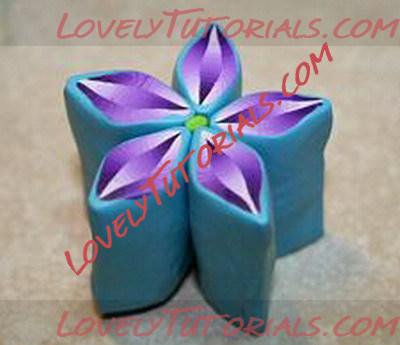 Step 11:
 Join all the pieces together to form the flower. If there is a gap in the center, fill it with a little snake of contrasting color (here I filled it with green clay that I had laying around the table).
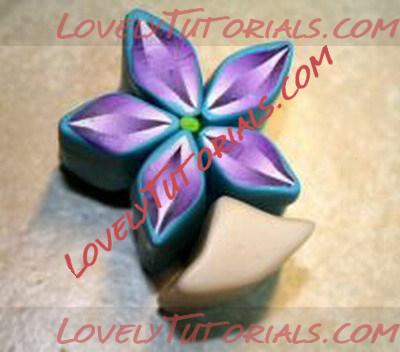 Step 12:
 Now fill in the gaps between the petals using your translucent clay (I'm using Premo Frost). Be careful to maintain the spacing of the petals.
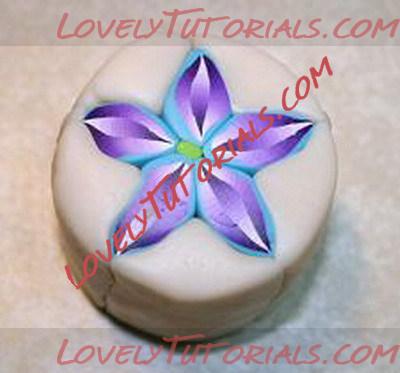 Step 13:
 Here is the completed cane before reducing.
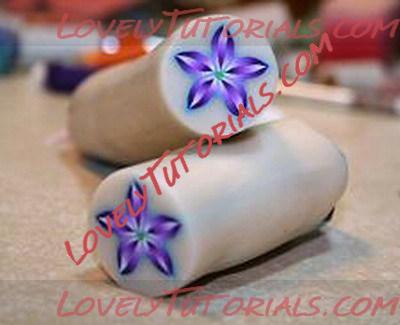 Step 14:
 And after reducing and cut in half.
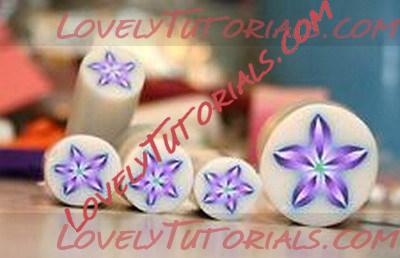 Step 15:
 Lastly, cut and reduce the canes into various sizes as you wish. Enjoy!
|
 |
|
–Ь–µ—В–Ї–Є
|
addƒ±m-addƒ±m t…Щlimat, adƒ±m, adƒ±m adƒ±m y√ґnergeler, artesanatos passo a passo, bemutat√≥, cane, curso de modelado, especializada em modelagem de biscuit, fender, fimo, fixando a cabencinha, fotopostup, hand-made, handmade, how to, how-to's, instruc≈£iuni, instrukcijas, instrukcje, jak na, korak, korak za korakom navodila, korak-po-korak upute, krok, krok po kroku, krok za krokem, krok-za-krokem, la mod√©lisation, las instrucciones, las t√©cnicas, le tecniche, les techniques, master-class, master-klasse, master-klasy, masy termoutwardzalnej, meistras klasƒЧs, metodikas, millefiori, mistr t≈Щ√≠dy, modelado, modelagem, modelando a barriga, modelando a cabencinha, modelando a perninha, modelando as maozinhas, modelando o cabelinho, modelando o corpinho, modelando os bracinhos, modelando os pezinhos, modelare, modeling, modeliranje, modellazione, modelleme, modellering, modellieren, modell…Щ≈Яdirm…Щ, modelovanie, modelov√°n√≠, modelowanie, n√°vod, oppl√¶ringen, orelhas, pamoka, pap, pas, pas-cu-pas, paso, paso a paso, passo, passo a passo, passo-a-passo, passo-passo le istruzioni, pintura dos olhos, polimer kil, polimeras molis, polymer argila, polymer clay, polymer clay cane tutorials, polymer glina, polymeren clay, postupak za ukrasavanje, premo, schritt f√Љr schritt anleitung, schritt-f√Љr-schritt, schritt-f√Љr-schritt-anleitungen, sculpting, shady flower cane tutorial, stap, stap-voor-stap, stap-voor-stap instructies, steg for steg, steg-f√ґr-steg-instruktion, step, step by step, step-by-l√©p√©sre, step-by-step, step-by-step instructions, technieken, techniken, techniki, techniky, technik√°k, techniques, tehnici, tehnike, teknikker, teknikler, torte, trin, trin for trin, trin-for-trin, trin-for-trin instruktioner, trinn, trinn for trinn, trinn-for-trinn-instruksjoner, tuto et bijoux en polym√®re, tutorial, tutoriale, tutorias, tutoriel, tutorijal, t√©cnicas, а§Яа•На§ѓа•Ва§Яа•Ла§∞а§ња§ѓа§≤ а§Ѓа§Ња§Єа•На§Яа§∞ ৵а§∞а•На§Ч, а§Х৶ু, а§Х৶ু ৶а§∞ а§Х৶ু ৮ড়а§∞а•Н৶а•З৴, ১а§Х৮а•Аа§Х, а§Ѓа•Йа§°а§≤а§ња§Ва§Ч, гГҐгГЗгГЂ, √©tape, √©tape par √©tape les instructions, √ґƒЯretici, ≈Њingsnis, ≈Њingsnis po ≈Њingsnio, еЃЧеЄЂзіЪжХЩз®ЛпЉМдЄАж≠•пЉМдЄАж≠•дЄАж≠•зЪДжМЗз§ЇжК Аи°УпЉМud≈Њbenik, еїЇж®°, ќ≤ќЃќЉќ±, ќ≤ќЃќЉќ± ѕАѕБќњѕВ ќ≤ќЃќЉќ± ќњќіќЈќ≥ќѓќµѕВ, ќњќіќЈќ≥ќѓќµѕВ ќ≤ќЃќЉќ± ќ≤ќЃќЉќ±, ѕАќњќїѕЕќЉќµѕБќєќЇќњѕН ѕАќЈќїќњѕН, ѕАќ±ќљѕДќµѕГѕАќђќљќє art, ѕДќµѕЗќљќєќЇќ≠ѕВ, ѕЖѕБќњќљѕДќєѕГѕДќЃѕБќєќњ, –Є–љ—Б—В—А—Г–Ї—Ж–Є—П, –Є–Ј–і–µ–ї–Є—П –Є–Ј –њ–ї–∞—Б—В–Є–Ї–Є, –Ї–Њ–ї–±–∞—Б–Ї–Є –Є–Ј –њ–Њ–ї–Є–Љ–µ—А–љ–Њ–є –≥–ї–Є–љ—Л, –Ї–Њ–ї–±–∞—Б–Ї–∞ –Є–Ј –њ–Њ–ї–Є–Љ–µ—А–љ–Њ–є –≥–ї–Є–љ—Л, –Ї–∞–Ї —Б–і–µ–ї–∞—В—М, –Ї–∞–Ї —Б–ї–µ–њ–Є—В—М, –Ї–∞–Ї —Б–ї–µ–њ–Є—В—М –Ї–Њ–ї–±–∞—Б–Ї—Г –Є–Ј –њ–Њ–ї–Є–Љ–µ—А–љ–Њ–є –≥–ї–Є–љ—Л, –Ї–∞–љ–µ, –Ї—А–Њ–Ї –Ј–∞ –Ї—А–Њ–Ї–Њ–Љ, –Ї—А–Њ–Ї –Ј–∞ –Ї—А–Њ–Ї–∞–Љ, –њ–Њ–Ї—А–Њ–Ї–Њ–≤–Њ, –њ–Њ–ї–Є–Љ–µ—А–љ–∞ –≥–ї–Є–љ–∞, –њ–Њ–ї–Є–Љ–µ—А–љ–∞—П –≥–ї–Є–љ–∞, –њ–Њ–ї—Ц–Љ–µ—А–љ–∞ –≥–ї–Є–љ–∞, –њ–Њ—И–∞–≥–Њ–≤–Њ, –њ–Њ—И–∞–≥–Њ–≤—Л–µ —Д–Њ—В–Ї–Є, –њ–∞–Ї—А–Њ–Ї–∞–≤–∞, –њ–∞–ї—Ц–Љ–µ—А–љ–∞—П –≥–ї—Ц–љ–∞, –њ–ї–∞—Б—В–Є–Ї, –њ–ї–∞—Б—В–Є–Ї–∞, –Љ–Є–љ–Є–∞—В—О—А–∞, –Љ–Ї, –Љ–Ї —В–µ–љ–µ–≤–Њ–є —Ж–≤–µ—В–Њ–Ї –Є–Ј –њ–ї–∞—Б—В–Є–Ї–Є –≤ —В–µ—Е–љ–Є–Ї–µ "–Ї–Њ–ї–±–∞—Б–∞", –Љ–Ї-—Л "–Ї–Њ–ї–±–∞—Б–Ї–Є –Є–Ј –њ–Њ–ї–Є–Љ–µ—А–љ–Њ–є –≥–ї–Є–љ—Л", –Љ–Њ–і–µ–ї–Є—А–∞–љ–µ, –Љ–∞–є—Б—В–Њ—А-–Ї–ї–∞—Б–∞ —Г—А–Њ–Ї, –Љ–∞–є—Б—В–∞—А-–Ї–ї–∞—Б, –Љ–∞–є—Б—В–µ—А-–Ї–ї–∞—Б, –Љ–∞–є—Б—В–µ—А-–Ї–ї–∞—Б–Є, –Љ–∞—Б—В–µ—А-–Ї–ї–∞—Б—Б, –ї–µ–њ–Є–Љ –Є–Ј –њ–ї–∞—Б—В–Є–Ї–Є, –ї–µ–њ–Ї–∞, –ї—Ц–њ–ї–µ–љ–љ—П, —А—Г—З–љ–Њ–є —А–∞–±–Њ—В—Л, —А—Г—З–љ–∞—П —А–∞–±–Њ—В–∞, —Б–Њ–Ј–і–∞–љ–Є–µ –±–Є–ґ—Г—В–µ—А–Є–Є –Є–Ј –њ–Њ–ї–Є–Љ–µ—А–љ–Њ–є –≥–ї–Є–љ—Л, —Б–≤–Њ–Є–Љ–Є —А—Г–Ї–∞–Љ–Є, —Б—В—К–њ–Ї–∞, —Б—В—К–њ–Ї–∞ –њ–Њ —Б—В—К–њ–Ї–∞ –Є–љ—Б—В—А—Г–Ї—Ж–Є–Є, —В–µ—Е–љ–Є–Ї–Є, —В–µ—Е–љ–Є–Ї–∞, —В–µ—Е–љ–Є–Ї–∞ "–Ї–Њ–ї–±–∞—Б–∞", —В–µ—Е–љ—Ц–Ї–∞, —В—Г—В–Њ—А–Є–∞–ї, —В—Г—В–Њ—А—Ц–∞–ї, —В—Н—Е–љ—Ц–Ї–∞, —Д–Є–Љ–Њ, —Д–Њ—В–Њ—Г—А–Њ–Ї, —Ж–≤–µ—В–Њ–Ї, —Ж–≤–µ—В—Л, —Ж–≤–µ—В—Л –Є–Ј –њ–ї–∞—Б—В–Є–Ї–Є, —И–∞–≥ –Ј–∞ —И–∞–≥–Њ–Љ, —Ц–љ—Б—В—А—Г–Ї—Ж—Л—П, —Ц–љ—Б—В—А—Г–Ї—Ж—Ц—П  |
|


