|
|
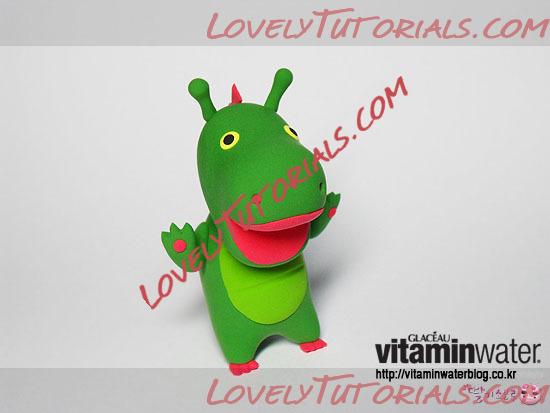
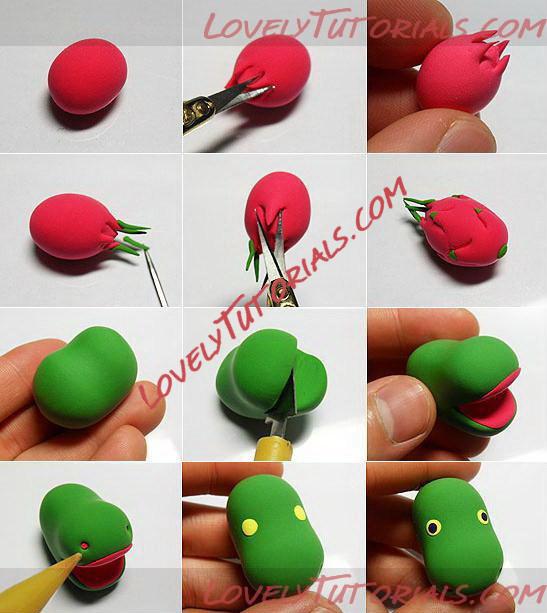
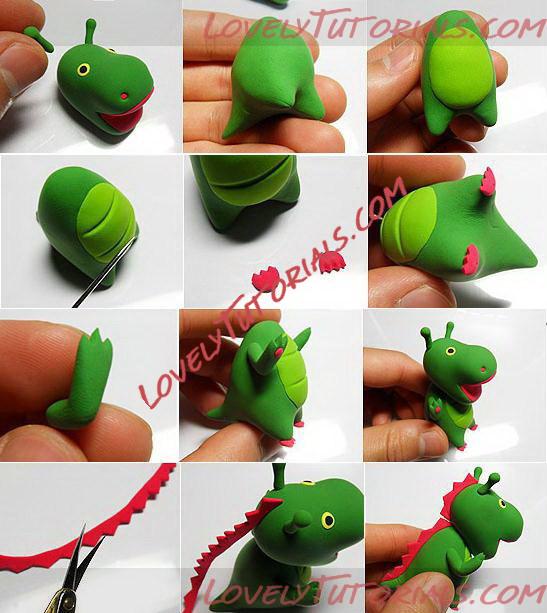
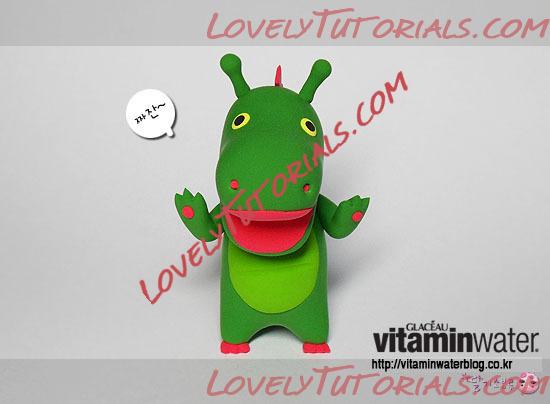
Динозавры,драконы,dragon, Dinosauri, Dinosauři, draci,Les dinosaures, les dragons
|

26.02.2012, 11:49
|
|
Администратор
|
|
Регистрация: 07.09.2010
Сообщений: 7,669
|
|
|
27.04.2012, 14:40
|
|
Администратор
|
|
Регистрация: 07.09.2010
Сообщений: 7,669
|
|
|
27.04.2012, 19:30
|
|
Администратор
|
|
Регистрация: 07.09.2010
Сообщений: 7,669
|
|
|
28.04.2012, 14:45
|
|
Администратор
|
|
Регистрация: 07.09.2010
Сообщений: 7,669
|
|
|
28.04.2012, 15:33
|
|
Администратор
|
|
Регистрация: 07.09.2010
Сообщений: 7,669
|
|
|
28.04.2012, 16:30
|
|
Администратор
|
|
Регистрация: 07.09.2010
Сообщений: 7,669
|
|
|
02.06.2012, 13:44
|
|
Администратор
|
|
Регистрация: 07.09.2010
Сообщений: 7,669
|
|

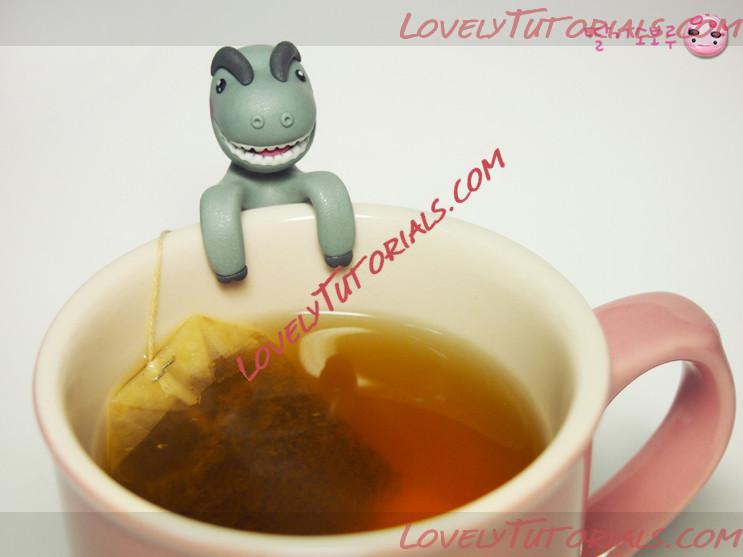
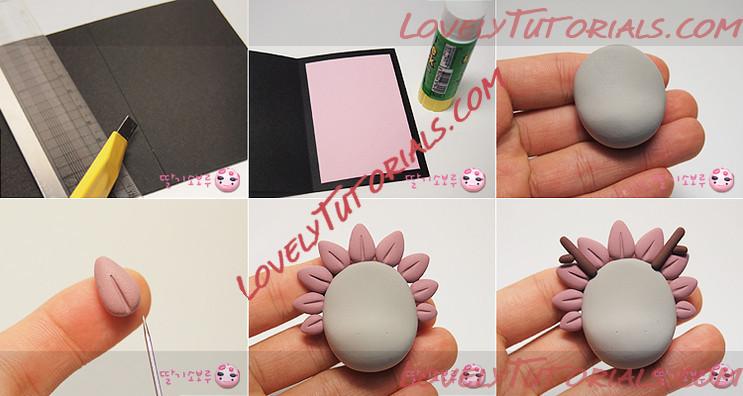
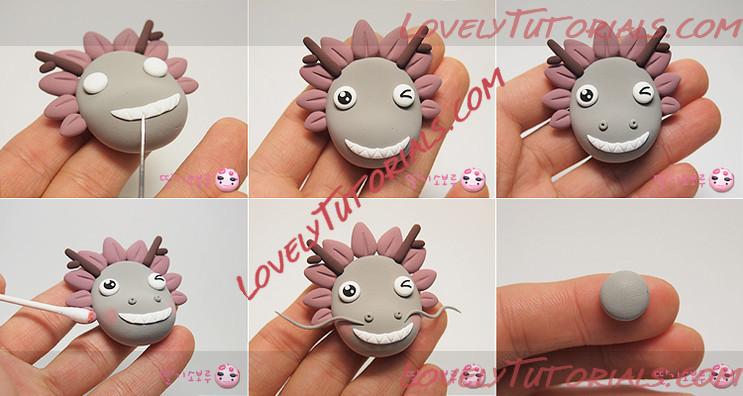
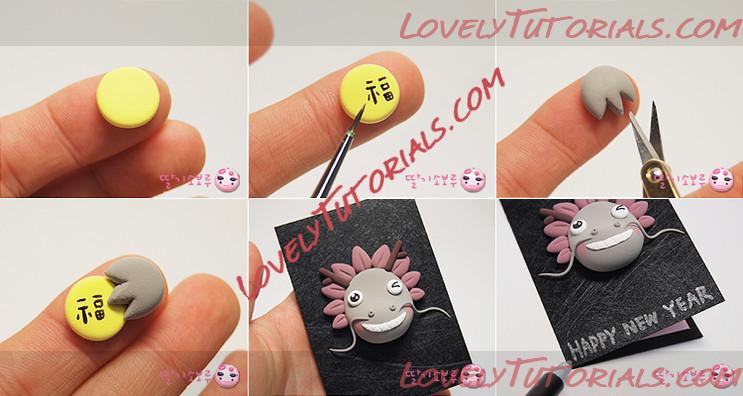
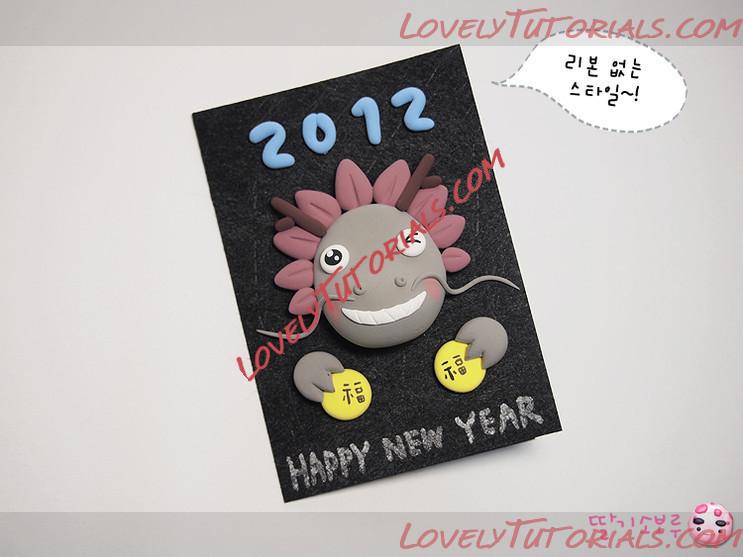
Огромная благодарность Crustymuffin за Мастер-класс
I have been asked a lot and I have it on my face book page but I figured I would post it here for easier access.
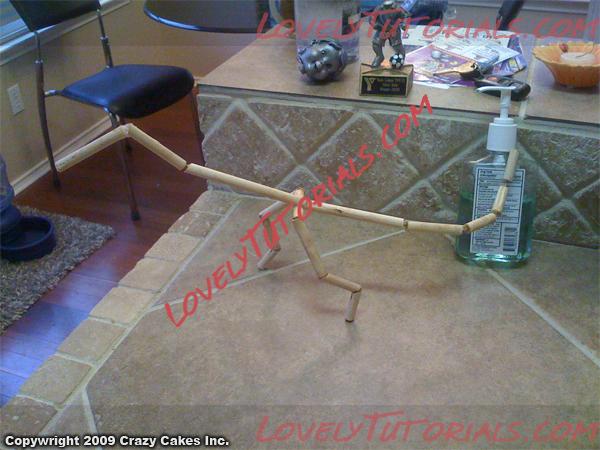
The T-rex figure had to have a sturdy structure to build off of. We used
wooden dowels and thick wire to create a sturdy structure that we could pose.
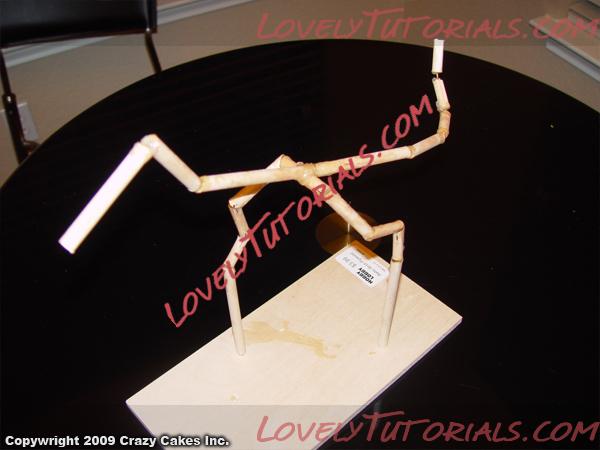
The structure was then mounted to a base. This base supported the figure during the creation
and in the final cake.
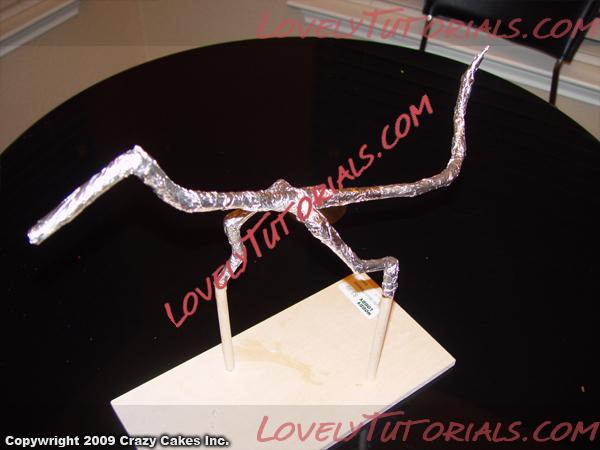
After being cleaned and sanitized the structure was covered in foil.
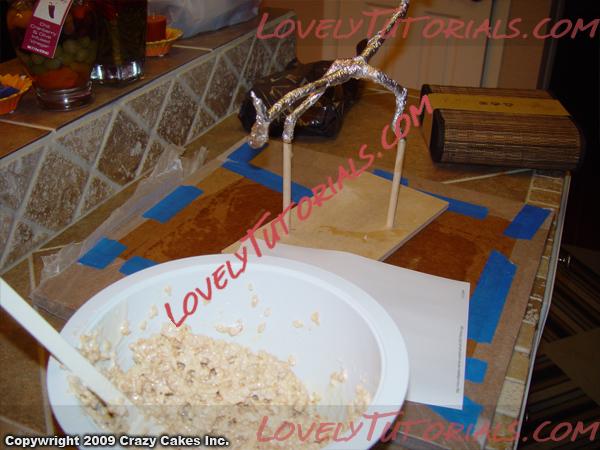
Then it was time to mix the rice cereal and build up the body. We found that mixing the rice
treats and then baking them for 10-15 min helped them to stick and harden faster which was
key since gravity is not your friend here.
We coated the structure with melted marshmallow to help the rice treats stick. You can still see
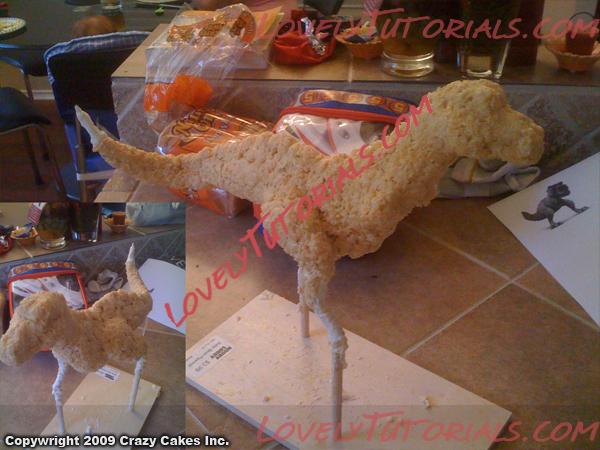
this on the tips of the feet and the tail. We packed the rice cereal treats on in manageable
sections starting with the belly as it was the most bulky area. Once we were happy with the basic form
we squeezed and compacted the treats. This firmed it up and revealed any areas that needed additional work.

When we were happy with the form of our figure, then we began to crumb coat
it with icing. I hollowed out the eye sockets so I could make nice round eyeballs with fondant later.
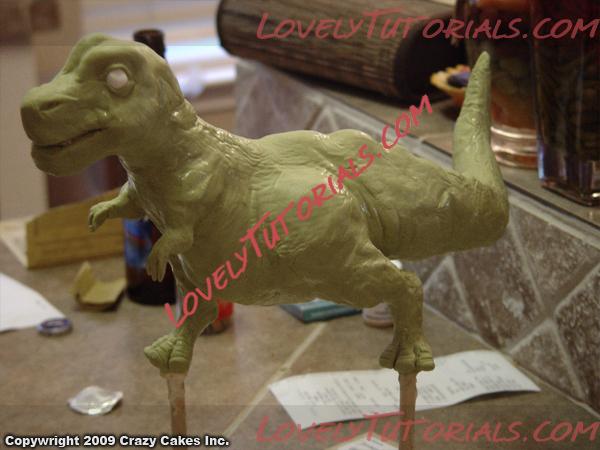
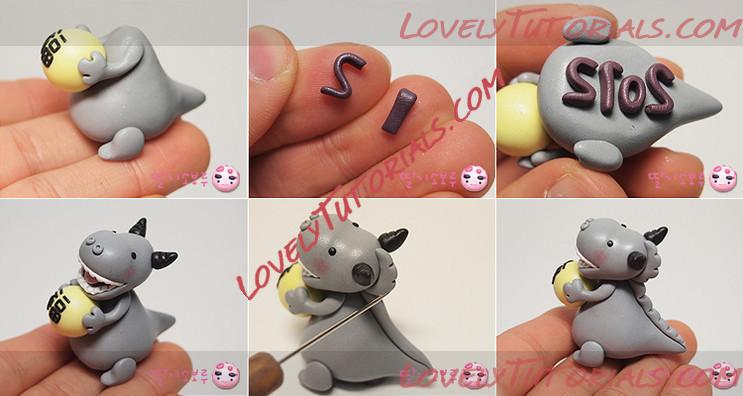
Next we went on to wrapping the figure with fondant or gum paste. We used fondant in this case.
We rolled out green colored fondant the same as we would when covering a cake. We covered the
figure in 4 parts; first the body, then the legs individually, and the head last. The idea is to cover it
in a way that all seams are hidden or in a natural location. We used Vodka to blend the 4 coverings together.
Vodka helps to wet the fondant extending the working time so you can knead it together. Standard
sculpting tools were used to add skin ripples other details such as the mount and the nose.
The Vodka evaporates after time.

The eyes were done after the body was entirely complete. We use white fondant, rolling it into
little balls and inserting them into the eye sockets. We then made little eyelids and kneaded them in.
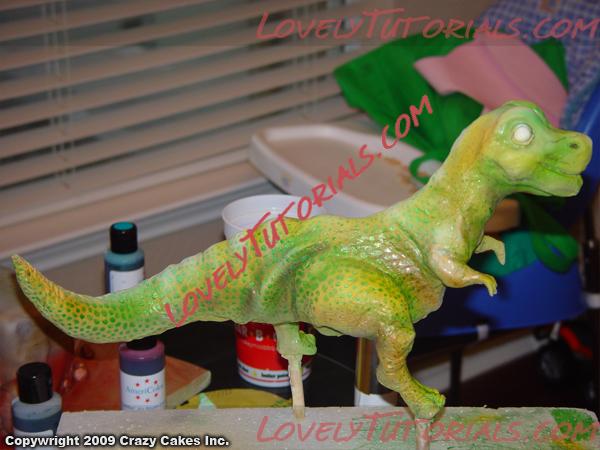
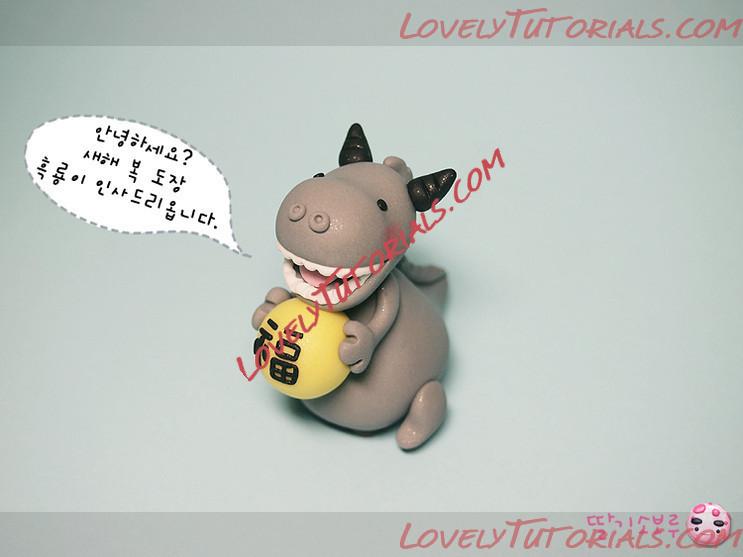
After the figure completely dried we began the painting process. I found this scrap book paper at
a craft store. It really helped us understand the pattern needed. We didn�t want this Dinosaur to be very
scary so we went less realistic on the color. Every little spec was painted with a brush using metallic green
Americolor edible paints.
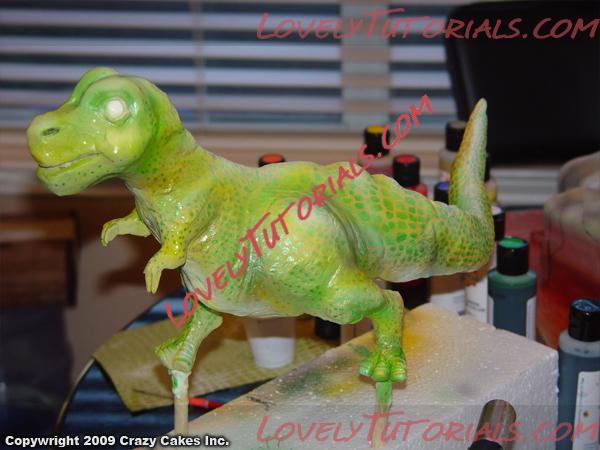
Once the specs were done, we airbrushed 2 additional shades of green, white for highlights and
brown/green mix for shadows.
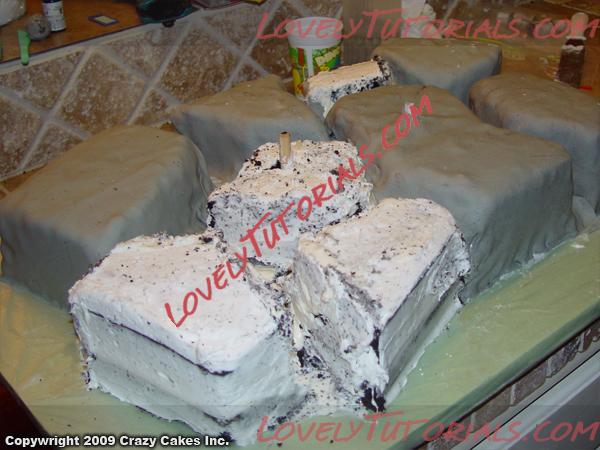
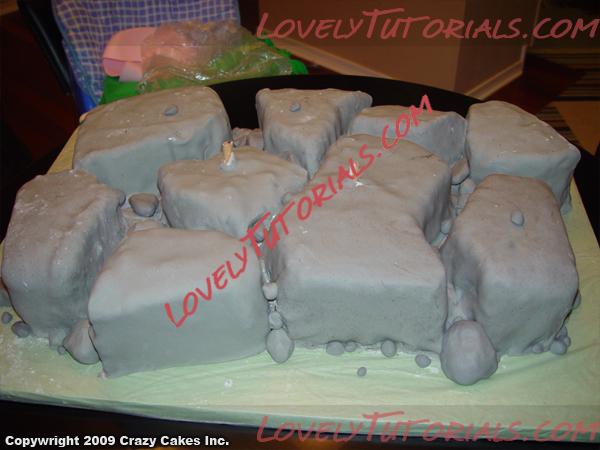
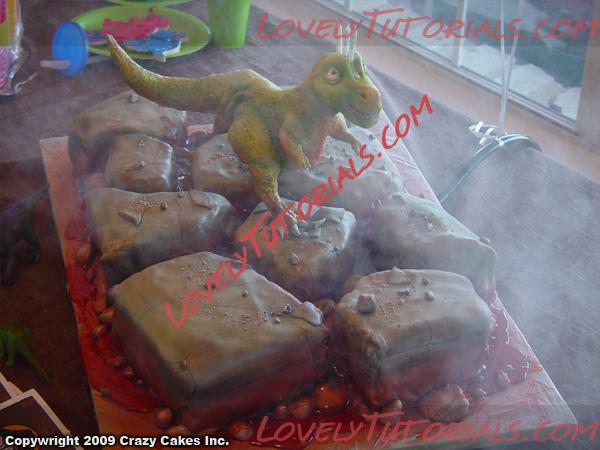
We put the figure aside to dry while we shifted out attention to the cake base. The cake base was
chocolate with butter cream filling and crumb coat. To create the breaking ground formation we just cut our
sheet cake into cracked sections and covered them separately.
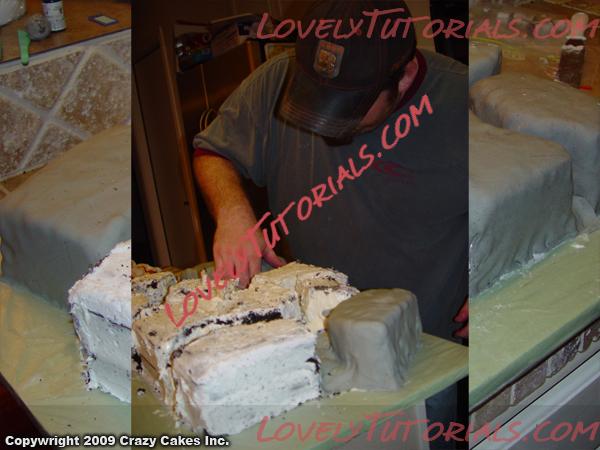
You might have noticed that we did not use a smooth crumb coat; that was intentional, as it gives the rocks
better surface texture. The fondant was also rolled thin to further capture the roughness of the crumb coat.
Variously sized �detail� rocks were rolled from fondant to accentuate the cracks and border of the cake.
These were meticulously placed.
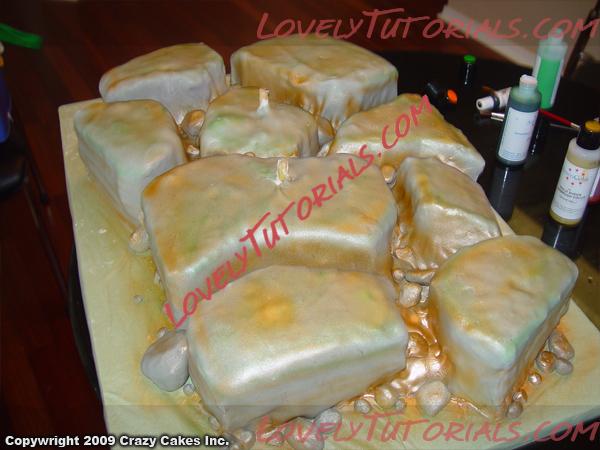
We wanted the rocks to look like they were under lit from the lava. A trick we used was to paint
them the same way candy car paint is applied; using a gold base color, and then spraying a red-tinted
clear coat. Again we used Americolor edible airbrush paints.
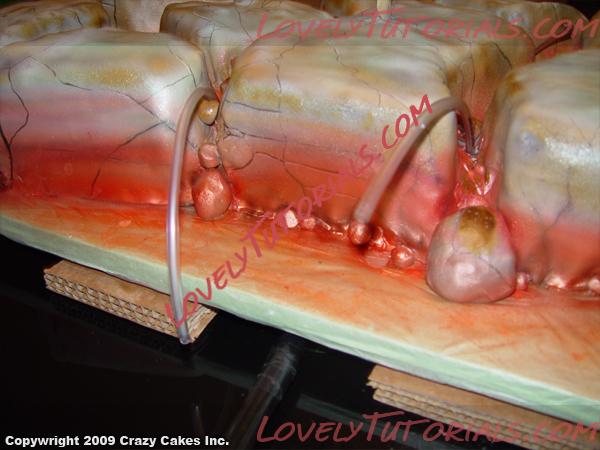
Then we hand painted all the crack details with a fine brush.
We then applied torch heat to the paint that we spent a hour applying. This sugar is slightly caramelized,
blending the colors. It was intended to be lava rock, so we wanted it to look hot! We applied heat
heavily on the little detail rocks, making them look like roasted marshmallows. Four small
hoses were then run through the cake and out the bottom. We connected the hoses into one big hose
that ultimately attached to the water-based fog machine.
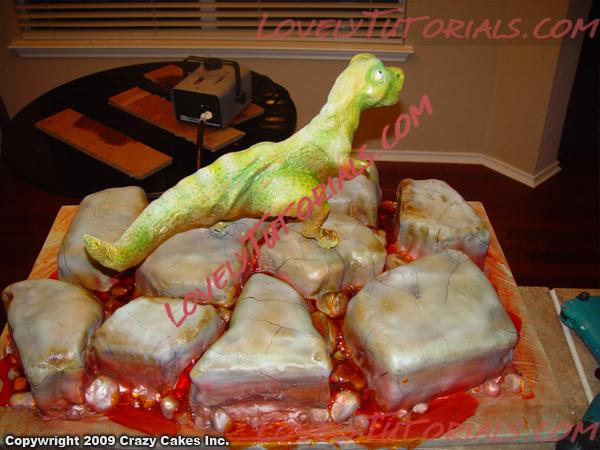
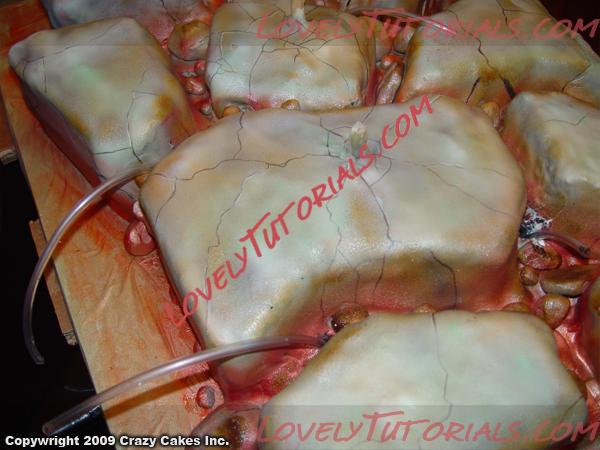
After the fog hoses were in place, we needed to pour the lava. (Sorry, I do not have a photo
of this step with out the figure in place.) We cooked sugar to the �Sugar Crack� state, and added
cherry flavor and some orange-red food coloring. After the cooked sugar cooled two to three
minutes, we poured it into the cracks of the rock forms. After ten to twenty minutes, this was
fully hardened. We trimmed the excess fog hoses, and placed the figure on top.
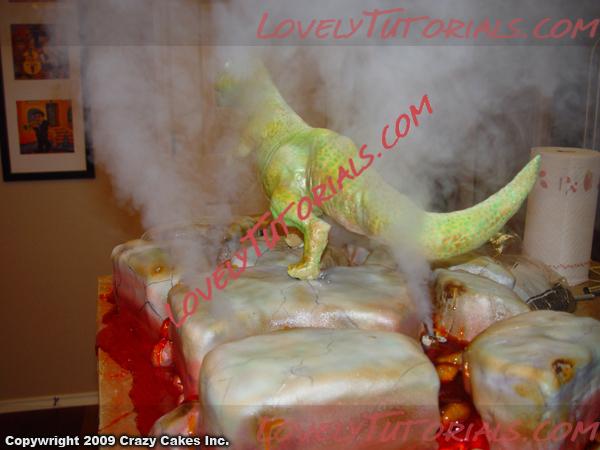
It sure was awesome to see the fog fan out into the room from this cake.
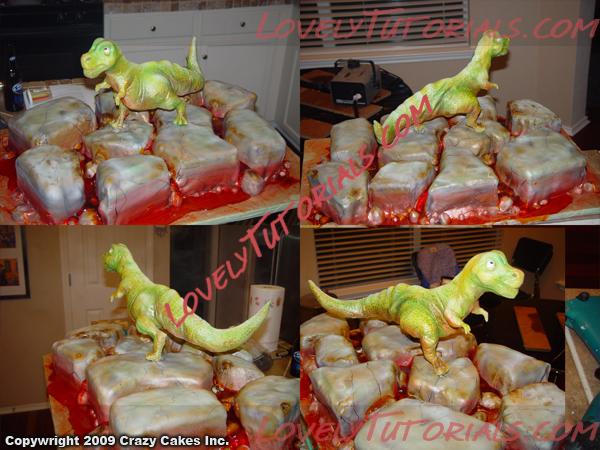
Once looking at it from all angles we realized that we needed to apply more torch effect.
We also torched onto the figure in places.
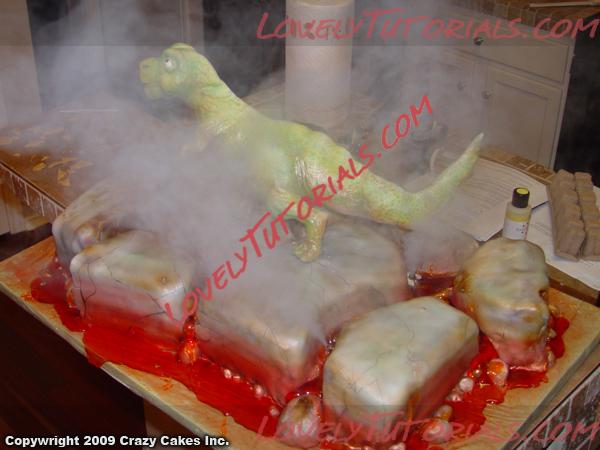
The moment of truth had arrived. Hook up the fog, and let her rip.
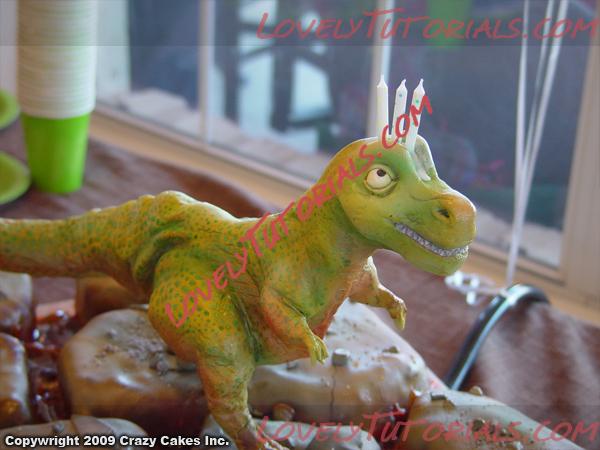
We got it to the party in one piece, thanks to the structure we placed within the cake in step 1.
All we needed to do now was add the candles. There was only once place for that, the head!
|
 |
|
|
Метки
|
3d, 3d figures, 3д, addım-addım, addım-addım təlimat, adherido a cabo plstilina, adım, adım adım, adım adım yönergeler, animais, animali, animals, animaux, arcilla polimérica, argila do polímero, argila polimèrica, argile polymère, artesanatos passo a passo, arxila do polímero, askel askeleelta, auksts porcelāns, baridi porcelain, bemutató, birthday cake, biscuit, bolando bolos, bolos decorados, cake decorating, cake decorating techniques, cake topper, cake toppers, cake tops, cerâmica plástica, character figures, characters, children's cake, cola de plstilina, cold porcelain, colla da plstilina, colle de plstilina, confeitando bolos, cré polaiméir, curso de modelado, céim ar chéim, decoracion de pasteles, decoración de tortas, decorada en fondant, decorare le torte, decorazioni, deinosor, deko fondant, dekorace na dort, dekoracija, dekoracije, dekorasyon, dekorácie, dingin porselen, dinosaur, dinosaur cake topper tutorial, dinosaure, dinosauri, dinosaurie, dinosaurier, dinosaurio, dinosauro, dinosaurum, dinosaurus, dinosauři, dinosawru, dinosaŭro, dinosourus, dinossauro, dinoszaurusz, dinozaur, dinozauras, dinozaurs, dinozaurų, dinozaver, dinozor, dinozò, draak, drac, drachen, draci, draco, drage, drago, dragon, dragun, dragón, dragão, draig, drak, drake, drako, drakonas, dreki, dyr, ejderha, especializada em modelagem de biscuit, etap pa etap, fender, figur kager, figuras, figure making tutorials, figuren, figures, figurice, figurice od fondana, figurine on the cake, figurines, figurinhas, figurky, figúrky, figür modelleme, fimo, fixando a cabencinha, fjölliða leir, flower paste, fondan, fondant, fondente, fondente di zucchero, fotopostup, foundant, frigus murrina, frèt porselèn, gam dari plstilina, gam wrth gam, gebak, glazuur, gliú ó plstilina, glud o plstilina, glue from plstilina, gluo de plstilina, gluten de plstilina, gom uit plstilina, gradatim, gum pasta, gum paste, gumpaste, gundi kutoka plstilina, hakbang-hakbang, hand-made, handmade, hap pas hapi, hatua kwa hatua, hayvanlar, heyvanlar, hideg porcelán, hladno porcelan, hladno porculan, hotz portzelana, how to, how to make fondant dragon, how-to's, immudellar, instrucţiuni, instrukcijas, instrukcje, jak na, joka, jílu polymeru, kage dekoration, kagedekoration, kakebaking, kaldt porselen, kall porslin, kalt postulín, kalten porzellan, khủng long, kiesaħ porċellana, klei, kold porcelæn, kolla minn plstilina, korak, korak po korak, korak za korakom, korak za korakom navodila, korak-po-korak upute, koristeet ja koristelu, koud porselein, koue porselein, krok, krok po kroku, krok za krokem, krok za krokom, krok-za-krokem, kylmä posliini, külm portselan, la modélisation, lakòl soti nan plstilina, langkah demi langkah, las instrucciones, las técnicas, le tecniche, leim aus plstilina, lem dari plstilina, lepidlo z plstilina, lepilo plstilina, les dinosaures, les dragons, les techniques, liimaa plstilina, lim fra plstilina, lim från plstilina, lipici la plstilina, ljepila iz plstilina, lohe, lohikäärme, los animales, lukie, lạnh sứ, lépésről lépésre, líkan, lím frá plstilina, malamig porselana, mallintaminen, malvarma porcelano, manekenstvo, marcipanové figurky, marshmallow, marsipanfigurer, masa flexible, master-class, master-klasse, master-klasy, meistras klasės, metodikas, mistr třídy, model, modelado, modelage, modelagem, modelando a barriga, modelando a cabencinha, modelando a perninha, modelando as maozinhas, modelando o cabelinho, modelando o corpinho, modelando os bracinhos, modelando os pezinhos, modelare, modelat, modelatze, modelaxe, modelerte figurer, modeliavimas, modelim, modeling, modeling paste, modeliranje, modelizasyon, modellazione, modelleerimine, modelleerimine alates plstilina, modelleme, modellering, modellering van plstilina, modellezés, modellieren, modellierpaste, modelling, modelling past, modellismo, modelləşdirmə, modelovanie, modelování, modelování krok za krokem, modelowanie, modelowanie od plstilina, modelu, modelēšana, modelēšana no plstilina, motivtorten, mô hình, mô hình từ plstilina, naga, nuo plstilina modeliavimas, návod, návody a postupy, návody na květy a lístky, opplæringen, orelhas, ozdoby, pagmomolde, pamoka, pangola mula plstilina, pap, pas, pas a pas, pas cu pas, pas à pas, pas-cu-pas, pas-à-pas et modèles, paso, paso a paso, pass pass, passo, passo a passo, passo dopo passo, passo-a-passo, passo-passo le istruzioni, pasta de goma, pasta de miel, pasta flexible, pasta laminada, paŝon post paŝo, pemodelan, pintura dos olhos, plstilina dən modelləşdirmə, plstilina from kola, plstilina yapışkan, plstilina માંથી ગુંદર, plstilina ರಿಂದ ಮರವಜ್ರ, plstilina से गोंद, plstilina থেকে আঠালো, plstilina இருந்து பசை, plstilina నుండి జిగురు, plstilina سے گلو, plstilinaからグルー, plstilina에서 접착제, pocelana fria, polimer agyag, polimer argilă, polimer balta, polimer gil, polimer gline, polimer kil, polimer luad, polimer tanah liat, polimerna glina, polimero argilo, polimero buztin, polimero molis, polimeru tafal, polimēra māls, polymeer klei, polymeerin savi, polymer argilla, polymer clai, polymer clay, polymer leire, polymer ler, polymer lera, polymer udongo, polymer đất sét, polymère ajil, polümeersavist, porcelain fuar, porcelain ເຢັນ, porcelaine froide, porcelana fria, porcelana fría, porcelani ftohtë, porcellana freda, porcellana fredda, porselin sejuk, porslen oer, porțelan rece, postupak za ukrasavanje, pravljenje figurica za torte, pâtisserie, předměty z marcipánu, pūķis, ragasztó plstilina, rồng, samhaltú, samm-sammult, schmelzend, schritt für schritt, schritt für schritt anleitung, schritt-für-schritt, schritt-für-schritt-anleitungen, sculpting, sculpturae, skref fyrir skref, smok, soggetti, soli pa solim, souvenirs, soyuq çini, soğuk porselen, stap, stap vir stap, stap voor stap, stap-voor-stap, stap-voor-stap instructies, steg for steg, steg för steg, steg-för-steg-instruktion, step, step by step, step-by-lépésre, step-by-step, step-by-step instructions, studený porcelán, styrofoam, sugarcraft, sugarpaste, suikerglazuur, sárkány, technieken, techniken, techniki, techniky, technikák, techniques, tecnicas de decoracion, tecniche, tehnici, tehnike, teknikker, teknikler, telgopor, tiere, topo de bolo, topo do bolo, topos de bolo, torte, torte decorate, torten dekorieren, torti, trin, trin for trin, trin-for-trin, trin-for-trin instruktioner, trinn, trinn for trinn, trinn-for-trinn-instruksjoner, trucs et questions sur la décoration de gateaux, tutorial, tutoriale, tutorias, tutorias/ideas para decorar los bizcochos, tutoriel, tutoriels, tutorijal, từng bước, técnicas, udžbenik, ukrašavanje torti, uputstvo za dekoraciju, urratsez urrats, zam nga plstilina, zimnej porcelany, zmaj, zuckerfigürchen, zuckermasse, zvieratá, zvířata, การสร้างแบบจำลอง, กาวจาก plstilina, พอร์ซเลนเย็น, มังกรไดโนเสาร์, ขั้นตอนโดยขั้นตอ� �, ดินโพลิเมอร์, ກາວຈາກ plstilina, પોલિમર ક્લે, ສ້າງແບບຈໍາລອງ, ມັງກອນ, ડ્રેગન ડાઈનોસોર, ຂັ້ນຕອນທີໂດຍຂັ້ນ� �ອນ, ઉત્તરોત્તર, ດິນເຜົາ polymer, ઠંડા પોર્સેલેઇન, મોડલ બનવું, ಪಾಲಿಮರ್ ಕ್ಲೇ, ಡ್ರ್ಯಾಗನ್, ಡೈನೋಸಾರ್, ಮಾಡೆಲಿಂಗ್, ಶೀತ ಪಿಂಗಾಣಿ, ಹಂತ ಹಂತವಾಗಿ, सजा केक, डायनासोर, ट्यूटोरियल मास्टर वर्ग, अजगर, कदम, कदम से कदम, कदम दर कदम निर्देश, ठंड चीनी मिट्टी के बरतन, तकनीक, बहुलक मिट्टी, मॉडलिंग, मोडलिंग, পলিমার মৃন্ময়, ডাইনোসর, ড্রাগন, ঠান্ডা চীনামাটির বাসন, ধাপে ধাপে, মূর্তিনির্মাণ, பாலிமர் களிமண், படிப்படியாக, டைனோசர், டிராகன், குளிர் பீங்கான், மாடலிங், స్టెప్ బై స్టెప్, పాలీమర్ క్లే, చల్లని పింగాణీ, డ్రాగన్, డైనోసార్, మోడలింగ్, ໄດໂນເສົາ, ც�?ვ�? ფა�?ფურ�?, პოლ�?მერ�?ს თ�?ხ�?ს, დ�?ნოზავრ�?ს, დრაკონ�?, ეტაპობრ�?ვად, მოდელ�?რება, მოდელ�?რებ�?ს საწყ�?ს�? plstilina, ポリマー�?土, モデリング, モデル, étape, étape par étape les instructions, ílu polyméru, öğretici, 一步, 一步一步來, 一步一步来, 一步一步的指示術, žingsnis, žingsnis po žingsnio, živali, šalto porceliano, 冷たい磁器, 冷瓷, 宗師級教程, 少しずつ, 建模, 竜、恐竜, 聚合物�?土, 胶从plstilina, 裝飾蛋糕, 膠從plstilina, 造型, 龍,恐龍, 龙,恐龙, 黏土教程, 공룡, 모델링, 단계적으로, 만들기 제작 과정, 슈가모델링, 용, 차가운 도자기, 폴리머 클레이, δεινόσαυρος, δράκος, κρύο πορσελάνη, κόλλα από plstilina, βήμα, βήμα προς βήμα, βήμα προς βήμα οδηγίες, οδηγίες βήμα βήμα, μοντελοποίηση, πολυμερές πηλό, παντεσπάνι art, τεχνικές, φροντιστήριο, динозавр, динозавры, динозавър, диносаурус, декорация на торти стъпка по стъпка, дракон, драконы, дыназаўр, инструкция, корак по корак, как сделать, как слепить дракона, клей из plstilina, клей з plstilina, крок за кроком, крок за крокам, от днес за днес, покроково, полимер глина, полимерной глины, полимерна глина, полимерная глина, полимерске глине, полімерної глини, пошагово, пошаговые фотки, пакрокава, палімернай гліны, персонажи, миниатюра, мк, мк детский торт с динозавром, моделиране, моделиране от plstilina, моделирање, моделирање из плстилина, моделовање, майстор-класа урок, майстар-клас, майстер-клас, майстер-класи, маршмеллоу, мастика, мастер-класс, животни, жывёлы, зма�?, зме�?, ладно порцелан, лепка, лепак од plstilina, ліплення, ліплення з плстіліна, ручной работы, ручная работа, украшение тортов, сахарная мастика, уроки прикрашання, студен порцелан, стъпка, стъпка по стъпка, стъпка по стъпка инструкции, торта стъпка по стъпка, тварини, техники, техника, техніка, туториал, туторіал, тэхніка, фигурки, фигурка на торт, фимо, фігурки, фігуркі, холодний фарфор, холодный фарфор, халодны фарфор, хладно порцелана, цмок, чекор по чекор, шаг за шагом, інструкцыя, інструкція, מאָדעלינג, דרקון, דבק מplstilina, דיינאַסאָר, דינוזאור, חימר פולימרים, כיור, פּאָלימער ליים, פורצלן קר, צעד אחר צעד, קאַל�? פּאָרצעלייַ, קליי פון פּלס�?ילינאַ, שרי�? דורך שרי�?, שלאנג, سرد چینی مٹی کے برتن, پولیمر مٹی, قدم بہ قدم, ماڈلنگ, ڈریگن، ڈایناسور  |
|