|
|
Sculpting Fondant Fairies figurines | МК лепка "Феи"
|

27.08.2011, 15:27
|
|
Администратор
|
|
Регистрация: 07.09.2010
Сообщений: 7,669
|
|
 Sculpting Fondant Fairies figurines | МК лепка "Феи"
A big shout out to author for this Master Class
Огромная благодарность Автору за Мастер-класс
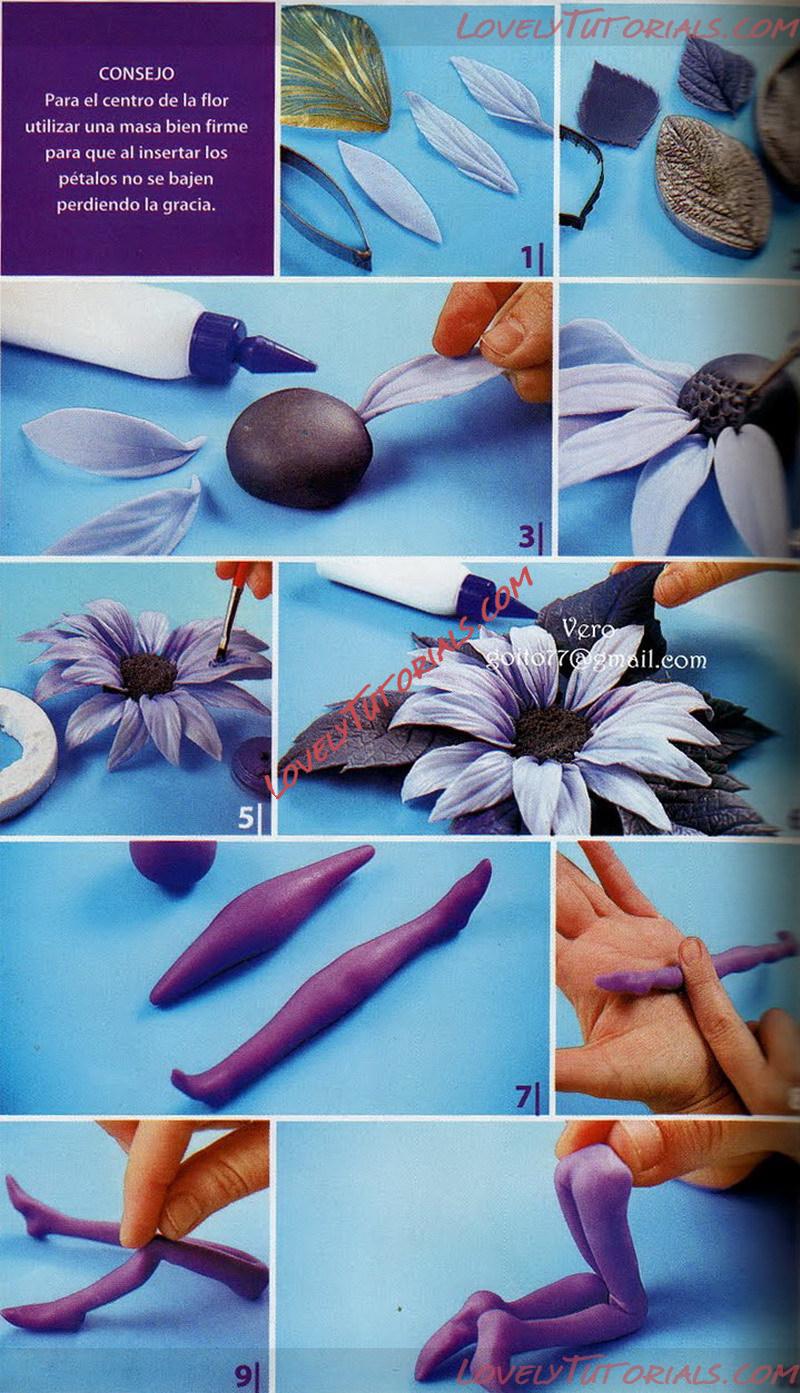
TIP: For the center of the flower, use a very firm dough so that when the petals are inserted, they do not lower themselves, losing grace.

The world is full of magic things, patiently waiting for our senses to grow sharper.
― W.B. Yeats
|
28.08.2011, 09:38
|
|
Администратор
|
|
Регистрация: 07.09.2010
Сообщений: 7,669
|
|
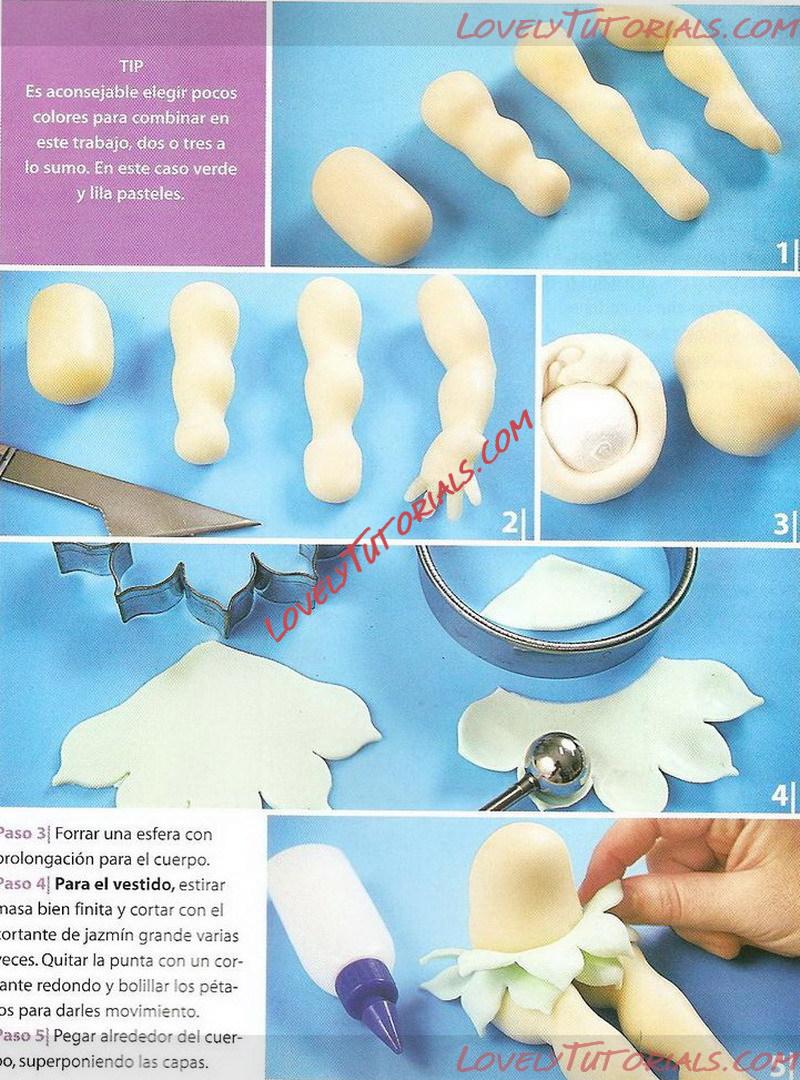
How to Make a sitting Fondant Fairy 1 | фея сидя
Огромная благодарность Leticia Suarez del Cerro за Мастер-класс
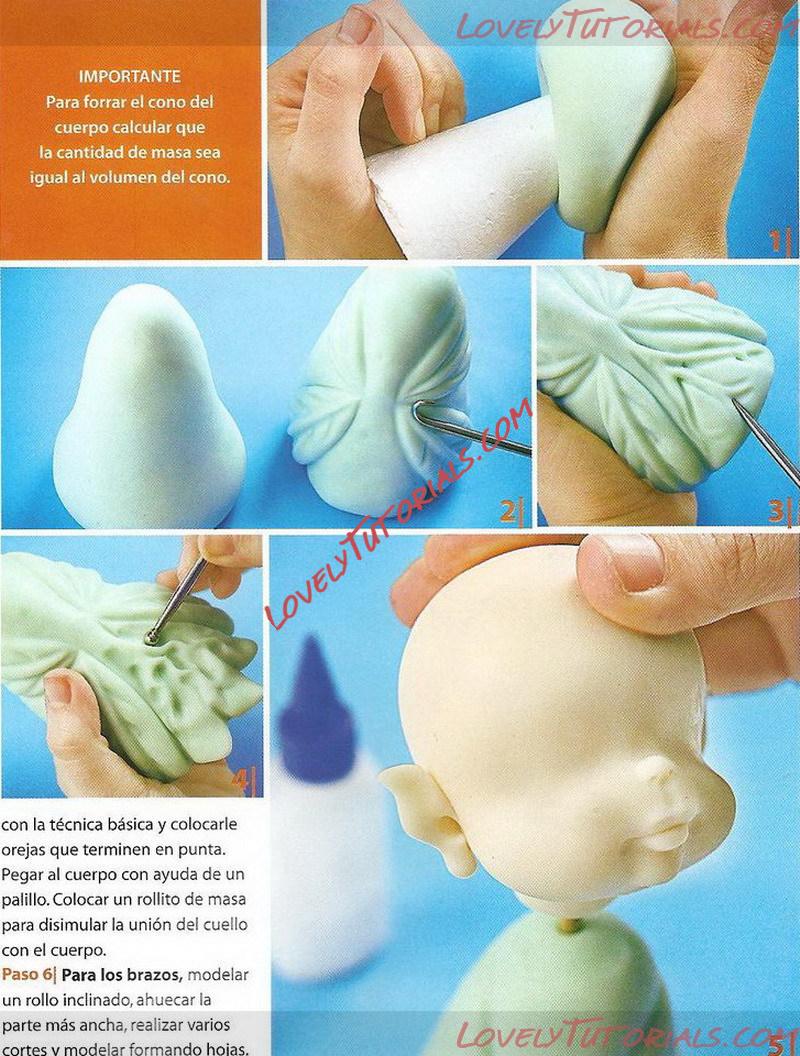 Stick to the body with the help of a stick. Place a dough roll to hide the union of the neck with the body.
Step 6 | For the arms, model an inclined roll, hollow out the widest part, make several cuts and model forming hoias.
IMPORTANT: To line the cone of the body calculate that the amount of mass is equal to the volume of the cone.
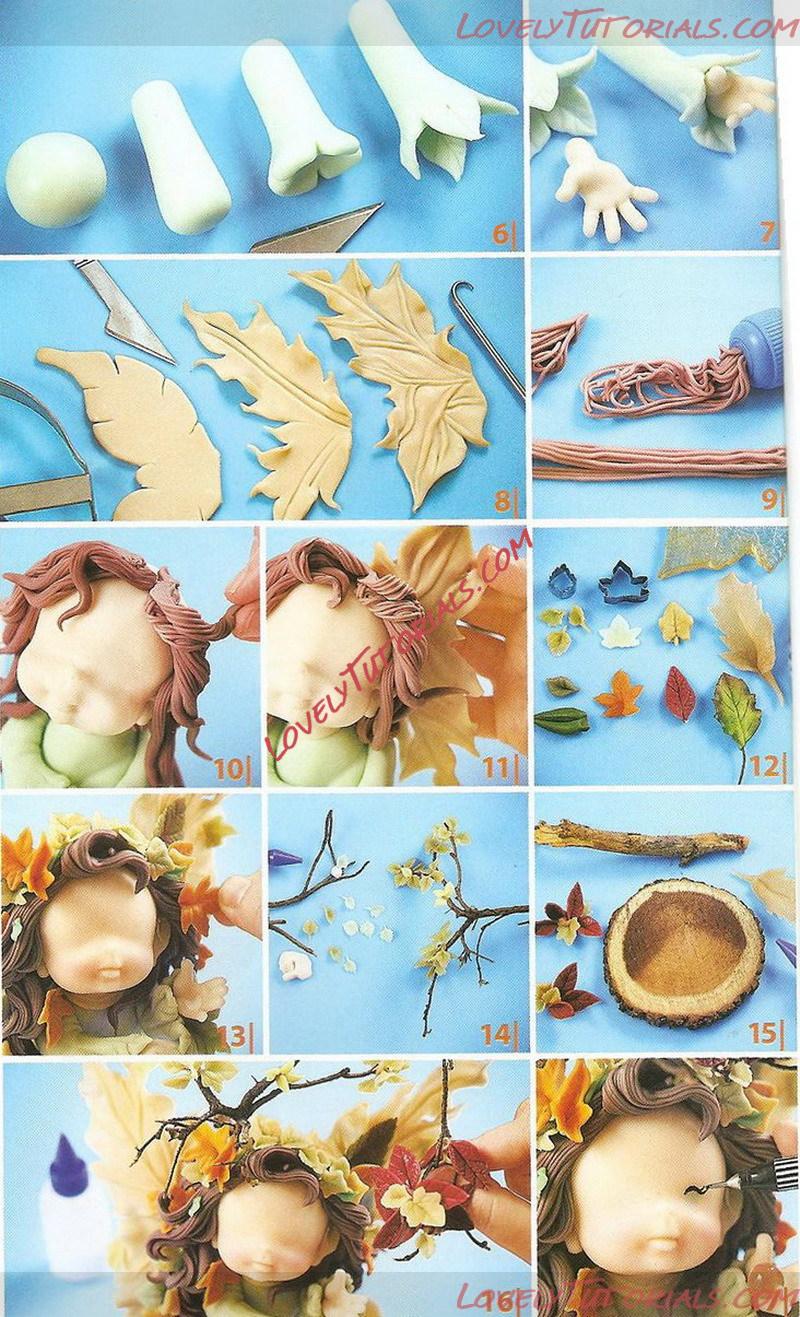
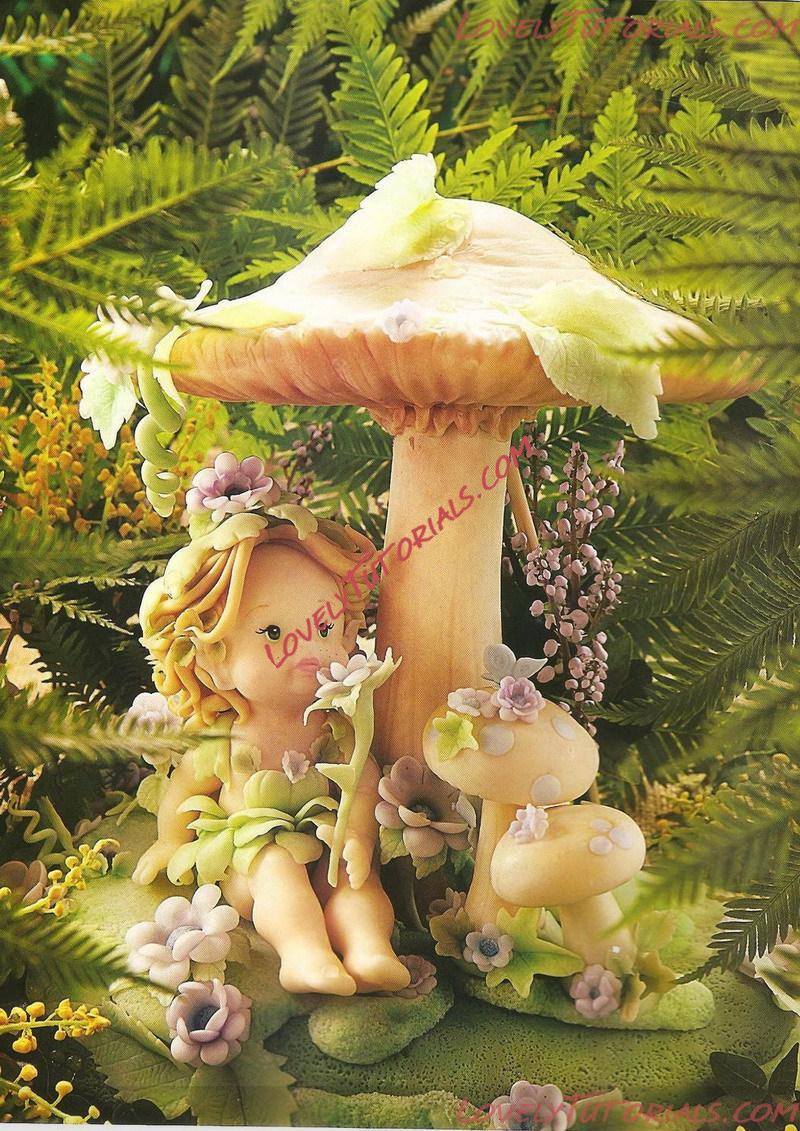
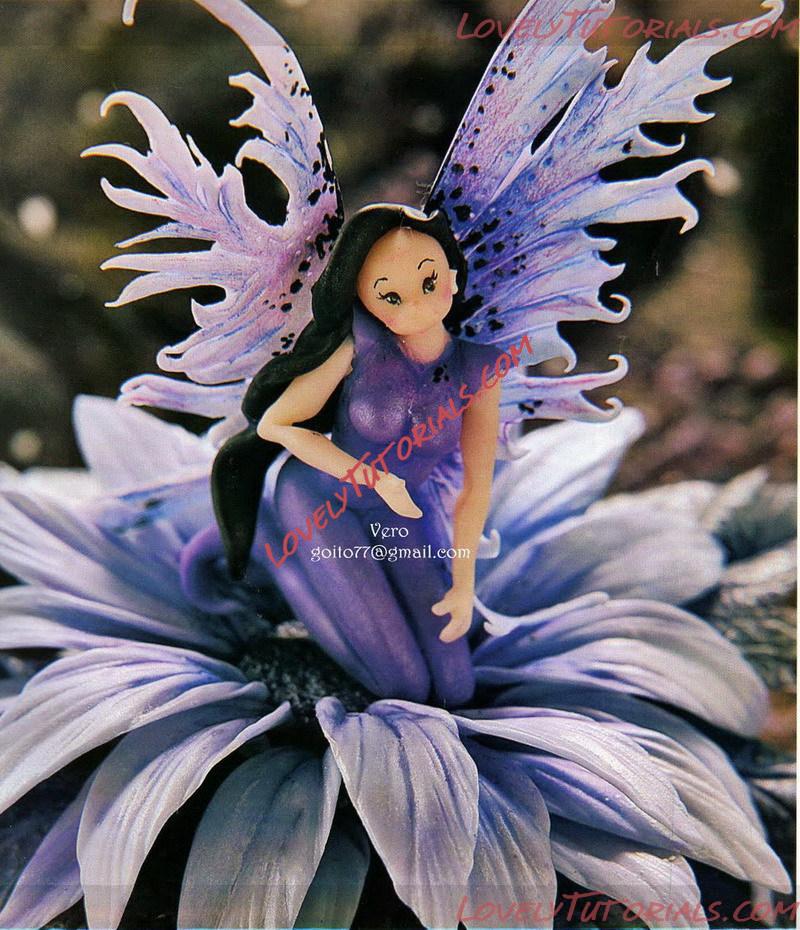
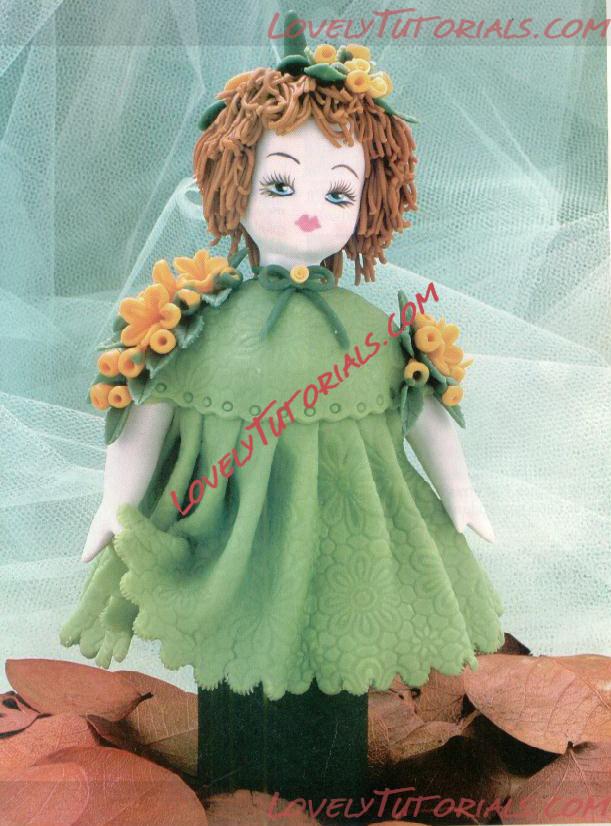
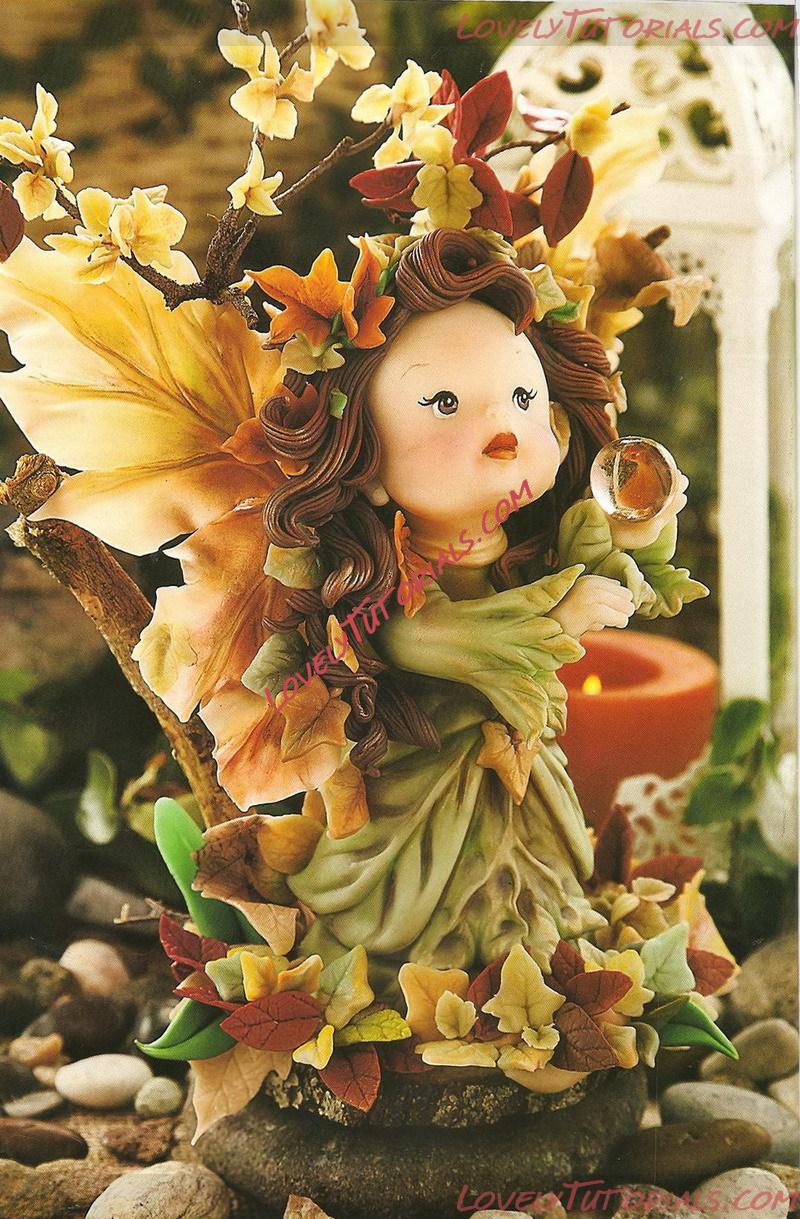 A beautiful "Hadita" loaded with the magic of autumn.The ocher and golden tones achieve a very delicate effect, which combines very well with twigs and natural leaves.
Una preciosa hadita cargada con la magia del otoño.Los tonos ocres y dorados logran un efecto muy delicado,que combina muy bien con ramitas y hojitas naturales.
We do not need magic to transform our world. We carry all of the power we need inside ourselves already.
― J.K. Rowling
|
28.08.2011, 11:19
|
|
Администратор
|
|
Регистрация: 07.09.2010
Сообщений: 7,669
|
|
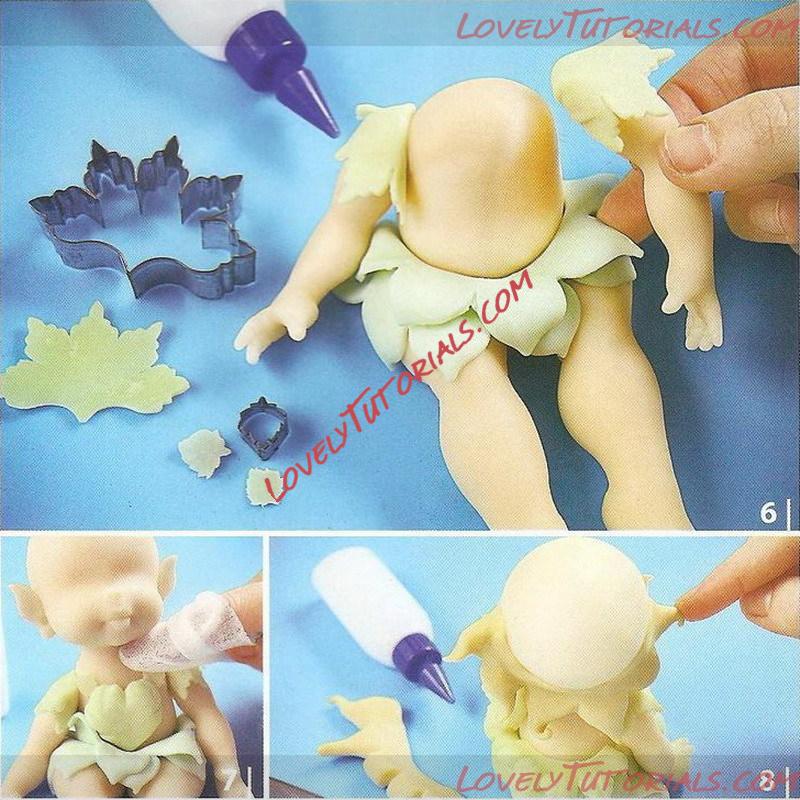
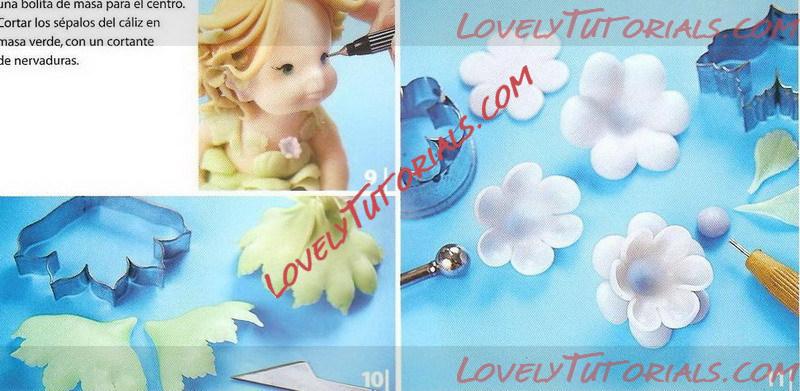
How to Make a sitting Fondant Fairy 2 | Фея сидя
|
28.08.2011, 11:33
|
|
Администратор
|
|
Регистрация: 07.09.2010
Сообщений: 7,669
|
|
How to Make a sitting Fondant Fairy 3 | Фея сидя
Huge shout out to Leticia Suarez del Cerro for sharing Master-Class
Огромная благодарность Leticia Suarez del Cerro за Мастер-класс
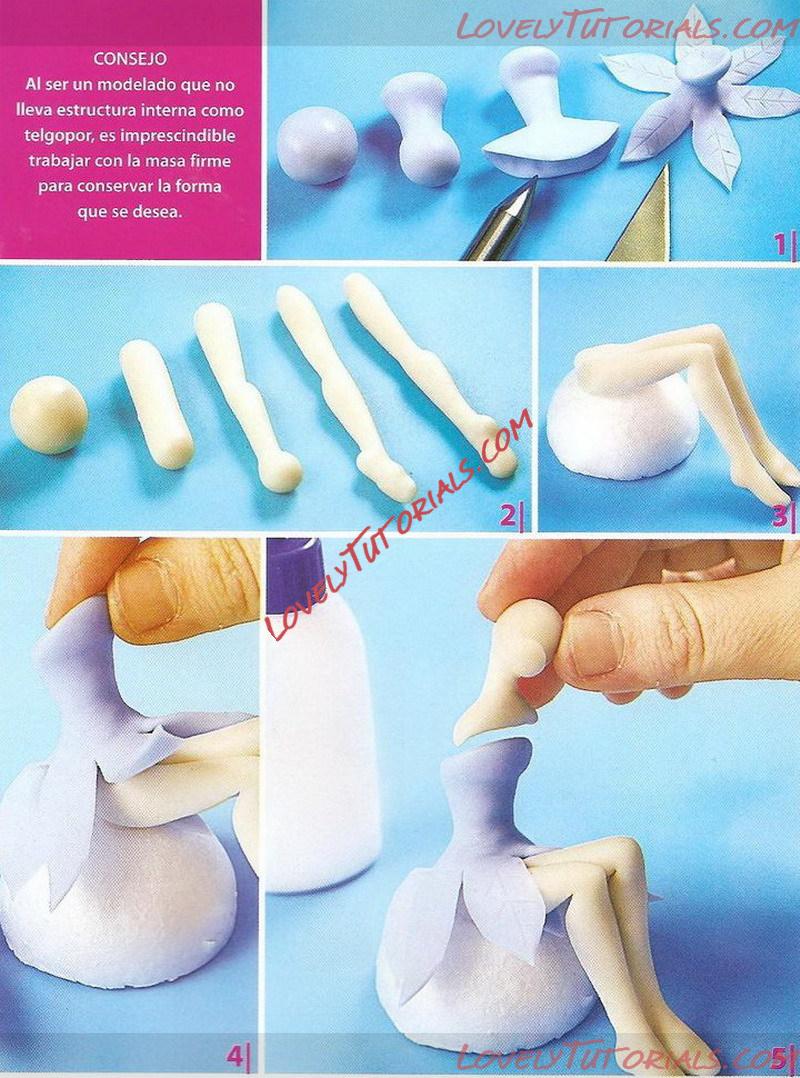 TIP: Being a modeling that does not have an internal structure such as telgopor, it is essential to work with the firm dough to preserve the desired shape.

Magic exists. Who can doubt it, when there are rainbows and wildflowers, the music of the wind and the silence of the stars? Anyone who has loved has been touched by magic. It is such a simple and such an extraordinary part of the lives we live.
|
11.11.2011, 20:52
|
|
Администратор
|
|
Регистрация: 07.09.2010
Сообщений: 7,669
|
|
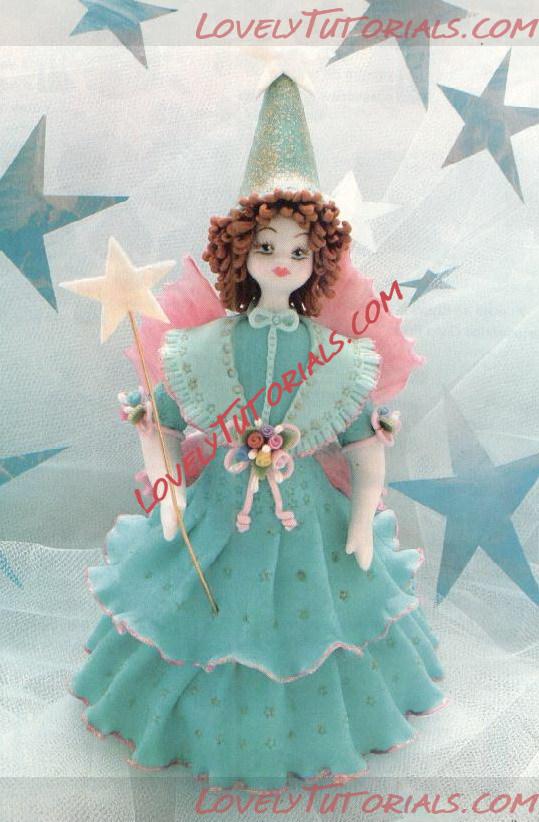
How to Make a Fondant Fairy 4 | Фея стоя
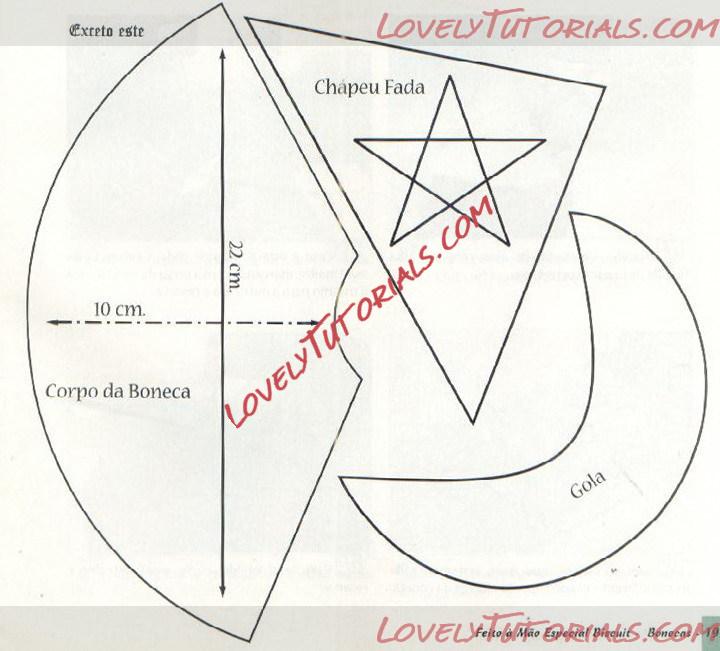
 1. To make the doll's body, pass the template onto the cardboard. Glue the sides.
2. To make the doll's bodice, make a drumstick, flatten it and fit the cone. Model Place the head of the doll on the body.
3. Using the wings cutter with the anointed white paste, cut 3 wings.
4. With the stanchion, mark the entire length of the wing. Finish by marking with the pen charge. Do the same for the other wing and set it aside.
5. With the other two wings decorate differently, using only the pen charge.
6. Using the mold, cut two stars and reserve.
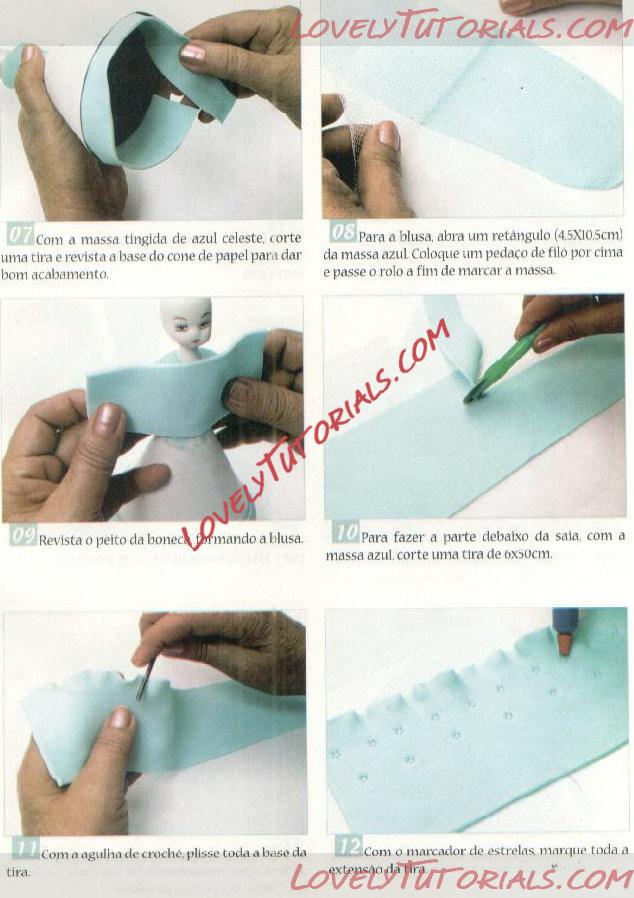 7. With the dough dyed blue, cut a strip and coat the base of the paper cone to give a good finish.
8. For the blouse, open a rectangle (4.5X10.5cm) of the blue mass. Place a piece of filo on top and roll the roll to mark the dough.
9. Coat the breast of the doll forming the blouse.
10. To make the part under the room with blue dough, cut a 6x50 cm strip.
11. Using the crochet hook, pleat the entire base of the strip.
12. With the star marker, mark the entire length of the strip.
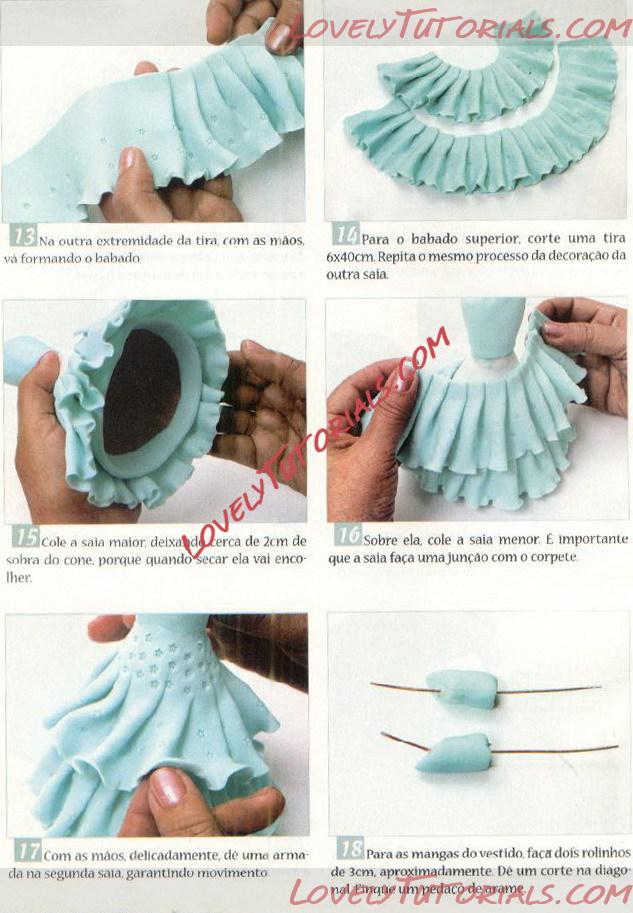 13. At the other end of the strip, the hands will form the ruffle.
14. For the top ruffle, cut a 6x40cm strip. Repeat the same process for decorating the other skirt.
15. Put the larger skirt on, leaving about 2cm left over the cone. because when it dries it will shrink.
16. About her. stick the smaller skirt. It is important that the skirt matches the bodice.
17 With your hands. gently, with an armada on the second skirt, ensuring movement.
18. For the dress sleeves, make two rolls of approximately 3cm. From a diagonal cut, pretend a piece of wire.
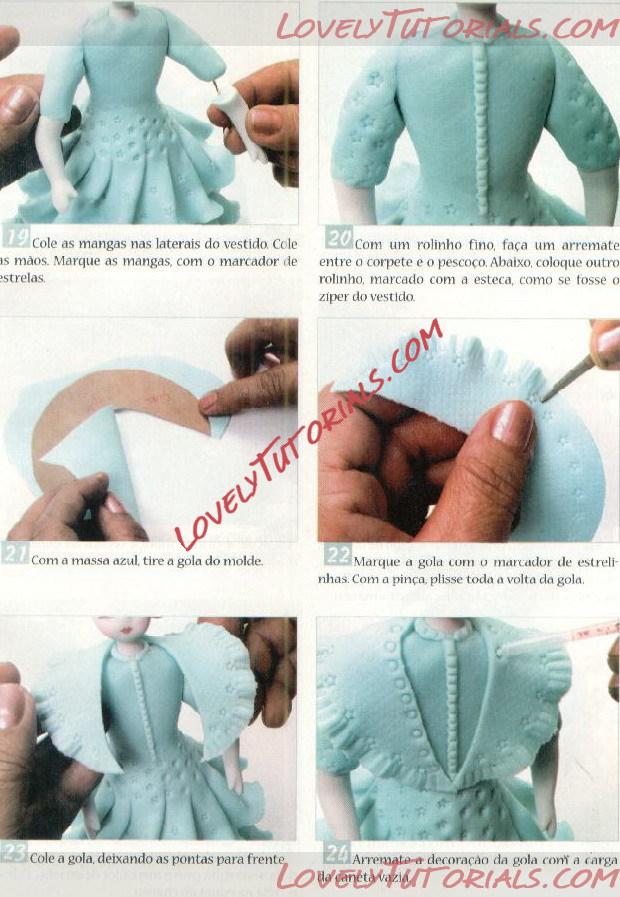 19. Glue the sleeves to the sides of the dress Glue your hands. Mark the sleeves with the star marker.
20. With a thin roll. make a finish between the bodice and the neck. Below, put another roll. marked with the esteca. as if it were the zipper of the dress.
21. With the blue dough. remove the collar from the mold.
22. Mark the collar with the star marker. With the tweezers, pleat all the way around the collar.
23. Glue the collar. leaving the tips forward.
24. Secure the decoration of the collar with the load and the empty pen.
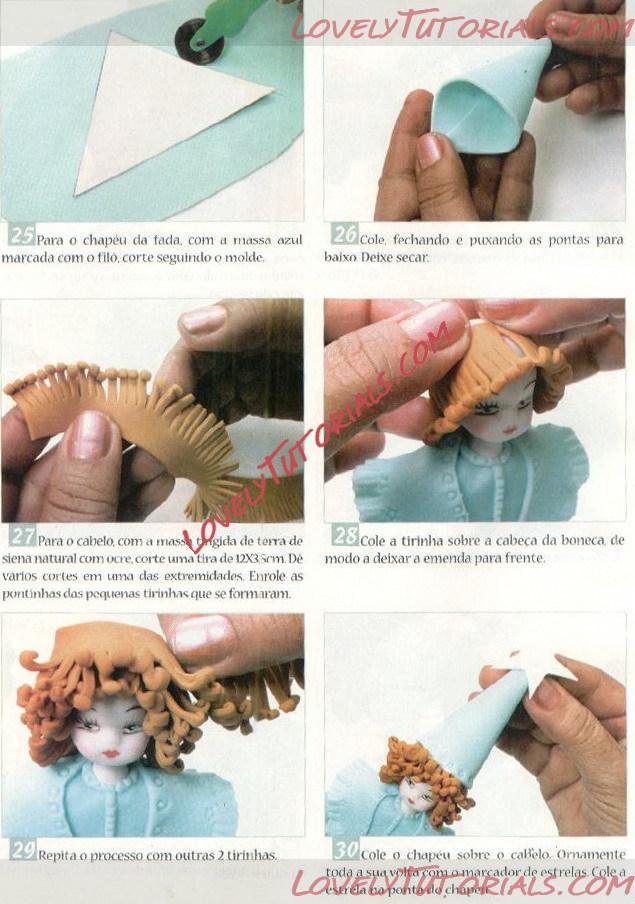 25. For the hat of the tada. with the blue mass marked with the phylum. cut following the mold.
26. Lap closing and pulling the tips down Let it dry.
27. For the hair, with the tinted mass of natural sienna earth with ocher cut a 12X3.5cm strip. From several cuts at one end Wrap the tips of the small strips that have formed.
28. Glue the strip over the doll's head in order to leave the seam forward.
29. Repeat the process with another 2 strips.
30. Glue the hat over your hair. Decorate all the way around with the star marker Stick the star on the end of the hat.
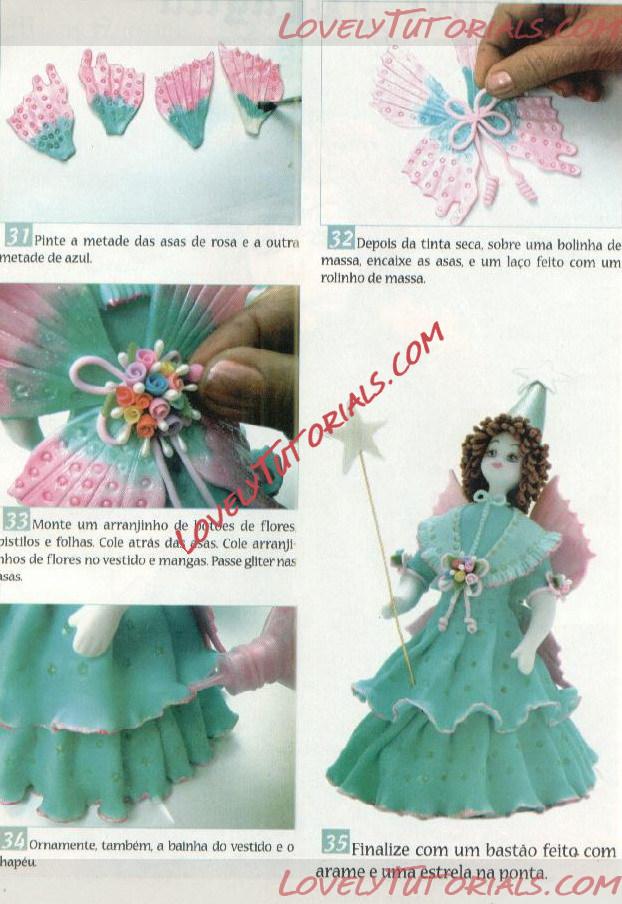
31. Paint half the wings pink and the other half blue.
32. After the paint dries. on a dumpling, fit the wings. and a bow made with a rolling pin.
33. Set up an arrangement of pistil flower buds and paste leaves behind the wings. Glue flower arrangements to the dress and sleeves.
34. Ornaments, too, the hem of the dress and the hat.
Finish with a stick made with wire and a star on the end.
Real magic can never be made by offering someone else's liver. You must tear out your own, and not expect to get it back.
|
11.11.2011, 20:56
|
|
Администратор
|
|
Регистрация: 07.09.2010
Сообщений: 7,669
|
|
How to Make a Fondant Standing Fairy 5 | Фея стоя
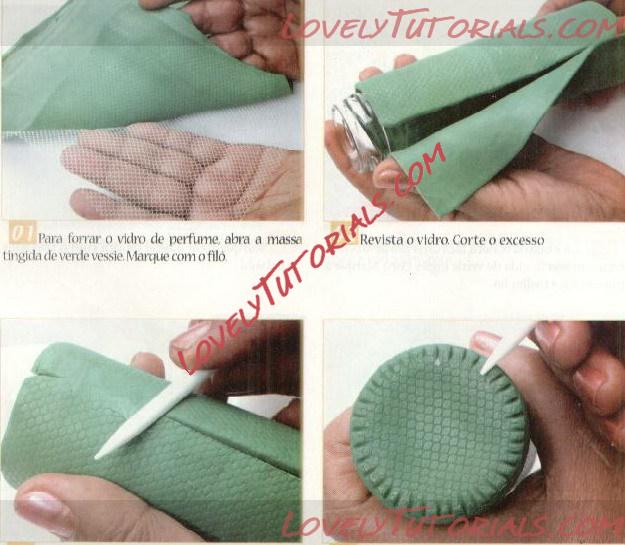 1. To line the glass of ile perfume, open the dough dyed green marked. Mark with the filo.
2. Coat the glass Cut the excess
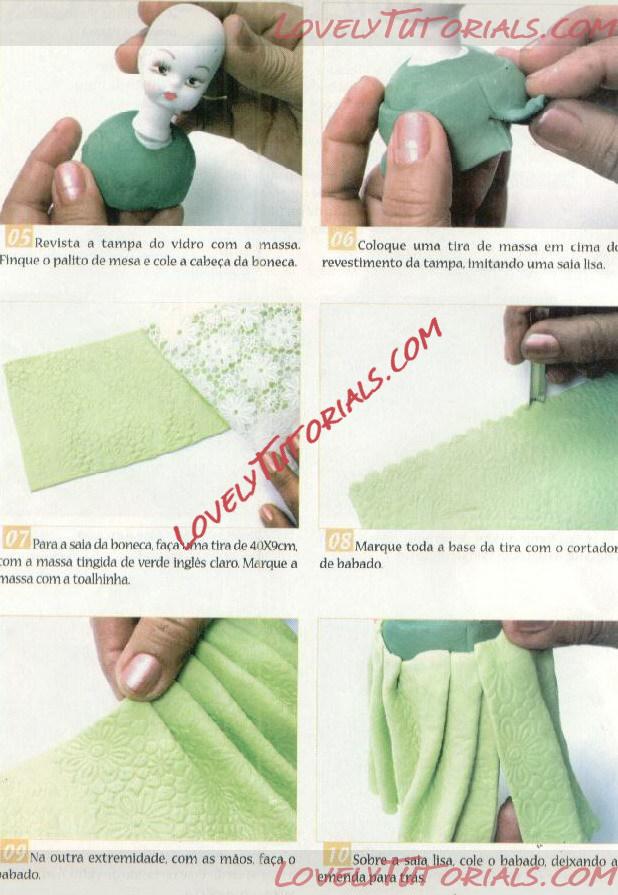 5. Coat the glass cover with the putty. Key in a table toothpick and glue the doll's head.
6. Place a shot of dough on top of the cover lining. Imitating a smooth room.
7. For the doll's room, make a strip of 40X9cm with the dough dyed in light English green. Mark the dough with the washcloth.
8. Mark the entire base of the strip with the babad cutter.
9. At the other end, with your hands do the abado.
10. On the flat room, glue the ruffle leaving the seam behind.
 11. Put some dough in the porcelain bowl. Stick to the sides of the doll's body.
12. For the cover of the dress, in the mass dyed in English green and marked with the towel, cut a circle of 7.5 cm in diameter. Pour the melon.
13. Mark, with the sticking point, all the way around the circle.
14. Finish off, marking with the pen charge, all the way around.
15. Make an opening on the dress cover.
16. Glue around the doll's neck by matching the arms.
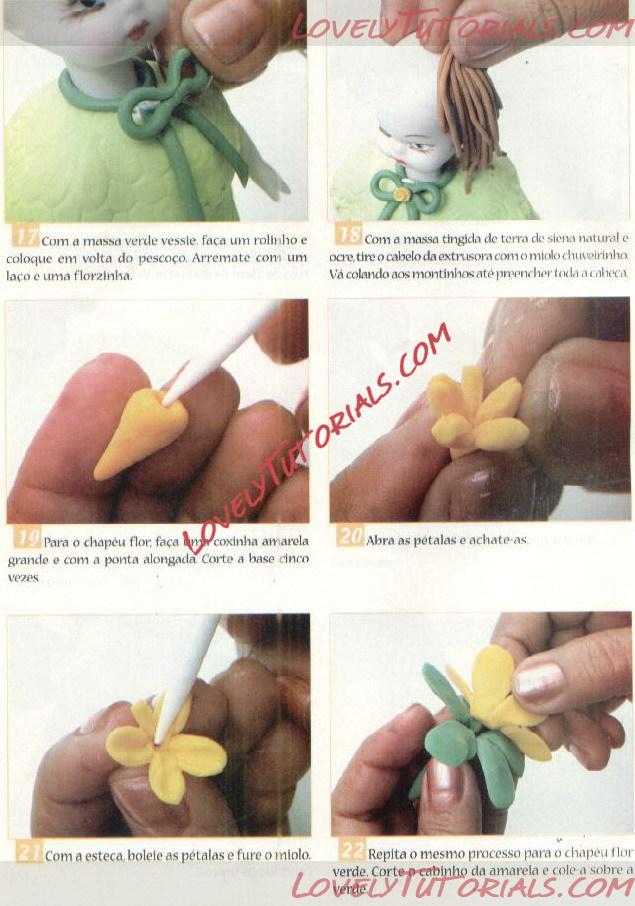 17. With the green pastry pastry, make a little round and put it around the neck. Finish with a bow and a flower
18. Remove the hair from the extruder with the dyed mass of natural and ocher sienna as the shower core. Go pasting the blankets until you fill the entire tail.
19. For the flower hat, make a large yellow drumstick or the elongated tip Cut the base five times.
20. Open the petals or flatten them
21. Stir the petals with the stems and pierce the core.
22. Repeat the same process for the green flower hat. Cut the little yellow one and paste it over the green one.
Magic is believing in yourself, if you can do that, you can make anything happen.
|
11.11.2011, 20:59
|
|
Администратор
|
|
Регистрация: 07.09.2010
Сообщений: 7,669
|
|
How to Make a Fondant Sitting Fairy 6 | Фея сидя

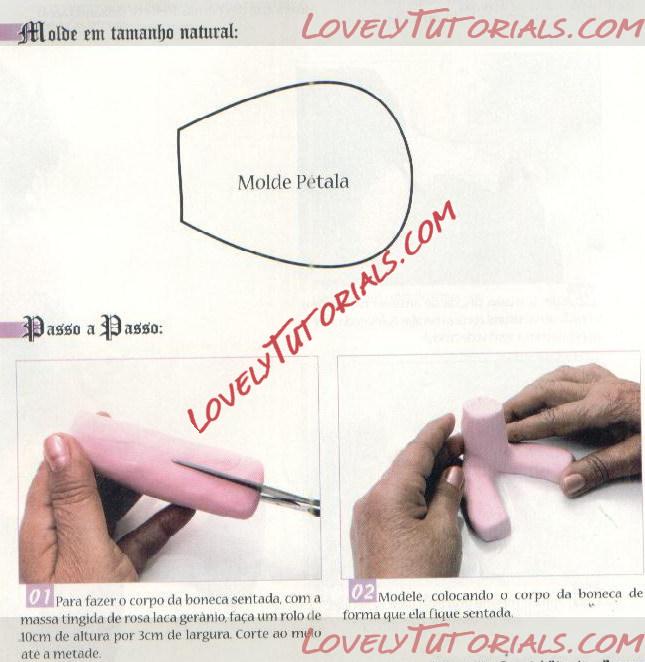 1. To make the body of the doll seated, with the dough dyed in pink lacquer geramo, a single bowl 10cm high by 3cm wide. Cut in half to half.
2. Model, placing the doll's body so that she sits.
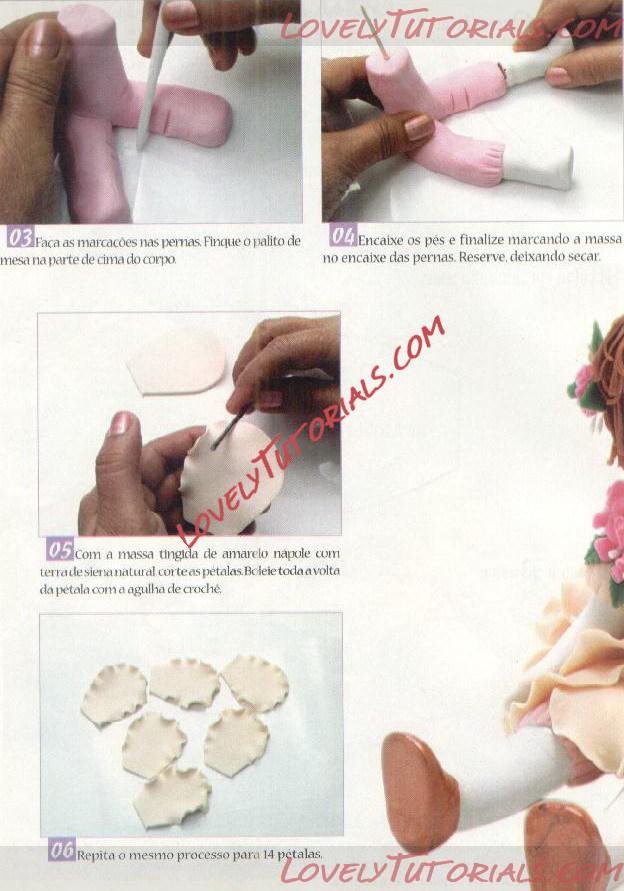 3. Make markings on the legs. Put the table toothpick on top of the body.
4. Fit the feet and finish by marking the dough on the legs. Set aside, letting it dry.
5. With the napole dyed yellow dough with natural sienna land cut the petapas Ruffle the petal around the crochet hook.
6. I repeat the same process for.
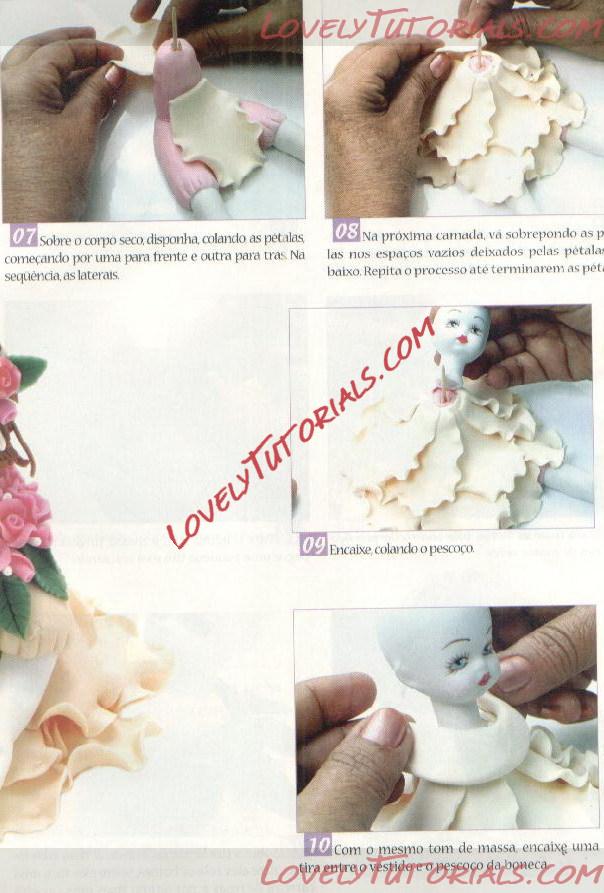
7. On the dry body, arrange by pasting the petals starting with one for the front and one for the back. Then, the sides.
8. On the next layer, overlap the loops in the empty spaces left by the petals below. Repeat the process until finished.
9. Fit, gluing the neck.
10. With the same mass tone, fit a strip between the dress and the neck of the doll.
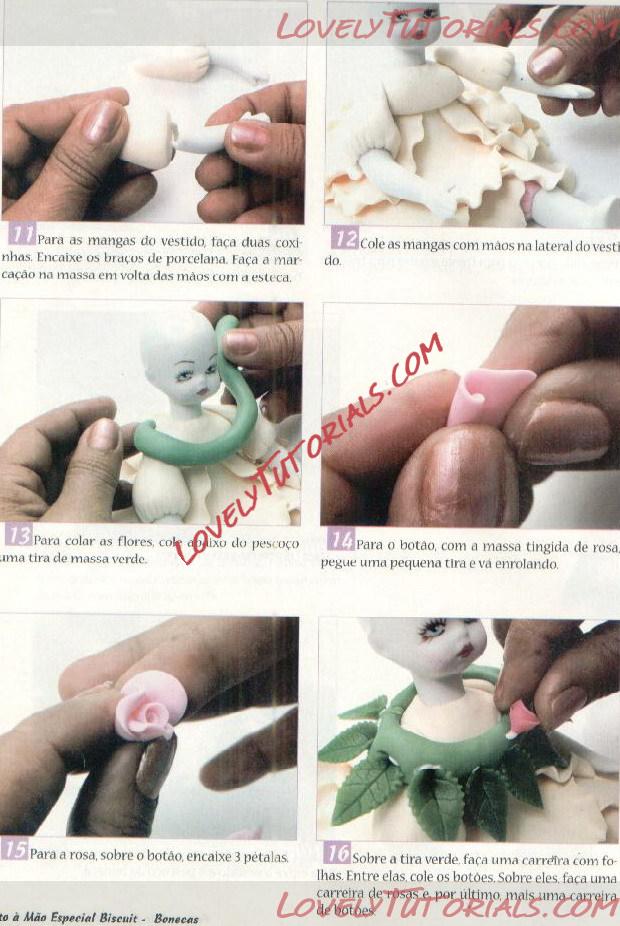 11. For the sleeves of the dress, make two drumsticks. Fit the porcelain arms. Mark the dough around the hands with the stick.
12. Glue the sleeves with hands to the side of the dress
13. To glue the flowers, glue a strip of green dough to the neck.
14. For the button, with the mass dyed pink. take a small strip and roll it up.
15. For the rose, on the button, fit 3 petals.
16. On the green strip, make a basket with leaves. Between them, paste the buttons. Make them a carriera de rosas and, finally, another row of buttons.
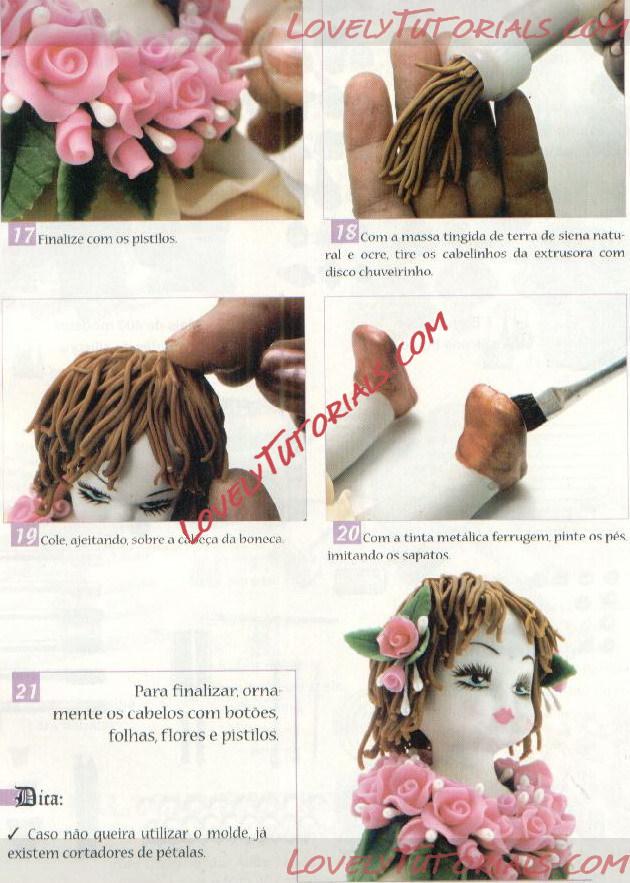 17. Finish with the pistils
18. With n mass dyed with natural sienna soil and ocrc, remove the hairs from the extruder with shower disc.
19. Stick it on the doll's head.
20. With rust metallic paint, paint your feet imitating shoes.
21. Finally, decorate the hair with buttons, leaves, flowers and pistils.
22. If you don't want to use the mold, there are already petal cutters.
Цитата:
|
Magic's just science that we don't understand yet.
|
|
 |
|
|
Метки
|
3d figures, addım-addım təlimat, adım, adım adım yönergeler, artesanatos passo a passo, bemutató, birthday cake, biscuit, bolando bolos, bolos decorados, cake decorating, cake decorating techniques, cake topper, cake toppers, cake tops, cerâmica plástica, character figures, characters, chica, children's cake, cold porcelain, confeitando bolos, curso de modelado, decoracion de pasteles, decoración de tortas, decorada en fondant, decorare le torte, decorazioni, deko fondant, dekorace na dort, dekoracija, dekoracije, dekorasyon, dekorácie, dievča, dívka, especializada em modelagem de biscuit, fadas, fairy, fairy figure making tutorial, fairy under mushroom, fata, fe, fee, female, fender, figur kager, figuras, figure making tutorials, figuren, figures, figurice, figurice od fondana, figurine on the cake, figurines, figurinhas, figurky, figúrky, figür modelleme, fillette, fimo, fixando a cabencinha, flower paste, fondan, fondant, fondente, fondente di zucchero, fotopostup, foundant, fée, fées, fėja, gebak, girl, glazuur, gum pasta, gum paste, gumpaste, hada, hand-made, handmade, how to, how to make a sitting fondant fairy, how-to's, instrucţiuni, instrukcijas, instrukcje, jak na, jente, kage dekoration, kagedekoration, kakebaking, keijukainen, korak, korak za korakom navodila, korak-po-korak upute, koristeet ja koristelu, krok, krok po kroku, krok za krokem, krok-za-krokem, kız, la modélisation, las instrucciones, las técnicas, le tecniche, les techniques, leticia suarez del cerro, lukie, marcipanové figurky, marshmallow, marsipanfigurer, masa flexible, master-class, master-klasse, master-klasy, meisje, meistras klasės, menina, metodikas, mistr třídy, modelado, modelagem, modelando a barriga, modelando a cabencinha, modelando a perninha, modelando as maozinhas, modelando o cabelinho, modelando o corpinho, modelando os bracinhos, modelando os pezinhos, modelare, modelerte figurer, modeling, modeling paste, modeliranje, modellazione, modelleme, modellering, modellieren, modellierpaste, modelling, modelling past, modelləşdirmə, modelovanie, modelování, modelowanie, motivtorten, mädchen, návod, opplæringen, orelhas, ozdoby, pamoka, pap, pas, pas-cu-pas, paso, paso a paso, passo, passo a passo, passo-a-passo, passo-passo le istruzioni, pasta de goma, pasta de miel, pasta flexible, pasta laminada, peri, pige, pintura dos olhos, pocelana fria, polymer clay, postupak za ukrasavanje, pravljenje figurica za torte, preciosa hadita cargada, pâtisserie, předměty z marcipánu, pəri, qız, ragazza, schmelzend, schritt für schritt anleitung, schritt-für-schritt, schritt-für-schritt-anleitungen, sculpting, soggetti, souvenirs, stap, stap-voor-stap, stap-voor-stap instructies, steg for steg, steg-för-steg-instruktion, step, step by step, step-by-lépésre, step-by-step, step-by-step instructions, styrofoam, sugarcraft, sugarpaste, suikerglazuur, technieken, techniken, techniki, techniky, technikák, techniques, tecnicas de decoracion, tecniche, tehnici, tehnike, teknikker, teknikler, telgopor, topo de bolo, topo do bolo, topos de bolo, torte, torte decorate, torten dekorieren, torti, trin, trin for trin, trin-for-trin, trin-for-trin instruktioner, trinn, trinn for trinn, trinn-for-trinn-instruksjoner, tutorial, tutoriale, tutorias, tutorias/ideas para decorar los bizcochos, tutoriel, tutorijal, tündér, técnicas, udžbenik, ukrašavanje torti, uputstvo za dekoraciju, vila, víla, wróżka, zuckerfigürchen, zuckermasse, zână, सजा केक, ट्यूटोरियल मास्टर वर्ग, कदम, कदम दर कदम निर्देश, तकनीक, मॉडलिंग, モデル, étape, étape par étape les instructions, öğretici, 一步, 一步一步的指示術, žingsnis, žingsnis po žingsnio, 宗師級教程, 建模, 裝飾蛋糕, νεράιδα, βήμα, βήμα προς βήμα οδηγίες, οδηγίες βήμα βήμα, παντεσπάνι art, τεχνικές, φροντιστήριο, девочка, дзяўчынка, дівчинка, инструкция, как сделать, крок за кроком, крок за крокам, покроково, полимерная глина, пошагово, пошаговые фотки, пакрокава, персонажи, миниатюра, мк, моделиране, момиче, майстор-класа урок, майстар-клас, майстер-клас, майстер-класи, маршмеллоу, мастика, мастер-класс, лепка, ліплення, ручной работы, ручная работа, украшение тортов, сахарная мастика, уроки прикрашання, стъпка, стъпка по стъпка инструкции, техники, техника, техніка, туториал, туторіал, тэхніка, фигурки, фигурка на торт, фимо, феечка под грибом, фея, фігурки, фігуркі, холодный фарфор, шаг за шагом, інструкцыя, інструкція  |
|