|
|
РҙРөСҖРөРІРҫ, tree, strom, l'arbre, Baum, albero, ГЎrvore, ГЎrbol
|

23.09.2010, 05:33
|
|
РҗРҙРјРёРҪРёСҒСӮСҖР°СӮРҫСҖ
|
|
Р РөРіРёСҒСӮСҖР°СҶРёСҸ: 07.09.2010
РЎРҫРҫРұСүРөРҪРёР№: 7,940
|
|
 РҙРөСҖРөРІРҫ, tree, strom, l'arbre, Baum, albero, ГЎrvore, ГЎrbol
|

25.09.2010, 08:21
|
|
РҗРҙРјРёРҪРёСҒСӮСҖР°СӮРҫСҖ
|
|
Р РөРіРёСҒСӮСҖР°СҶРёСҸ: 07.09.2010
РЎРҫРҫРұСүРөРҪРёР№: 7,940
|
|
 РҙРөСҖРөРІРҫ РҪР° РҝСҖРҫРІРҫР»РәРө
|

10.10.2010, 05:36
|
|
РҗРҙРјРёРҪРёСҒСӮСҖР°СӮРҫСҖ
|
|
Р РөРіРёСҒСӮСҖР°СҶРёСҸ: 07.09.2010
РЎРҫРҫРұСүРөРҪРёР№: 7,940
|
|
 РҝалСҢРјР°
|

22.07.2011, 20:23
|
|
РҗРҙРјРёРҪРёСҒСӮСҖР°СӮРҫСҖ
|
|
Р РөРіРёСҒСӮСҖР°СҶРёСҸ: 07.09.2010
РЎРҫРҫРұСүРөРҪРёР№: 7,940
|
|
 How to make edible trees
СҒРҝР°СҒРёРұРҫ РҫРіСҖРҫРјРҪРҫРө artisancakecompany Р·Р° РңРҡ
СҒР»РҫРІР° Рё С„РҫСӮРҫ авСӮРҫСҖР°
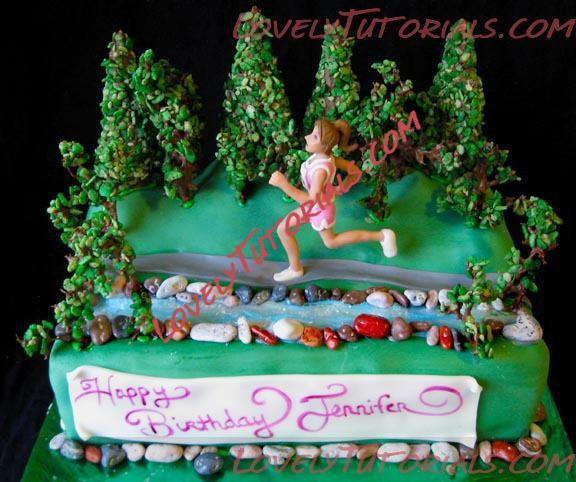 Edible Trees
I was recently contacted to make a cake for a runners 35th birthday. This runner is going to be competing in the upcoming columbia gorge marathon and so we decided to do a cake theme around that event. It took me a while to find a way to make some trees for the cake that would look pretty realistic but were also pretty edible (I do realize that grape stems are not technically edible but its better than wire) I found a couple different techniques that I think worked pretty well and thought I would share them with you. Enjoy!
Liz
STEP ONE (gather your supplies)
Two bowls
Rice Krispies Cereal
Chocolate for melting
Floral wire
Grape stems
Sugar ice cream cones
Green food coloring
Spray bottle or food coloring airbrush
Wooden dowel
Step 2 (dying the rice krispies)
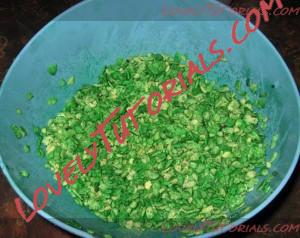
Rice Krispies Cereal dyed green. Make sure you use a fairly large bowl so you can shake off excess cereal when dipping without making too much of a mess.
I dyed mine with an airbrush but you can use a spray bottle with water and green dye. Just spray, mix, spray, mix until green. DonвҖҷt do too much or youвҖҷll get soggy treats. 
 Step 3 (melting chocolate)
Next we need some melted chocolate. I use tree bark that I get from the food supply store but you can also use any chocolate for candy making. Put chocolate in microwave safe container and melt in 15 sec intervals starting off with 30 seconds. Make sure you stir between heating. if you try to melt too fast and too hot, you will scorch your chocolate, it will seize up and get lumpy and you pretty much have to start over.
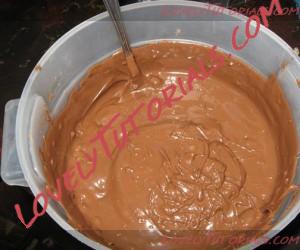 melt chocolate at 15 second intervals
Step 4 (Making trees from grape stems)
Gather your grape stems and attach some floral wire to the ends. This will make it easy to hang our trees to dry. Wrap the floral wire around the base and dip stem into chocolate. Shake excess chocolate off the stem so the вҖҳbranchesвҖқ are easily seen.
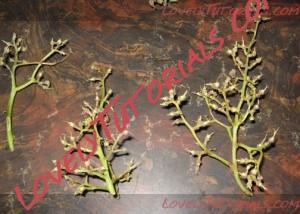 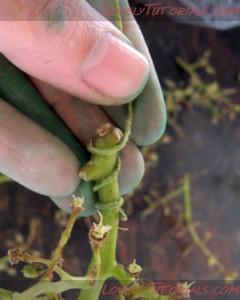 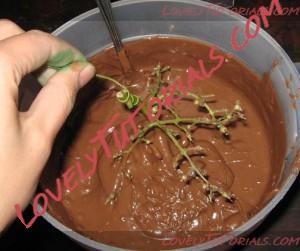 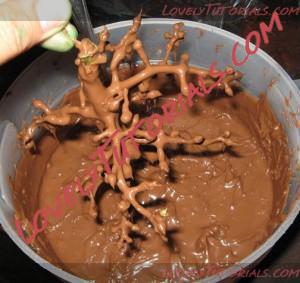 shake off excess chocolate
Dip your stems into the rice krispies to add вҖңleavesвҖқ then hang on your dowel to dry
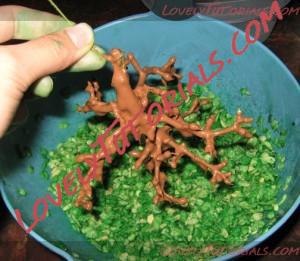 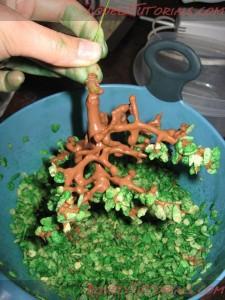 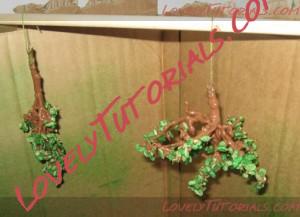 Step 5 (making the cone trees)
For these trees, the process is similar but instead we are going to use sugar cones to make more evergreen looking trees to give our cake a little variety. You could use something other than green rice krispies if you wanted to like green sprinkles or other candies but I just used the same rice krispies.
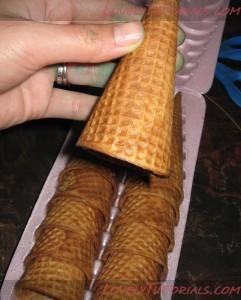 use sugar cones
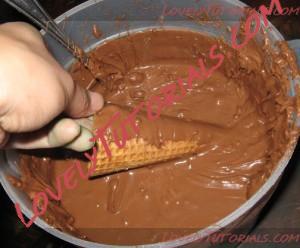 rotate cone in chocolate
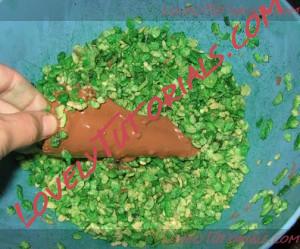 add "leaves" to cone
I just set these cones on the table over some parchment to dry.
After everything is dry, poke holes into your cake and then push your trees into the holes. I attached the cone trees with some royal icing.
For this cake I also added a path, a sugar runner I made, a river made of melted chocolate and sparkle gel and some chocolate вҖңrocksвҖқ
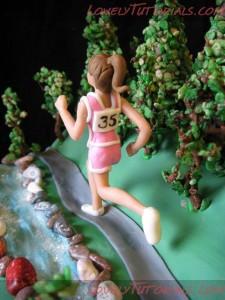 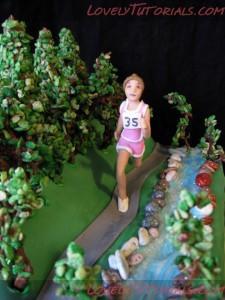 
I hope this tutorial was helpful to you.
HAPPY BAKING!
|

24.07.2011, 20:13
|
|
РҗРҙРјРёРҪРёСҒСӮСҖР°СӮРҫСҖ
|
|
Р РөРіРёСҒСӮСҖР°СҶРёСҸ: 07.09.2010
РЎРҫРҫРұСүРөРҪРёР№: 7,940
|
|
|

29.07.2011, 15:10
|
|
РҗРҙРјРёРҪРёСҒСӮСҖР°СӮРҫСҖ
|
|
Р РөРіРёСҒСӮСҖР°СҶРёСҸ: 07.09.2010
РЎРҫРҫРұСүРөРҪРёР№: 7,940
|
|

СҒРҝР°СҒРёРұРҫ РҫРіСҖРҫРјРҪРҫРө tanusha84 Р·Р° РңРҡ
РңРҡ РҙРөСҖРөРІР°
РҳСӮР°Рә, РҪам РҝРҫРҪР°РҙРҫРұРёСӮСҢСҒСҸ РәРҫСҖРёСҮРҪРөРІР°СҸ РјР°СҒСӮРёРәР° (СҸ РёСҒРҝРҫР»СҢР·Рҫвала РјРҫР»РҫСҮРҪСғСҺ) Рё СҒРҫР»РҫРјРәР° (СҒлаРҙРәР°СҸ РөСҒСӮРөСҒСӮРІРөРҪРҪРҫ))
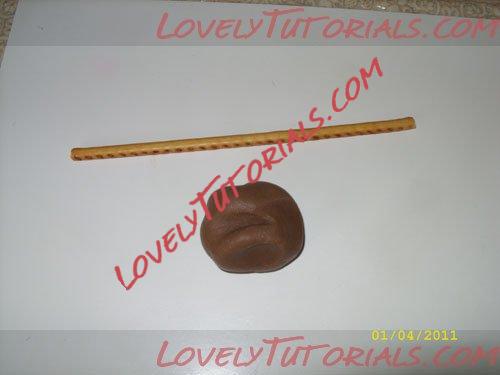
РһСӮламСӢРІР°РөРј СҒРҫР»РҫРјРәСғ РҪРөРҫРұС…РҫРҙРёРјРҫР№ РҙлиРҪСӢ (РІСӢСҒРҫСӮР° РҙРөСҖРөРІР°). РҳР· РјР°СҒСӮРёРәРё РҙРөлаРөРј Р»РөРҝРөСҲРөСҮРәСғ РҝСҖРҫРҙРҫлгРҫРІР°СӮСғСҺ (РҪРө СҒлиСҲРәРҫРј СӮРҫРҪРөРҪСҢРәСғСҺ!). РҡлаРҙРөРј РҪР° РјР°СҒСӮРёРәСғ РәСғСҒРҫСҮРөРә СҒРҫР»РҫРјРәРё, Рё Р·Р°СүРёРҝСӢРІР°СҸ РәСҖР°СҸ РјР°СҒСӮРёРәРё, РҫРұРҫСҖР°СҮРёРІР°РөРј РөСҺ СҒРҫР»РҫРјРәСғ.
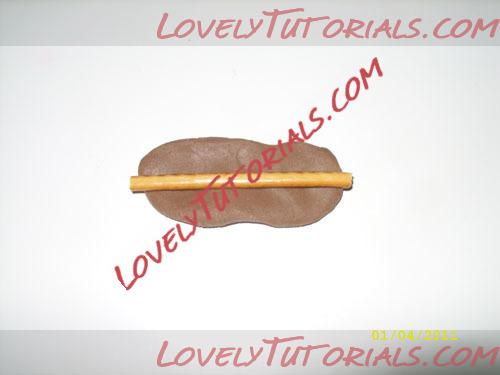
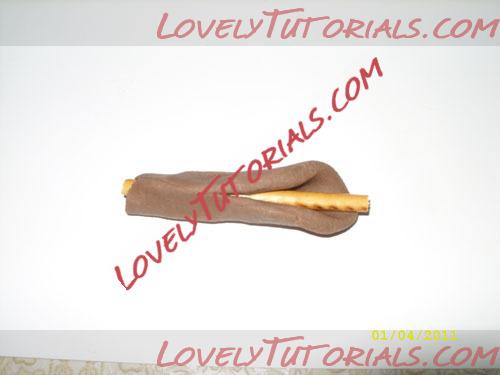
РўРөРҝРөСҖСҢ РјРөР¶РҙСғ лаРҙРҫРҪСҸРјРё РҝСҖРҫРәР°СӮСӢРІР°РөРј РҪРөРјРҪРҫРіРҫ загРҫСӮРҫРІРәСғ РҙР»СҸ СҒСӮРІРҫла (РҪР° СҚСӮРҫРј СҚСӮР°РҝРө РјРҫР¶РҪРҫ СҖРөРіСғлиСҖРҫРІР°СӮСҢ СӮРҫР»СүРёРҪСғ СҒСӮРІРҫла, РөСҒли РҫРҪ РҪСғР¶РөРҪ СӮРҫРҪСҢСҲРө, СӮРҫ РҪРөРҫРұС…РҫРҙРёРјРҫ СҒРёР»СҢРҪРҫ РҪР°РҙавливаСӮСҢ лаРҙРҫРҪСҸРјРё, СӮРҫРіРҙР° лиСҲРҪСҸСҸ РјР°СҒСӮРёРәР° РәР°Рә РұСӢ СҒРҝРҫлзРөСӮ Рә РәСҖР°СҸРј, РіРҙРө СғР¶Рө РҪРөСӮ СҒРҫР»РҫРјРәРё, Рё РөРө РұСғРҙРөСӮ Р»РөРіРәРҫ СғРұСҖР°СӮСҢ). РҜ РҝСҖРҫРәР°СӮСӢвала СҒСӮРІРҫР», СҒСӮР°СҖР°СҸСҒСҢ СҮСӮРҫРұСӢ РІРҪРёР·Сғ РҝРҫР»СғСҮРёР»РҫСҒСҢ СғСӮРҫР»СүРөРҪРёРө
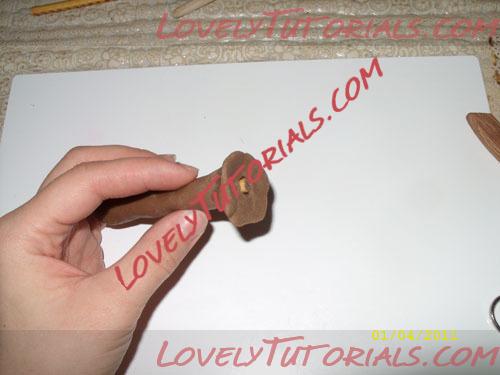
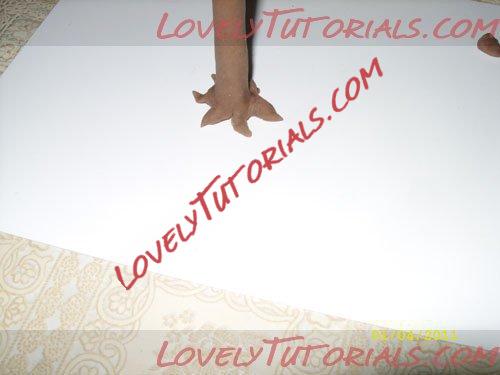
РӯСӮРҫ СғСӮРҫР»СүРөРҪРёРө РҪСғР¶РҪРҫ СҖР°СҒРҝР»СҺСүРёСӮСҢ Рё РҪРҫР¶РҪРёСҶами РҝСҖРҫСҖРөР·Р°СӮСҢ РәРҫСҖРҪРё, СҒС„РҫСҖРјРёСҖРҫРІР°СӮСҢ РёС… РәР°Рә РҪСғР¶РҪРҫ
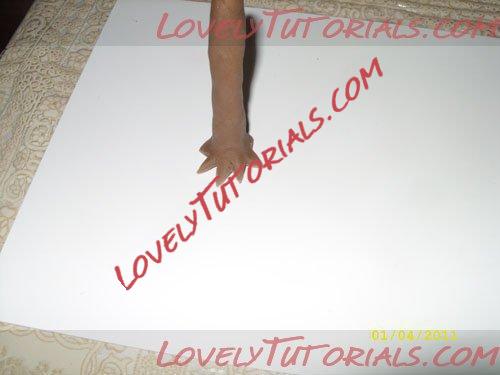
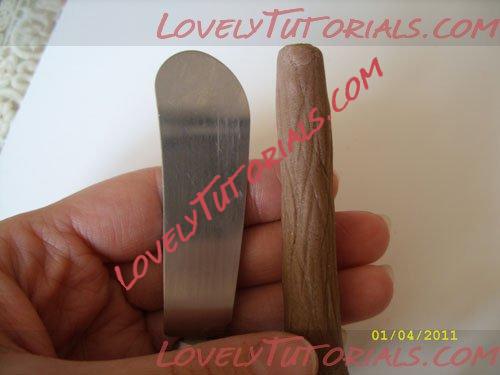
Р’РҫСӮ СӮР°РәРёРј РҪРҫР¶РҫРј (РјРҫР¶РҪРҫ С…РҫСӮСҢ СҮРөРј) СҸ РҪР°РҪРөСҒла СҖРёСҒСғРҪРҫРә РҪР° СҒСӮРІРҫР» РҙРөСҖРөРІР°, РҪажимаСҸ РёРј СҒРҫРІСҒРөРј СҮСғСӮСҢ-СҮСғСӮСҢ, СҮСӮРҫРұСӢ РҪРө РұСӢР»Рҫ СҒлиСҲРәРҫРј РіР»СғРұРҫРәРёС… РҝРҫР»РҫСҒ. ДвижРөРҪРёСҸ РҪРҫР¶РҫРј Р°РұСҒРҫР»СҺСӮРҪРҫ С…Р°РҫСӮРёСҮРҪСӢРө
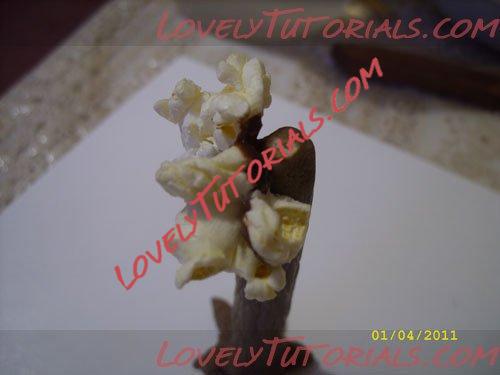
РўРөРҝРөСҖСҢ РҪам РҝРҫРҪР°РҙРҫРұРёСӮСҢСҒСҸ лиРұРҫ СҒСғС…РҫР№ завСӮСҖР°Рә ( РҪРө РҝР»РҫСҒРәРёРө С…Р»РҫРҝСҢСҸ, Р° РІР·РҙСғСӮСӢРө, фигСғСҖРҪСӢРө), лиРұРҫ РәСғРәСғСҖСғР·РҪСӢРө РҝалРҫСҮРәРё, Сғ РјРөРҪСҸ РІРҫРҫРұСүРө РҝРҫРҙ СҖСғРәРҫР№ РұСӢР» СӮРҫР»СҢРәРҫ РҝРҫРҝ-РәРҫСҖРҪ РәР°СҖамРөР»СҢРҪСӢР№ (РҪРҫ РёРј РҝРҫСҒР»РҫР¶РҪРөРө СҖР°РұРҫСӮР°СӮСҢ, СӮР°Рә РәР°Рә Сғ РҪРөРіРҫ С„РҫСҖРјР° фиг Р·РҪР°РөСӮ РәР°РәР°СҸ). РҳСӮР°Рә, РІ СҖР°СҒСӮРҫРҝР»РөРҪРҪСӢР№ СҲРҫРәРҫлаРҙ, РҫРұРјР°РәРёРІР°РөРј РҝРҫРҝ-РәРҫСҖРҪ (РІ РјРҫРөРј СҒР»СғСҮР°Рө), РҪРҫ СӮРҫР»СҢРәРҫ РҪРө РІРөСҒСҢ, Р° СӮСғ СҒСӮРҫСҖРҫРҪСғ, РәРҫСӮРҫСҖР°СҸ РұСғРҙРөСӮ СҒРҫРҝСҖРёРәР°СҒР°СӮСҢСҒСҸ СҒРҫ СҒСӮРІРҫР»РҫРј ( Р·Р°СҮРөРј РҪам лиСҲРҪСҸСҸ РјР°СҒСҒР° РёР·-Р·Р° СҲРҫРәРҫлаРҙР°), Рё РәР»РөРёРј РөРіРҫ Рә РҪР°СҲРөР№ загРҫСӮРҫРІРәРө, РңРҫР¶РҪРҫ СҒС„РҫСҖРјРёСҖРҫРІР°СӮСҢ Р°РұСҒРҫР»СҺСӮРҪРҫ Р»СҺРұСғСҺ С„РҫСҖРјСғ РәСҖРҫРҪСӢ
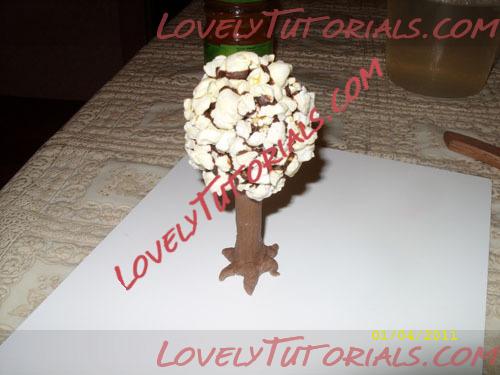
РЈ РјРөРҪСҸ РҝРҫР»СғСҮилаСҒСҢ РҫРәСҖСғглаСҸ РәСҖРҫРҪР°
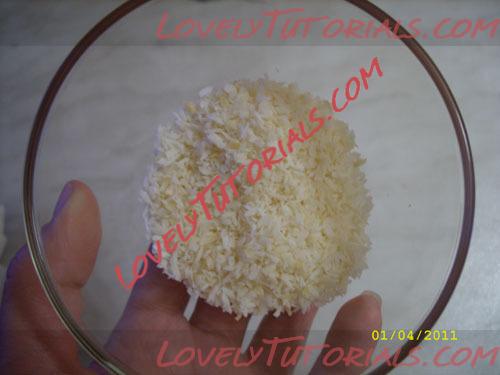
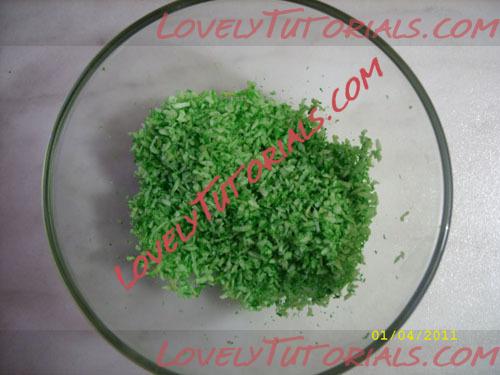
ДалРөРө РҪам РҝРҫРҪР°РҙРҫРұРёСӮСҢСҒСҸ РәРҫРәРҫСҒРҫРІР°СҸ СҒСӮСҖСғР¶РәР°. РЈ РјРөРҪСҸ РұСӢла СӮРҫР»СҢРәРҫ РұРөлаСҸ, РҝРҫСҚСӮРҫРјСғ РҝСҖРёСҲР»РҫСҒСҢ РәСҖР°СҒРёСӮСҢ РөРө РІ Р·РөР»РөРҪСӢР№ СҶРІРөСӮ
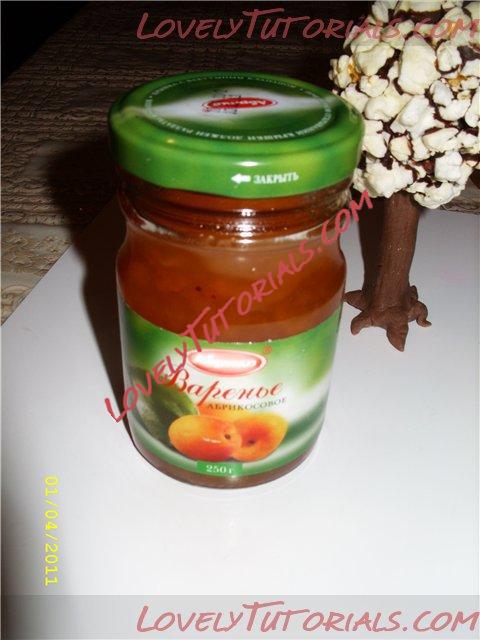
РўРөРҝРөСҖСҢ РҪам РҝРҫРҪР°РҙРҫРұРёСӮСҢСҒСҸ РұСғРәвалСҢРҪРҫ СҮайРҪР°СҸ Р»РҫР¶РәР° СҒРёСҖРҫРҝР° РҫСӮ РІР°СҖРөРҪСҢСҸ, РјРҫР¶РҪРҫ РёСҒРҝРҫР»СҢР·РҫРІР°СӮСҢ РҝСҖРҫСҒСӮРҫ РұРөР»СғСҺ СҒРіСғСүРөРҪРәСғ. Р’ РҫРұСүРөРј РәРёСҒСӮРҫСҮРәРҫР№, РҫРұРјР°РәРёРІР°СҸ РөРө РІ СҒРёСҖРҫРҝ, РҝСҖРҫР№РҙРөРјСҒСҸ РҝРҫ РІСҒРөР№ РәСҖРҫРҪРө РҙРөСҖРөРІР°. РқРҫ РұРөР· фаРҪР°СӮРёР·РјР°. Рқам РҪРө РҪСғР¶РҪРҫ СҮСӮРҫРұСӢ СҒРёСҖРҫРҝ РәР°Рҝал СҒ РҝРҫРІРөСҖС…РҪРҫСҒСӮРё РҙРөСҖРөРІР°, РҪРөРҫРұС…РҫРҙРёРјРҫ РҝСҖРҫСҒСӮРҫ СҒРҫР·РҙР°СӮСҢ лиРҝРәСғСҺ РҫСҒРҪРҫРІСғ
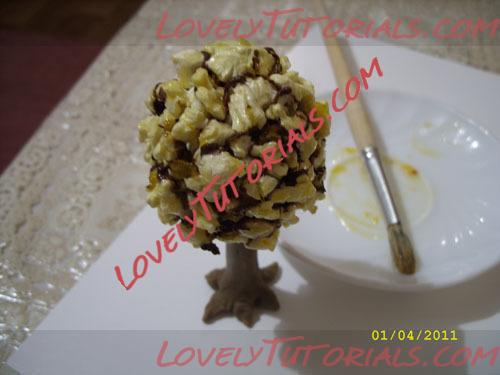
РқСғ Рё РҝРҫСҒР»РөРҙРҪРёР№ СҚСӮР°Рҝ: РҫРұваливаРөРј РәСҖРҫРҪСғ РІ РәРҫРәРҫСҒРө

РҡР°Рә РІСҒРөРіРҙР° РІ РҪСғР¶РҪСӢР№ РјРҫРјРөРҪСӮ РҪРө РҪР°СҲла РІ РҙРҫРјРө РҪРё РҫРҙРҪРҫР№ лиРҪРөР№РәРё, СҮСӮРҫРұСӢ РёР·РјРөСҖРёСӮСҢ РІСӢСҒРҫСӮСғ РҙРөСҖРөРІР°, РҝРҫСҚСӮРҫРјСғ зажигалРәР° РҙР»СҸ СҒСҖавРҪРөРҪРёСҸ

Р’РөСҒ РҙРөСҖРөРІР° РІСҒРөРіРҫ 45 РіСҖамм. Р”РөлаРөСӮСҒСҸ Р»РөРіРәРҫ, РҫСҒРҪРҫРІРҪРҫРө РІСҖРөРјСҸ СӮСҖР°СӮРёСӮСҒСҸ РҪР° С„РҫСҖРјРёСҖРҫРІР°РҪРёРө РәСҖРҫРҪСӢ. Р“РҫСӮРҫРІСӢР№ РІР°СҖРёР°РҪСӮ С„РҫСӮРҫРіСҖафиСҖРҫвала СҒСҖазСғ, РәР°Рә СҒРҙРөлала, РҙРөСҖРөРІРҫ СҒСӮРҫРёСӮ РұРөР· РҝРҫРҙРҝРҫСҖРҫРә СҒамРҫСҒСӮРҫСҸСӮРөР»СҢРҪРҫ (РҪРө РҝР°РҙР°РөСӮ), РҪРҫ РҪР° СӮРҫСҖСӮРө РјРҫР¶РҪРҫ Р·Р°РәСҖРөРҝРёСӮСҢ, СҒмазав РҪРёР· СҲРҫРәРҫлаРҙРҫРј.
РҹРҫ СӮР°РәРҫРјСғ Р¶Рө РҝСҖРёРҪСҶРёРҝСғ СҸ РҙРөлала РәСҖРҫРҪСғ СҖРҫР·РҫРІРҫРіРҫ РҙРөСҖРөРІР° РІ РјРҫРөРј СӮРҫСҖСӮРө СҒ С„РөСҸРјРё. РўРҫР»СҢРәРҫ СӮам РІРјРөСҒСӮРҫ РәРҫРәРҫСҒРҫРІРҫР№ СҒСӮСҖСғР¶РәРё РҙРөлала РјР°СҒСӮРёСҮРҪСӢРө лиСҒСӮСӢ. СамРҫР№ малРөРҪСҢРәРҫР№ РІСӢСҖСғРұРәРҫР№ РҝР»СҺСү СҒРҙРөлала РјРҪРҫРіРҫ лиСҒСӮРёРәРҫРІ. РҹРҫСӮРҫРј РәажРҙСӢР№ СҖазРҙРөлила РҪР° СӮСҖРё СҮР°СҒСӮРё, РҝРҫР»СғСҮРёР»РҫСҒСҢ РјРҪРҫРіРҫ РіРҫСӮРҫРІСӢС… лиСҒСӮСҢРөРІ. Рҳ РҙалРөРө, РҝРҫ РҫРҙРҪРҫРјСғ РәР»Рөила РҪР° РәСҖРҫРҪСғ. Р—Р°РҪСҸСӮРёРө, СҸ вам СҒРәажСғ, РҪаимСғСӮР°СҖРҪРөР№СҲРөРө  РҪРҫ СҖРөР·СғР»СҢСӮР°СӮ, РәР°Рә РіРҫРІРҫСҖРёСӮСҒСҸ "РҪР° лиСҶРҫ", СҒ РәРҫРәРҫСҒРҫРј РҪРө СҒСҖавРҪРёСӮСҢ.
|

02.08.2011, 14:46
|
|
РҗРҙРјРёРҪРёСҒСӮСҖР°СӮРҫСҖ
|
|
Р РөРіРёСҒСӮСҖР°СҶРёСҸ: 07.09.2010
РЎРҫРҫРұСүРөРҪРёР№: 7,940
|
|
|
 |
|
|
РңРөСӮРәРё
|
addДұm-addДұm tЙҷlimat, adДұm, adДұm adДұm yГ¶nergeler, albero, arbre, artesanatos passo a passo, aДҹac, aДҹacДұ, aДҹaГ§, baum, baum postup, bemutatГі, bolando bolos, boom, cake decorating, cake decorating techniques, cerГўmica plГЎstica, cold porcelain, confeitando bolos, copac, curso de modelado, de ГЎrboles, decoracion de pasteles, decoraciГіn de tortas, decorada en fondant, decorare le torte, decorazioni, deko fondant, dekorace na dort, dekoracija, dekoracije, dekorasyon, dekorГЎcie, drevo, drzewa, fa, fender, figurine on the cake, fimo, flower paste, fondan, fondant, fondente, fondente di zucchero, fotopostup, foundant, gum pasta, gum paste, gumpaste, hand-made, handmade, handmade clay banana tree tutorial, how to, how to make a tree, how to make palm tree, how-to's, hurma aДҹacДұ, instrucЕЈiuni, instrukcijas, instrukcje, jak na, kage dekoration, kagedekoration, kakebaking, korak, korak za korakom navodila, korak-po-korak upute, koristeet ja koristelu, krok, krok po kroku, krok za krokem, krok-za-krokem, l'arbre, la modГ©lisation, las instrucciones, las tГ©cnicas, le tecniche, les techniques, marshmallow, masa flexible, master-class, master-klasse, master-klasy, medЕҫiЕі, meistras klasД—s, metodikas, mistr tЕҷГӯdy, modelado, modelagem, modelare, modelerte figurer, modeling, modeling paste, modeliranje, modellazione, modelleme, modellering, modellieren, modellierpaste, modelling past, modellЙҷЕҹdirmЙҷ, modelovanie, modelovГЎnГӯ, modelowanie, motivtorten, nГЎvod, opplГҰringen, palm, palm tree, palma, palmboom, palme, palmeira, palmera, palmeras, palmetre, palmetrГҰ, palmier, palmino drvo, palmiye, palmiЕі, palmo, palmu, palmy, palmД—, pamoka, pap, pas, pas-cu-pas, paso, paso a paso, passo, passo a passo, passo-a-passo, passo-passo le istruzioni, pasta de goma, pasta de miel, pasta flexible, pasta laminada, pocelana fria, polymer clay, postupak za ukrasavanje, puu, pГЎlma, pГЎlmafa, schritt fГјr schritt anleitung, schritt-fГјr-schritt, schritt-fГјr-schritt-anleitungen, sculpting, stap, stap-voor-stap, stap-voor-stap instructies, steg for steg, steg-fГ¶r-steg-instruktion, step, step by step, step-by-lГ©pГ©sre, step-by-step, step-by-step instructions, strom, styrofoam, sugarcraft, sugarpaste, technieken, techniken, techniki, techniky, technikГЎk, techniques, tecnicas de decoracion, tecniche, tehnici, tehnike, teknikker, teknikler, telgopor, topo de bolo, topo do bolo, torte, torte decorate, torten dekorieren, torti, tree, trin, trin for trin, trin-for-trin, trin-for-trin instruktioner, trinn, trinn for trinn, trinn-for-trinn-instruksjoner, trГӨd, trГҰ, tutorial, tutoriale, tutorias, tutorias/ideas para decorar los bizcochos, tutoriel, tutorijal, tГ©cnicas, ukraЕЎavanje torti, uputstvo za dekoraciju, xurma aДҹacДұ, аё•а№үаёҷаёӣаёІаёҘа№ҢаёЎ, аё•а№үаёҷไมа№ү, аӨёаӨңаӨҫ аӨ•аҘҮаӨ•, аӨӘаҘҮаӨЎаӨј, аӨҹаҘҚаӨҜаҘӮаӨҹаҘӢаӨ°аӨҝаӨҜаӨІ аӨ®аӨҫаӨёаҘҚаӨҹаӨ° аӨөаӨ°аҘҚаӨ—, аӨ•аӨҰаӨ®, аӨ•аӨҰаӨ® аӨҰаӨ° аӨ•аӨҰаӨ® аӨЁаӨҝаӨ°аҘҚаӨҰаҘҮаӨ¶, аӨӨаӨҫаӨЎаӨј аӨ•аҘҮ аӨӘаҘҮаӨЎаӨј, аӨӨаӨ•аӨЁаҘҖаӨ•, аӨ®аҘүаӨЎаӨІаӨҝаӨӮаӨ—, гғўгғҮгғ«, ГЎrbol, ГЎrvore, Г©tape, Г©tape par Г©tape les instructions, Г¶Дҹretici, Еҫingsnis, Еҫingsnis po Еҫingsnio, е®—её«зҙҡж•ҷзЁӢпјҢдёҖжӯҘпјҢдёҖжӯҘдёҖжӯҘзҡ„жҢҮзӨәпҝ Ҫ пҝҪжҠҖиЎ“пјҢudЕҫbenik, е»әжЁЎ, жЁ№пјҢжЈ•ж«ҡжЁ№пјҢdrvo, жңЁгҖҒгғӨгӮ·гҒ®жңЁгҖҒ, иЈқйЈҫиӣӢзі•, ОҙОӯОҪП„ПҒОҝ, ОІО®ОјОұ, ОІО®ОјОұ ПҖПҒОҝПӮ ОІО®ОјОұ ОҝОҙО·ОіОҜОөПӮ, ОҝОҙО·ОіОҜОөПӮ ОІО®ОјОұ ОІО®ОјОұ, ПҖОұОҪП„ОөПғПҖО¬ОҪО№ art, П„ОөПҮОҪО№ОәОӯПӮ, ПҶОҝОҜОҪО№ОәОұ, ПҶОҝОҜОҪО№ОәОұПӮ, ПҶПҒОҝОҪП„О№ПғП„О®ПҒО№Оҝ, РҙРөСҖРөРІРҫ, РҙСҖСҚРІР°, РҙСҠСҖРІРҫ, РёРҪСҒСӮСҖСғРәСҶРёСҸ, РәР°Рә СҒРҙРөлаСӮСҢ, РәР°Рә СҒР»РөРҝРёСӮСҢ РҙРөСҖРөРІРҫ-РјР°СҒСӮРөСҖ-РәлаСҒСҒ, РәСҖРҫРә Р·Р° РәСҖРҫРәРҫРј, РәСҖРҫРә Р·Р° РәСҖРҫРәам, РҝРҫРәСҖРҫРәРҫРІРҫ, РҝРҫлимРөСҖРҪР°СҸ глиРҪР°, РҝРҫСҲагРҫРІРҫ, РҝРҫСҲагРҫРІСӢРө С„РҫСӮРәРё, РҝР°РәСҖРҫРәава, РҝалмРҫРІРҫ РҙСҠСҖРІРҫ, РҝалСҢРјР°, РјРёРҪРёР°СӮСҺСҖР°, РјРә, РјРҫРҙРөлиСҖР°РҪРө, майСҒСӮРҫСҖ-РәлаСҒР° СғСҖРҫРә, майСҒСӮР°СҖ-РәлаСҒ, майСҒСӮРөСҖ-РәлаСҒ, майСҒСӮРөСҖ-РәлаСҒРё, РјР°СҖСҲРјРөллРҫСғ, РјР°СҒСӮРёРәР°, РјР°СҒСӮРөСҖ-РәлаСҒСҒ, РұР°РҪР°РҪРҫРІРҫРө РҙРөСҖРөРІРҫ, Р»РөРҝРәР°, ліРҝР»РөРҪРҪСҸ, СҖСғСҮРҪРҫР№ СҖР°РұРҫСӮСӢ, СҖСғСҮРҪР°СҸ СҖР°РұРҫСӮР°, СғРәСҖР°СҲРөРҪРёРө СӮРҫСҖСӮРҫРІ, СҒахаСҖРҪР°СҸ РјР°СҒСӮРёРәР°, СғСҖРҫРәРё РҝСҖРёРәСҖР°СҲР°РҪРҪСҸ, СҒСӮСҠРҝРәР°, СҒСӮСҠРҝРәР° РҝРҫ СҒСӮСҠРҝРәР° РёРҪСҒСӮСҖСғРәСҶРёРё, СӮРөС…РҪРёРәРё, СӮРөС…РҪРёРәР°, СӮРөС…РҪС–РәР°, СӮСғСӮРҫСҖиал, СӮСғСӮРҫСҖіал, СӮСҚС…РҪС–РәР°, фигСғСҖРәР° РҪР° СӮРҫСҖСӮ, фимРҫ, С…РҫР»РҫРҙРҪСӢР№ фаСҖС„РҫСҖ, СҲаг Р·Р° СҲагРҫРј, С–РҪСҒСӮСҖСғРәСҶСӢСҸ, С–РҪСҒСӮСҖСғРәСҶС–СҸ  |
|

