Огромная благодарность Автору Rhu за Мастер-класс
For the cake
1 x 15cm (6”)
250g (approx) buttercream
To decorate
400g coloured sugarpaste – this car is Sugarflair Gooseberry
100g black sugarpaste
50g white sugarpaste
50g grey sugarpaste
gum tragancth / cmc / tylose
edible silver paint
silver dusting powder
edible glue
sharp knife
Special equipment
10” cake drum
A4 foam board
sugarcraft gun
spaghetti
scalpel
circle cutters
dressmaker pins
 Carving and preparing the cake
- Prepare your sugarpaste with either gum tragancth, cmc, tylose or similar medium. For the main colour add about ½ tsp, this will give the sugarpaste just extra strength to cover the car. Add the equivalent of 1 tsp per 250g to the other colours, if you have used gum tragancth leave for the appropriate time to work.
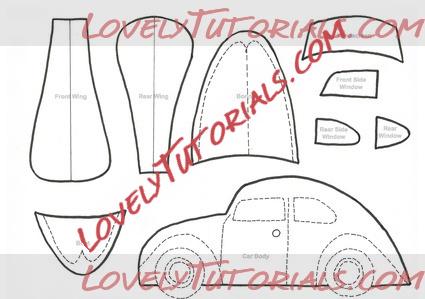
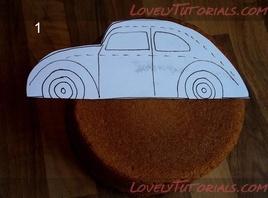
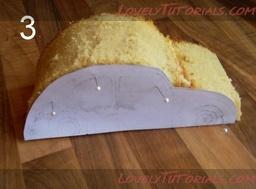
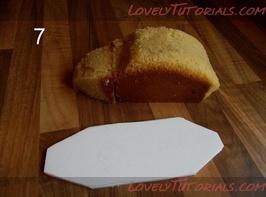
- Level the top of the cake, (1) pin template to cake (remember to count them out and back in!) Using a sharp knife cut cake in half and add the remaining part to the front of the car (2), join with buttercream. Using the template as a guide cut halfway into cake, remove the template, flip it over and attach to the other side of the cake and again cut around the template to meet your first cut from the other side (3 )
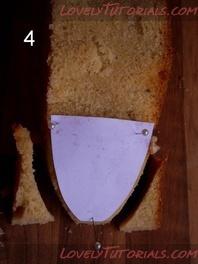
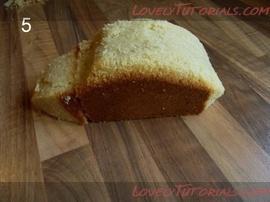
- Pin bonnet to front of cake and trim as in (4) Repeat for boot at the back using appropriate template. Now you have the basic shape of the car you can soften the edges of the roof, under the bonnet and under the boot area (5)

 Support boards
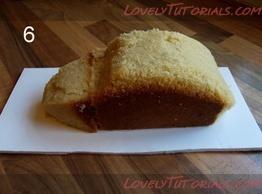
- Create an underneath support board for the cake from either cake board or foam board (you may want to cover this with cling-film) do this by placing the cake onto the board and drawing around the shape of the cake (6) Cut this out, just inside the line you have drawn (7). Then using this as a template we can create the 'lift' effect support board, ensuring that you keep the size within the board you have just made cut two rectangular boards from foam board or even corrugated card, providing you create a depth of 5 – 7mm this will be fine. Edge this card in black electricians tape (this will not have contact with the cake), put this to one side for later.
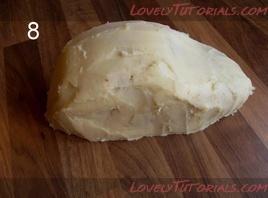
- Attach the cake to the underneath support board with a small amount of buttercream and crumbcoat the cake in buttercream, chill and repeat so that you have two layers of buttercream under your sugarpaste (8)
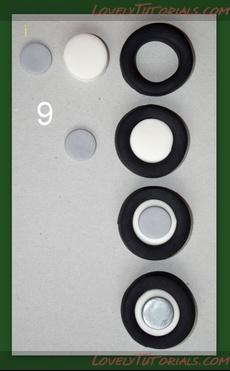
Use the template to guage size of wheels
Roll black sugarpaste with CMC added to approx 1cm depth cut 4 circles, leave sugarpaste on board and use relevant sized circle cutter to cut inner rim, again use template to guage correct size remove from centre.
Using the same cutter ,cut 4 in white sugarpaste slightly shallower than the black sugarpaste, sit into middle of black tyre.
Using a smaller cutter, cut 4 smaller circles for hubcap and paint silver.
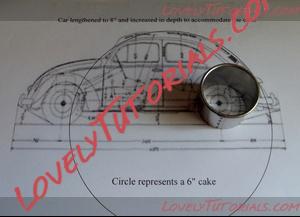
Note: this image is the original line drawing used to create a template for the car. I also used this to guage where on the cake the template would fit.
Covering the cake
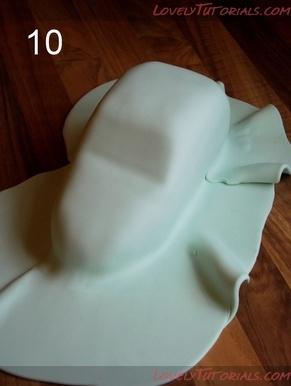
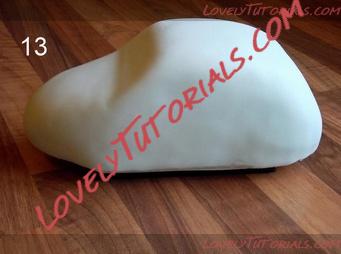
- Roll the main sugarpaste out so that it is big enough to sit right over the cake. Sit over the cake, allow to drape over the sides and then gently tease into the curves of the cake (10). Cut of the excess sugarpaste to about 1.5 – 2cm around the cake Using a suitable tool, tuck the lower edge of the sugarpaste in and under the cake (11). Trim. You can now sit the car onto the 'lifting board' (12 and (13) stick car to the board with either buttercream or royal icing.
- Whilst the sugarpaste is still soft, use a small ball tool to create a recess for the door handle on the side of the car, use template as a guide. Roll a small sausage of grey to create the handle and glue over the recess.


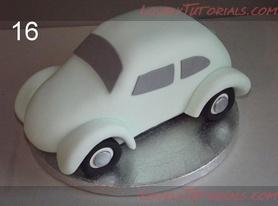
 Wheels, wings, bonnet and boot
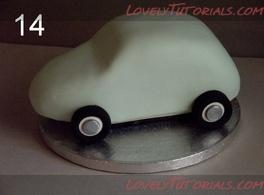
- Using the template as a guide glue the wheels onto the car . (14)
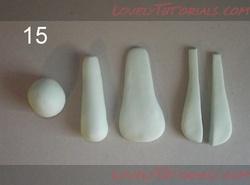
- Use the template and a golf ball size piece of sugarpaste in the same colour as your car, firstly roll into a ball (15) and then into a cone shape roughly the length of the template (16), then flatten this with the heel of your palm to match the template cut off any excess the narrow end, keep smoothing the shape all round the edges to get a natural curve on these edges, use a small amount of glue to make the sugarpaste tacky and glue to the sides of the car over each wheel. Use the main template as a guide.
- Roll the sugarpaste to approx 5mm and cut out a bonnet and boot with the scalpel using the relevant templates, leave them on the board, but remove the excess paste. Whilst they are still on the board gently smooth your fingers around the top outside edge of the shapes so that it create as soft curved edge around each shape. Place the templates back onto each piece and using a blunt tool trace the outline of the detail on the bonnet and boot onto the sugarpaste, this will act as a guide when adding the detail. Now glue each piece in place.
Tip: using gentle pressure with the heel of your palm will allow you to gradually smooth the sides of the sugarpaste to a more rounded shape, try a gentle stroking action to achieve this.
 Mirrors, windows and bumpers
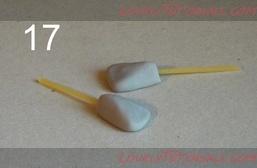
- Make the mirrors using two small pea-sized pieces of grey sugarpaste, roll each into a ball, flatten slightly and pinch at one end smoothing down the other to get the desired shape (q) insert dried spaghetti approx 5cm long into each mirror and paint the mirrors silver.
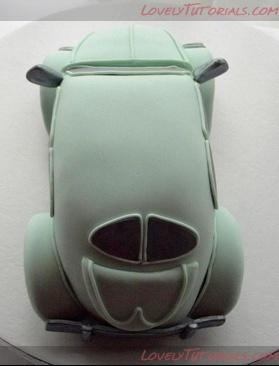
- To make the windows, roll the grey sugarpaste thinly and using the templates cut out the windows, use silver dusting powders to get a glass effect. Glue the window in place using the template for a guide for the sides, the back windows sit above the boot with the straight edges facing each other and a 3mm approx between them.
- To make the bumpers roll the grey sugarpaste to approx 2 - 3mm thick and cut a strip long enough to reach across the front of the car from the outside edge of the each wing, smooth down each end to give the impression of reaching around the wings. Using a small amount of glue, make it tacky rather that wet, glue the bumpers in place, cut a small thin strip of the grey to add as detail on the bumpers. Paint silver.
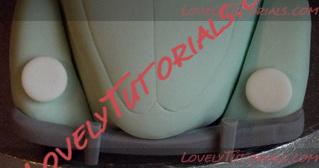
- Cut two small circles using a piping nozzle from white, add a cross-hatch effect to each of them and glue to each wing.
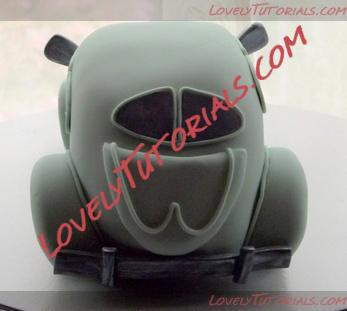
- Using a sugarcraft gun, fill with the same colour as the body of the car, using the smallest circle disc to outline around the windows, lights, detail on boot and bonnet, over the wings where they meet the car body, and to define the doors (template) gluing the guideline onto the cake before laying the line of sugarpaste onto the cake to follow the details.
- Cut two thin strips from the same coloured sugarpaste as the body to go along the bottom edge of the doors between the front and rear wings.
- Cut two small strips of black to create windscreen wipers and glue in place. Attach the mirrors to the sides of the cake between the front windscreen and side windows.
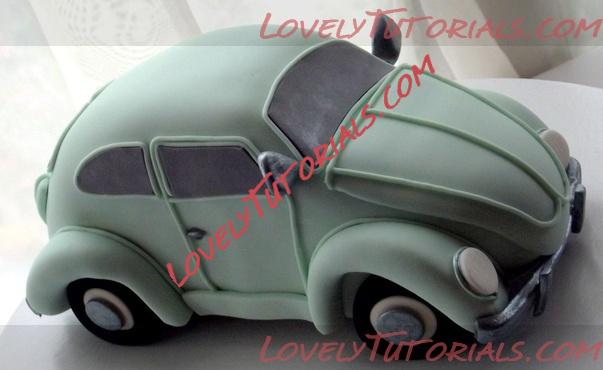
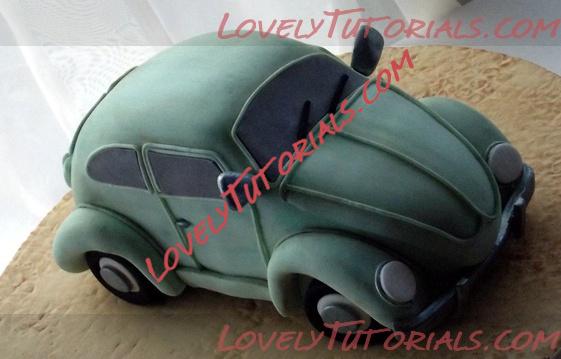
- Stand back and admire your work.