Огромная благодарность
Ceri DD Griffiths за МК

Equipment:
Pieces of foam or kitchen towel
Rolling pin
Pizza Cutting wheel or small sharp knife
PME Designer cutting wheel with stitching head
Small pallet knife
Small brush for edible glue
Textured rolling pin or mat
Stay fresh mat (optional)
Materials:
Paste (Mexican or 50/50)
Edible Glue
1. Mexican modeling paste or a 50/50 mix of sugarpaste and gum paste works best for fabric effect bows as it can be rolled thinly and still maintains its shape when firm.
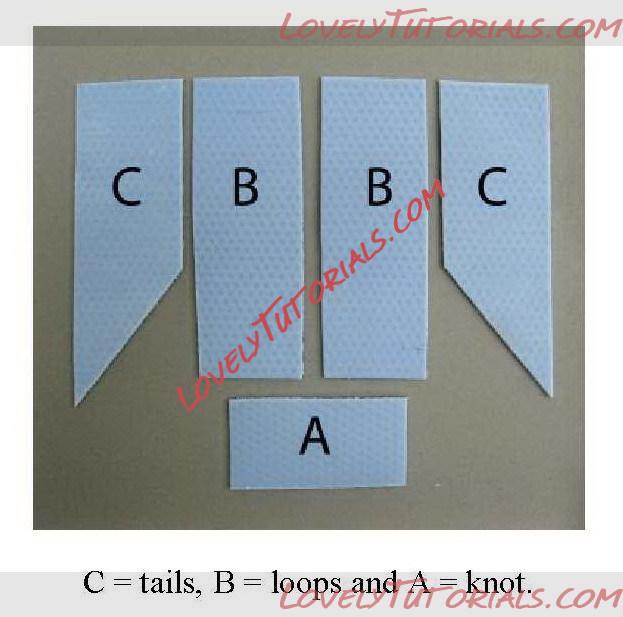
2. Using a non-stick rolling pin and board, roll out your paste until your reach the desired thickness. To finish either roll the paste with a textured rolling pin or gently press a texture mat onto the surface of the paste. Cut out your bow pieces using a sharp knife or a pizza cutting wheel. Place all of the pieces under a plastic sheet or a stay fresh mat to prevent drying out.
3. Take a section B of the bow, place it textured surface down on a work surface and fold the very edges of the long sides over to give the illusion of a hem, turn the paste over and create stitch marks down either side using the PME designer cutting wheel or similar with the stitch head. Repeat this for the second B section.
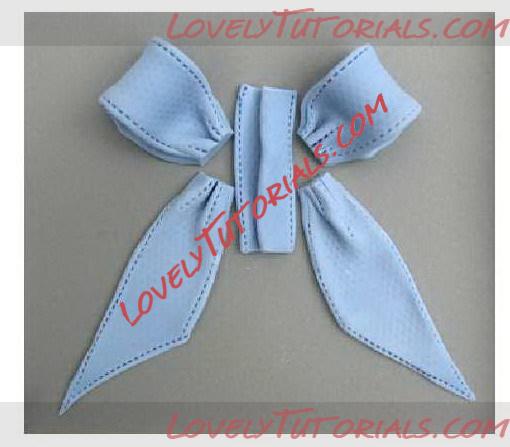
4. Moisten the end of one B section and then fold it over to create a loop. Pinch the ends together to make a pleat then mark with the PME designer cutting wheel stitch head. Use kitchen paper or small pieces of foam to keep the loop open whilst drying. Repeat for the other loop.
5. Take the C sections of the bow and repeat the hemming process for the sides and pointed end, these edges should then be stitch marked. Pinch the blunt end to make a pleat then mark with the stitching whee 1. Immediately attach these tail sections to the cake in position so that they can dry, remembering that bows will look more realistic with pleats and folds. Use edible glue to attach the tails to the cake.
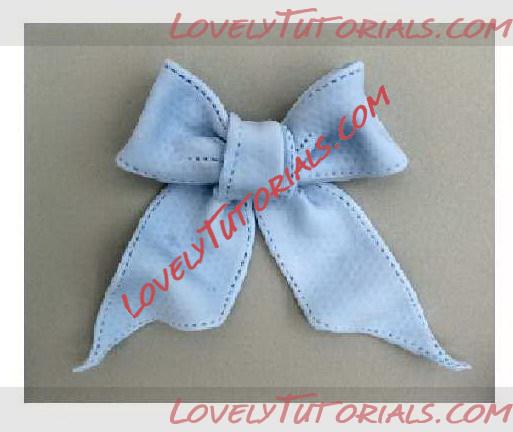
6. Take section A and hem and stitch as per section B, once this is done create a central pleat down the length of the knot. Using a little edible glue attach the end of the knot to the center of the tails where they meet. The length of the knot should be hanging down in front. Now using edible glue attach the loops of the bow in position leaving the tissue or foam in for support if necessary, (remember to remove them before presenting the cake). Once the loops are securely in position gently wrap the knot up and over the center of the bow and attach behind with a little edible glue. To create a clean finish use a small pallet knife to tuck the end of the knot under the bow.
Helpful hints
The thinner you roll the paste for fabric bows the more pleats and realistic folds you will be able to create. Dusting the bow sections with a luster dust prior to placing them on the cake will give the bow a wonderful satin finish.