Огромная благодарность Автору strawberry-chic за Мастер-класс
Cake Pops - Spring Flowers
The other day I decided to create my own spring inspired cake pops, seeing how Easter is only a few weeks away. If you are feeling a little confused because you have never heard the words "cake pops" before you should visit this site,
(Bakeralla) because they are simply fabulous!
*Cake Pops are basically ground up cake pieces which are mixed with lots of yummy frosting and then dipped into chocolate and formed into various fascinating designs.
To make these cake pops a little more festive for Easter, I decided to use carrot cake with cream cheese frosting instead of the suggested chocolate and they turned out great! I'll be honest, the original design I had for the flowers looked a little different then how they ended up turning out. But, I haven't had much experience with the whole cake pop thing and I definitely learned a lot!
To view my full tutorial for these spring flowers click below, I have added lots of design tips to help you along the way!
Spring Flower Cake Pops
Materials Needed
1 - 9x13 baked carrot cake, (or any desired flavor will work)
1-3/4 cups cream cheese frosting, I just used the canned Betty Crocker type
A food processor
Wax paper
Rolling pin
Pizza Cutter
Lolly pop sticks, can be purchased at most large craft stores like Michaels or Hobby Lobby
Yellow dipping chocolate
Block of foam
Green Ribbon
Hot Glue gun
*Before you begin know that this process is a little lengthy and takes a bit of time, but the result is well worth it!
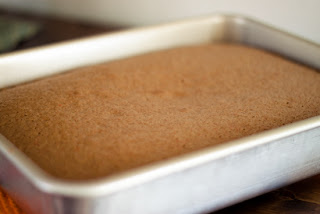
Step 1. Bake your cake according to package directions in a 9x13 pan and set aside to cool.
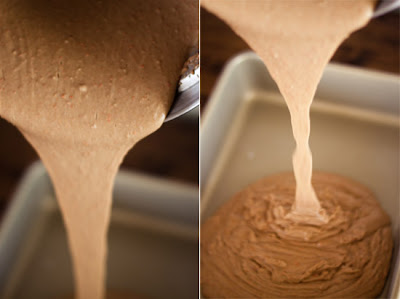
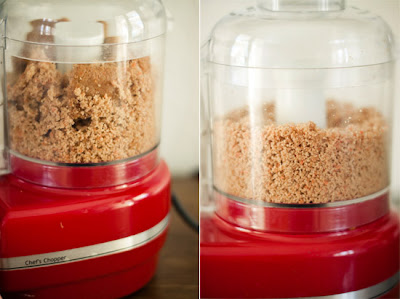
Step 2. Using a knife or spatula, cut cake into small pieces and place in a large bowl.

Step 3. Place pieces of cake into a food processor and process until fine crumbs form (you will probably need to work in batches depending on how large your food processor is). Pour cake crumbs into a large bowl.

Step 4. Add about 1-3/4 cups of cream cheese frosting and mix well
using the backside of a large spoon.


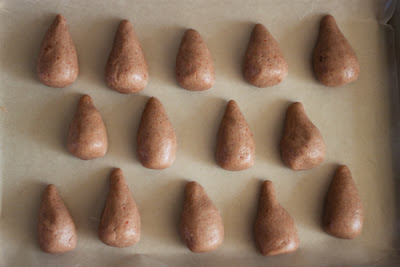
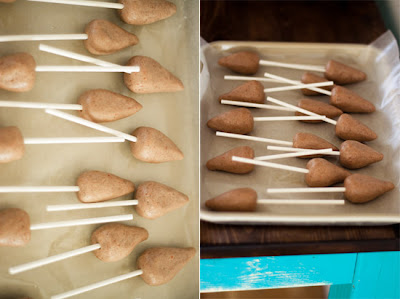
Step 5. Take about 1 tablespoon of the cake dough and shape into a rosebud or long Hershey kiss.
You can do this by first rolling the mix into a ball and then rolling one side into a skinnier tip.
]Leave about 1/3 of the dough to make the flower petals.
Place on a cookie sheet lined with wax paper and put in the freezer.
Note: I only made about 14 flowers, but I had extra dough,
so you should be able to make around 20.


Step 6. After your dough pieces have been in the freezer for about an hour, you can take them out and insert your lolly pop sticks. When finished return cake pops to the freezer.
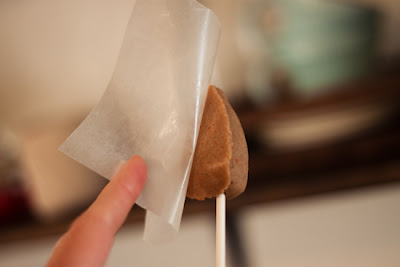
Step 7. Cut out 2 pieces of wax paper about 4" square.
Take a small piece of dough, about 1/2 teaspoon full, and roll into a ball.
Place the ball in the center of one of the wax paper squares then lay the 2nd sheet over the top.


Step 8. Using a rolling pin, flatten the ball into a oval shape, about 1/8" thick (don't flatten to thin or your petal will fall apart when you dip your finished cake pops in the chocolate).
Using a pizza cutter, cut away the edges of the oval so you are left with a long raindrop shape.


Step 9. Take one of the cake pops out of the freezer, lightly press your petal in place, and gently peel off the wax paper. Return cake pop to the freezer so petal has time to set. Repeat process until all cake pops have 1 petal.


Making sure to return each flower to the freezer after each petal is placed. Then move on to the 2nd petal and continue pattern until you have 4 petals on each flower. You can cut out multiple squares of wax paper and roll out petals in groups (I ended up doing 4 at a time). If you find a more efficient method, thats great! Just remember to keep your cake pops cold so they will hold their shape.


Note: Make sure to exaggerate the shape and thickness of your petals because after they are dipped in the chocolate they will loose a lot of their detailing.
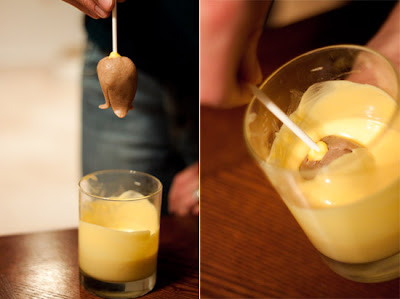
Step 10. Place a few of your chocolate pieces in a zip-lock bag. Microwave in 30 second increments until melted. Cut a very small hole in the tip of the bag and pipe a ring around the bottom of each flower (this will secure the flower to the stick and seal the end so cake doesn't start oosing through

When finished you can now place your flowers right side up by sticking the lolly pop ends into a block of foam.
Place cake pops into the fridge (not freezer) for at least an hour.


Step 11. Melt chocolate in a tall/thin microwave safe bowl or cup in 30 sec. increments, stirring each time until completely melted. If you feel like your chocolate is too thick you can add a little bit of shortening (mix in about 1/4 teaspoon at a time until desired thickness is reached). Take cake pops out of the fridge one at a time and dip into chocolate. Keep the flower face down and let the chocolate drip off the end. You can even twist the lolly pop back and forth with your fingers until the chocolate hardens. Once chocolate is set, return cake pop to the fridge (insert back in foam), grab another one, and repeat these steps until they are all done!
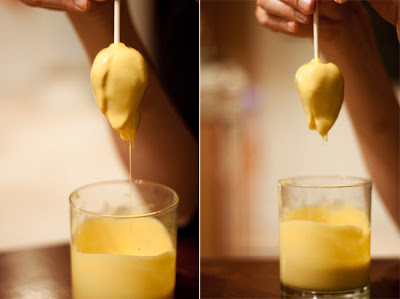
As you can see, although I had shaped my petals so they would flare out at the ends, when they were dipped in chocolate the petals fell into the center. If I flipped the flower right side up immediately after dipping, the extra chocolate would pool at the top and the detailing was lost (this is why I mentioned earlier that the petals should be thicker, so they will keep their shape).
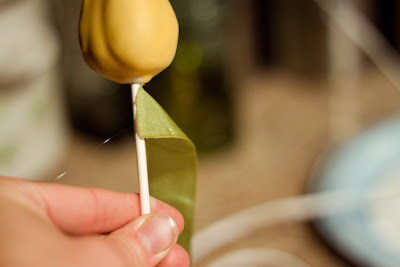
Step 12. For optional stem: Place a small strip of hot glue and the top of the lolly pop stick. Apply ribbon and twist downward until you reach the end of the stick. Cut the ribbon and hot glue to the end. Cut a piece of ribbon about 3" long and tie to the top of each stick to resemble leaves.


Now place back into the foam and keep in the fridge until you serve them.
(In-case your interested, I ended up covering my foam block with burlap for the photo shoot.)