 STEP 1:
 Start by making a basic armature. Since the polymer clay baby will have it's arms and legs tucked up close to the body, we will not need to support them with wire. Puppen Fimo is generally strong enough without support if the limbs are tucked in.
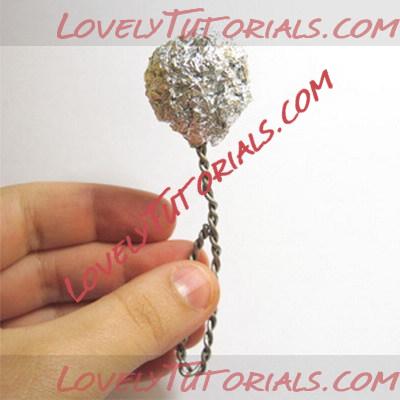
Twist some armature wire (galvanized steel wire will do)so that the wire is doubled up and very study. You want the core of the baby to be strong. Here I've bent up one end of the wire so it doesn't poke me while I sculpt. Always have more than you need, just in case you find you haven't make the body long enough.
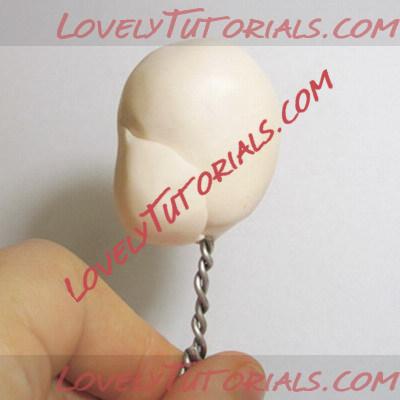
For the head, bend a loop into the other end of the wire and scrunch up some aluminum foil over it. Squeeze it as tight as you can so it's completely compacted. It should feel pretty sturdy on the end of the wire. This foil will be the head, so it needs to be round (not a wonky uneven shape) or else it will be difficult to get an accurate looking face. Also, keep in mind that it needs to be small enough so that you can build up the face over it without giving the polymer clay baby a giant head. Allow for another 5mm of clay at least to be added to it.
 STEP 2:
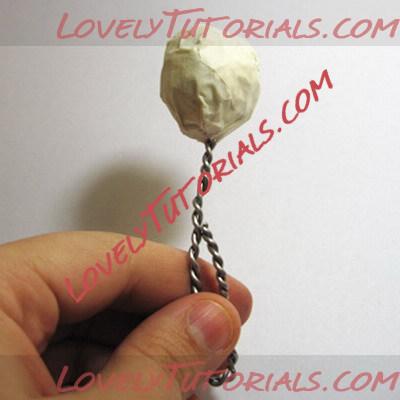
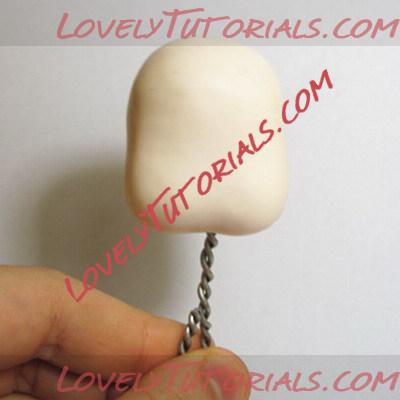
 Now you need to give the clay something to grip to. Polymer clay tends not to grip to aluminum foil very well so it's important that you do this step. If your sculpture has air pockets between the clay and the armature, then your sculpture is likely to crack or get weak spots.Wrap the aluminum foil completely with masking tape. Try to use a good quality tape as you want it to stick down solidly and not peel up while you are trying to work. Ensure it's all wrapped tightly.
 STEP 3:
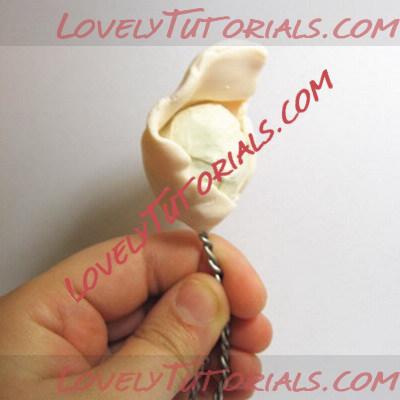
 Now you can start adding some clay. You can choose to spread a thin layer of Translucent Liquid Sculpey over the masking tape like an extra "glue" for the clay, but I find that most of the time it isn't necessary. Condition some clay in your hands and flatten it out like a pancake. [NOTE: Conditioning your clay means kneading it until it become soft and pliable. You cannot work with polymer clay until you condition it first].
Press it firmly over your baby head armature.
 STEP 4:
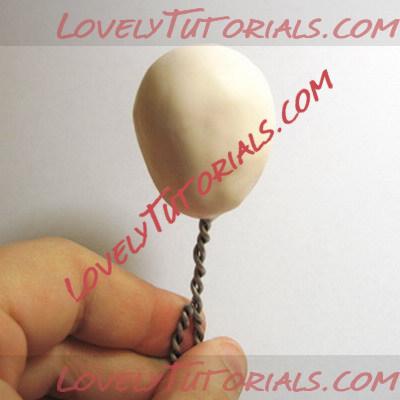
 Completely cover the masking tape with clay. The clay should be approximately 3-5mm thickness all over. Do not allow the clay to get too thin in some areas or the clay will be weak in that area and may crack. If you can see the masking tape through the clay then you've applied it too thin. This is also where having a round ball to start with is important. If your armature is an irregular shape, then it will be nearly impossible to have a round clay ball without having the armature sticking through parts of it. Carefully smooth out the clay, gently dragging your finger or thumb over the surface being sure not to press so hard that you create indentations in the clay.
 STEP 5:
 Now we can add a cheek to our polymer clay baby. Condition a piece of polymer clay and roll it into a dome shape. Apply it to the base of the face, slightly off to one side.
Look at a photo of a baby; their cheeks are much lower on their face than adults and their cheekbones aren't really evident. This is what we will be trying to emulate. Notice that the cheek isn't sticking straight out the side. It's still fairly level with the side of the face.
 STEP 6:
 Repeat step 5 on the opposite side, creating two even cheeks. Blend and smooth them with your finger or thumb. Be sure not to flatten or distort the cheeks. You want them to keep their shape.
 STEP 7:
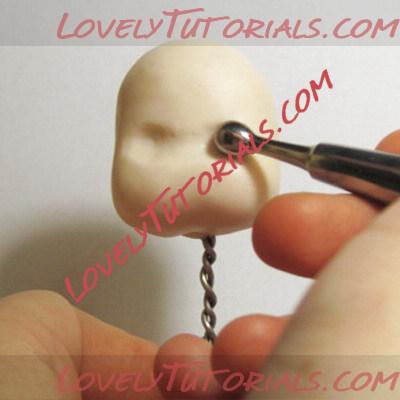
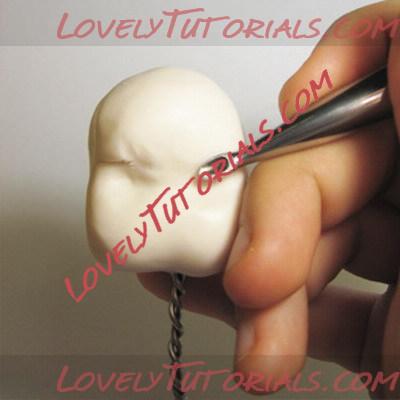
 Use a ball tool to carefully press eyeball sockets into the polymer clay. Have a look at your photo reference. Babies eyes are approximately halfway down the head (or slightly under halfway according to how young a baby they are).
 STEP 8:
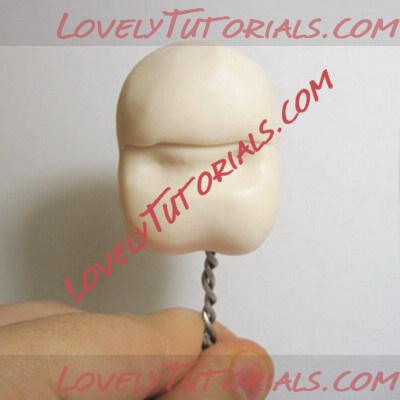
 Condition and flatten another pancake of clay and place it over the forehead. This will create a bit more of a dome for the forehead and the browbone. Try not to go too overboard with this step. Refer to your reference and make sure it's not sticking out too much.
 STEP 9:
 Blend it in with the back of the stainless steel spoon tool, gently dragging the edges of the pancake into the rest of the clay. Don't do this too firmly or it will create a dent where you have blended the clay. Use a very light touch and go over it several times.
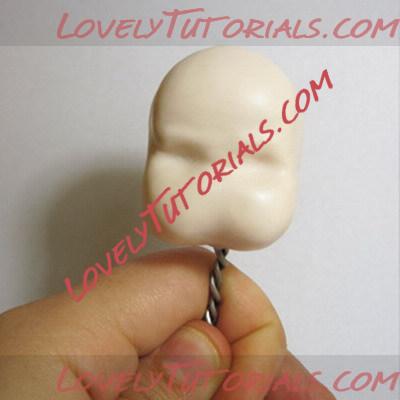 STEP 10:
 Smooth over all the tool marks with your thumb, gently wiping your thumb over the surface of the clay. You baby should have a nice little forehead and eyesockets.
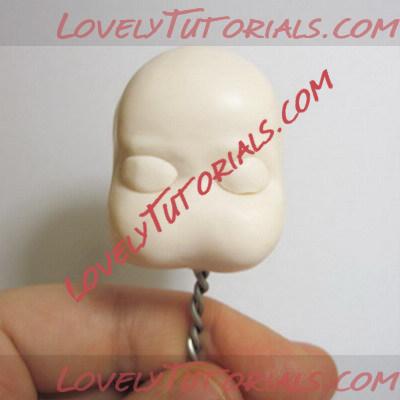 STEP 11:
 In the eye sockets, place two small, round pancakes of clay. This is going to make up the top and the bottom eyelids of the baby's closed eyes.
 STEP 12:
 Using a spoon tool blend in all the edges of the pancakes into the face, being sure not to distort the overall shape. You want the eyelids to maintain a slightly convex shape. Smooth it over gently with your finger/thumb.
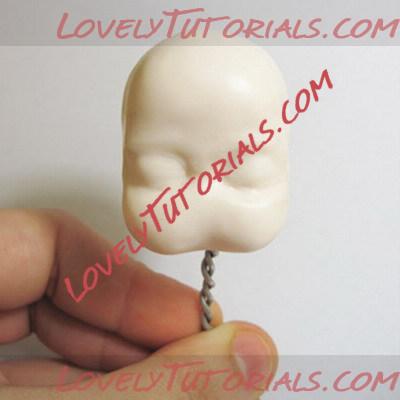
 STEP 13:
 This baby needs some eyelids. Use a Pick tool to carefully press a line across the pancakes you just created. Be sure not to carve the clay, digging it up at the corners. You want to create the lines in a pressing motion, tilting the Pick Tool almost on it's side.
 STEP 14:
 Now we form a nose. Start with the bridge of the nose, applying a small piece of clay between the eyes. You don't want it to be too high. Your baby should have a fairly shallow bridge of the nose.
Then, roll a small ball of clay and gently press it on the end of the bridge. This will form the bulb of the nose and the nostrils.
 STEP 15:
 Use a spoon tool to carefully blend in the edges. You don't want any seam lines. Smooth it over with your finger, making sure you don't distort the overall shape. Here I've reduced the size of the nose slightly while I was blending because I realized the bulb of the nose was too large after comparing it to the photo reference. Make sure you always compare what you're doing to a photo reference.
 STEP 16:
This step is about defining the bridge and the bulb of the nose, preparing for the nostril placement. Use a spoon tool or a small ball tool and define the bulb of the nose, creating small lines where the nostril extend from the nose.
 STEP 17:
 Using your pick tool, press in the edges of the nostrils. You want them to curl around smoothly. Next, poke the Pick tool up the base of the nose, gently pulling outward creating the nostrils. Be sure not to make the holes too large or too small. Keep them an even thickness and keep referring to your photo reference to try and get them looking as accurate as possible. Take your time with this.
 STEP 18:
 Form a small, thick pancake of clay and place it just under the nose. This will form the top lip and the area between the top lip and the nose.
 STEP 19:
 Use a spoon tool to blend the clay under the nose and into the cheeks. You want to have a slightly indented line going from the nostril down to the corner of the top lip. Don't make it too deep however, as the baby should still have a chubby sort of appearance.
Gently wipe the spoon tool along where the top lip should be. This will create a defined surface so there is a visible difference between the top lip and the rest of the flesh under the nose.
 STEP 20:
 Using a spoon tool, carefully press a small indentation just above the center of the top lip (the Philtral Dimple). Next, use the tool to define the top lip, creating a "cupid's bow" (and Tubercle).
Now, roll a small sausage of clay and tuck slightly under the top lip. This will be the bottom lip. The top lip should stick out further
 STEP 21:
 Blend in the bottom lip with the spoon tool. Leave between the lips intact- don't blend the bottom lip into the top lip.
 STEP 22:
 Roll up a piece of polymer clay and place it just under the bottom lip and across the bottom of the face. This will form the bottom jaw.
 STEP 23:
 Blend the clay into the face being careful not to distort the lips. Use the spoon tool to blend in tight spots, otherwise try to use the pad of your finger. I find that my fingers tend to blend the clay a lot smoother than tools ever can. Just be sure that you don't press into the clay or you will make the surface bumpy.
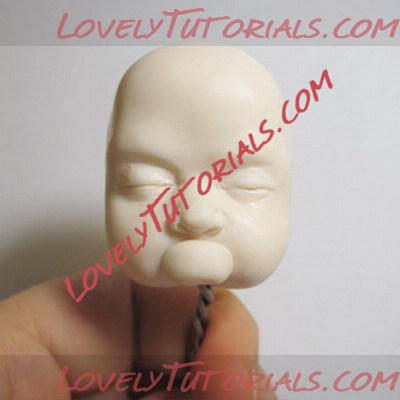
 STEP 24:
 Now we define the chin. Add tiny amounts of clay under the left and ride side of the bottom lip and blend into the chin. These form the muscles that help give the mouth expression. It ties the bottom lip into the rest of the face. Make sure there is a little divot under the center of the bottom lip. This will define the chin. I have also pointed the jawline slightly, just under the chin. Be sure to smooth as you go or else you may be leaving fingerprints.
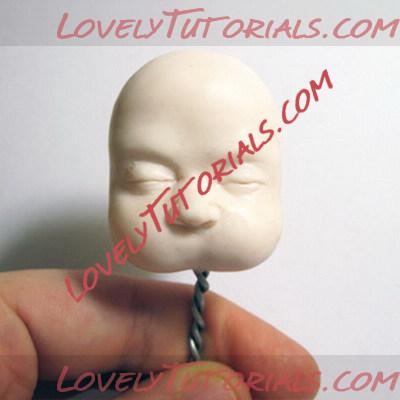
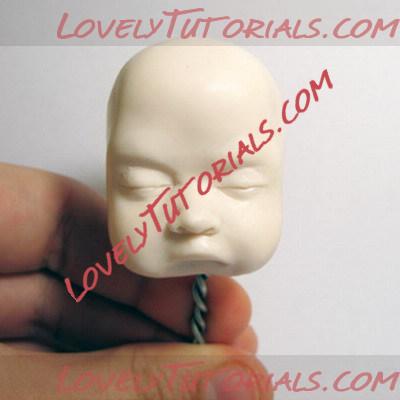
 STEP 25:
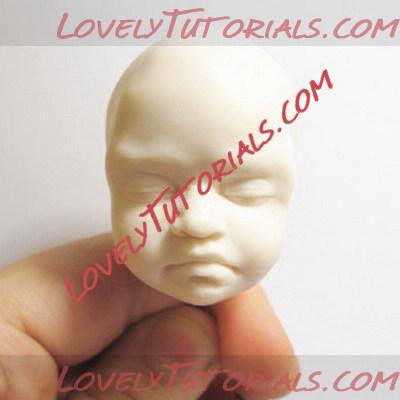
 Use this time to refer to your photo reference and make some tweaks to try and get it more accurate. As you can see here I have slightly changed the brow of the baby; changing it's expression. I did this by carefully smoothing my thumb over the brow until I had slightly shifted the clay to the place I wanted it. I have also pushed up the jawline a little, making the cheeks appear to be lower.
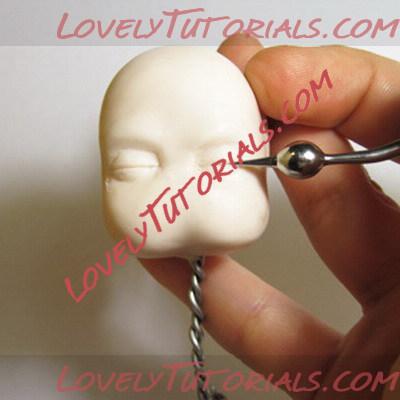
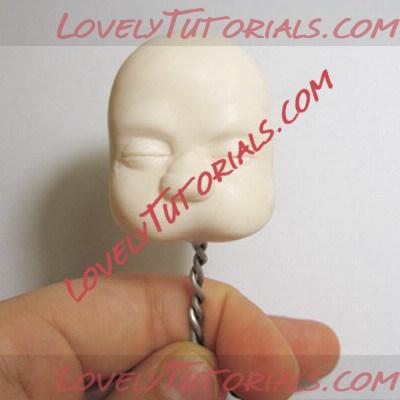
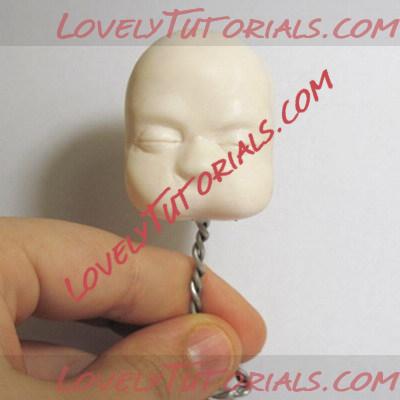
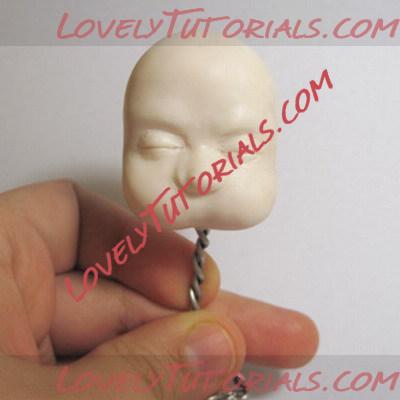
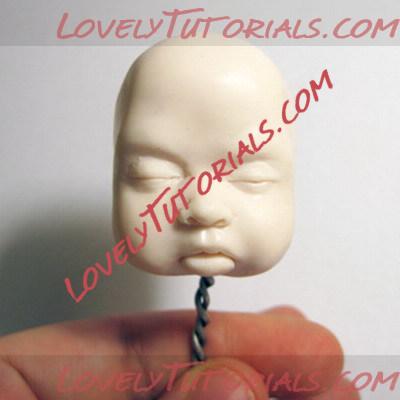
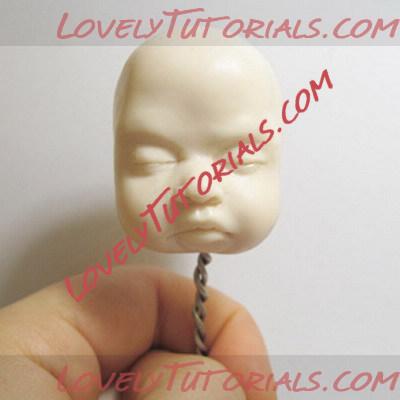
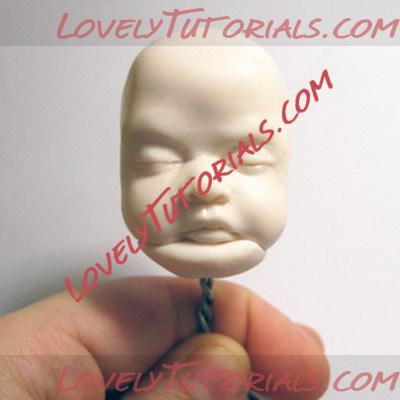
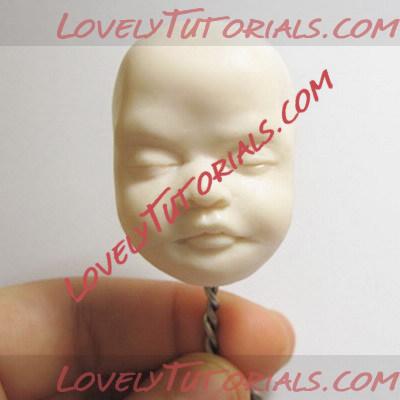
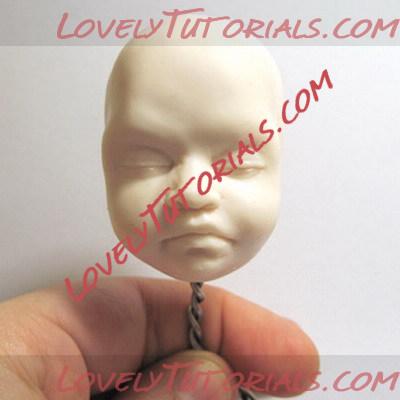
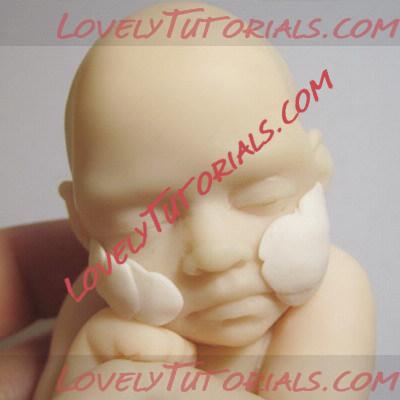
STEP 26: Finish off the head by adding the ears. Roll 2 pancakes of clay and blend them into the side of the head. How detailed you make the ears at this point is up to you. If you want fairy ears you can make a little point at the top of each one. Make sure the top of the ear is in line with the eyes. This is slightly lower than it is on an adult. Blend the ears in as smooth as you can being sure to blend the back of the ear into the head also. Define the cavities of the ear with a pick tool. Smooth the inner ear with a small ball tool.
 STEP 27:
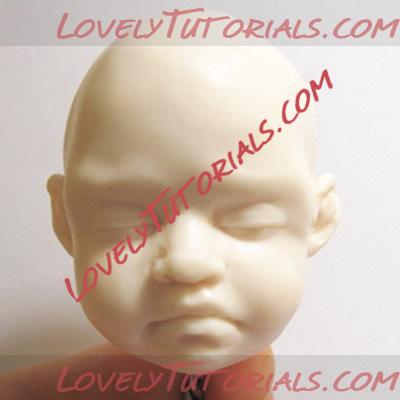
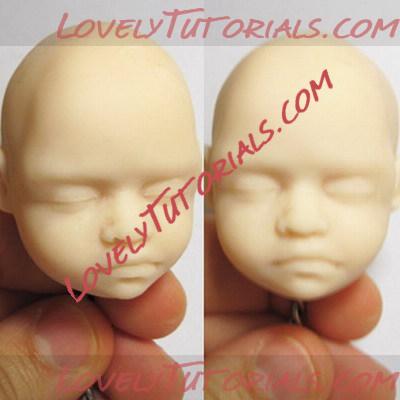
 STEP 28:
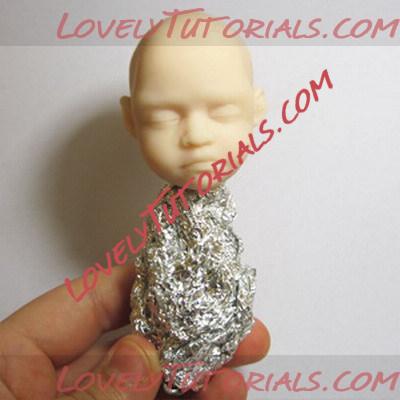
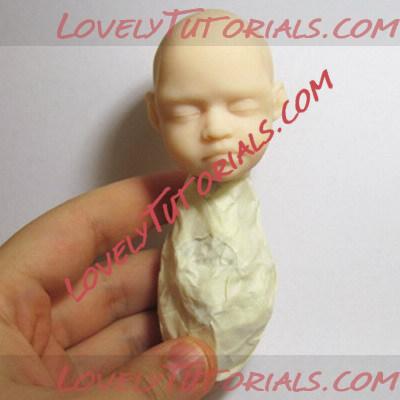
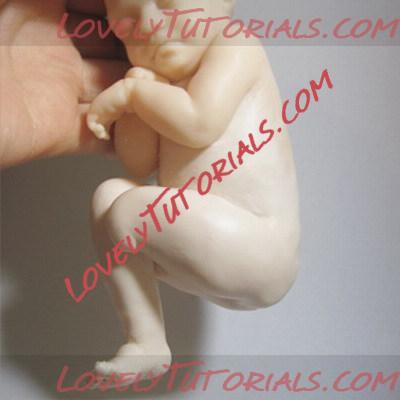
 Now you can focus on the body of the polymer clay baby. At 1 year old, the baby's body will be ONE and THREE-QUARTERS head lengths. So measure the length of the baby's head with some calipers from the chin to the top of the forehead. Then measure the armature wire from the base of the chin, down 1 and 3/4ths. Where the measurement ends will be where the baby's bottom should be. Double up or cut off any excess wire and then tightly wrap the body with aluminum foil paper. This will bulk up the body so the clay isn't too thick in these parts. Try not to make it too thick though as it's difficult to cut back once you have started adding clay.
 STEP 29:
 Cover the foil completely with masking tape. Make sure you don't have any pieces of masking tape sticking up; you don't want any adhesive pressing against the clay or the oils from the clay could unravel the tape or it could damage your clay.
 STEP 30:
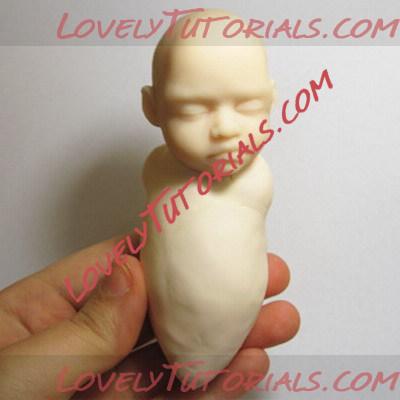
 Cover the masking tape completely with a layer of clay at least 3mm thick. You shouldn't be able to see the tape at any point through the clay. Start bulking up the body. Be sure that you press the clay firmly onto the armature and blend the clay seamlessly. If you trap air pockets at this point then it can crack or blemish the clay during baking. This is very important.
 STEP 31:
 We will start on the baby's right arm. Roll a cylinder of clay and attach and blend the clay at the shoulder point. The baby's arm should be fairly short and stumpy. If it were to reach above it's head, the elbows should be approximately at the brow-line, and the baby's wrist should reach the top of the head. This is much shorter than an adult's arm- where the elbow reaches the top of the head.
 STEP 32:
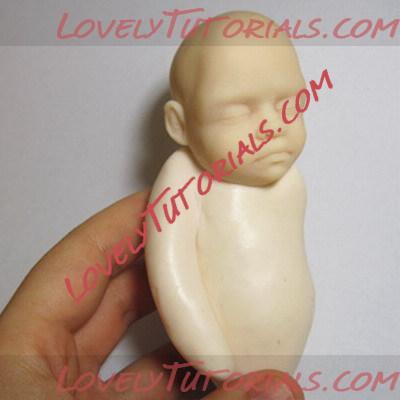
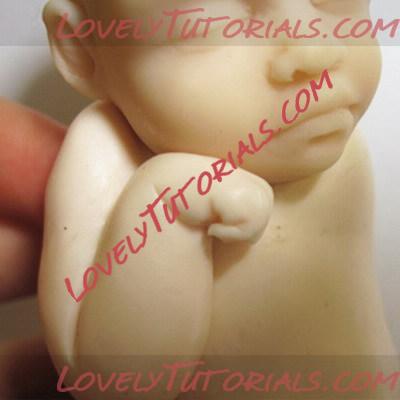
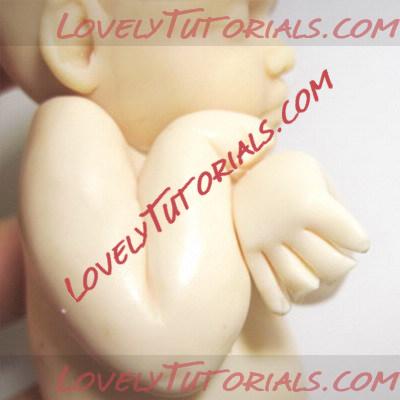
 Bend the arm up at the elbow (halfway down the arm- excluding the hand) and bend where the wrist would be to form a little hand. Pinch and smooth the elbow so that it appears more realistic. Be sure not to make it too pointy as baby's have very rounded features. Push the back of the hand up against the face, so the baby appears to be leaning on its fist.
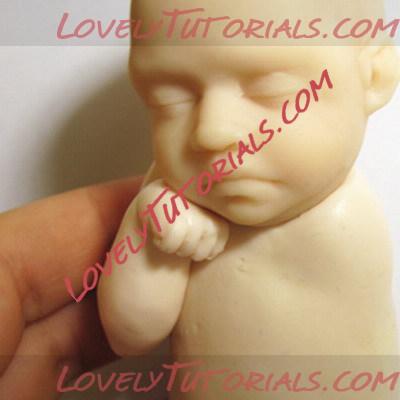 STEP 33:
 Using the pick tool, carefully press in lines across the end of the baby's fist. This will form little fingers. Follow the lines down under the fist as the baby's fingers are clenched into its' palm. Use the spoon tool to define the little bumps of its' knuckles. Keep it very subtle though, a baby's hands are chubby.
 STEP 34:
 Again, using the pick tool, define the creases around the baby's little finger. Also define the crease where the palm folds into the wrist.
 STEP 35:
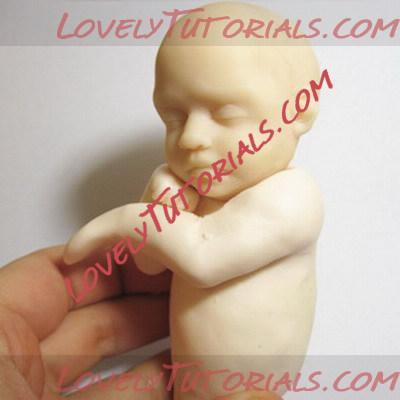
 Repeat the process with the other arm, creating a cylinder, blending it at the shoulder and bending it at the elbow and the wrist. If any clay gets too bulky to bend at the elbow, simply cut some of the polymer clay away with a hobby knife.
 STEP 36:
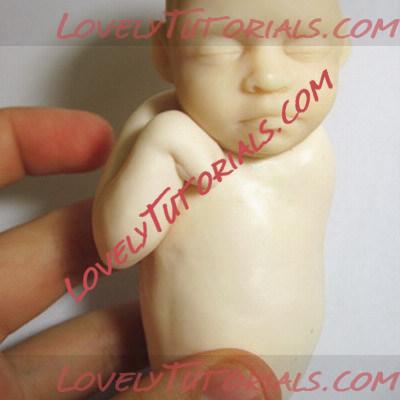
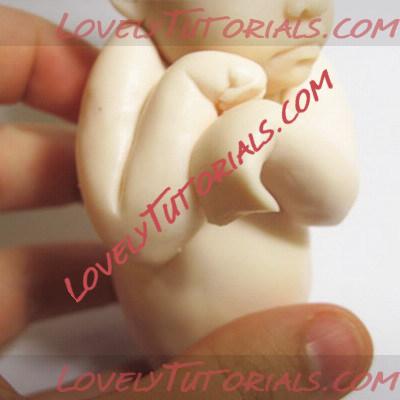
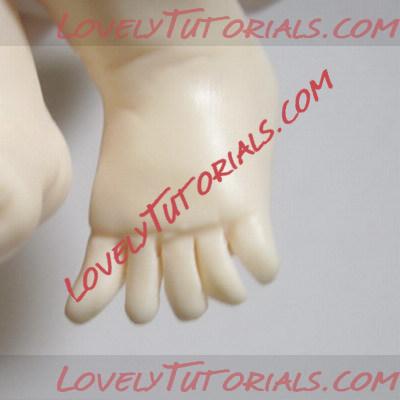
 We will start working on the left hand of the polymer clay baby. Pinch the end of the hand to make a flat paddle. This area is where the 4 fingers will be so you want it to be thinner than the palm. Trim off any excess with a hobby knife or the sharp end of the spoon tool. Bend the "fingers" downwards slightly, to create a definition where the knuckles will be.
 STEP 37:
 Using a hobby knife or the sharp end of your spoon tool, cut the polymer clay neatly into four separate fingers. Note that I have the arm butting up against the other arm. Babies often like to wrap themselves up when they are sleeping. We call this the fetal position.
 STEP 38:
 Carefully stretch and smooth each finger until they are longer and thinner. Trim off the excess length. Try to still keep the "chubby" look, but you don't want the fingers to be rectangular from the cuts you made before. Use the pick tool to define the creases in the fingers and the tiny little fingernails. You achieve this by gently pressing the side of the pick tool into the polymer clay. Curl the fingers around so that the hand looks relaxed and limp.
 STEP 39:
 Roll a piece of polymer clay and smooth one end of it onto the hip. This will form the upper leg/thigh. Make sure you add it to the side. Don't add the clay to the bottom of the body that you created, or else it will be too long.
 STEP 40:
 Smooth the clay and define the little crease where the leg joins to the hip with a pick tool. Also define a smooth, shallow dimple where the legs joins to the bottom.
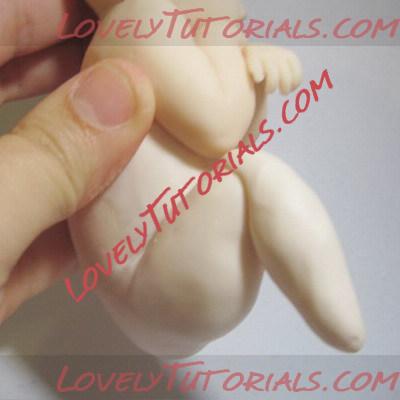 STEP 41:
 Roll a long piece of polymer clay and attach it to where the knee will be. This will form the lower leg of the baby. Try to keep it tucked close to the thigh. This will help with strength. If you extend the leg out straight, then you will need to support it with a wire armature. Try to keep the leg smooth as you work as it's going to be more difficult to smooth later on.
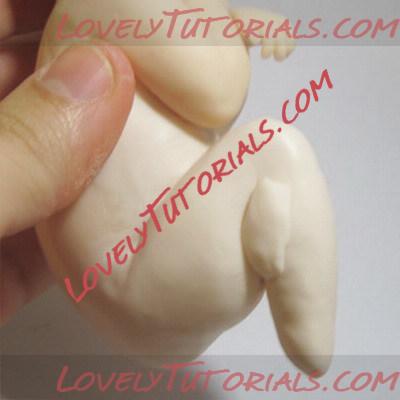 STEP 42:
 Apply a small piece of clay to where the calf muscle presses against the thigh. Blend the polymer clay into the leg smoothly.
 STEP 43:
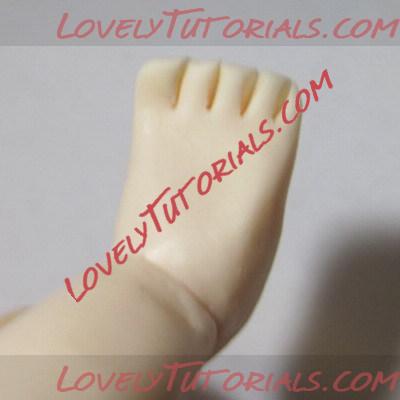
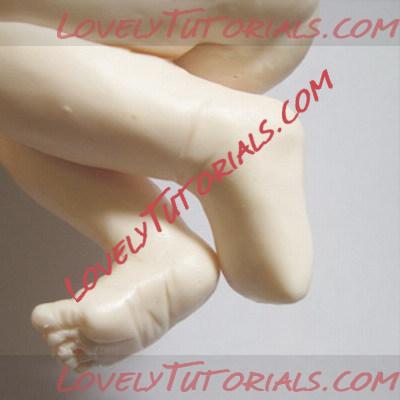
 Now we can add the foot. Blend a piece of clay into the end of the leg. To gauge the size that the foot should be, use the measurement from the chin to the eyebrows of the baby's face. Add a small piece of clay to the top of the foot to create a bit of bulk (where the fat, bone and tendons at the top of the foot connect to the front of the leg).
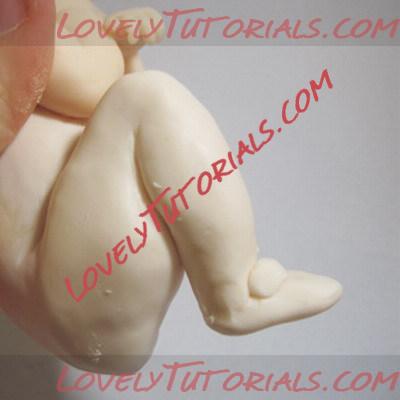
 STEP 44:
 Gently pinch the end of the foot. This area will be where the toes will be. Make sure that everything is smoothed out as you go. If there is any debris stuck in the clay as you sculpt, be sure you remove it. We will start to sculpt detail into the foot and it will become more difficult to remove dirty clay.
 STEP 45:
 Using a hobby knife/ scalpel, cut five toes into the end of the foot. Make sure that the "big toe" is on the inside of the foot.
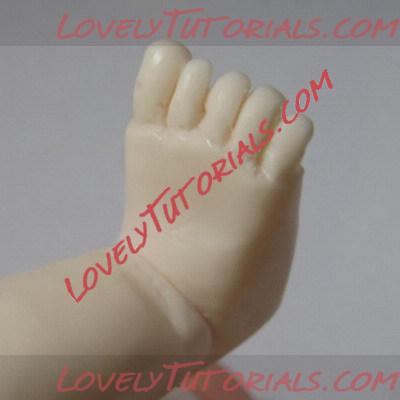 STEP 46:
 Press a pick tool between each of the toes to round off the edges and prevent the toes from splitting. You want each toe to appear rounded.
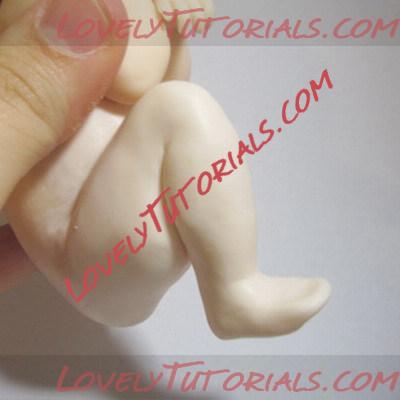
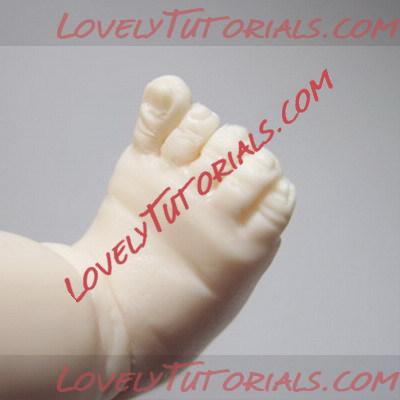 STEP 47:
 Use the pick tool to gently sculpt all the little toe nails and creases around the baby's foot. When using the tool, don't carve the point of the tool along the clay. This will simply dig up the clay and leave it looking more like scratches rather than creases. You want it to be more rounded in appearance; so lay the tool slightly on it's side, so you are pressing the length of the pick along clay. Rocking the tool along the clay will gently push the creases into the foot.
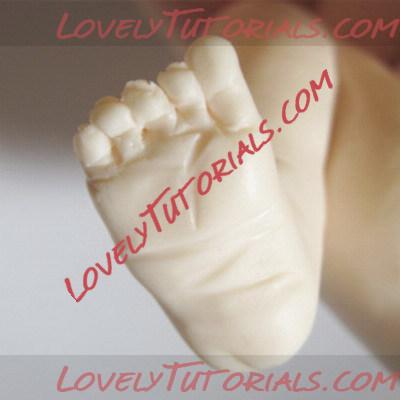 STEP 48:
 Do the same with the bottom of the foot, defining all the creases in the bottom of the toes and around the ball and heel of the foot. Look at a photo of a baby's foot as a reference to where the creases should go.
 STEP 49:
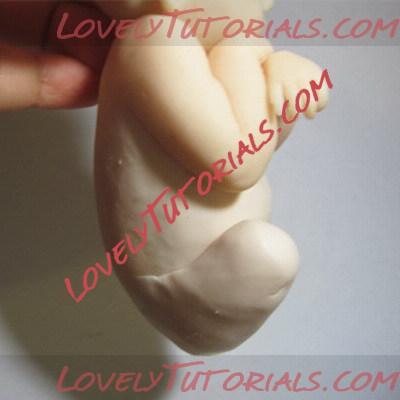
 Repeat the process for the other leg. Roll a piece of polymer clay to form the thigh of the baby. Smooth and blend this onto the bottom of the baby. Tuck it upwards towards the belly to emulate the baby sleeping in a ball.
 STEP 50:
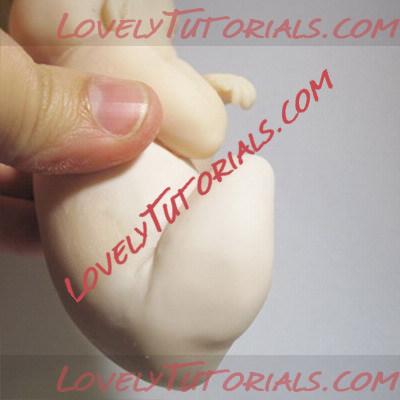
 Create the lower half of the leg and the foot by rolling some more polymer clay and attaching it at the knee you just sculpted. Keep smoothing the clay as you go and remember that the calf should be thicker than the ankle. Bend the foot up and start to create some creases.
 STEP 51:
 Cut in the toes and follow the steps from before to sculpt the other baby foot. Try to keep the features smooth by gently running your thumb over the surface of the clay.
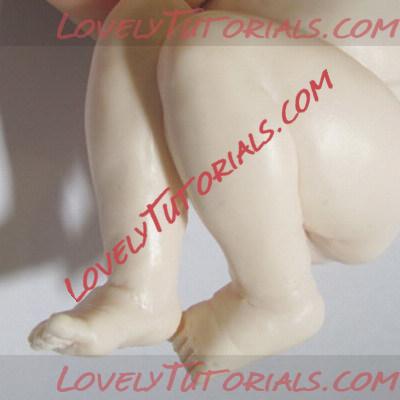 STEP 52:
 Smooth the foot into the ankle and leg of the baby. Carefully position the legs together so that the baby looks like it’s laying there asleep. Go over the legs and the feet again to make sure everything is smooth and there are no air pockets in the clay.
 STEP 53:
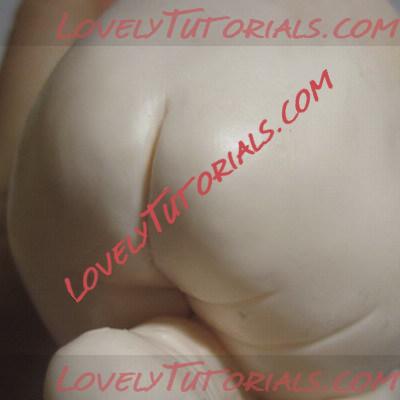
 Using a Pick tool, carefully press a crease where his bottom should be. Be sure not to create the crease too high, refer to your reference photo; babies have very small bottoms. Make sure that when you are creating the crease that you are not carving the clay with the point of the tool. Lean the tool slightly to the side and press the tool into the clay, rather than carving a line. Do this also for the fat folds around the thighs.
 STEP 54:
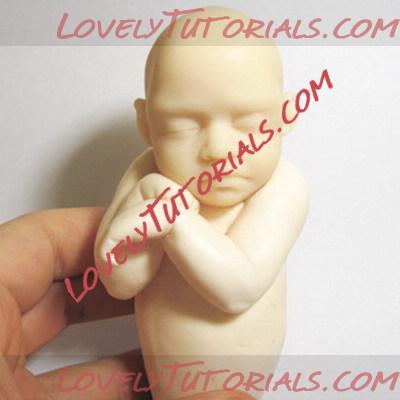
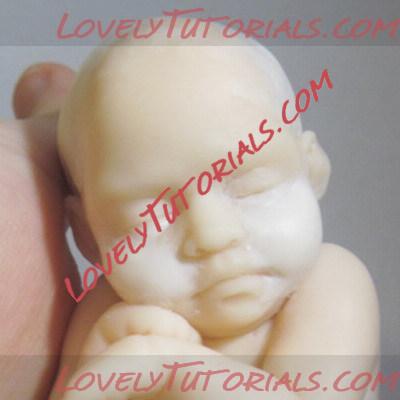
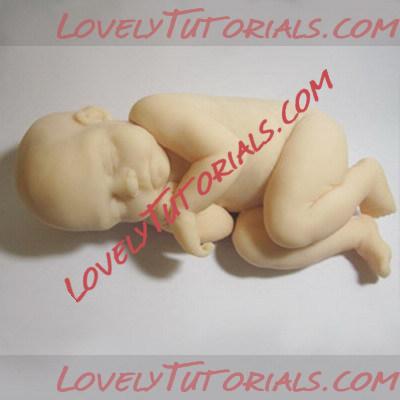
 Now you have everything sculpted in the polymer clay you have to look over the entire doll and refer to your reference photo. Are there any changes that need to be made before you bake again? Is everything in proportion? Have you done the best that you can do with this doll? Don’t be scared to get a knife into the doll right now and cut away anything that doesn’t look right. It’s better to fix any problems you can notice now, rather than having it glaring at you once you’ve finished. Referring to my reference photo I can see that there are still some changes that need to be made to the face. My baby’s face is a lot slimmer than my reference. The head is also a bit too small.
 STEP 55:
 Here I am simply applying more polymer clay to the areas that need fattening up. If the clay doesn’t stick to the raw clay very well, apply a small amount of Liquid Fimo or Translucent Liquid Sculpey to the baked clay. It will act as a polymer clay glue.
 STEP 56:
 Blend the raw clay into the baked clay (by smoothing your tools or fingers over the surface with a tiny amount of water). Take the time to refine the face so it looks as close as possible to the photo reference you are using (or to how you want it to look).
 STEP 57:
 Bake the baby in the oven a final time, keeping in mind the thickness of the unbaked clay. Once the clay has cooled completely, you're all ready to start painting the sculpture. If you want the baby to be very fair or feminine, use less Burnt Umber paint. Babies have very delicate skin so try not to use too much of the dark colours.
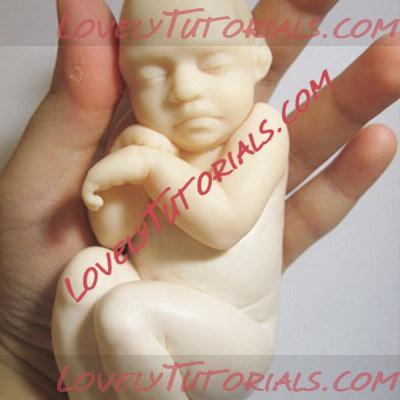
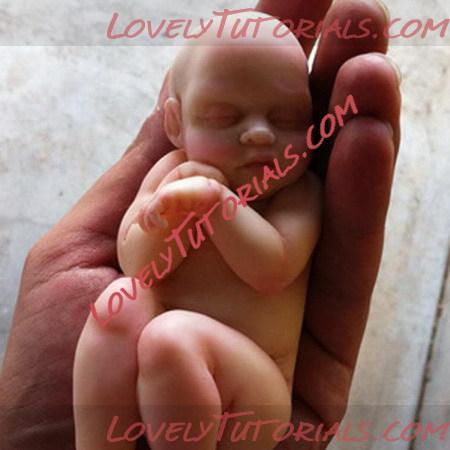 STEP 58:
 Here he is all blushed with paints. He is laying in the palm of my brothers hand for an idea of the scale. Now we can move on to adding the hair, eyebrows and eyelashes.