МК взят с сайта madewithloveby.me
Огромная благодарность Автору за МК
Stencils are a brilliant way of creating beautiful designs on cookies, cupcakes, or layer cakes.
Here is my step by step guide to using one of the fabulous, time saving tools.
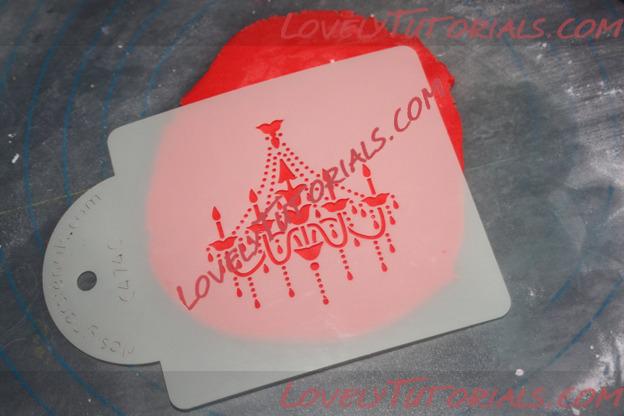
1. Roll out your sugarpaste, making sure you roll it out to the correct thickness for the end design. Roll the sugar paste out onto a clean, flat surface making sure you use either icing sugar or trex underneath so that you can manoeuver the sugar paste after you’ve finished stencilling.
2. Make your royal icing. Dont forget to add the colour to the icing if you want to stencil in colour!
Consistency wise i find toothpaste consistency works best. Any thinner and it will run under the stencil, much thicker and you cant spread it.
3. Once you have your paste rolled out lay your stencil over the top.
 4.
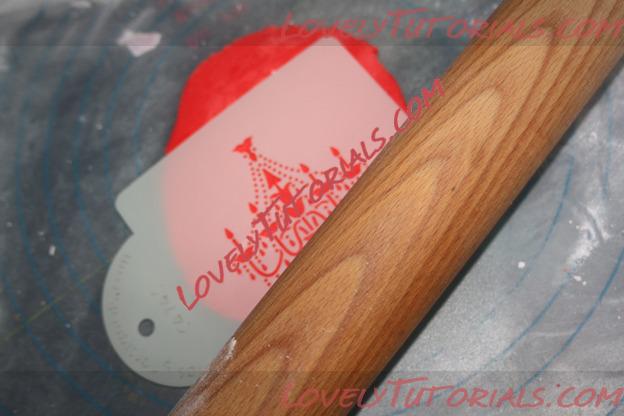
4. If you are confident enough you can just hold down the stencil with your finger and thumb, but if you prefer that extra security you can also dollop a little royal icing on the edge of the stencil to secure it onto the sugarpaste whilst you work.
5. Once you have the stencil secured roll the rolling pin over the top to slightly emboss the pattern through the stencil.
 6.
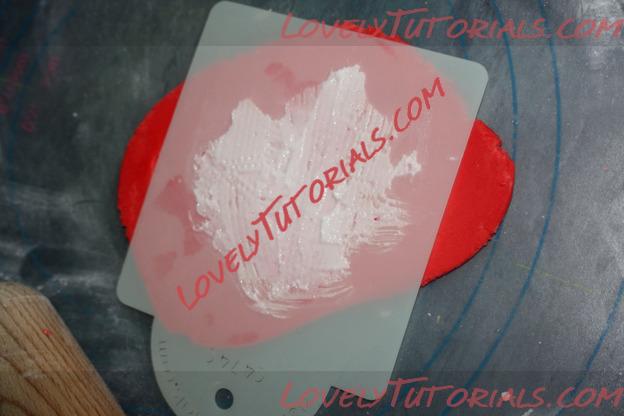
6. Begin spreading the royal icing carefully over the top of the stencil. Do this with either the broad side of a knife or preferably a pallet knife. Keep the strokes in one direction and just skim across the top until the whole stencil is covered in a thin layer of icing.
 7.
7. Make sure all of the stencil is well covered, but dont allow the icing to get too thick.
 8.
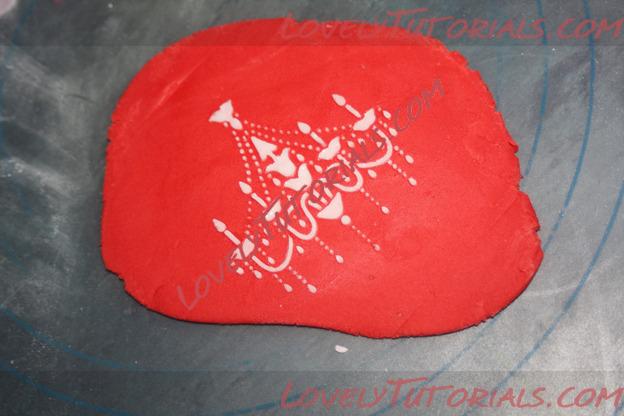
8. Leave the stencil on the sugar paste for a minute to give the icing time to begin setting.
9. Gently
peel back the plastic stencil, starting with one edge and bending it back on itself to reveal the stencilled pattern underneath. If your royal icing is the correct consistency it will leave a beautiful pattern behind.
Finally, once you have revealed your gorgeous pattern from underneath the stencil you can use your regular cutters to cut/shape the sugar paste and place it onto your cookies or cupcakes as normal.
Tip* Make sure you lift and place your sugar paste before the icing completely dries, as you risk it cracking if you wait to long before trying to move it.
Once you’ve mastered this you will find it has so many applications you’ll not know what you did without it!!
Tip* If you are decorating the top of a cake you can stencil directly onto the already iced cake, but i would advise you practice first, as its hard to ‘un-do’ a stencil once you’ve done it!
From stencilling cookies to decorating the top of wedding cakes to printing beautiful patterns on the top of cupcakes.