Огромная благодарность
Angie Scarr за Мастер-класс

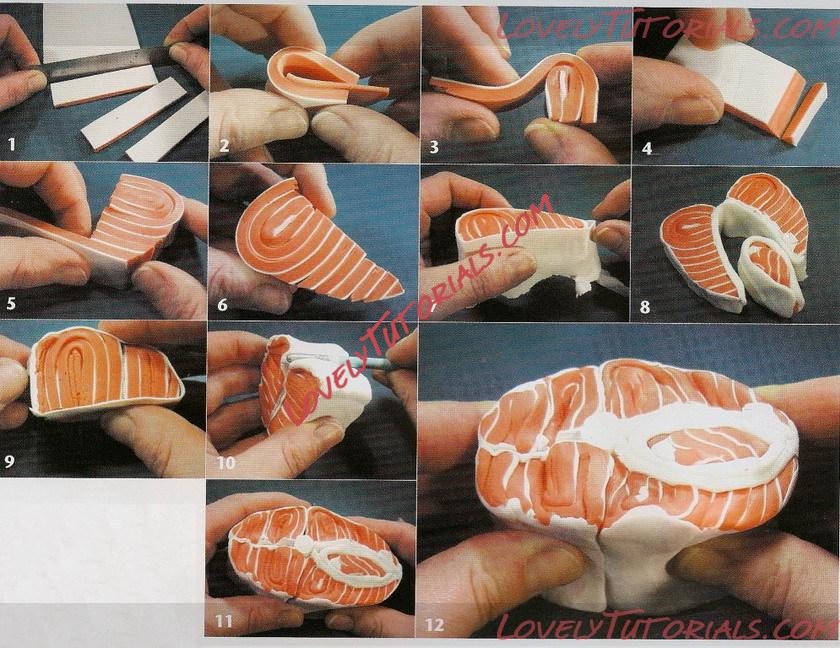
1 Roll out a fairly large, even sheet of salmon clay about 5mm thick and a thinner layer of white, 1 mm thick, lo lay on top. A pasta maker is ideal for this job, but if you do not have one, use a large glass bottle instead. If you do have a pasta maker, roll the salmon clay on the thickest possible setting, the white on the next to thinnest. Pat the two together and roll again on a thick setting. However, make sure your tlay has been through the pasta maker a few times and is really warm, soft and well-conditioned before you add the layers together, otherwise the edges can crumble a bit.
Cut the clay into strips about 2-2.5cm deep and as long as you can.
2 Use a spare bit to roll thinner still and make a straight centre piece. Wrap a U-shaped strip of your prepared clay around this, pink on the inside and white on the outside.
3 Add two more sheets. (Please note that the photograph shows only one.)
4 Cut the nest sheet to a slight angle and add to the side of the U shape you have now created.
5 Keep adding sheets like
this in gradually decreasing sizes until complete.
6 Take a look at your sheets to ensure that they follow the pattern shown in the photograph.
7 Wrap this shape with a very thin sheet of white mix. This now completes one half
of the salmon steak. Repeat steps 1-7, above, to make the opposite side.
8 Make a thick strip of white clay and join the pair of sections. Wrap a teardrop-shaped cane of leftover material around them, again covered in a thick strip of while. This shape serves only to support the resi of the cane while you are lengthening ii and most of it will he removed later, so don't worry about how it looks. I make it with the leftovers so that if any scraps remain later, there will be no disparity of colour with the rest of the fish.
9 Make two more sections for the top using two less sheets on one side of the U shape and adding one or two
to the other side. Again, wrap these sections.
10 Add the two top quarters together and, using a paintbrush handle, make a space for the bone to go in.
11 For the bone, make a little cane of translucent with the foundation colour mix 1 surrounding it. Add the two halves together with this little bone in the middle.
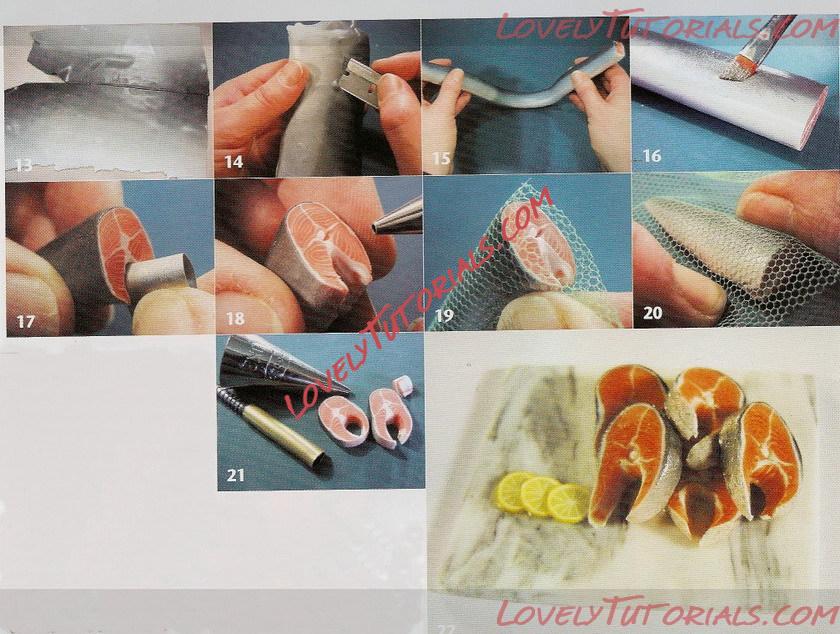
12 Gently, but firmly, begin to squeeze this cane in the middle. You should lake plenty of lime about this to avoid dislorling all your hard work. The edges may bulge and look a little peculiar but you should be used to this by now. When you have formed the cane to about 10cm (4in) long you can rest; perhaps have a cup of tea or go for a walk!
13 Make up a sheet in hues of black through to white using the Skinner shading technique. Cut the resultant sheet in two and join together black edge to black.
14 Wrap the cane first with a layer of white clay mix, and then with the shaded layer. Don't forget to pierce any air bubbles with a sharp blade.
15 Lengthen this cane by continuing to stretch and squeeze it firmly. You may find it useful when working with your cane to bang it fairly hard all the way round on the work surface. This helps to join the particles in the clay and improves its stretchability. You need your cane to stretch to about 1.5cm across. You will have to cut the cane Into several pieces for the sake of manageability.
16 Using a soft-bristled brush, coat your cane in the Fimo metallic silver powder for added realism.
17 Cut about 2.5cm (lin) from the cane and gently squeeze from the middle to
one end to make it narrower, thus creating the shape of a fish body. Carefully cut out a straight strip of tin from a drinks can and bend it into a teaidrop-shaped loop. Use this to carve and form the chest cavity from the good side, about 1cm back. If you wish, use youi dental tool to mark rib bones on ths inside.
18 Mark the bone In the centre with an icing nozzle used in cake decoration.
19 and 20 Add a fish scale
texture to the surface by pulling a piece of netting tightly over the surface.
21 To make salmon steaks,
cut out the centre with the strip of metal from the drinks can or with a tiny teardrop-shaped cutter.
For smoked and poached salmon
You may wish to make other kinds of cooked or cured salmon instead of the steaks. For smoked salmon, cut thin slices from the stripy cane and display them on a serving dish.
For poached salmon, make up the clays from the same salmon mix, but add more white clay for a paler look.