Огромная благодарность
Angie Scarr за Мастер-класс
I cannot emphasize strongly enough the importance of keeping your hands clean when working these projects, especially when making the whiskers for the prawns. Just a tiny speck of dust can lead to nasty grey results which are bound to make you feel like a five-year old, pastry baking with mother!


Method
1 Mix together some salmon pink clay colour mix and, separately, some flesh pink. Stack together the salmon pink and flesh pink day in thin, neal layers of equal thickne.ss.
2 Cul in half and stack together once more.
3 Squeeze, cut and stack twice more.
4 Add an extra layer of flesh pink clay to the top. Squeeze down to approximately 1cm deep.
5 Cut a thin slice cross the stripes of pink approximately l-2mm (Man) thick. From this slice cut several tiny strips.
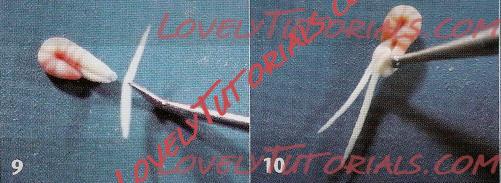
6 Roll off the sharp edges. Try to make the tail end a little narrower than the head end. The head end will be the one with the thicker stripe of pale pink.
7 Curl the prawn over so that the tail end tucks under and just behind the head end.
8 Using a dental tool or cocktail stick, make an indentation in the bottom of the head section lo simulate the mouth parts.
9 Roll a very fine whisker of
pale pink. Pick it up with your denial tool (or the licked end of a piece of dry spaghetti). Press lightly into the indentation, bending it in half as you do so.
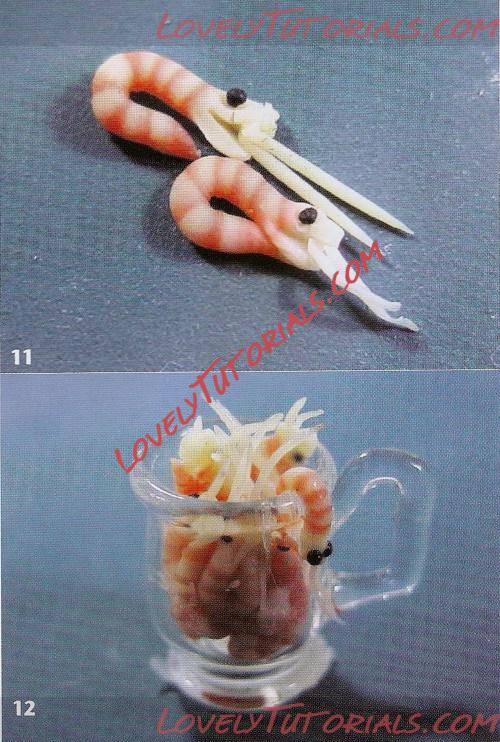
10 Using a tiny ball-ended tool, make a little eye socket.
11 Add tiny eyes lo these holes. While a bit fiddly, this is what gives the little prawns their realism, so it is worth the extra effort.
12 Before displaying them in a traditional pint glass, first harden them in the oven. Press a few good examples against the side of a little ball of Mix Quick and position into the mug. Judiciously slot a few more around the top and, if you like, hang one over the rim. Return to the oven to harden.