Огромная благодарность Angie Scarr за Мастер-класс
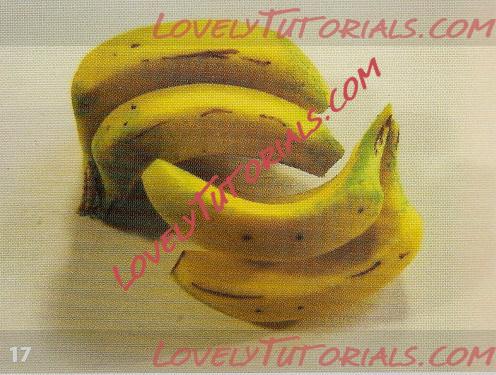
One problem with miniature bananas is the shape. Almost all examples I've seen have a round profile, whereas real bananas have more pronounced sides and edges. The solution is very simple. To make an off-square profile, rather than a perfect cylindrical shape, work your thumbs and forefingers together to form what I call a square prism.
Method
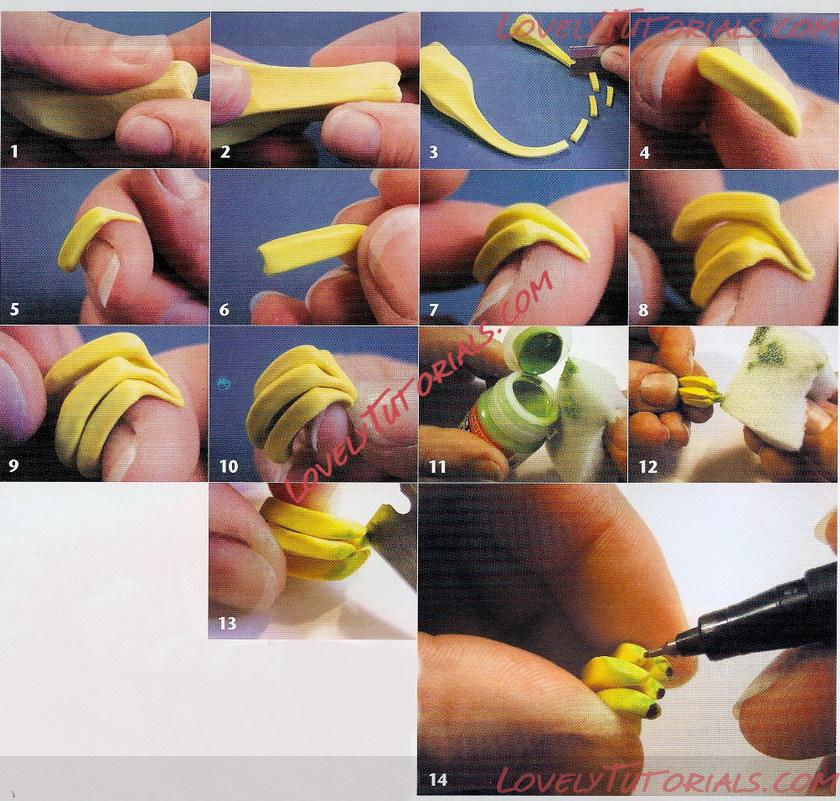
1 First, using your thumbs and forefingers, make your square prism with the yellow
mix clay.
2 Stretch this shape gently by a combination of smoothing and pulling until you get a long, thin strip the desired width of your banana (depending on whether you'd like them long and thin, or short, fat and chunky).
3 Cut the shape to sections approximately 1.5cm in length.
4 Gently nip upwards both ends. Make the top end a little longer and slightly sideways and finish with a twist.
5 Curve the banana over your finger, making sure that one of the ridges is facing upwards for definition.
6 Depending on the size of your bunch, repeat this processs three to five times.
7 Keeping the ridges upwards, place them side by side and join them together at the top and front. Position two side by side for a bunch of three bananas, or three for a bunch of five.
8 and 9 Position the top layer so that it sits comfortably within the ridges of the bottom bananas.
10 Nip off the top ends to
form the top of the bunch of bananas, then set to harden in the oven.
11 and 12 Using a small amount of light green acrylic paint on a sponge, lightly green the tops and bottoms of the bananas. Work very quickly, wiping it away so you leave only a hint of colour on the surface of the banana.
13 Using a sharp blade, cut
off the very tip of each banana, to leave very small flat ends. Keep your fingers well clear of the blade. Always cut downwards towards your work surface, and use a piece of Blu-Tack to anchor your work if you think the fruit might slip.
14 Using a fine-tipped brown permanent pen, and working from life, judiciously colour in the banana ends.
15 Similarly, colour in the end of the banana stalk brown.
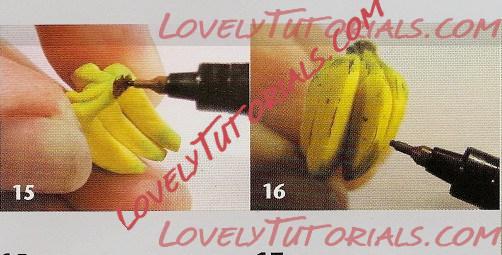
16 Draw fine lines along the ridges. Be light-handed, making broken lines and dots here and there. The finer, the better - unless you want overripe bananas, of course!
17 If you want to make a hole in the top of your bunch of bananas, use either a
cocktail stick before hardening in the oven, or if already hardened, a minidrill. Take a paperclip and re-form to make a hook to hang them up on a market stall.