Огромная благодарность
Angie Scarr за Мастер-класс


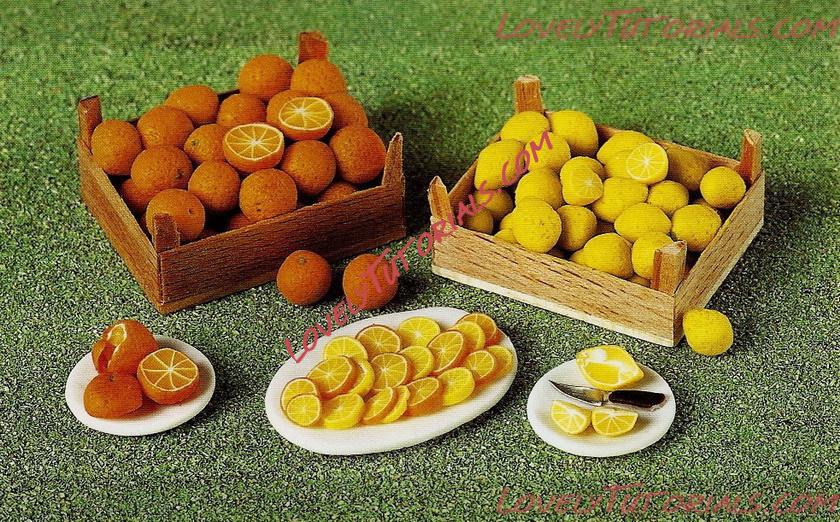
Continuing the theme of 'peelable' fruit, the oranges project demonstrates how to insert a series of clay strips wrapped in a skin to produce fruit that you can peel, slice and cut in half, all with surprising authenticity.The translucency of the colour produces a striking, almost super-real result.
Method
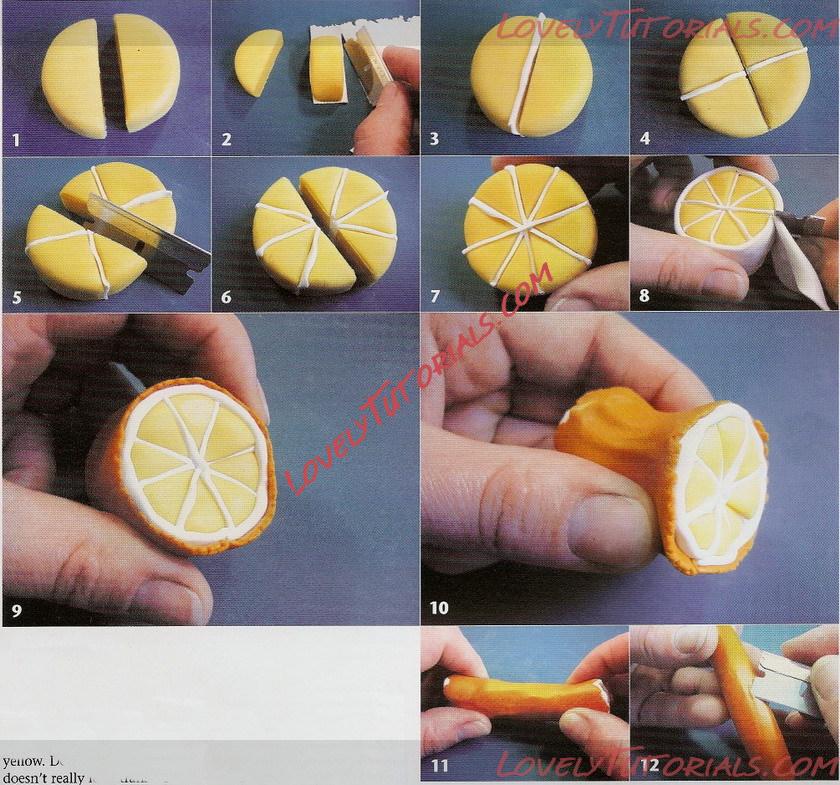
1 Mix some translucent clay with a very small amount of orange and the same of yellow. Don't worry that this doesn't really look translucent, it becomes more so as it sets in the oven. Form a squat cylinder of the translucent/ orange mix approximately 2cm thick. Cut the cylinder in half down the centre. Make sure that you make your cut at 90', straight down onto the board.
2 Roll out the cream into a wafer-thin strip.
3 Sandwich a little of the cream clay strip between the two halves.
4 Now cut the cylinder
again in the other direction (at 90' to the other cut) and repeat the process of sandwiching the cream-coloured clay. It is important that you make these strips very thin indeed.
5—7 Repeat the process,
adding in the diagonal strips, making sure each cut crosses over the very centre of the clay cylinder.
8 Roll out a slightly thicker cream mix strip and wrap it around the entire cylinder. This forms the orange 'pith'. Make sure this pith meets tidily and does not overlap.
9 Repeat this with a piece of orange clay. (If using Fimo, mix with a little ochre as Fimo orange is just a bit too strong.)
10 Begin the process of
extending the cylinder by squeezing the middle all the way round into a sort of capstan shape. This ensures the segments adhere properly without slippage and ensures that you have better definition in your finished cylinder.
11 Working outwards, lengthen the cylinder by a combination of squeezing and rolling, but do not roll it on the work surface too soon.
12 If you find any air bubbles under the surface, pierce them with a blade to release the air and then smooth the skin again.
13 Now roll the clay cylinder on your work surface. Cut the length into shorter pieces if it gets too long and awkward to handle.
14 When your cylinder has reached a diameter of approximately 1cm, stop rolling. If you've followed the instructions, and you're lucky, somewhere along this cylinder of clay is the perfectly cut little orange.
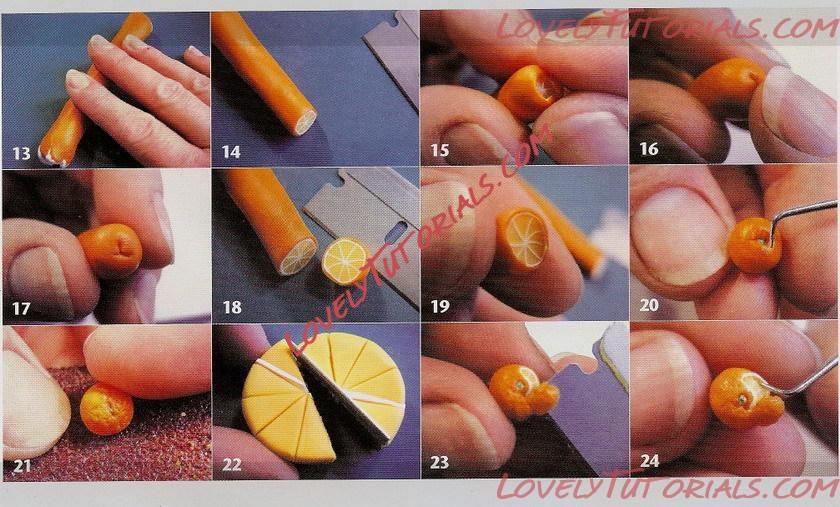
15-17 Starting with a straight edge, enclose one end of your cylinder by rolling between the thumb and forefinger of your left hand (or, if you are left-handed, with the right) and gently tweaking at the edge withyour right thumb and forefinger to 'persuade' the clay to join. Pat the end back gently from time to time. Don't force this process; taking your time produces better results. Leave the ends visible. Do not smooth them since we need to see where the ends are and it looks more realistic.
18 Cut off the end as if you
were making half an orange that looks just a little too big for scale.
19 Enclose the other end in just the same way.
20 Add a very small blob of light green into one of the ends. Perfect this using your cocktail stick or dental tool.
21 Roll your oranges and half oranges on a piece of very coarse sandpaper to form the dimpled skin. To finish, cut them in half to display on a large pile of oranges or in a fruit and vegetable box on your market stall or in your dolls' house shop.
22 Very experienced
modellers might like to add more 'segments' by reducing the angle you use, instead of following step 4. Mark all these segments before you start cutting to make sure you have them in the right place. If you have any imperfect bits - parts of your cylinder where the segments don't join perfectly at the centre - you can use them to form whole oranges by enclosing both ends as you did with the apples. After all, who will know if your orange is all wrong in the middle! Alternatively, you can make simple solid oranges.
23 Because you have put a skin on your oranges, you can also take it off again. Take great care with this process and never try to do it with an orange that has already been hardened in the oven. Make sure you roll the orange against the blade rather than trying to cut against the orange.
24 If you have managed successfully to leave the peel attached - well done! You can then make it look hand-peeled rather than cut with a blade by gently dragging your pointed tool around the edge of the pith.