Огромная благодарность Автору globalsugarart за Мастер-класс
- 110 x 3 Inches Round Cake Pan by Fat Daddio's
- 1Buttercream Icing 3-1/2 Pounds Tub by CK Products
- 1Satin Ice White Rolled Fondant Icing -5 Pounds
- 1Americolor Soft Pink Soft Gel Paste
- 1Americolor Deep Pink Soft Gel Paste
- 1Texture Sheets Set E by Makin's
- 1Foam Core Cake Board Round White, 14 x 1/2 Inches by GSA
- 1Gumpaste 2 Pounds by Satin Fine Foods
- 1Cranberry Red Luster Dust by GSA
- 1Raspberry Twinkle Dust by GSA
- 1Snow White Twinkle Dust by GSA
- 1Gold Highlighter by GSA
- 1Waterbrush -Medium Tip
- 1Mexican Paste Mix by GSA
- 1Pasta & Gumpaste Roller- Atlas 150 by Marcato
- 19 Inches Rolling Pin by Wilton
- 1Easy-Glide Fondant Smoother by Wilton
- 1Classic Handbag Cutter by Stephen Benison
- 1Americolor Ivory Soft Gel Paste
- 1Americolor Chocolate Brown Soft Gel Paste
- 1Gold Shimmering Stars Edible Glitter by Wilton
- 1Raspberry Luster Dust by GSA
- 1Fabulous Shoe Kit by Stephen Benison
- 1PME Knife with Ribbon Insertion Tool
- 1Oyster Luster Dust by GSA
- 1Brown Luster Dust by GSA
- 1Wilton Kelly Green Icing Color
- 1Crystal Flowers Shasta Daisy Cutters by GSA
- 1Olive Sterling Pearl Dust by GSA
- 1Gum Paste Forming Cups by Wilton
- 1White Dragees-4mm
- 1Gem Petals Cutters by GSA
- 1FMM Sugarcraft Knife & Scriber Tool
- 1Americolor Teal Soft Gel Paste
- 1Americolor Royal Blue Soft Gel Paste
- 1Daisy Set by First Impressions
- 1Pastel Blue Sterling Pearl Dust by GSA
- 1Americolor Super Red Soft Gel Paste
- 1Lots of Roses Mold (NM-078) by Sunflower Sugar Art
- 1Fabulous Hats Kit by Stephen Benison
- 1FMM Sugarcraft Multi-Ribbon Cutter
- 1Makin's Stainless Steel Ultimate Extruder
- 1Fantasy Flower Set by Stephen Benison
- 1Americolor Super Black Soft Gel Paste
- 1Perfect Pearls 6, 8, 10 mm by First Impressions
Step 1
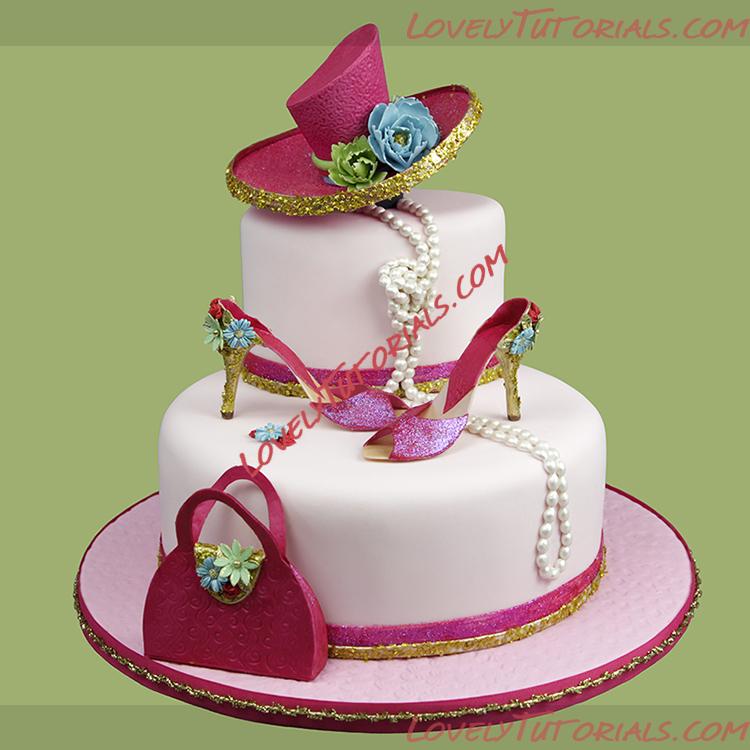
Prepare the Cake & Board Bake one cake using Fat Daddio's 10x3 Inch Round Cake Pan. Bake two cakes using 6x2 inch round cake pans. Allow to cool. Stack cakes to create a 6x4 inch round cake and then carve into an oval. Crumb coat cakes with white buttercream icing. Cover immediately with white rolled fondant tinted with Soft Pink Soft Gel Paste. Tint white rolled fondant with Deep Pink Soft Gel Paste. Roll out tinted fondant and emboss with Curly Beard impression mat from Texture Sheets - Set E - by Makin's. Cover a 14 x 1/2 Inch Round Cake Board with embossed fondant. Add ribbon border if desired.
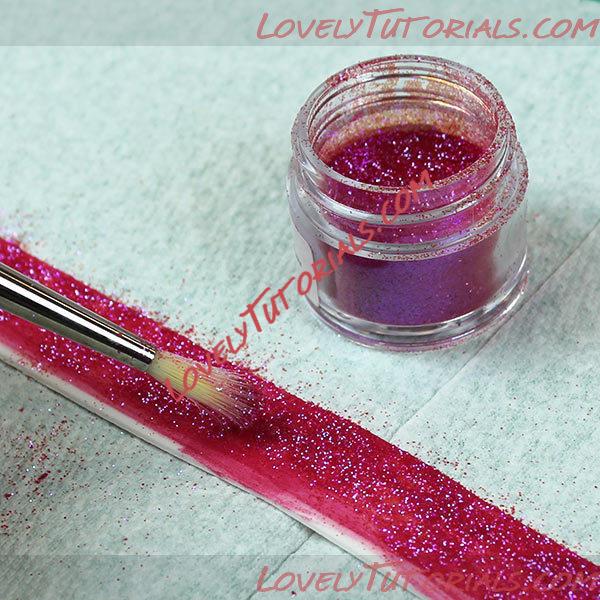
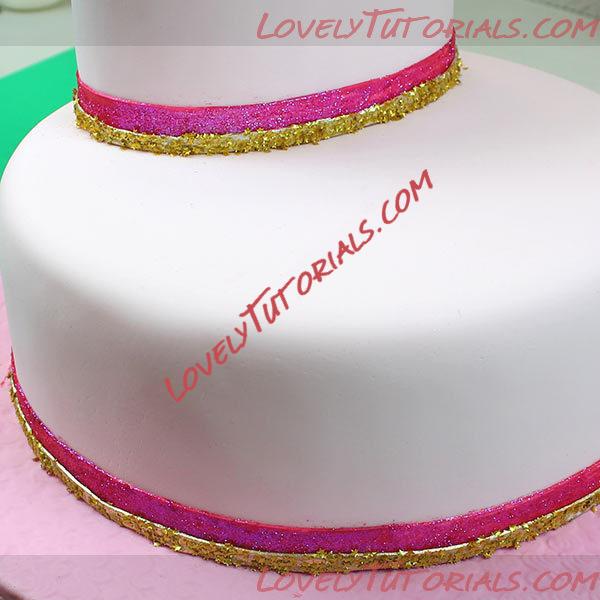
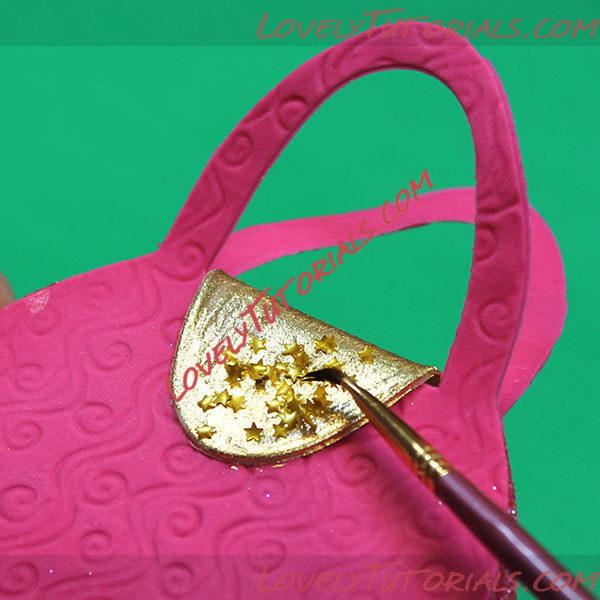
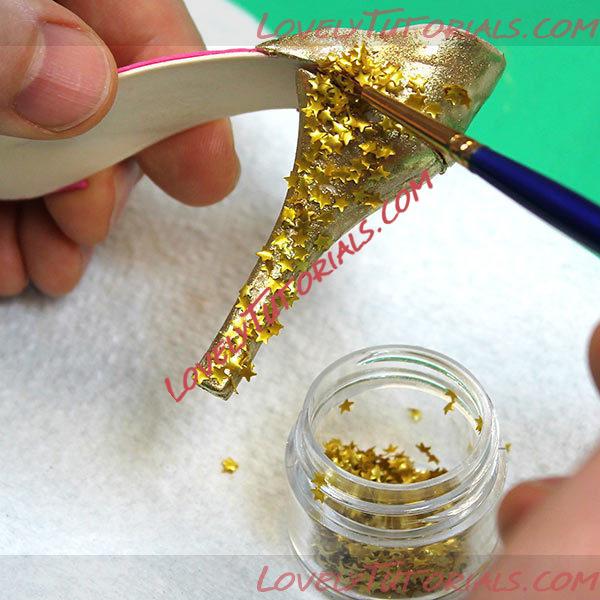
The Gold Stars and the Twinkle Dust finish are the same throughout the project. For all the Gold Star finishes, begin by painting the surface with Gold Highlighter or Super Gold Luster dust mixed with edible alcohol and allow to dry. Lightly brush the surface again with gum glue and dry until tacky. Apply the gold shimmering stars with a dry brush to the tacky surface. For the Twinkle Dust finishes, begin by painting the surface with Cranberry Luster dust mixed with alcohol. Allow to dry then lightly brush with gum glue and dry until tacky. Mix equal parts of Raspberry and Snow White Twinkle dust and apply to the tacky surface with a dry brush.
Step 2
Cake Border Roll a thin strip of white 50/50 paste (50% gumpaste and 50% fondant) and cut two, 3/4 inch wide strips that will encircle each tier. Apply the Twinkle dust finish as directed then adhere the band to the base of the cake with a little water. Prepare another set of thin strips that are 3/8 inch wide. Apply the Gold Stars finish as directed. Wrap these bands around the base of each tier and adhere to the bottom of each Cranberry band with a little water.
 TIP:
TIP: Cover the top cake or drum with a white piece of paper to fit neatly around the cake. This will protect your fondant from being stained while adhering the bands to the side of the cake.
Step 3
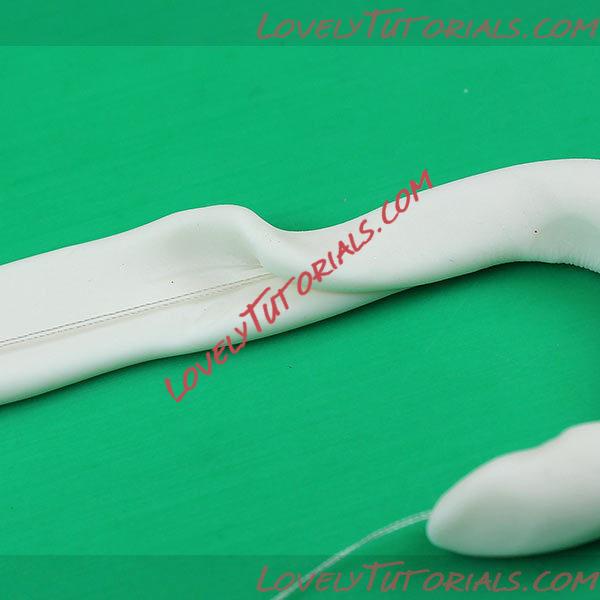
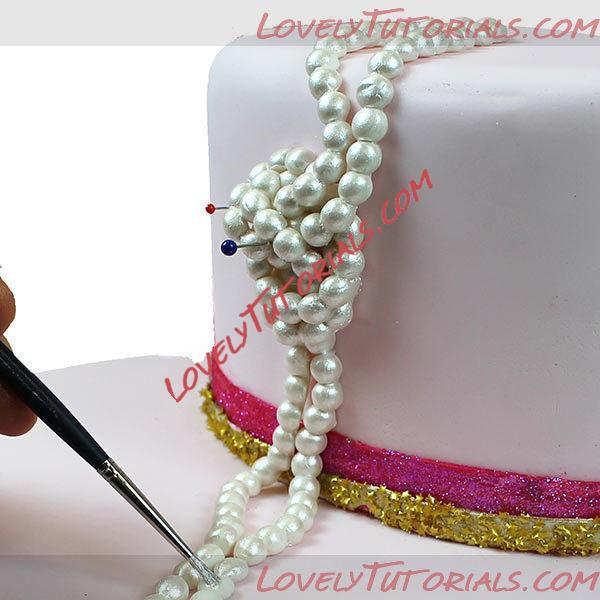
Pearls Roll out a 1/2 inch wide strip of gumpaste . Place a double thickness of white thread in the center of the gumpaste, leaving excess string on both ends. Fold the gumpaste over then press to seal and then roll by hand into a 3/8 inch rope. Press rope into a Perfect Pearls 8mm pearl mold by First Impressions. We used the 8mm size. Unmold "string" of pearls. Lay two strings of pearls together and make a simple overhand knot. Drape pearls from top tier of cake, cascading to bottom tier and secure with gum glue and pins or toothpicks until they have dried in place. Add additional strings of pearls to extend down the side of the bottom tier and up under the hat. Make a thick mixture of Super Pearl Dust by GSA and alcohol and carefully paint pearls with a small brush.
 Step 4
Flowers
Step 4
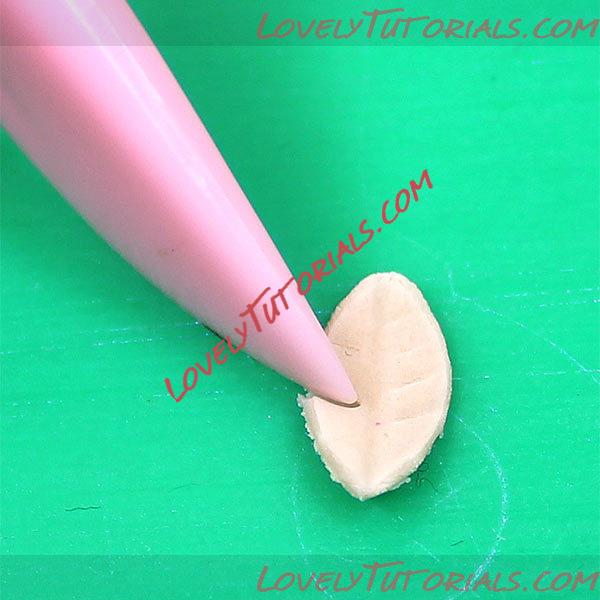
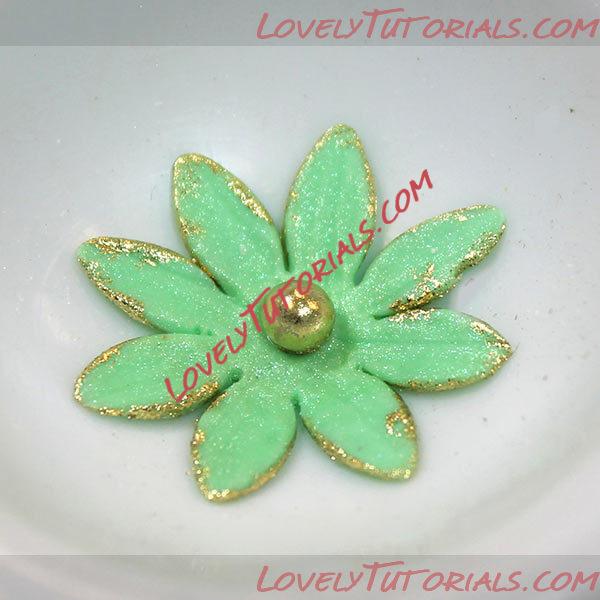
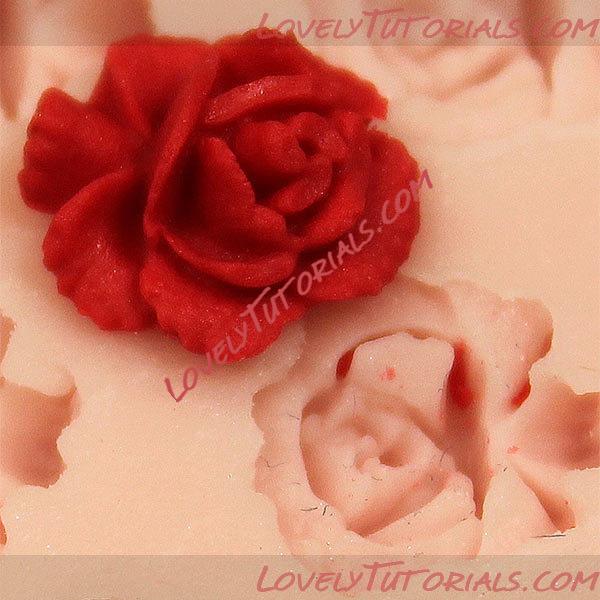
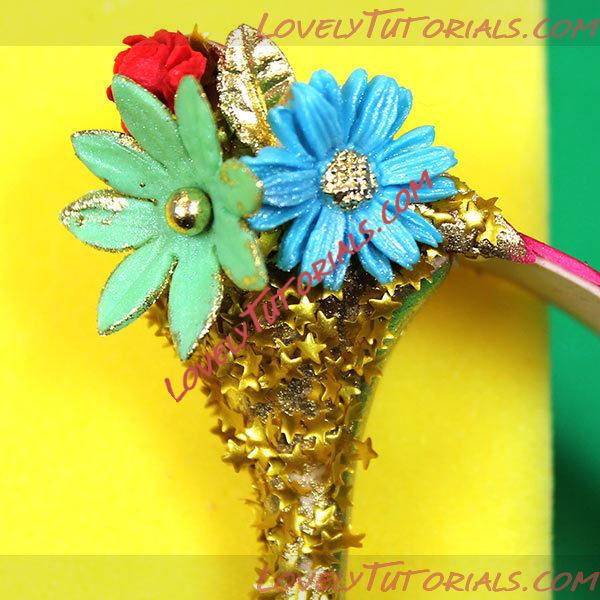
Flowers Cut leaves from thin pieces of white Mexican Paste using the second largest of the Gem Petal Cutter Set by GSA. Make veining lines in the leaves with a Knife and Scriber Tool. Paint the leaves gold with a gold highlighter and alcohol mixture. The daisies were cut from light green flower paste using the smallest Crystal Flowers Shasta Daisy Cutter by GSA. Roll a Jem Tool 12 from side to side on each petal then dust with Olive Sterling Pearl Dust by GSA. Invert the flower and paint the edges with Gold Highlighter mixed with alcohol. Lay the daisy right side up in a Gum Paste Forming Cup by Wilton up to dry. When dry, add a White Dragee-4mm and paint it gold with the highlighter and alcohol mixture. Use light blue gumpaste to mold a few flowers in the Daisy Set mold by First Impressions. When dry, dust them with Pastel Blue Sterling Pearl Dust by GSA and paint the centers gold. Press red gumpaste into Lots of Roses Mold by Sunflower Sugar Art.
 Step 5
Hat Flowers
Step 5
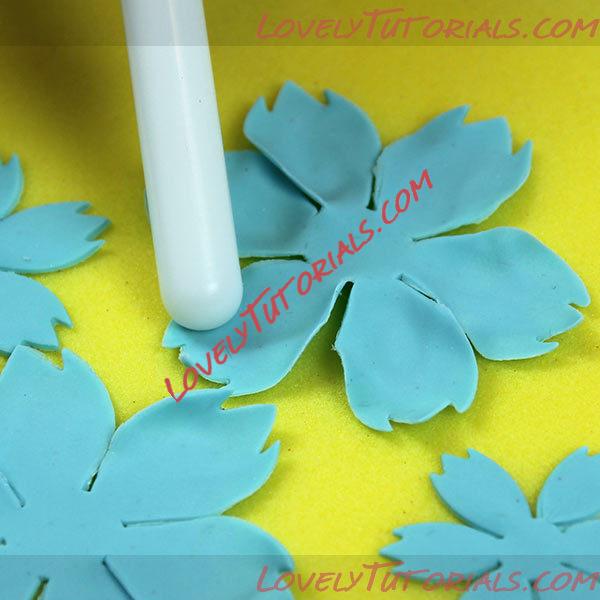
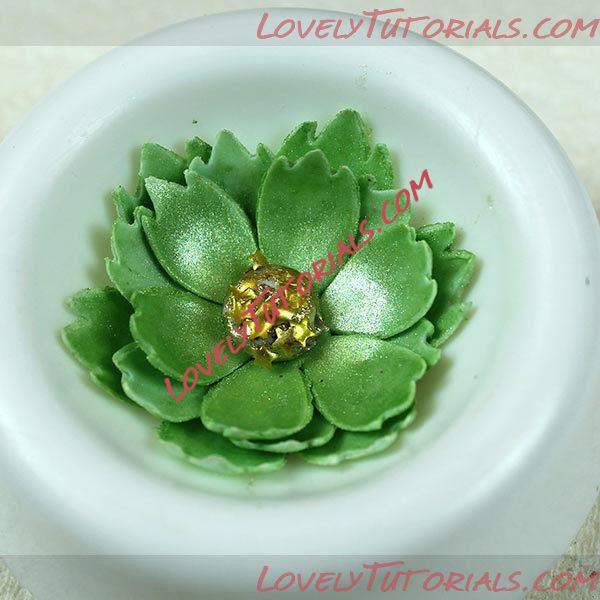
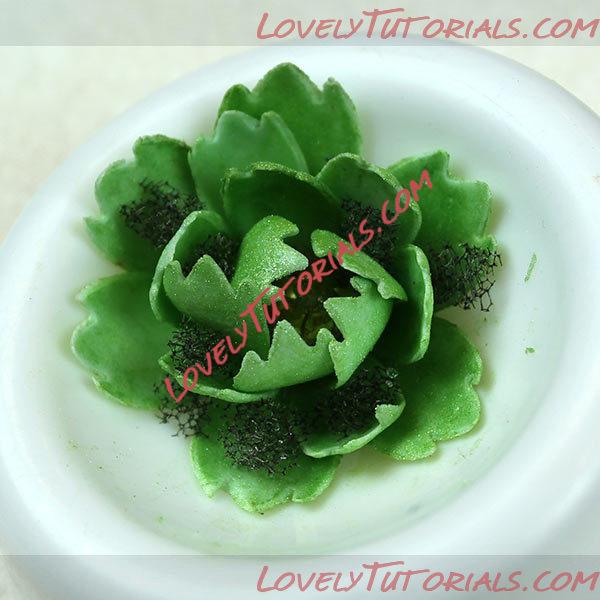
Hat Flowers The centers are made by rolling a small bit of gumpaste into a ball, flatten and paint with gold highlighter and alcohol. Apply gold shimmering edible stars while wet then allow to dry. The flowers were made using blue and green gumpaste and Fantasy Flower Cutter set by Stephen Benison. Roll the paste thin and cut two large, one medium and one small piece for the large blue flower. Dust the petals with Pastel Blue Sterling Pearl dust then lay them on a Celpad and soften the edges with a ball tool. Layer petals, nesting them at alternating intervals and gluing the centers with water. Glue the gold center in the flower. Using tweezers and tiny pieces of foam, lift the petals and tuck in foam pieces to lift and separate the petals. Tape card stock to the back of a forming cup to simulate crown of hat for the larger flower. Allow to dry overnight then carefully remove the foam pieces. Repeat the process for the smaller green flowers using Olive Sterling Pearl Dust and one medium and two small petals.
 TIP:
TIP: Cover your Celpad with paper towels to prevent the colored dust from staining the sponge. I dust the flowers before they are dried because they are very brittle once dried.
Step 6
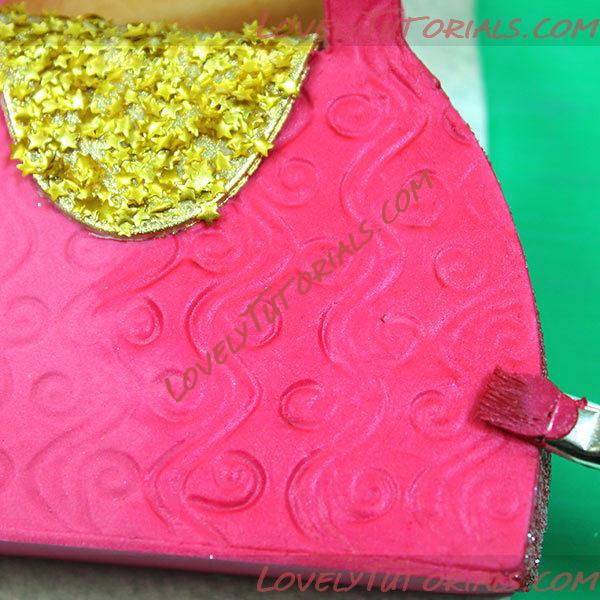
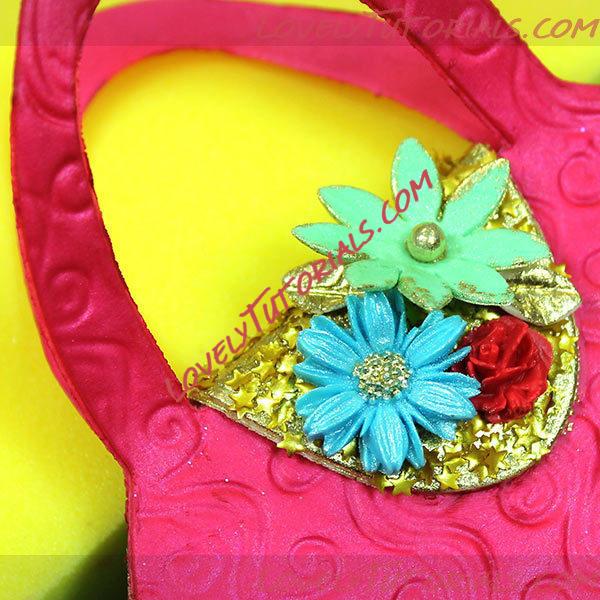
Handbag Roll some cranberry colored Mexican paste thin and emboss with the Curly Beard embossing sheet. Cut and assemble the Classic Handbag Cutter by Stephen Benison. When dried, apply the Twinkle Dust finish as directed to both ends. Cut out the clasp in flesh colored paste and adhere to the top of the purse with gum glue. Apply the Gold Stars finish to the clasp. Mix Cranberry Luster with a little shortening and brush the remainder of the purse to deepen the color and give a satin finish. Finish the purse by gluing on a green daisy, a blue daisy, one red rosebud and a few gold leaves.
 Step 7
Shoes
Step 7
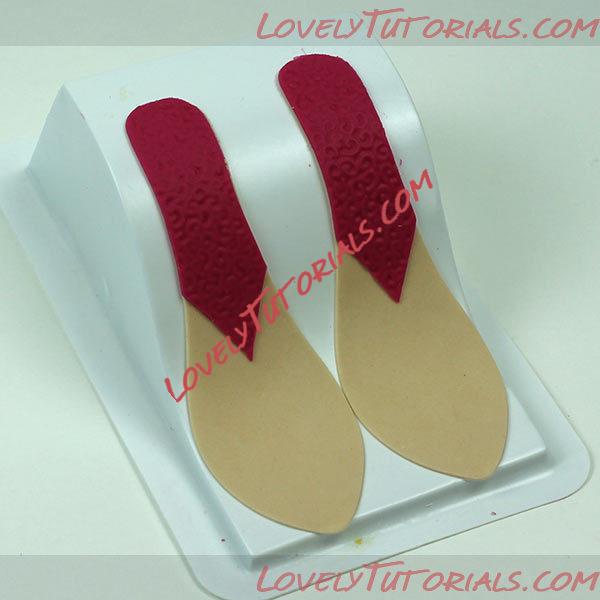
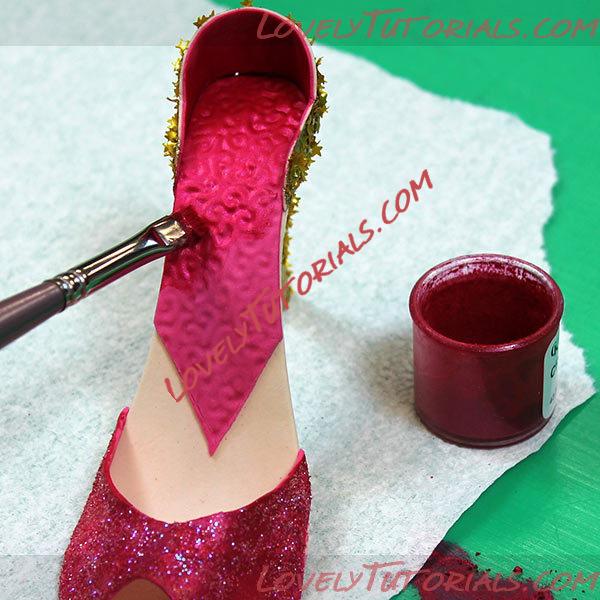
Shoes Prepare the heels from the Fabulous Shoe Kit by Stephen Benison with flesh colored Mexican Paste according to package direction using the mold supplied in the kit. Roll out flesh colored paste and cut two soles. Lay them on a lightly greased former. Roll some cranberry paste very thin and emboss with the Curly Beard embossing sheet. Cut out two partial soles then use an exacto knife to cut the insole into a "V" shaped end halfway down. Layer this on top of the flesh colored sole with a little water and allow to dry thoroughly. When dry, attach the soles to the heels with a little bit of paste and gum glue.
The "peep toe" pattern was used for the shoe front and cut from cranberry paste. For the shoe back, roll a thin piece of cranberry paste and a thin piece of flesh paste and adhere the two layers together with water. Cut out the shoe back from this double sided paste and glue to the back of the shoe with gum glue. The cranberry color will be on the inside. Finish the heel and back of the shoe with the Gold Stars Finish. Finish the "peep toe" front with the Twinkle Dust finish.
Finish the inside of the shoe by painting the cranberry insole with Cranberry luster dust mixed with a little white vegetable shortening. Paint the flesh colored insole with Oyster Luster Dust by GSA mixed with a little white vegetable shortening. This will give the shoes a satin look. Attach the flowers and leaves to the outside of each heel with little balls of Mexican paste and gum glue.
 Step 8
Hat
Step 8
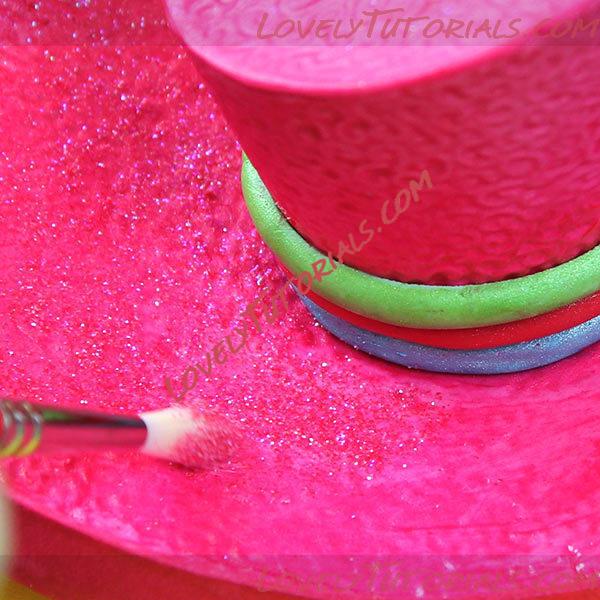
Hat Roll out cranberry Mexican paste, emboss with the Curly Beard Embossing mat then cut out the round brim and crown from the Fabulous Hats Kit by Stephen Benison. Dry on formers then assemble according to package directions. Cut a 1/2 inch band of cranberry Mexican paste and glue to the brim of the hat with gum glue.
The three colored bands were made by extruding blue, green and red paste from Makin's Stainless Steel Ultimate Extruder fitted with the half- moon disk. Glue the bands around the base of the crown with a little water. Finish the top of the brim with the Twinkle Dust Finish.
Paint the crown of the hat with a mixture of Cranberry Luster and shortening. Apply the Gold Stars finish to the outside of the band. Finish the hat by adding one large blue Fantasy Flower and two smaller green Fantasy flowers. Secure with a little ball of paste and gum glue.
 Tip:
Tip: Always keep a very soft foam sponge available to rest the hat, shoes or purse on while you are working on them This will help prevent breakage
Step 9
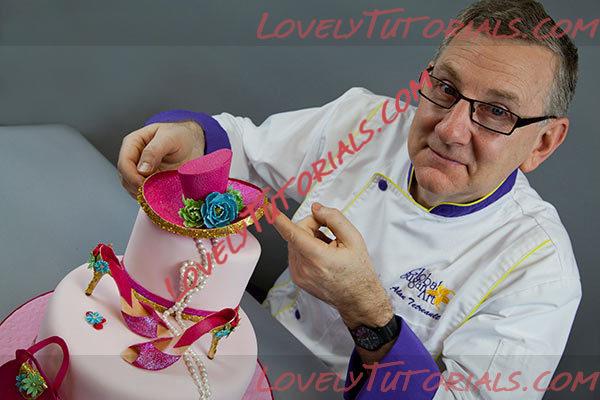
Hat Stand Create hat stand by mixing Super Black Gel Paste into gumpaste. Follow the kit directions to create a hat stand that will be inserted into the oval cake and will hold the hat.
 Step 10
Finishing the Cake
Step 10
Finishing the Cake Carefully glue down the shoes, purse and hat with a little gum glue or a small piece of flower paste. Cut the stick of the Hat Stand about 3-4 inches long and insert into the top of the cake. Rest the hat on the stand at an angle.