Огромная благодарность Автору за Мастер-класс


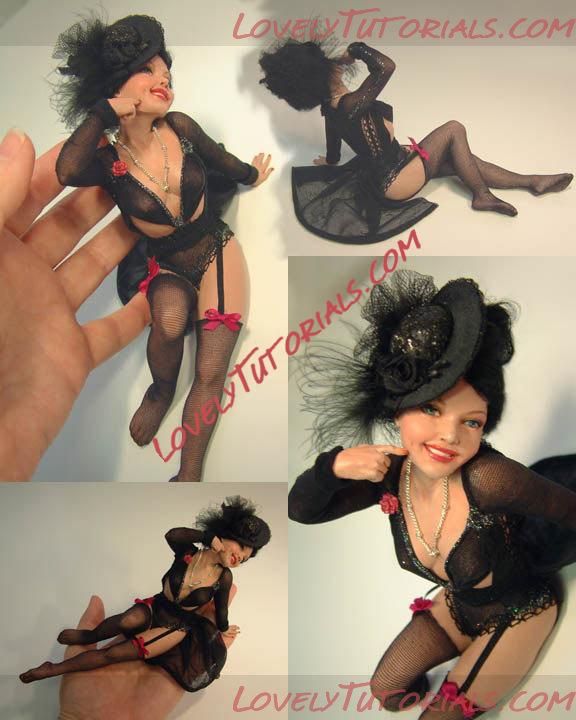
Trixie the Merry Widow!
She is supposed to be in mourning for the
rich old man she married a month ago. and who just passed away ... but although she is wearing black, we can see thru her little plan, can't we? Don’t let Tricky Trixie fool you, she's getting all dolled up for her next conquest!
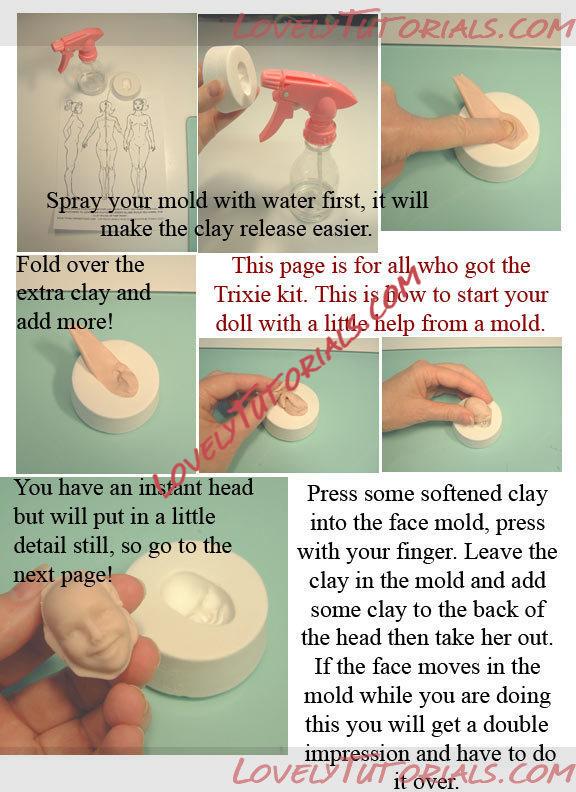
Spray your mold with water first, it will make the clay release easier.
Fold over the extra clay and add more!
This page is for all who got the Trixie kit. This is nlow to start your doll with a little nelp from a mold.
You have an instant head but will put in a little detail still, so go to the next page!
Press some softened clay into the face mold, press with your finger. Leave the clay in the mold and add some clay to the back of the head then take her out.
If the face moves in the mold while you are doing this you will get a double impression and have to do it over.
Use your tiny stylus to deepen the comers of her mouth.
This page is also for the people using the kit...
Here are a few detailing items to do on trixie’s face.
Don’t worry about making teeth now, that comes later!
Make the little nose holes match and a little deeper.
Also press in on the tear duct and outside corners of the eyes. Sometime I tap a little down where the whites of the eyes are so that the iris looks raised.
Press in a little to make a pupil in her eye.
Two Trixie heads both from a mold, notice the added detail.
Trim off the excess clay, be gentle, don`t want to squash her face!
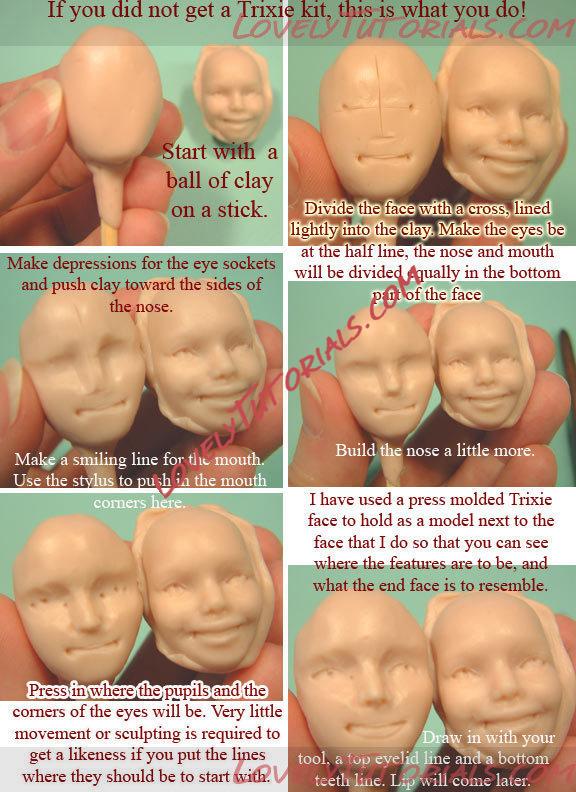
If you did not get a Trixie kit, this is what you do!
Start with a ball of clay on a stick.
Divide the face with a cross, lined lightly into the clay. Make the eyes be at the half line, the nose and mouth will be divided equally in the bottom
Make depressions for the eye sockets and push clay toward the sides of the nose.
part of the face Build the nose a little more.
Make a smiling line for the mouth. Use the stylus to push in the mouth corners here.
Press in where the pupils and the corners of the eyes will be. Very little movement or sculpting is required to get a likeness if you put the lines where they should be to start with. I have used a press molded Trixie face to hold as a model next to the face that I do so that you can see where the features are to be, and what the end face is to resemble.
Draw in with your tool, a top eyelid line and a bottom teeth line. Lip will come later.
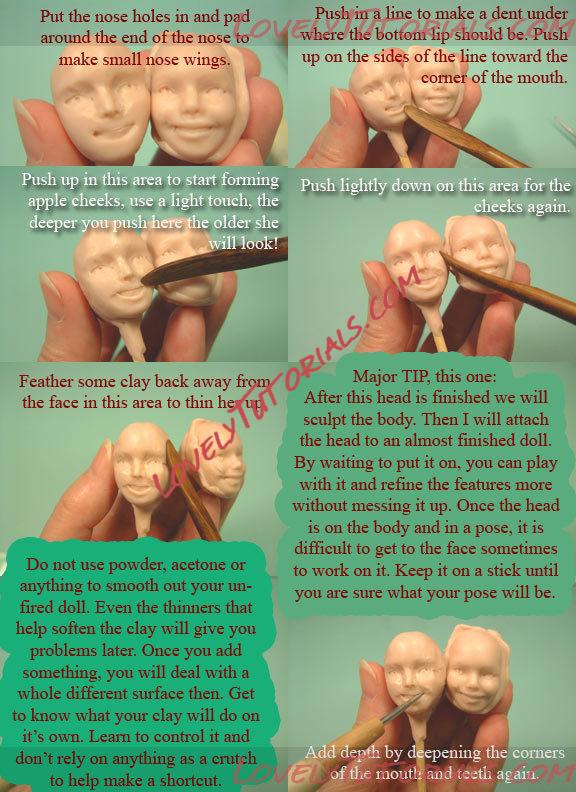
Put the nose holes in and pad around the end of the nose to make small nose wings.
Push in a line to make a dent under where the bottom lip should be. Push up on the sides of the line toward the corner of the mouth.
Push up in this area to start forming apple cheeks, use a light touch, the deeper you push-herc the older she will look!
Push lightly down on this area for the cheeks again.
Feather some clay back away fi-pm the face in this area to thin her up.
Major TIP, this one:
After this head is finished we will sculpt the body. Then I will attach the head to an almost finished doll. By waiting to put it on, you can play with it and refine the features more without messing it up. Once the head is on the body and in a pose, it is difficult to get to the face sometimes to work on it. Keep it on a stick until you are sure what your pose will be.
Do not use powder, acetone or anything to smooth out your unfired doll. Even the thinners that help soften the clay will give you problems later. Once you add something, you will deal with a whole different surface then. Get to know what your clay will do on it’s own. Leam to control it and don’t rely on anything as a crutch to help make a shortcut.
Add depth by deepening the comers of the mouth and teeth again.
With the backside of your hardwood tool lightly push up to form the upper lip.
Lightly push in on the inside of the eye comer to add a little depth and to slant the eyes toward the temples.
See where my thumbis? Push in there at an angle to make a soft brow area.
Roll your thumb toward the temple.
Gently smash in with both fingers on the temples to noarrow her face in that area.
Once again, where my thumb is you will press in a little to make the chin more pointed and the cheek's to appear higher.
Tap a little just under the eye area all the way across to the nose making a bottom eyelid, sort of.
Where my tool is now is where you deepen that are and at just that angle. Press back towards the nose bridge here.
Oh, so lightly, make a line with your eye detail tool for the upper lid.
Remember the eyes should slant and angle toward the temples.
They-are not on a flat plain!
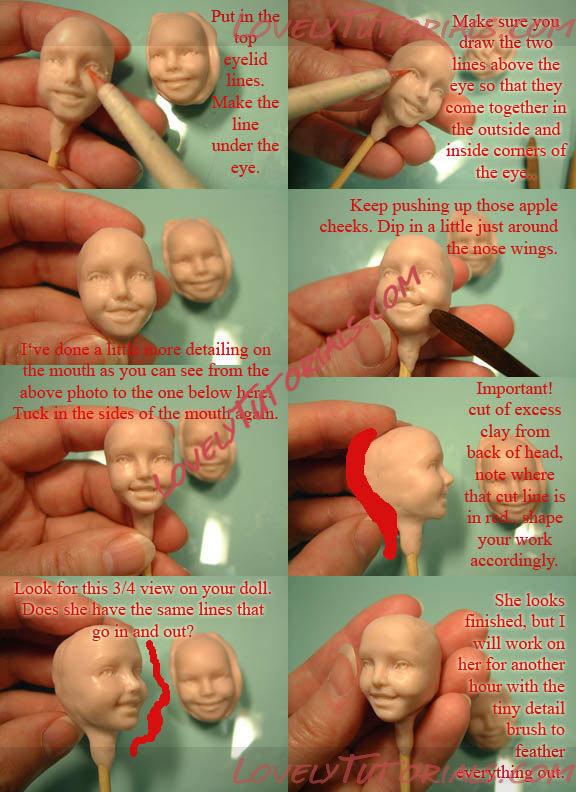
Put in the top eyelid lines.
rvlake the line under the eye.
Make sure you draw the two lines above the eye so that they come together in the outside and inside corners of the eye...
Keep pushing up those apple cheeks. Dip in a little just around the nose wings.
I`ve done a little more detailing on the mouth as you can see from the above photo to the one below here Tuck in the sides of the mouth again.
Important! cut of excess clay from back of bead, note where that cut line is in red shape your work accordingly.
Look for this 3/4 view on your doll.
Does she have the same lines that go in and out?
She looks finished, but I will work on her for another hour with the tiny detail brush to feather everything out.
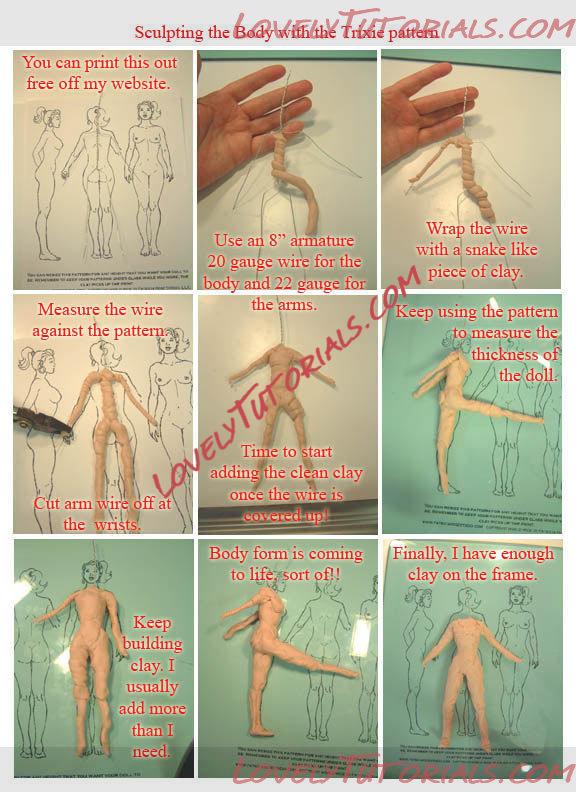
Sculpting the BOdy with the Trixie pattern. You can print this out free off my website.
Use an 8' armature 20 gauge wire for the body and 22 gauge for the arms.
Wrap they wire with a snake like piece of clay.
Measure the wire against the pattern.
Cut arm wire off at the wrists.
Time to start adding the clean clay once the wire is. covered up!
Keep using the pattern to measure the thickness of the doll.
Keep building clay. I usually add more than I need!
Body form is coming to life. sort of!!
Finally. I have enough clay on the frame.
I work on glass so I can keep the area clean with wipes.
Make sure the head is going to match in size with the body!
Smash in on the sides of the waist, it’s faster than removing clay.
Push up on the clay here to make a pelvic depression and a tiny tummy.
Push in with your thrumbs to make the hip bodes stand out.
Smash in here to thin up the rib cage.
Make depressions on each side of the leg in the knee area.
Squeeze thos ankles thinner.
One leg finished Now the other one needs trimmed and shaped.
Follow the cute little pin up shape.
Point those toes all the time!
Worh on angle. The inside bone is higher.
Dip in where the little red dots are here.
Bottom crease and spine work here.
Dip in here and build a small ball on the shoulder. I pull on the arm until it`s thin enough.
Pin up girls have shorter torsos, legs and arms. They are more child like. The key to making a cute is the shoulders. apple cheeks & smile.
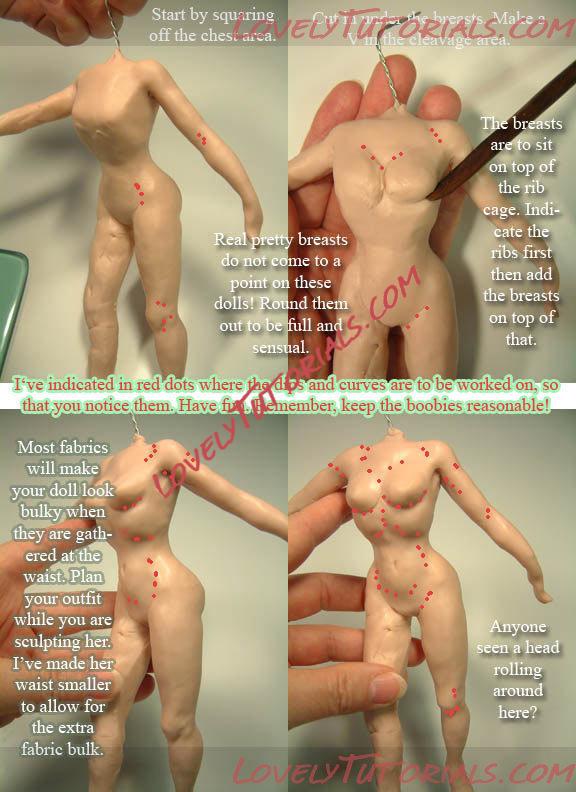
Start by squaring off the chest area.
Cut in under the breasts. Make a V in the cleavage area.
Real pretty breasts do not come to a point on these
dolls! Round them out to be full and sensual.
The breasts are to sit on top of the rib cage. Indicate the ribs first then add the breasts on top of that.
I`ve indicated in red dots where the dips and curves are to be worked on. so that you notice them. Have fun. Remember, keep the boobies reasonable!
Most fabrics , will make your doll look bulky when they are gathered at the waist. Plan your outfit while you are sculpting her. I've made her waist smaller to allow for the extra fabric bulk.
Anyone seen a head rolling around here?
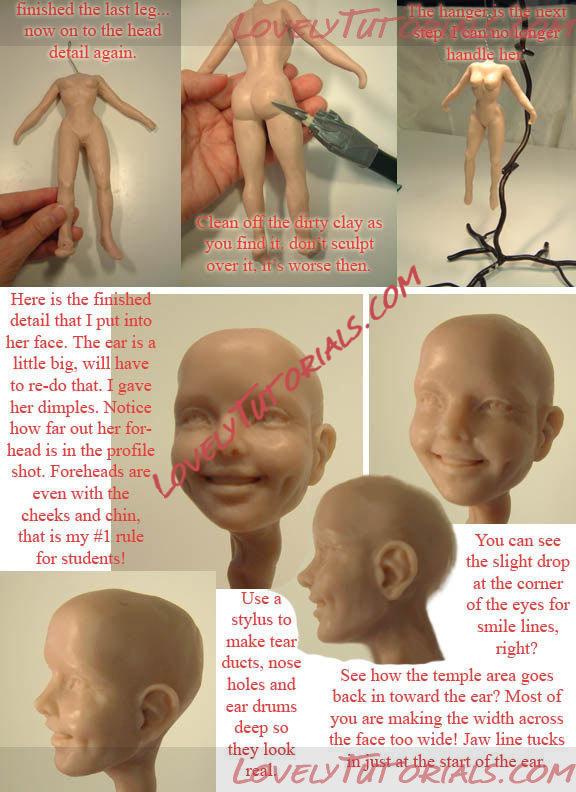
finished the last leg... now on the head detail again.
Clean off the dirty clay as you find it, don`t scuplt over it, its worse then.
The hanger is the next step. I can no longer handle her.
Here is the finished detail that I put into her face. The ear is a little big. will have to re-do that. I gave her dimples. Notice how far out her for-head is in the profile shot. Foreheads are even with the cheeks and that is my #1 rule for students!
Use a stylus to make tear ducts, nose holes and ear drums deep so they look real.
You can see the slight drop at the comer of the eyes for smile lines, right?
See how the temple area goes back in toward the ear? Most of you are making the width across the face too wide! Jaw line tucks in just at the start of the ear.
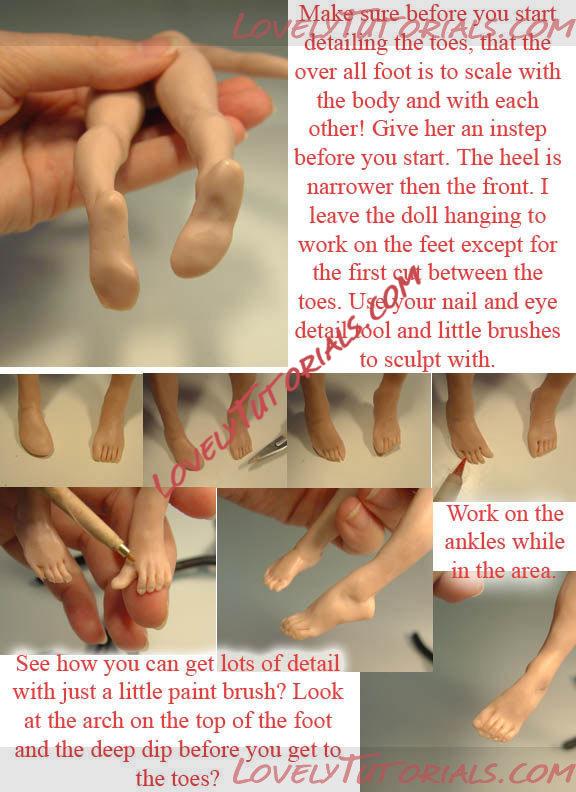
Make sure before you start detailing over the foot is to scale with
the body and with each other! Give her an instep before you start. The heel is narrower then the fiont. I leave the doll hanging to work on the feet except for the fust afl between the toes. Use your nail and eye detail tool and little brushes to sculpt with.
Work on the , ankles while in the area.
See how you can get lots of detail with just a little paint brush? Look at the arch on the top of the foot and the deep dip before you get to the toes?
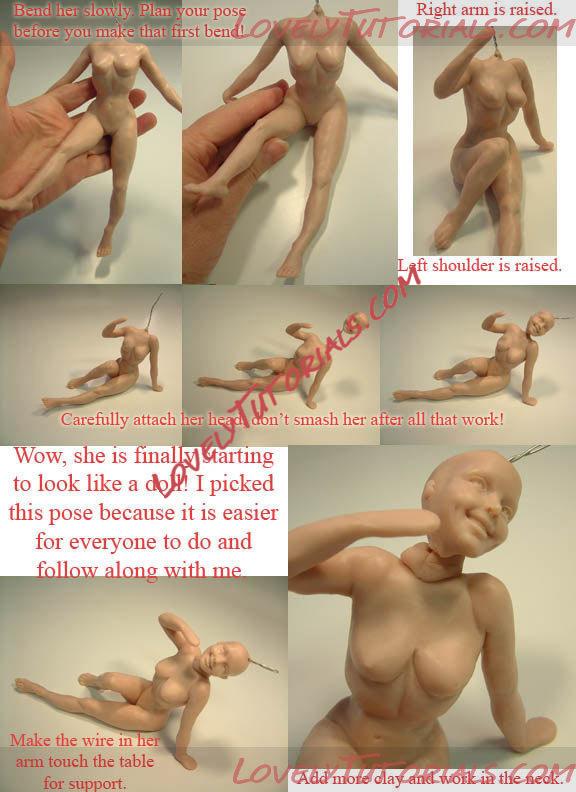
Bend her slowly. Plan your pose before you make that first bend!
Right arm is raised.
Left shoulder is raised.
Carefully attach her head don`t smash her after all that work!
Wow, she is finally starting to look like a doll! I picked this pose because it is easier for everyone to do and follow along with me.
Make the wire in her arm touch the table for support.
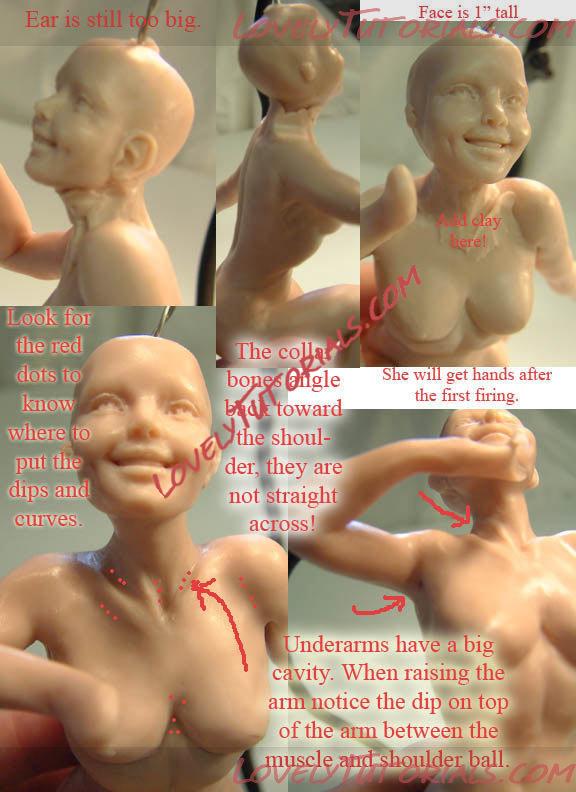
Add more clay and work in the neck Ear is still top big.
Face is 1” tall Add clay here!
Look for the red dots to know where to put the dips and curves.
The collar bones angle back towards the shoulder, they are not straight across!
She will get hands after the first firing.
Underarms have a big cavity. When raising the arm notice the dip on top of the arm between the muscle and shoulder ball.
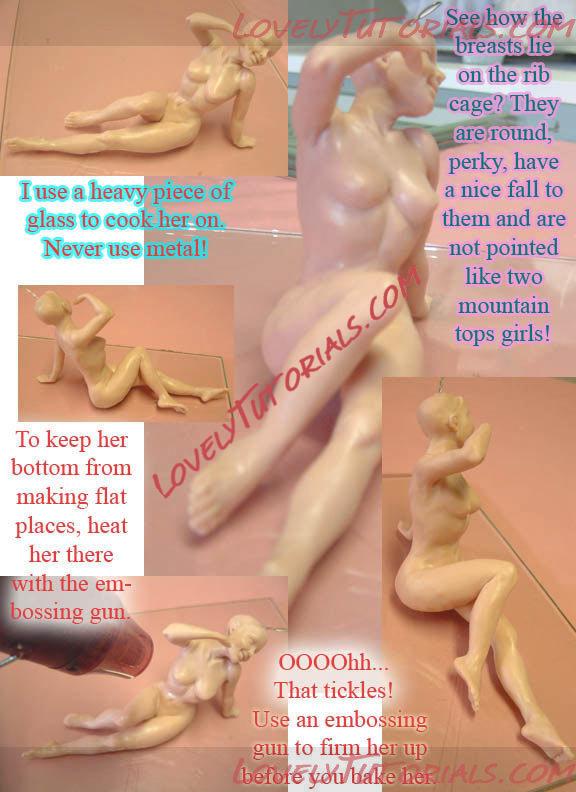
I use a heavy piece of glass to cook her on. Never use metal!
See how the breasts lie on the rib cage? They are round, perky, have a nice fall to them and are not pointed like two mountain tops girls!
To keep her bottom from making flat places, heat her there
with the embossing gun.
OOOOhh...
That tickles! I Use an embossings gun to firm her up before you bake her.
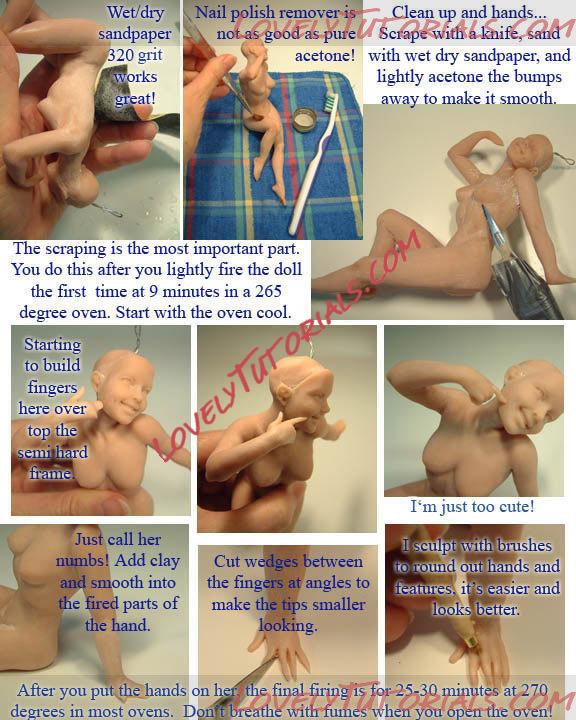
Wet/dry sandpaper 320 grit works great
Nail polish remover is not as good as pure acetone!
Clean up and hands...
Scrape with a knife, sand with wet dry sandpaper, and lightly acetone the bumps away to make it smooth.
The scraping is the most important part. You do this after you lightly fire the doll the first time at 9 minutes in a 265 degree oven. Start with the oven cool.
Starting to build fingers here over top the semi hard frame.
Just call her numbs! Add clay arid smooth into the fired parts of mr the hand.
Cut wedges between the fingers at angles to make the tips smaller looking.
I'm just too cute!
I scuplt with brushes to round out hands and features, it`s easier and looks better.
After you put the hands on her the final firing is for 25-30 minutes at 270 degrees in most ovens. Don`t breathe with fumes when you open the oven!
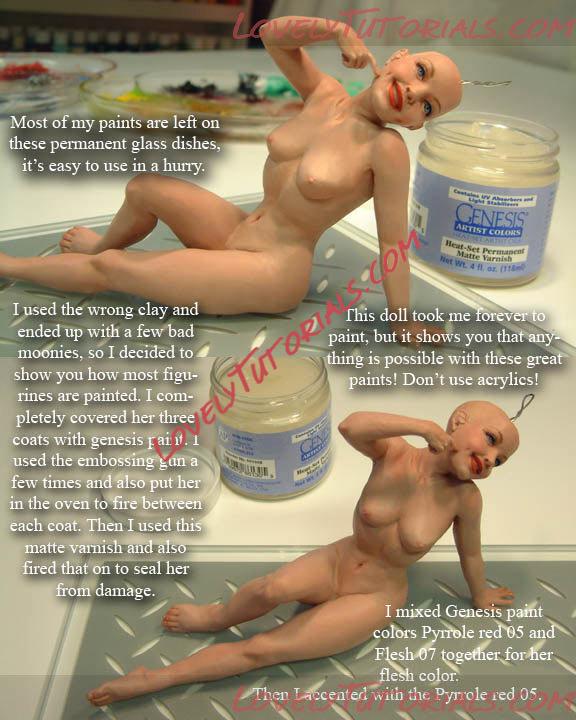
Most of my paints are left on these permanent glass dishes it’s easy to use in a hurry.
I used the wrong clay and ended up with a few bad moonies, so I decided to show you how most figurines are painted. I completely covered her three coats with genesis paint. l used the embossing gun a few times and also put her in the oven to fire between each coat. Then I used this mtte varnish and also fired that on to seal her from damage.
fins doll took me forever to paint, but it shows you that anything is possible with these great paints! Don't use acrylics!
I mixed Genesis paint colors Pyrrole red 05 and Flesh 07 together for her flesh color. Then i accented with the Pyrrole red 05.
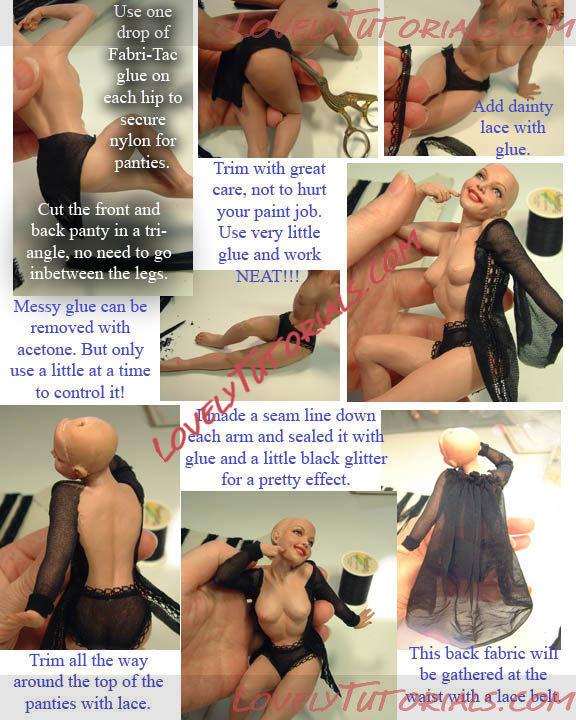
Use one drop of Fabri-Tac glue on each hip to secure nylon for panties.
Cut the front and back panty in a triangle. no need to go in between the legs.
Trim with great care, not to hurt your paint job. Use very little glue and work NEAT!!!
Add dainty lace with glue.
Messy glue can be removed with acetone. But only use a little at a time I to control it!
I made a seam line down each arm and sealed it with glue and a little black glitter for a pretty effect.
Trim all the way around the top of the panties with lace.
This back fabric will be gathered at the waist with a lace belt.
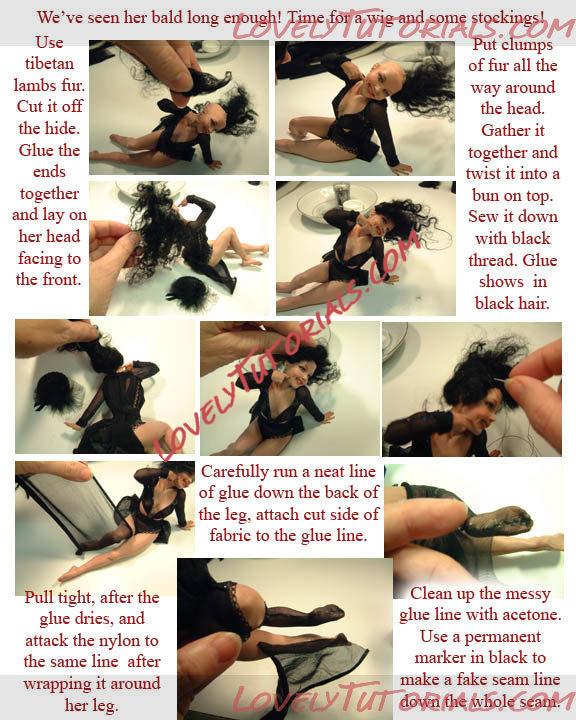
We’ve seen her bald long enough! Time for a wig and some stockings!
Use tibetan lambs fur. Cut it off the hide. Glue the ends together and lay on her head facing to the front.
Put clumps of fur all the way around the head. Gather it together and twist it into a bun on top. Sew it down with black thread. Glue shows in black hair.
Carefully run a neat line I af glue down the back of the leg, attach cut side of fabric to the glue line.
Pull tight, after the glue dries, and attack the nylon to the same line after wrapping it around her leg.
Clean up the messy glue line with acetone. Use a permanent marker in black to make a fake seam line down the whole seam.


