|
|
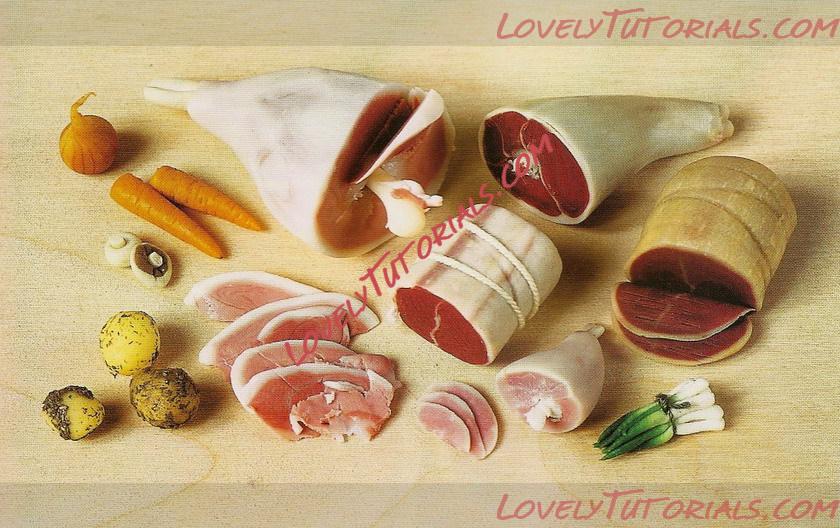
МК лепка "говядина, ветчина, ягнятина" --Gumpaste (fondant, polymer clay) beef, ham, lamb joints making tutorials
|

13.11.2011, 19:56
|
|
Администратор
|
|
Регистрация: 07.09.2010
Сообщений: 7,940
|
|
 МК лепка "говядина, ветчина, ягнятина" --Gumpaste (fondant, polymer clay) beef, ham, lamb joints making tutorials
Огромная благодарность Автору за Мастер-класс

With the joints of meat we look at simple ways of inserting new elements into the main mix, and develop colour mixing techniques, too. Key here is my philosophy of working from life, something I emphasize throughout this book, but which is more evident in this section. With complex canes, it's worth getting right.
Method
1 Make a short cylinder of basic raw meat mix.
2 Cut the cylinder slightly off-centre and only a little way in, then tear if direclly in half.
3 Roll out a very thin strip of foundation colour mix 2 and insert between the two pieces. If you want, cut or tear another piece closer to the edge and add anolher strip of the foundation mix.
4 Add another sirip of foundation mix around (he outer edge but not all the way round. Flatten one side of Ihe cylinder slightly. You can rub this layer of fat slightly with a piece of ochre to colour it, but Keep it subtle and streaky.
5 Squeeze and pull the flat-bottomed cylinder to lengthen until it is 1.5cm in diameter. Cut in half to expose the inside.
6 Using buttonhole thread or thick sewing thread, wrap it twice around the first 1-1.5cm of the beef and tie in a reef knot. Snip off the excess thread and cut your joint of beef from the cane.
7 Using a blade or scalpel, carefully press the edge againsi the end of the material in a scries of diagonal lines and then diagonally in the other direction, in a cross-hatching pattern, to produce the texture or grain of the meat.
8 Finish by running the blade around the edge, underscoring the edge of the fa to make it appear separate.
|
13.11.2011, 20:02
|
|
Администратор
|
|
Регистрация: 07.09.2010
Сообщений: 7,940
|
|
cooked beef
Огромная благодарность Автору за Мастер-класс
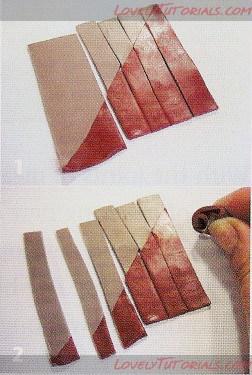

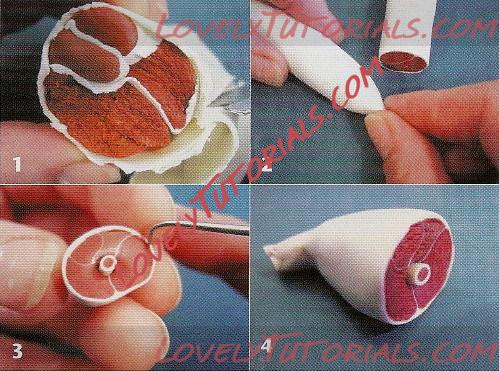
To ensure you get your colours blended gradually through from the rare, pink middle to the well-roasted brown of the beef, this method uses a similar approach as we will see used frequently throughout the book, called the Skinner shade technique. This is a very simple method, requires the minimum of equipment and materials, and is both quick and effective.
1 Roll out your two colours and cut them into two triangles of equal proportion. Position the diagonal edges of the triangles of clay together to form a rectangle. Cut into several strips of approximately equal size.
2 and 3 Mix the clay from each strip ensuring you keep the strips in order, and then form them into rolls of increasingly darker tone.
4 and 5 Roll out each strip. Take the first which should -represent the rare part of the beef, the centre of the beef joint, and curl it into a tight roll. Add progressively more 'well-cooked' layers of strips of clay to the outside, until you have a complete, many layered roll of meat.
6 You don't need to worry about whether each strip meets neatly in the middle, just carry on rolling until you have used all of the clay.
7 Cut into the side of the
roll and tear it in half. Add a strip of fat using the technique for the raw beef project.Rejoin the halves of loll and cover half of the whole with a layer of fat.
8 Lengthen the roll and mark with string marks as for the raw beef, but remove the piece of string.
9 Cut the beef cane into pieces about l.5cm long. For an authentic look, slice the ends and curl over into a slice of beef, before hardening in the oven.
|
13.11.2011, 20:09
|
|
Администратор
|
|
Регистрация: 07.09.2010
Сообщений: 7,940
|
|
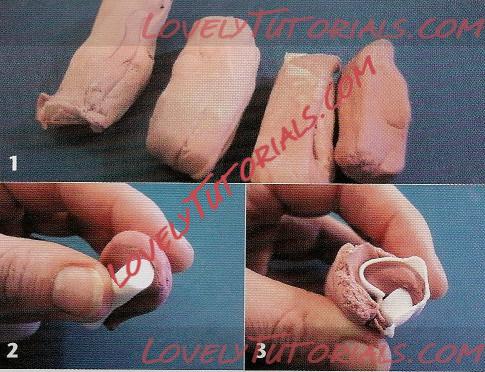
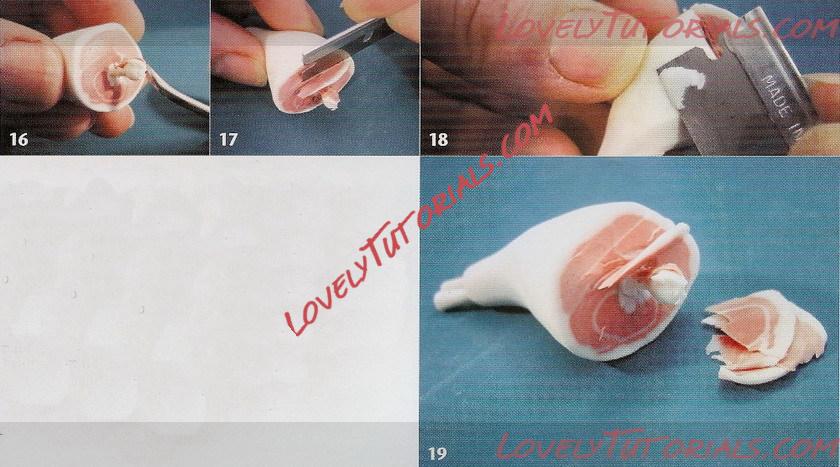
Method
1 Using either the technique described for making cooked beef, or just by eye, prepare several shades of pink meat mix by adding gradually more of the foundation colour mix 2 L also add the tiniest bit of grey for authenticity, but this is optional.
2 To make a narrow cylinder of foundation colour mix 2, wrap a piece of darker pink clay, to represent the muscle, around the outside of the cylinder, approximately a third of the way round the cane.
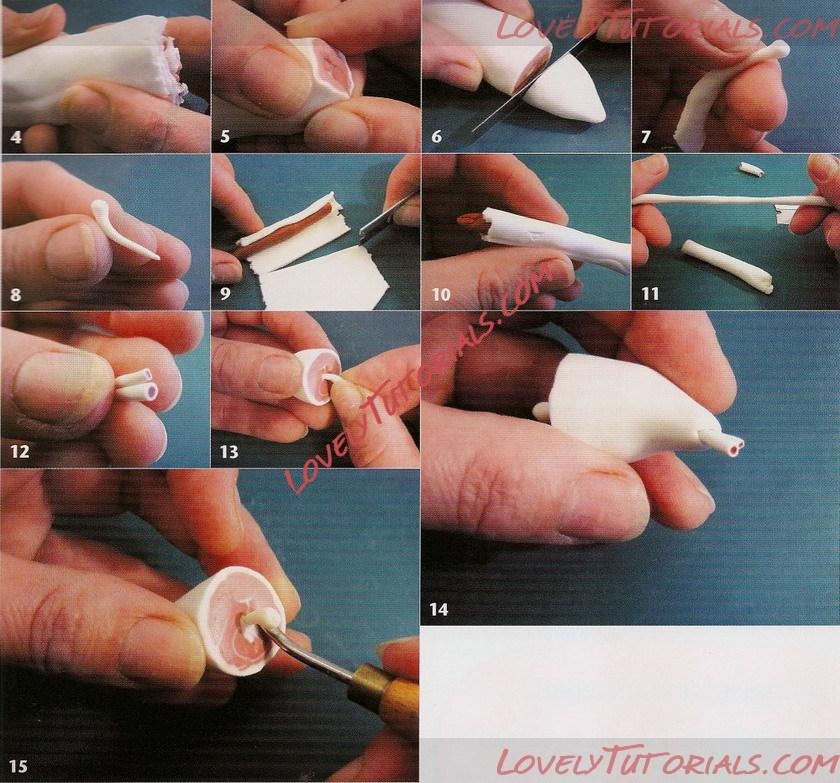
3 Wrap this section with a very thin sheet of foundation colour mix 2. Carry on adding muscle, increasing the size as you go. By way of a guide -and it won't be the last time I mention it - do work from life. Look at a leg of ham. The muscles do not have to be absolutely accurate, just follow the basic idea that a leg has a few small muscles taking up one-third of the joint, and a couple of larger ones. The smaller muscles tend to be slightly darker in colour.
4 When you have added a couple of larger sections, fill in the other two-thirds. Wrap the whole cane with a slightly thicker skin of foundation colour mix 2. Lengthen your cane in the normal way. The finished cane should be approximately 2-2.5cm in diameter.
5 Narrow the end of the cane to a blunt point. You may need to trim the end off a few times to neatly enclose the meat part and the white.
6 Cut a thin cone of day from the cane 2.5-3cm long. Put this section of clay to one side.
7 and 8 Make up the bones and harden in the oven before inserting them into the ham. Make a tiny blob of white with a long, pointed tail by rolling the material between the thumb and the forefinger. The blob should measure approximately 3mm in diameter. The length of the point is less critical since most of it will be pushed into the ham joint.
9 and 10 Make the two
leg bones for the other end by wrapping a little basic meat mix with a sheet of foundation colour mix 1.
11 Lengthen this cane until it is only about 3cm in diameter. Cut off a piece and lengthen it a little more, so that it is only about 2mm in diameter.
12 Make a pair of bones, one from each of the canes. Squeeze them together into a point at one end and harden them in the oven with the ball joint bone.
13 Once hardened, push the ball-ended bone into the front of the ham.
14 Push the other bones into the opposite side of the ham joint.
15 If there is a big gap left by pushing the bone in, fill it with a little of the foundation colour mix 2.
16 Carefully cut a tiny nick into the ball joint. Add a little of the ham mix or pink bits trimmed off from your work to the ball joint end. These should resemble ragged bits of ham and fat clinging to the severed bone.
17 Cut a slice of ham halfway down but leave it attached to the joint, slightly curled over as though it is being carved.
18 You can carefully trim
the fat a little to add to the tealism.
19 To display your ham, cut a few slices from your original cane to appear as if they have been cut from the joint, ready to serve.
|
13.11.2011, 20:16
|
|
Администратор
|
|
Регистрация: 07.09.2010
Сообщений: 7,940
|
|
Leg of lamb
Method
1 Make up a cane of approximately four parts of different sizes with slightly varying colours. Again, as with the ham, you need to think about the various muscles in an actual leg of lamb. I add a little extra terracotta to the basic meat mix to produce the darker colour for the smaller muscles in the meat.
2 Using your fingers and thumbs to pinch and mould, narrow the end of the joint cane to a blunt point.
3 and 4 Push a previously hardened pair of bones (like the ham bones but even smaller if possible) into the pointed end and a larger piece of bone, approximately 3mm in diameter, into the wider end, just a little off-centre and at the join between the sections.
To make the meat at the carved end look suitably ragged, use your dental tool to pick a bit at the inside edge of the fat, then draw or scratch a series of diagonal lines in a cross-hatching pattern into each meaty section.
|
 |
|
Метки
|
3d figures, acest site alimentare in miniatura, addım-addım təlimat, adım, adım adım yönergeler, agnello articolazioni, alimentaires, alimentaires en miniature, alimente, alimento, alimentos em miniatura, alimentos en miniatura, artesanatos passo a passo, avienos sąnarių, bemutató, biff, birthday cake, biscuit, boeuf cuit, bolando bolos, bolos decorados, bárány ízületek, báránycomb, cake decorating, cake decorating techniques, cake topper, cake toppers, cake tops, carne, carne cozida, carne de miel articulaţii, carne de res, carne de res cocida, carne de vită, cerâmica plástica, character figures, characters, children's cake, cibo, cibo in miniatura, co miniaturowe żywności, cold porcelain, comida, confeitando bolos, cooked beef, cordeiro articulações, cordero articulaciones, cosciotto d'agnello, curso de modelado, decoracion de pasteles, decoración de tortas, decorada en fondant, decorare le torte, decorazioni, deko fondant, dekorace na dort, dekoracija, dekoracije, dekorasyon, dekorácie, díky miniaturní potravin, especializada em modelagem de biscuit, fazer comida em miniatura, fender, fierte de carne de vită, figur kager, figuras, figure making tutorials, figuren, figures, figurice, figurice od fondana, figurine on the cake, figurines, figurinhas, figurky, figúrky, figür modelleme, fimo, fixando a cabencinha, flower paste, fondan, fondant, fondente, fondente di zucchero, food, fotopostup, foundant, főtt marhahús, gebak, gekochtes rindfleisch, gekookt rundvlees, gicz jagnięca, gigot d'agneau, glazuur, gotowana wołowina, govedina, gum pasta, gum paste, gumpaste, gør miniature mad, gör miniatyr mat, gıda, ham, hand-made, handmade, het maken van miniatuur voedsel, hogy miniatűr élelmiszer, hovädzie mäso, hovězí maso, how to, how-to's, hrana, instrucţiuni, instrukcijas, instrukcje, jahňacie kĺby, jahňacie stehno, jak na, jambon, jamón, janjetina zglobova, jautienos, jedlo, jehněčí klouby, jehněčí kýta, jídlo, kage dekoration, kagedekoration, kakebaking, kinkkua, kogt oksekød, kojų ėriukų, kokt nötkött, kokt oksekjøtt, korak, korak za korakom navodila, korak-po-korak upute, koristeet ja koristelu, krok, krok po kroku, krok za krokem, krok-za-krokem, kuhani govedine, kumpio, kuzu ayak, kuzu eklemler, kypsennetty naudan, l'agneau articulations, la modélisation, lage miniatyr mat, lam gewrichten, lam ledd, lam samlinger, lamm gelenke, lamm lederna, lammasta nivelet, lammekølle, lammelår, lammkeule, lammstek, lamsbout, las instrucciones, las técnicas, le bœuf, le jambon, le tecniche, lebensmittel, leg janjetine, leg karitsan, les techniques, lukie, machen miniatur nahrung, mad, maistas, making miniature ruokaa, manzo, marcipanové figurky, marhahús, marshmallow, marsipanfigurer, masa flexible, master-class, master-klasse, master-klasy, mat, meistras klasės, metodikas, miniatiūriniai maisto, miniatur, miniatur-lebensmitteln, miniatura, miniatura alimentare, miniature, miniature mad, miniaturní potravin, miniaturowe żywności, miniatuur, miniatuur voedsel, miniatyr mat, miniatyyri ruokaa, miniatúrne potravín, miniatűr élelmiszer, minijatura, minijaturne hrane, minyatür gıda, mistr třídy, modelado, modelagem, modelando a barriga, modelando a cabencinha, modelando a perninha, modelando as maozinhas, modelando o cabelinho, modelando o corpinho, modelando os bracinhos, modelando os pezinhos, modelare, modelerte figurer, modeling, modeling paste, modeliranje, modellazione, modelleme, modellering, modellieren, modellierpaste, modelling, modelling past, modelləşdirmə, modelovanie, modelování, modelowanie, motivtorten, naudanlihaa, návod, nötkött, oksekød, opplæringen, orelhas, ozdoby, pamoka, pap, pas, pas-cu-pas, paso, paso a paso, passo, passo a passo, passo-a-passo, passo-passo le istruzioni, pasta de goma, pasta de miel, pasta flexible, pasta laminada, pernil de cordeiro, picior de miel, pierna de cordero, pintura dos olhos, pişmiş sığır eti, pocelana fria, polymer clay, postupak za ukrasavanje, pravljenje figurica za torte, preparar la comida en miniatura, presunto, prosciutto, pâtisserie, předměty z marcipánu, rendere gli alimenti in miniatura, rendre la nourriture miniature, rindfleisch, rundvlees, ruoka, schinken, schmelzend, schritt für schritt anleitung, schritt-für-schritt, schritt-für-schritt-anleitungen, sculpting, skinka, skinke, soggetti, sonka, souvenirs, stap, stap-voor-stap, stap-voor-stap instructies, stawów jagnięciny, steg for steg, steg-för-steg-instruktion, step, step by step, step-by-lépésre, step-by-step, step-by-step instructions, stvaranje minijaturne hrane, styrofoam, sugarcraft, sugarpaste, suikerglazuur, szynka, sığır eti, technieken, techniken, techniki, techniky, technikák, techniques, tecnicas de decoracion, tecniche, tehnici, tehnike, teknikker, teknikler, telgopor, topo de bolo, topo do bolo, topos de bolo, torte, torte decorate, torten dekorieren, torti, trin, trin for trin, trin-for-trin, trin-for-trin instruktioner, trinn, trinn for trinn, trinn-for-trinn-instruksjoner, tutorial, tutoriale, tutorias, tutorias/ideas para decorar los bizcochos, tutoriel, tutorijal, técnicas, udžbenik, ukrašavanje torti, uputstvo za dekoraciju, varené hovädzie mäso, vařené hovězí maso, virtos jautienos, voedsel, vďaka miniatúrne potravín, wołowiny, zuckerfigürchen, zuckermasse, सजा केक, ट्यूटोरियल मास्टर वर्ग, कदम, कदम दर कदम निर्देश, तकनीक, मॉडलिंग, モデル, ミニチュア, élelmiszer, étape, étape par étape les instructions, öğretici, 一步, 一步一步的指示術, žingsnis, žingsnis po žingsnio, żywność, šunka, şuncă, 宗師級教程, 建模, 裝飾蛋糕, κάνοντας μινιατούρα τροφίμων, βήμα, βήμα προς βήμα οδηγίες, βόειο κρέας, οδηγίες βήμα βήμα, μαγειρεμένο βόειο κρέας, μινιατούρα τροφίμων, αρνί αρθρώσεις, αρνάκι, ζαμπόν, παντεσπάνι art, τεχνικές, τροφή, φροντιστήριο, инструкция, как сделать, крок за кроком, крок за крокам, ножка ягненка, ножка ягня, ніжка ягняти, говеждо месо, говядина, варанай ялавічыны, варени говеждо месо, вареной говядины, вареної яловичини, ветчина, вяндліна, питание, покроково, полимерная глина, пошагово, пошаговые фотки, пакрокава, персонажи, принятия пищи миниатюрные, прийняття їжі мініатюрні, прыняцця ежы мініяцюрныя, миниатюрни храна, миниатюрные пищи, миниатюра, мк, моделиране, майстор-класа урок, майстар-клас, майстер-клас, майстер-класи, маршмеллоу, мастика, мастер-класс, мініатюрні їжі, мініатюра, мініяцюрныя ежы, агнешко бутче, агнешко ставите, лепка, ліплення, ручной работы, ручная работа, украшение тортов, сахарная мастика, уроки прикрашання, стъпка, стъпка по стъпка инструкции, ягнятина, ягнятина суглобів, ягнятина суставов, ягнятина суставаў, яловичина, ялавічына, техники, техника, техніка, туториал, туторіал, тэхніка, фигурки, фигурка на торт, фимо, фігурки, фігуркі, холодный фарфор, харчаванне, храна, шинка, шаг за шагом, шунка, інструкцыя, інструкція, їжа  |
| Опции темы |
Поиск в этой теме |
|
|
|
|


