|
|
 |
|

30.11.2011, 13:03
|
|
–Р–і–Љ–Є–љ–Є—Б—В—А–∞—В–Њ—А
|
|
–†–µ–≥–Є—Б—В—А–∞—Ж–Є—П: 07.09.2010
–°–Њ–Њ–±—Й–µ–љ–Є–є: 7,940
|
|
|
30.11.2011, 18:23
|
|
–Р–і–Љ–Є–љ–Є—Б—В—А–∞—В–Њ—А
|
|
–†–µ–≥–Є—Б—В—А–∞—Ж–Є—П: 07.09.2010
–°–Њ–Њ–±—Й–µ–љ–Є–є: 7,940
|
|
|
01.12.2011, 10:08
|
|
–Р–і–Љ–Є–љ–Є—Б—В—А–∞—В–Њ—А
|
|
–†–µ–≥–Є—Б—В—А–∞—Ж–Є—П: 07.09.2010
–°–Њ–Њ–±—Й–µ–љ–Є–є: 7,940
|
|
|
31.01.2012, 16:46
|
|
–Р–і–Љ–Є–љ–Є—Б—В—А–∞—В–Њ—А
|
|
–†–µ–≥–Є—Б—В—А–∞—Ж–Є—П: 07.09.2010
–°–Њ–Њ–±—Й–µ–љ–Є–є: 7,940
|
|

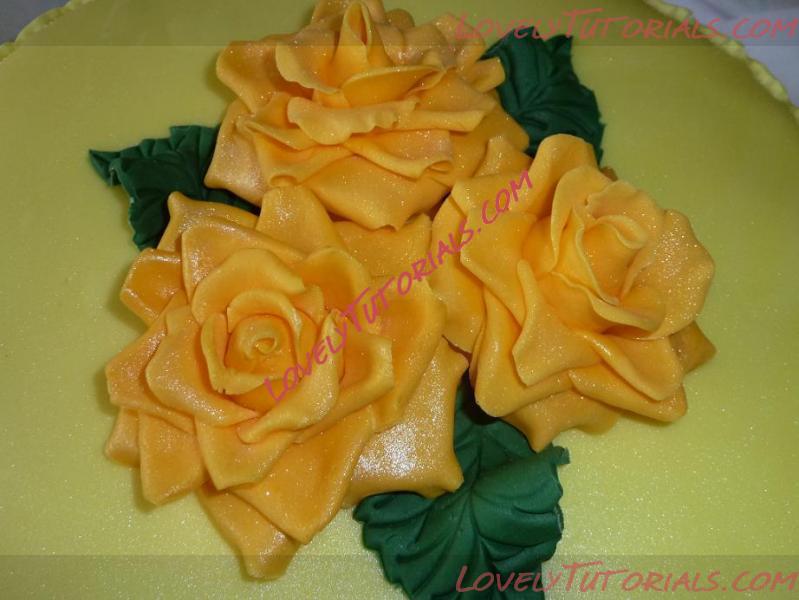
–Ю–≥—А–Њ–Љ–љ–∞—П –±–ї–∞–≥–Њ–і–∞—А–љ–Њ—Б—В—М Louise –Ј–∞ —З—Г–і–љ—Л–є —А–µ—Ж–µ–њ—В

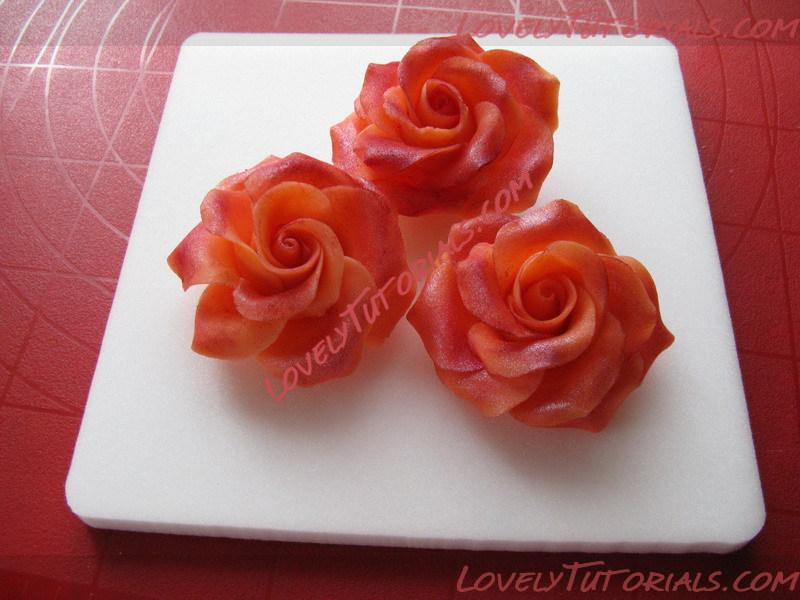
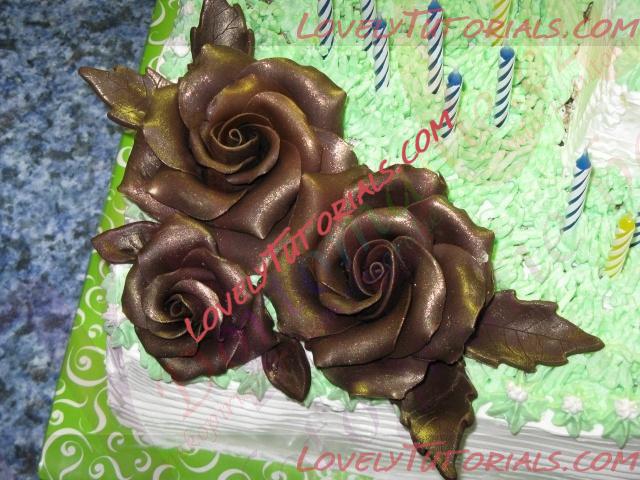
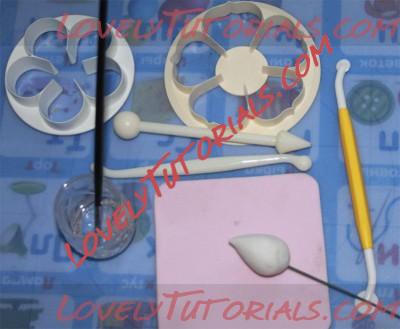
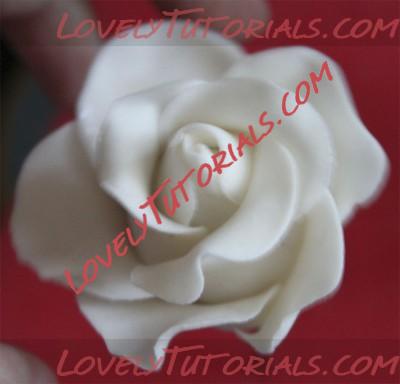
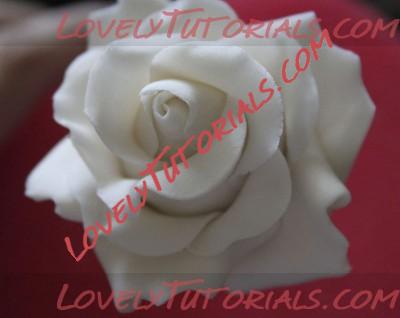
Learn how to make a sugar rose out of gum paste with this rose tutorial. I use one or two sizes of petal cutters when making sugar roses. The sizes of cutters generally depends on the size of the вАЬroseвАЭ cones that I am making. The more petals you add, the more fuller it will get. It looks really pretty when big roses and rose buds is mixed together on a cake.
This is what I use:
Flower paste/gum paste
Gel paste colors
Corn starch
Styrofoam or cake dummie
Flower foam pad (Orchard products)
Dogbone tool or ball tool
Small spatula
Tylo glue
Small brushes
Toothpicks
Rolling pin
Non-stick board
7 tablespoons
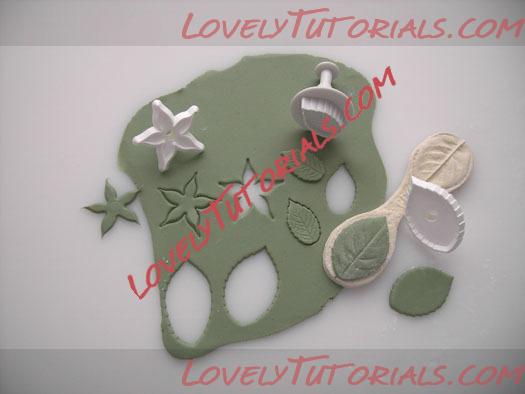
Rose petal cutters in various sizes
Rose leaf cutters in various sizes
Leaf veiner (optional)
Calyx cutters in various sizes
A small plastic bag
White vegetable fat
Edible petal dust
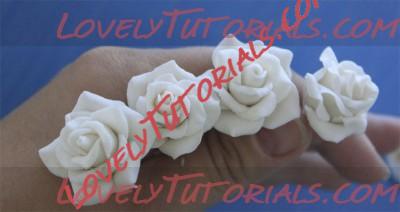
Small rose and rose buds
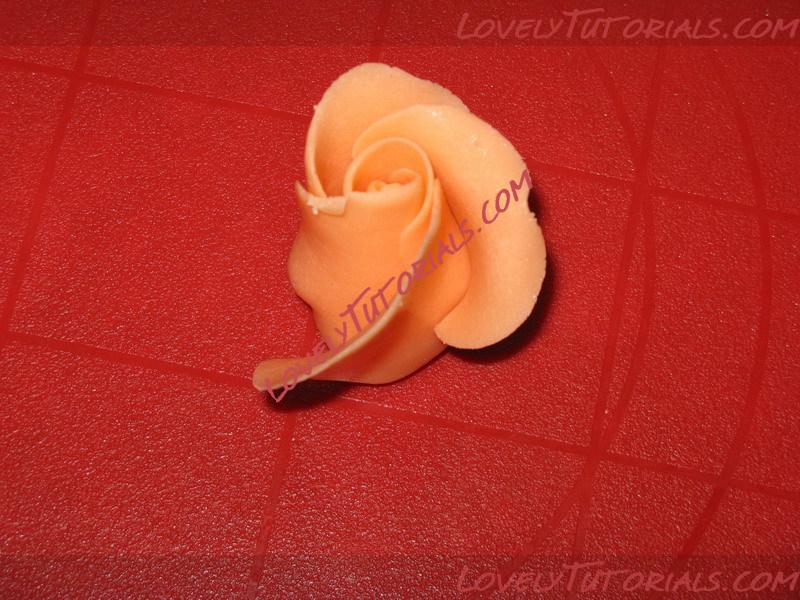
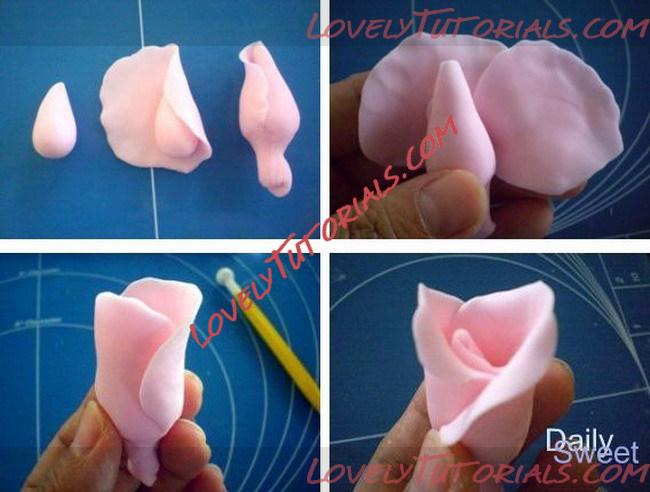
Step 1:
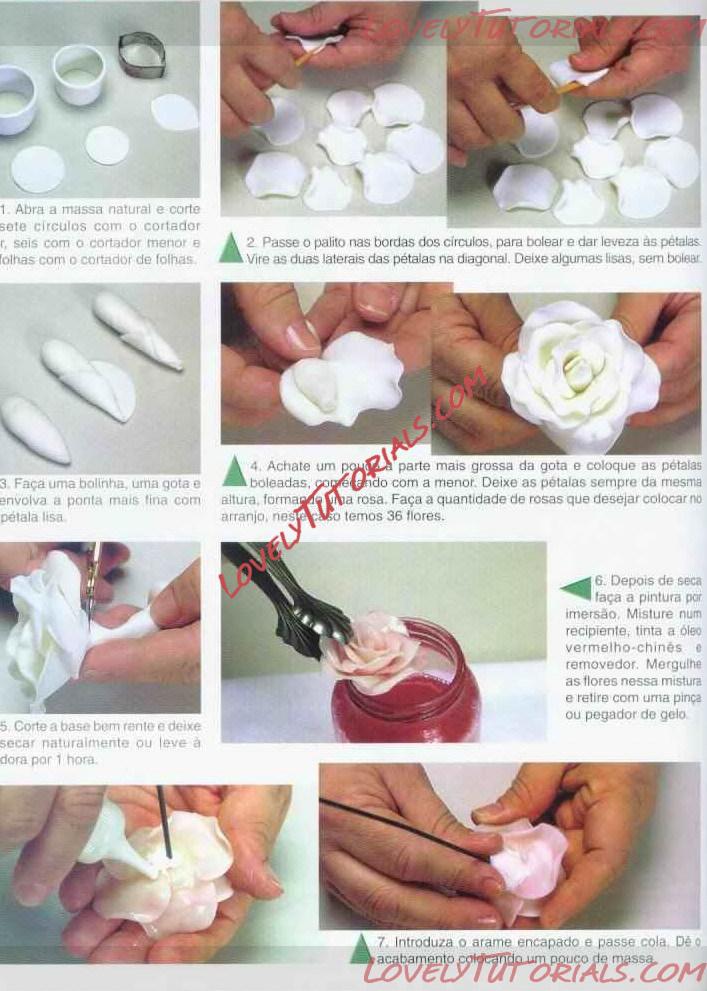
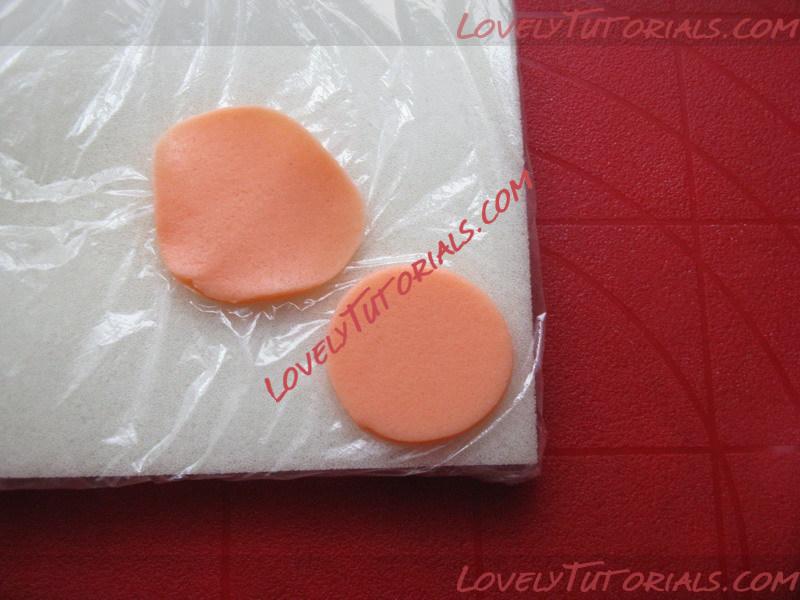
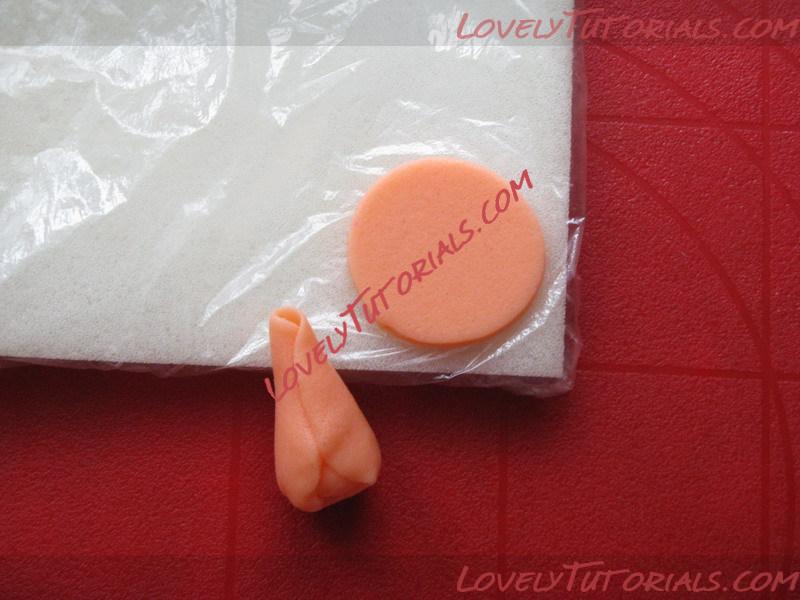
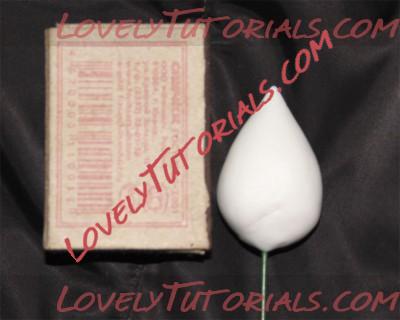
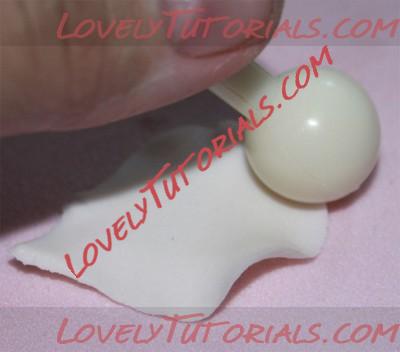
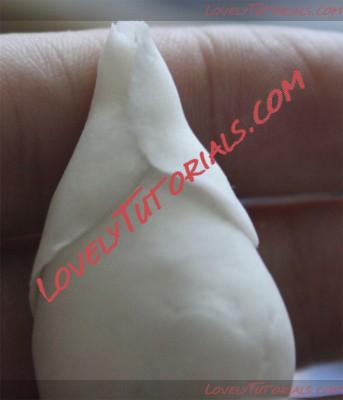
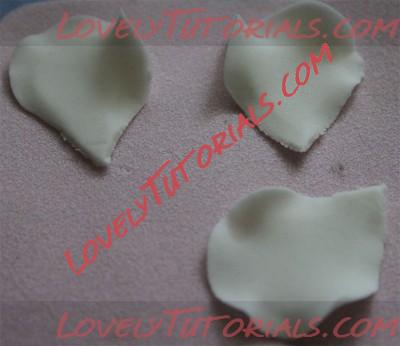
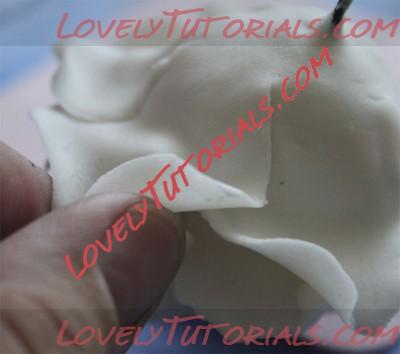
You will need to make a cone (no. 1 in the picture) for each sugar rose you are making. It is a good idea to start making the cones a day or two ahead. Remember that the cones should be a little bit smaller than the size of the petal cutter you will be using. Stick a tooth pick in the bottom af the cone and set aside on the styrofoam/cake dummie to dry completely.
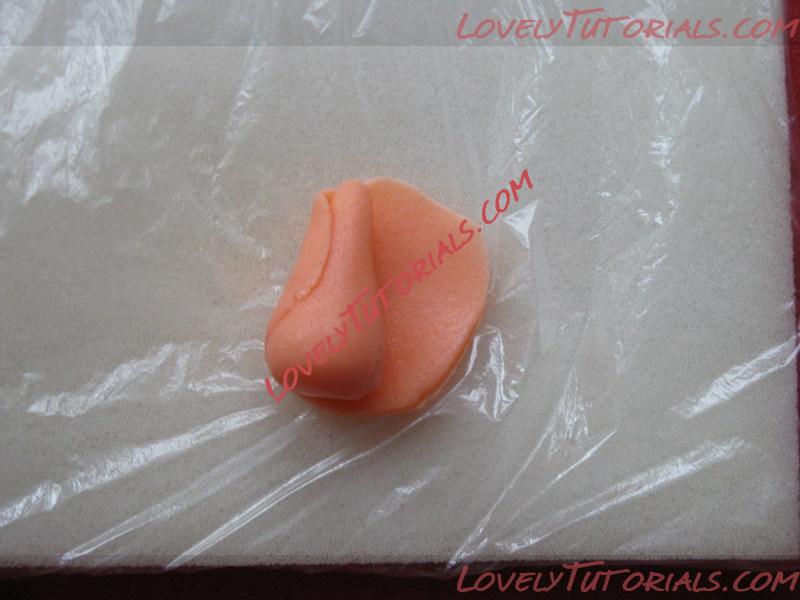
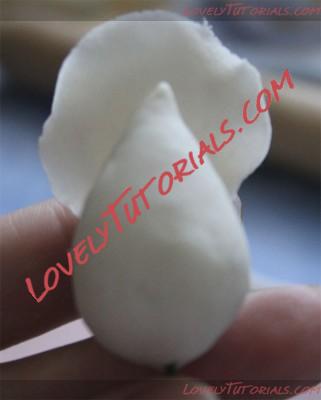
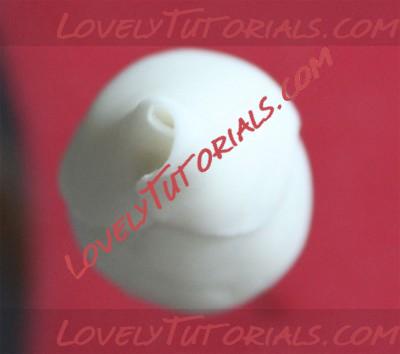
Next step is to roll out your flower paste/gum paste thinly and cut out three rose petals. Use your dogbone tool on the flower foam pad and carefully thin the edge of the rose petals so it get slightly frilly. Put two of the rose petals in a plastic bag to prevent them from drying out. Brush the cone with tylo glue and wrap one rose petal thight around it, so that the pointed end of the rose cone is covered (no. 2 in the picture).
TIP! Use this as a closed rose bud
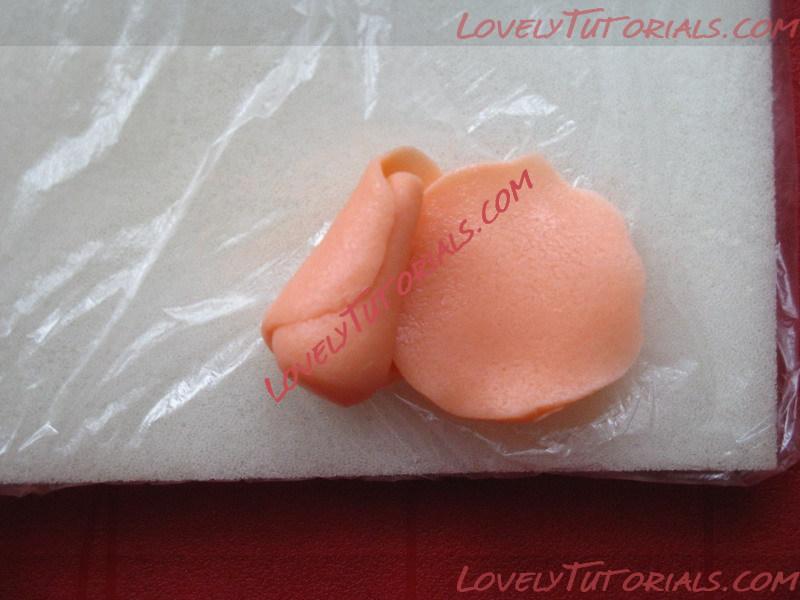
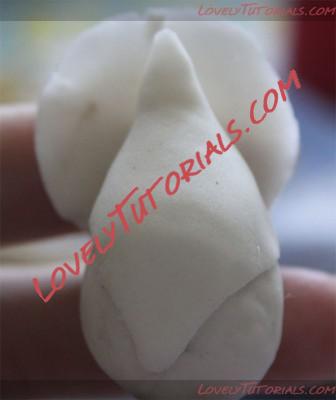
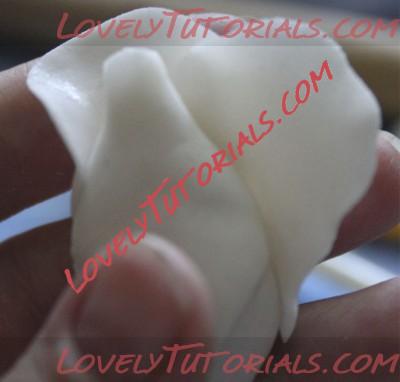
Brush with tylo glue once again and take the two last petals from the plastic bag. Wrap them around the cone so they slightly overlap each other (no. 3 in the picture). Arrange the rose petals and make вАЬmovementsвАЭ with your fingers and leave them to dry for about 30 minutes or more before you add more rose petals.
TIP! Use this as a open rose bud
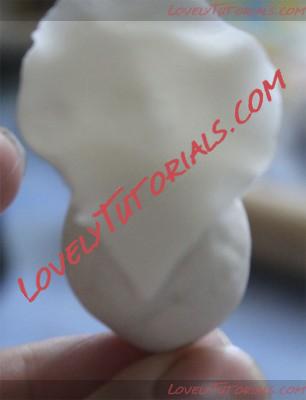
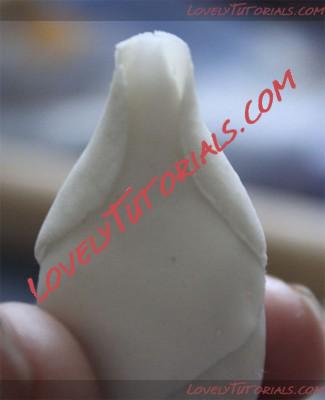
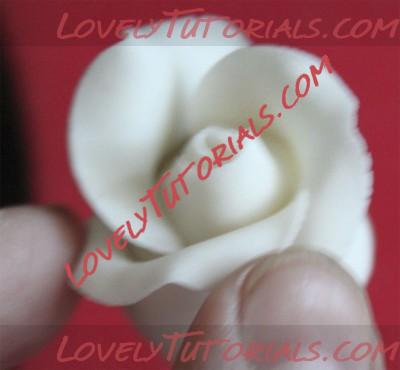
Cut out three more rose petals, just like the ones you made to begin with. Brush the rose petals lightly with tylo glue and arrange the next three rose petals, again overlaping the petals (no. 4 in the picture) Again make вАЬmovementsвАЭ with your fingers and leave your small sugar rose to dry comepletely.
TIP! Use this as a small rose
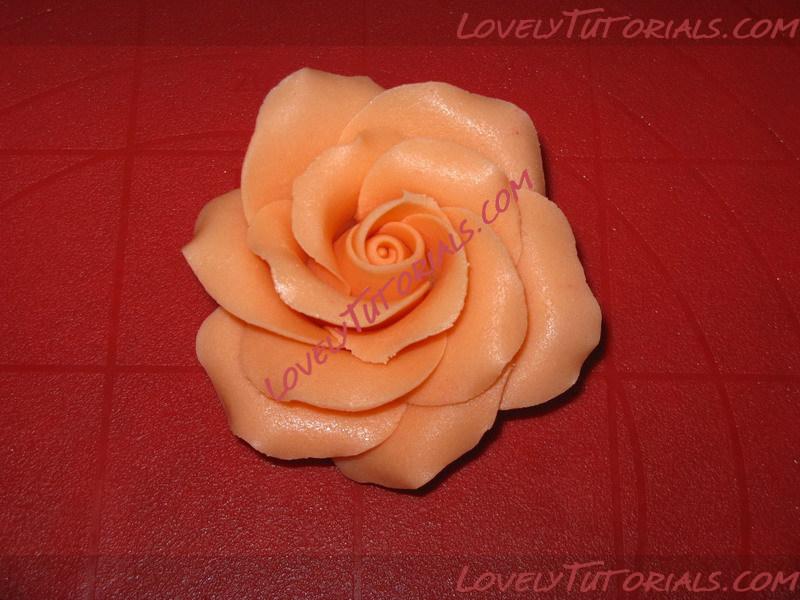
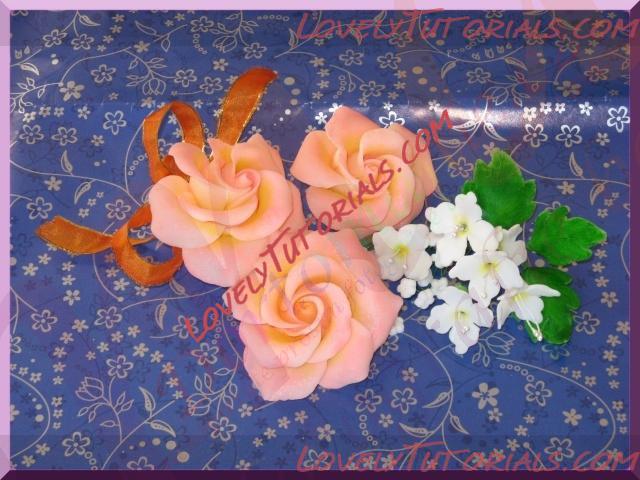
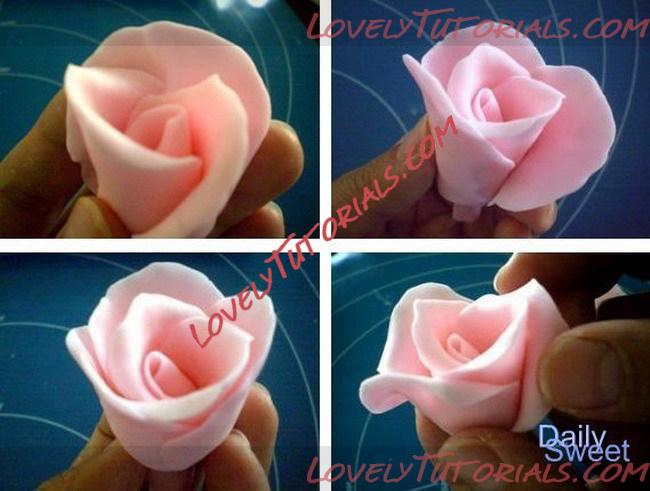
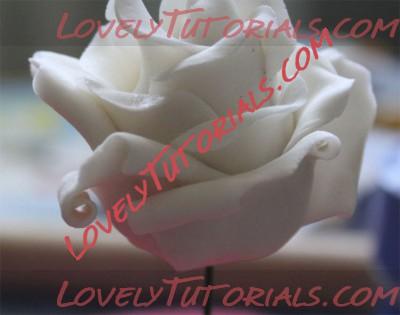
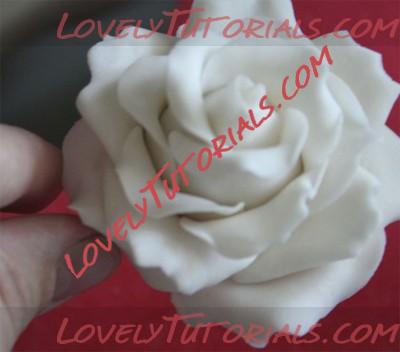
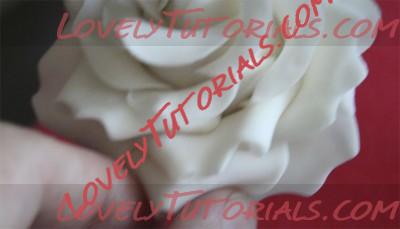
Step 2:
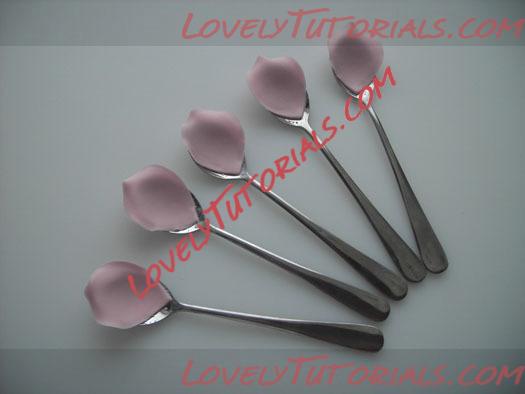
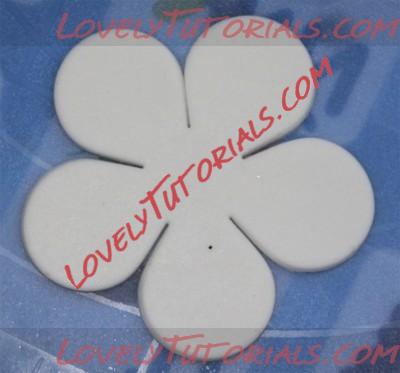
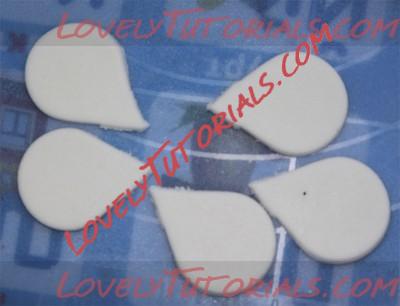
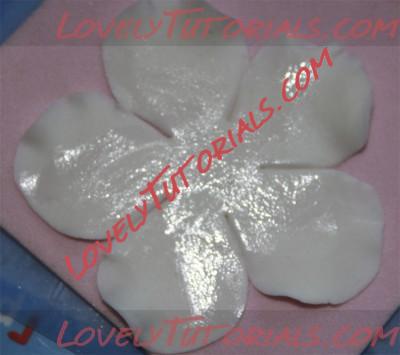
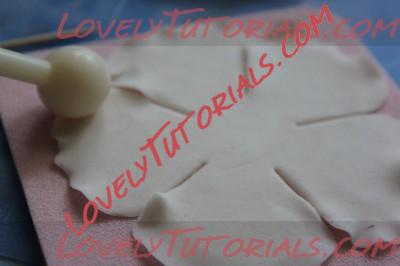
If you want a larger sugar rose, do as follows: Roll out your flower paste/gum paste thinly, this time cut out five rose petals with the next size of cutter. Use your dogbone tool on all five petals, as in step 1. Take five tabelspoons and dust them with a little corn starch (this will prevent the rose petals from sticking to the tbsp).
Put the rose petals on the teaspoons and let the petals go over the top of the edge of the spoons (as shown in the picture). Let the rose petals dry in the spoons for around 15-20 minutes. Then brush the lower half of the petals with tylo glue and arrange the petals arround the rose, so that they overlap each other. Set the rose aside to dry completely.
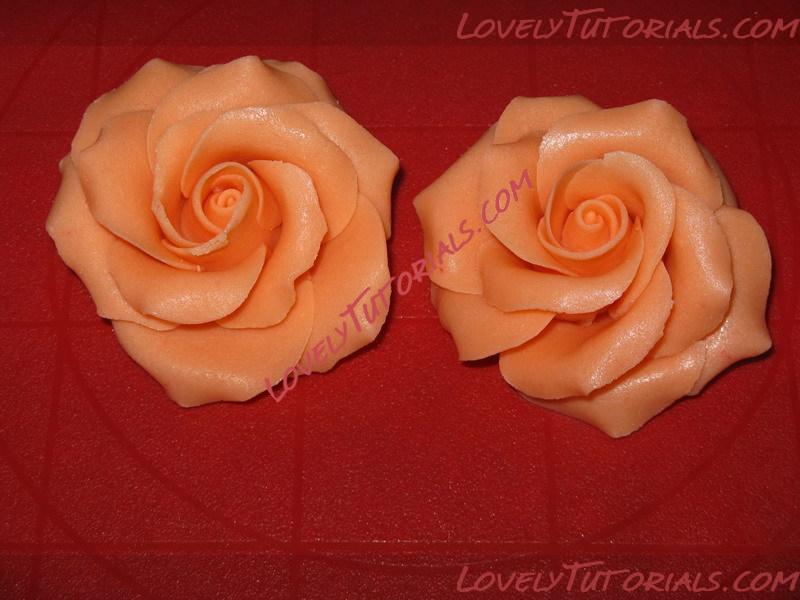
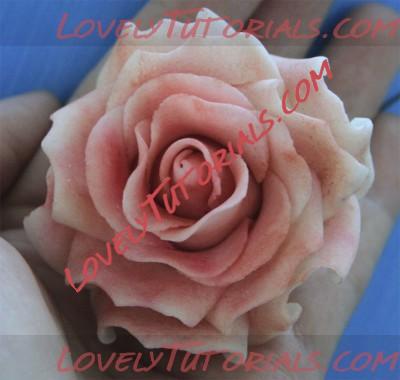
If you want an even bigger sugar rose, cut out seven more rose petals and put them on the tablespoons. Since the rose is getting rather big now you need to carefully turn the rose upside down for the last rose petals. Attach the rose petals with tylo glue like previous. Let the big sugar rose dry completely.
TIP! Use a piece of foam to place the rose on, to prevent it from breaking
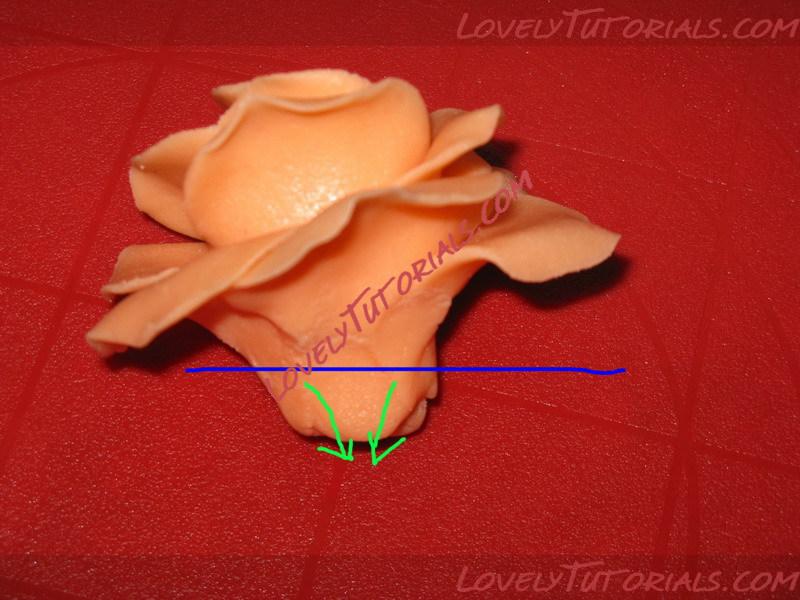
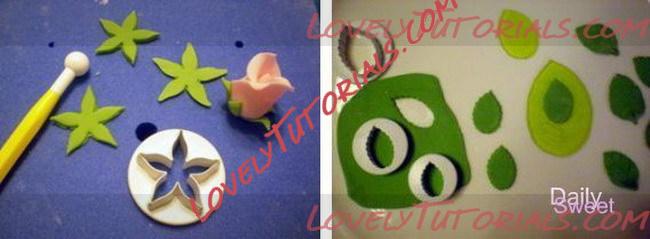
Step 3:
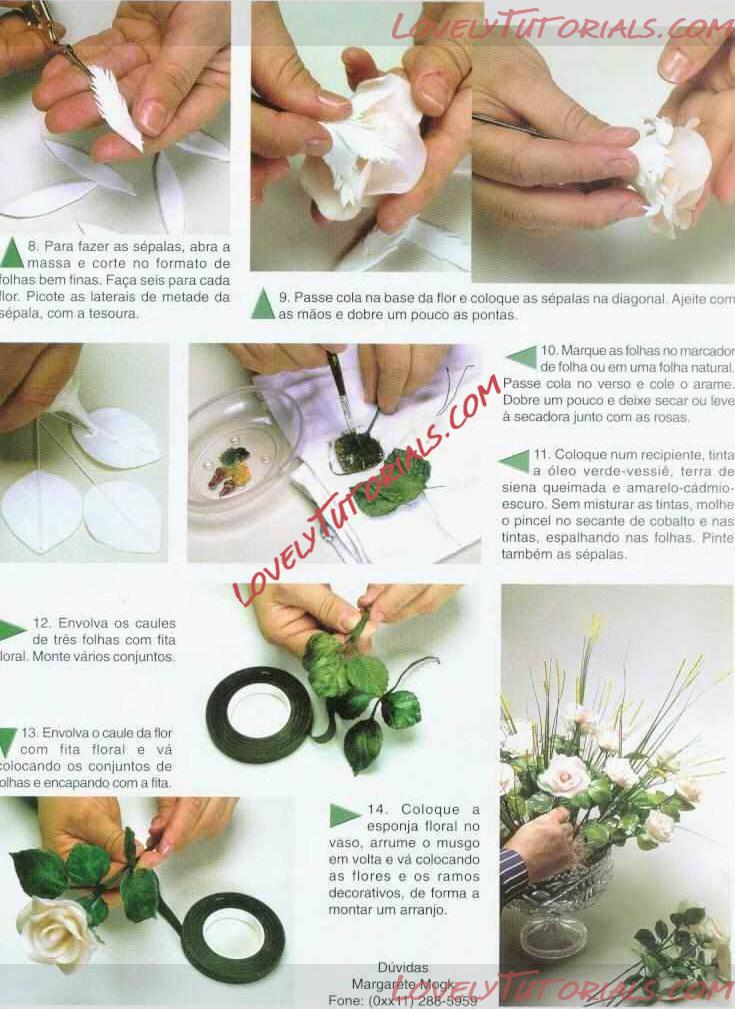
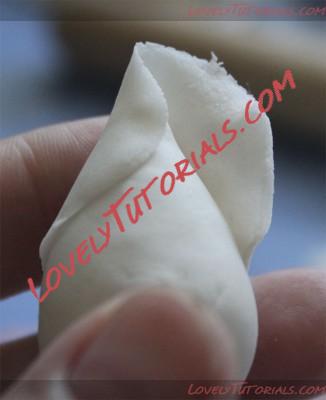
When your rose is dry, roll out some green flower paste/gum paste and cut out a calyx that fit the rose. Brush the calyx with tylo glue and attach it to the bottom of the rose. When making small sugar rose buds, put a small ball of green flower paste/gum paste on the rose buds after the calyx as well.
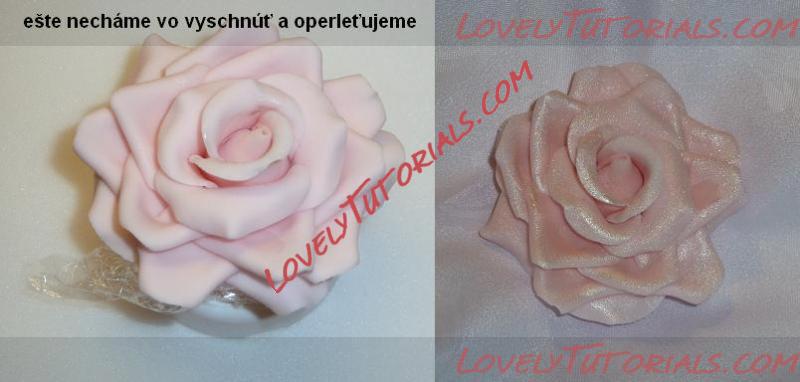
TIP! Apply dry edible petal powders with a soft brush on your roses, for great looking effects.
|
01.02.2012, 18:18
|
|
–Р–і–Љ–Є–љ–Є—Б—В—А–∞—В–Њ—А
|
|
–†–µ–≥–Є—Б—В—А–∞—Ж–Є—П: 07.09.2010
–°–Њ–Њ–±—Й–µ–љ–Є–є: 7,940
|
|
–Ю–≥—А–Њ–Љ–љ–∞—П –±–ї–∞–≥–Њ–і–∞—А–љ–Њ—Б—В—М –Э—О—И–∞ –Ъ–ї–µ–љ–≥ –Ј–∞ –Ь–∞—Б—В–µ—А-–Ї–ї–∞—Б—Б
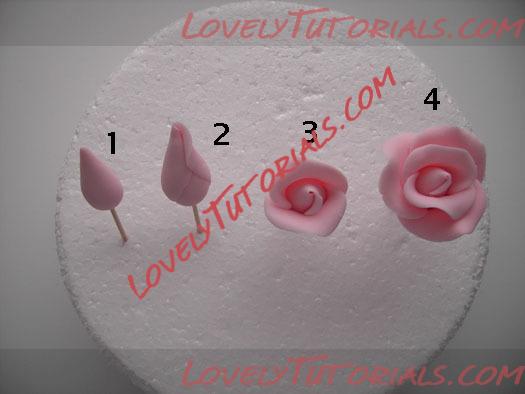
–Ф–µ–≤–Њ—З–Ї–Є, –Ї–∞–Ї –Є –Њ–±–µ—Й–∞–ї–∞, –њ–Њ–Ї–∞–ґ—Г –Ї–∞–Ї —П –і–µ–ї–∞—О —А–Њ–Ј—Л. –Э–∞–і–µ—О—Б—М —З—В–Њ –Љ–Њ–є –Ь–Ъ –њ—А–Є–≥–Њ–і–Є—В—М—Б—П. –Я–Њ–Ї–∞–Ј—Л–≤–∞—В—М –±—Г–і—Г –њ—А—П–Љ–Њ –њ–Њ—Н—В–∞–њ–љ–Њ, —В.–Ї. —Г –Љ–љ–Њ–≥–Є—Е –њ—А–Њ–±–ї–µ–Љ—Л –Є–Љ–µ–љ–љ–Њ –љ–∞ –љ–∞—З–∞–ї—М–љ–Њ–Љ —Н—В–∞–њ–µ. –Ш —В–∞–Ї –љ–∞—З–љ–µ–Љ:
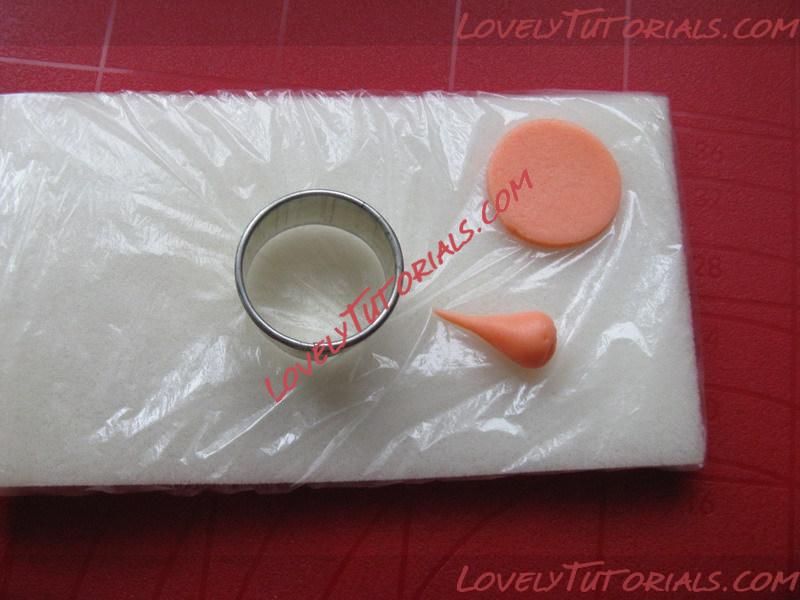
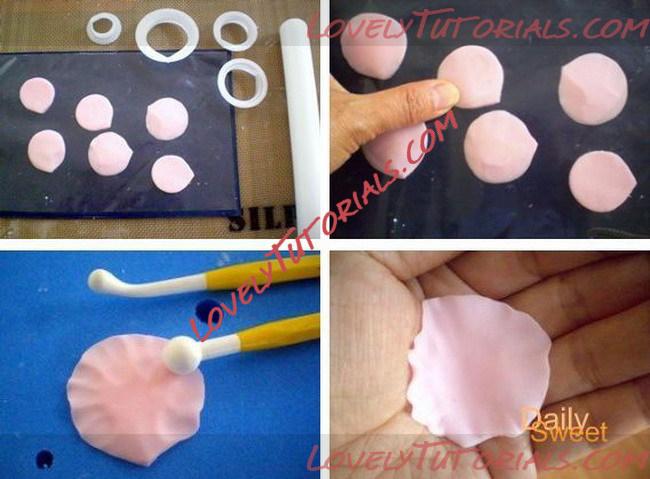
–Ф–ї—П –љ–∞—З–∞–ї–∞ –±–µ—А–µ–Љ –њ—А–Њ–≤–Њ–ї–Њ–Ї—Г –Є –Ј–∞–≥–Є–±–∞–µ–Љ –Ї–Њ–ї–µ—З–Ї–Њ

–Ч–∞—В–µ–Љ –љ–∞ –њ—А–Њ–≤–Њ–ї–Њ–Ї—Г –Њ–і–µ–≤–∞–µ–Љ —И–∞—А–Є–Ї –Љ–∞—Б—В–Є–Ї–Є, –љ–∞ —Н—В–Њ–Љ —Н—В–∞–њ–µ –≤–∞–ґ–љ–Њ –љ–∞—И —И–∞—А–Є–Ї –њ—А—П–Љ–Њ –њ—А–Є–Ї–∞—В–∞—В—М –Ї –њ—А–Њ–≤–Њ–ї–Њ–Ї–µ, –ї–Њ–ґ–Є–Љ –љ–∞ —Б—В–Њ–ї –Є –њ—А–Њ–Ї–∞—В—Л–≤–∞–µ–Љ, —В–µ–Љ —Б–∞–Љ—Л–Љ –њ—А–Є–ґ–Є–Љ–∞—П –Љ–∞—Б—В–Є–Ї—Г –Ї –њ—А–Њ–≤–Њ–ї–Њ–Ї–µ. –Ї–Њ–≥–і–∞ —Е–Њ—А–Њ—И–Њ –њ—А–Њ–Ї–∞—В–∞–ї–Є —Д–Њ—А–Љ–Є—А—Г–µ–Љ –Ї–∞–њ–ї—О. –ѓ –њ–Њ–Ї–∞–ґ—Г —А—П–і–Њ–Љ —Б–Њ —Б–њ–Є—З–Ї–∞–Љ–Є, —З—В–Њ–±—Л –±—Л–ї –њ–Њ–љ—П—В–µ–љ —А–∞–Ј–Љ–µ—А.
–Ю—Б—В–∞–≤–ї—П–µ–Љ –љ–∞—И—Г –Ї–∞–њ–ї—О —Б—Г—И–Є—В—М –њ–Њ–Ї–∞ –љ–µ –њ—А–Њ—Б–Њ—Е–љ–µ—В –њ–Њ–ї–љ–Њ—Б—В—М—О (–љ–∞ —Б—Г—В–Ї–Є –њ—А–Є–Љ–µ—А–љ–Њ).
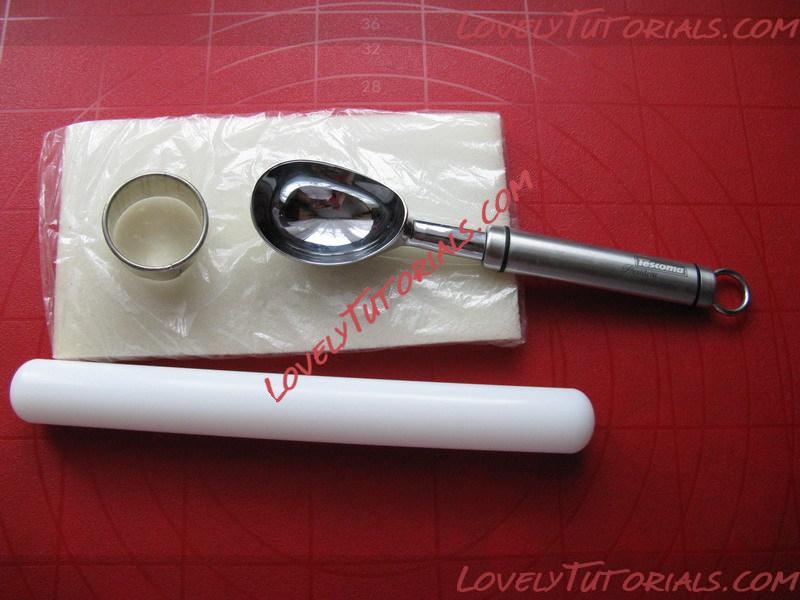
–Ъ–∞–њ–ї—П –љ–∞—И–∞ –≤—Л—Б–Њ—Е–ї–∞. (–Ї —Б–ї–Њ–≤—Г –Њ —Ж–≤–µ—В–Њ—З–љ–Њ–є –Љ–∞—Б—В–Є–Ї–µ –С–µ–є–Ї–ї–Ј, –Ј–∞ —Б—Г—В–Ї–Є –Њ–љ–∞ —В–∞–Ї –Є –љ–µ –њ—А–Њ—Б–Њ—Е–ї–∞).–У–Њ—В–Њ–≤–Є–Љ –Є–љ—Б—В—А—Г–Љ–µ–љ—В –Є –љ–∞—З–Є–љ–∞–µ–Љ —В–≤–Њ—А–Є—В—М. –Ь–Њ–Є –≤—Л—А—Г–±–Ї–Є —А–∞–Ј–Љ–µ—А 7 –Є 9 —Б–Љ.
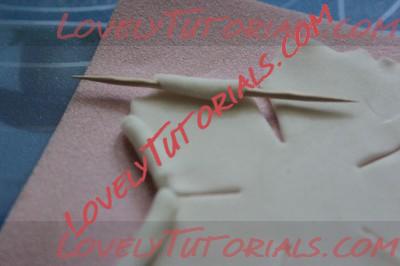
–Ф–µ–ї–∞–µ–Љ –≤—Л—А—Г–±–Ї—Г –њ—П—В–Є–ї–Є—Б—В–љ–Є–Ї–Њ–Љ, —В–∞–Ї–Є—Е –љ–∞–Љ –њ–Њ–љ–∞–і–Њ–±–Є—В—Б—П –і–≤–µ
–†–∞–Ј—А–µ–Ј–∞–µ–Љ –Њ–і–љ—Г –љ–∞ –ї–µ–њ–µ—Б—В–Ї–Є
–Т–Њ–ї–љ–Є–Љ –ї–µ–њ–µ—Б—В–Ї–Є —И–∞—А–Є–Ї–Њ–Љ, –µ—Б–ї–Є –Љ–∞—Б—В–Є–Ї–∞ –±—Л—Б—В—А–Њ —Б–Њ—Е–љ–µ—В, –і–µ–ї–∞–є—В–µ –њ–Њ –Њ–і–љ–Њ–Љ—Г –ї–µ–њ–µ—Б—В–Ї—Г, –Њ—Б—В–∞–ї—М–љ—Л–µ –Ј–∞–Ї—А—Л–≤–∞–є—В–µ
–Ч–∞–≤–Њ—А–∞—З–Є–≤–∞–µ–Љ –њ–µ—А–≤—Л–є –ї–µ–њ–µ—Б—В–Њ–Ї,–њ—А–µ–і–≤–∞—А–Є—В–µ–ї—М–љ–Њ —Б–Љ–Њ—З–Є–≤ –µ–≥–Њ –њ–Њ –≤—Б–µ–є –њ–Њ–≤–µ—А—Е–љ–Њ—Б—В–Є. –њ—А—П—З–µ–Љ —Б–µ—А–µ–і–Є–љ–Ї—Г, –њ–Њ —Д–Њ—В–Њ –і–Њ–ї–ґ–љ–Њ –±—Л—В—М –њ–Њ–љ—П—В–љ–Њ. –Ъ–Њ–≥–і–∞ –±—Г–і–µ—В–µ –Њ–±–Њ—А–∞—З–Є–≤–∞—В—М , –љ–µ —Б—В–µ—Б–љ—П–є—В–µ—Б—М –њ–ї–Њ—В–љ–Њ –њ—А–Є–ґ–Є–Љ–∞—В—М –ї–µ–њ–µ—Б—В–Њ–Ї —Г –≤–µ—А—Е—Г—И–Ї–Є, —В–Њ–ї—М–Ї–Њ —В–∞–Ї –≤—Л —Б–Ї—А–Њ–µ—В–µ —Б–µ—А–µ–і–Є–љ–Ї—Г.
–≠—В–Њ –≤–Є–і —Б–≤–µ—А—Е—Г, –љ–∞–і–µ—О—Б—М —Г –≤—Б–µ—Е –њ–Њ–ї—Г—З–Є–ї–Њ—Б—М –Є —Б–µ—А–µ–і–Є–љ–Ї–∞ –љ–µ –≤–Є–і–љ–∞
–С–µ—А–µ–Љ –≤—В–Њ—А–Њ–є –ї–µ–њ–µ—Б—В–Њ–Ї –≤–Њ–ї–љ–Є–Љ –Є –Њ–±–Њ—А–∞—З–Є–≤–∞–µ–Љ –љ–∞—И –Ї–Њ–љ—Г—Б —Б –і—А—Г–≥–Њ–є —Б—В–Њ—А–Њ–љ—Л
–Т–Њ—В —З—В–Њ —Г –Љ–µ–љ—П –њ–Њ–ї—Г—З–Є–ї–Њ—Б—М
–Т–Њ–ї–љ–Є–Љ –Њ—Б—В–∞–≤—И–Є–µ—Б—П —В—А–Є –ї–µ–њ–µ—Б—В–Ї–∞
–°–Љ–∞—З–Є–≤–∞–µ–Љ, –љ–∞ —Д–Њ—В–Њ –њ–Њ–Ї–∞–Ј–∞–љ–∞ –Њ–±–ї–∞—Б—В—М –Ї–Њ—В–Њ—А—Г—О —П —Б–Љ–Њ—З–Є–ї–∞

–Ф—А—Г–≥ –Ј–∞ –і—А—Г–≥–Њ–Љ –њ—А–Є–Ї–ї–∞–і—Л–≤–∞–µ–Љ –ї–µ–њ–µ—Б—В–Ї–Є –Ї –љ–∞—И–µ–є –±—Г–і—Г—Й–µ–є —А–Њ–Ј–µ

–†—Г–Ї–∞–Љ–Є —А–∞—Б–њ—А–∞–≤–ї—П–µ–Љ –ї–µ–њ–µ—Б—В–Ї–Є
–Т–Њ—В —В–Њ, —З—В–Њ —Г –љ–∞—Б –њ–Њ–ї—Г—З–Є–ї–Њ—Б—М –љ–∞ —Н—В–Њ–Љ —Н—В–∞–њ–µ

–Т—Л—А–µ–Ј–∞–µ–Љ –≤—В–Њ—А–Њ–є –њ—П—В–Є–ї–Є—Б—В–љ–Є–Ї,—З—Г—В—М –њ—А–Њ–Ї–∞—В–∞–µ–Љ —Б–Ї–∞–ї–Ї–Њ–є, –≤–Њ–ї–љ–Є–Љ –ї–µ–њ–µ—Б—В–Ї–Є, —Б–Љ–∞—З–Є–≤–∞–µ–Љ —Б–µ—А–µ–і–Є–љ–Ї—Г –Є –ї–µ–њ–µ—Б—В–Ї–Є. –Э–∞ —Д–Њ—В–Њ –≤–Є–і–љ–Њ –Њ–±–ї–∞—Б—В—М –≥–і–µ —П –њ—А–Њ—И–ї–∞—Б—М –Ї–Є—Б—В–Њ—З–Ї–Њ–є.
–Ю–і–µ–≤–∞–µ–Љ –љ–∞ –љ–∞—И—Г —А–Њ–Ј–Њ—З–Ї—Г, –њ—А–Є–ґ–Є–Љ–∞–µ–Љ, —А—Г–Ї–∞–Љ–Є –њ—А–Є–і–∞–µ–Љ —Д–Њ—А–Љ—Г

–Т—Л—А–µ–Ј–∞–µ–Љ —Б–ї–µ–і—Г—О—Й–Є–є –њ—П—В–Є–ї–Є—Б—В–љ–Є–Ї, –±–Њ–ї—М—И–µ–≥–Њ —А–∞–Ј–Љ–µ—А–∞, –≤–Њ–ї–љ–Є–Љ –ї–µ–њ–µ—Б—В–Ї–Є

–Ч–∞–Ї—А—Г—З–Є–≤–∞–µ–Љ –ї–µ–њ–µ—Б—В–Ї–Є, –Љ–Њ–ґ–љ–Њ —Б–і–µ–ї–∞—В—М —Н—В–Њ —А—Г–Ї–∞–Љ–Є –Є–ї–Є —Б –њ–Њ–Љ–Њ—Й—М—О –Ј—Г–±–Њ—З–Є—Б—В–Ї–Є
–Ю–і–µ–≤–∞–µ–Љ –љ–∞ —А–Њ–Ј—Г, –њ—А–Є–ґ–Є–Љ–∞–µ–Љ, —А–∞—Б–њ—А–∞–≤–ї—П–µ–Љ
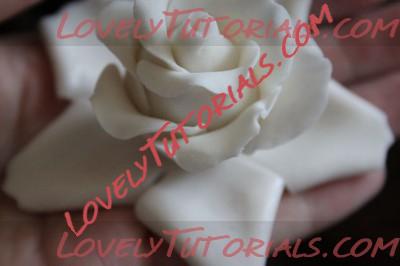
–Т –Є—В–Њ–≥–µ –њ–Њ–ї—Г—З–∞–µ–Љ —В–∞–Ї—Г—О —А–Њ–Ј–Њ—З–Ї—Г

–Т—Л—А–µ–Ј–∞–µ–Љ –µ—Й—С –Њ–і–Є–љ –њ—П—В–Є–ї–Є—Б—В–љ–Є–Ї, –µ–≥–Њ —П –љ–∞ –Ј—Г–±–Њ—З–Є—Б—В–Ї—Г –љ–µ –Ј–∞–Ї—А—Г—З–Є–≤–∞–ї–∞, –≤—Б—С —Б–і–µ–ї–∞–ї–∞ —А—Г–Ї–∞–Љ–Є, –љ–∞ –Љ–Њ–є –≤–Ј–≥–ї—П–і —В–∞–Ї —Б–Љ–Њ—В—А–Є—В—М—Б—П –µ—Б—В–µ—Б—В–≤–µ–љ–љ–µ–є.
–Т–Њ—В —В–∞–Ї—Г—О —А–Њ–Ј—Г –Љ—Л –њ–Њ–ї—Г—З–Є–ї–Є –≤ –Є—В–Њ–≥–µ
–≠—В–Њ —А–Њ–Ј–∞ –Њ–Ї—А–∞—И–µ–љ–∞—П —Б—Г—Е–Є–Љ–Є –Ї—А–∞—Б–Є—В–µ–ї—П–Љ–Є, –њ–µ—А–≤—Л–µ 5 –ї–µ–њ–µ—Б—В–Ї–Њ–≤ –Є–Ј —А–Њ–Ј–Њ–≤–Њ–є –Љ–∞—Б—В–Є–Ї–Є, –Ј–∞–Ї—А—Г—З–Є–≤–∞–ї–∞ –±–µ–Ј –Ј—Г–±–Њ—З–Є—Б—В–Њ–Ї, —А—Г–Ї–∞–Љ–Є
–Р —Н—В–Њ –Љ–∞–ї–µ–љ—М–Ї–Є–µ —А–Њ–Ј–Њ—З–Ї–Є —Б–і–µ–ї–∞–љ—Л–µ –њ–Њ —В–Њ–Љ—Г –ґ–µ –њ—А–Є–љ—Ж–Є–њ—Г —Б–∞–Љ—Л–Љ–Є –Љ–∞–ї–µ–љ—М–Ї–Є–Љ–Є –≤—Л—А—Г–±–Ї–∞–Љ–Є.
|
24.02.2012, 16:08
|
|
–Р–і–Љ–Є–љ–Є—Б—В—А–∞—В–Њ—А
|
|
–†–µ–≥–Є—Б—В—А–∞—Ж–Є—П: 07.09.2010
–°–Њ–Њ–±—Й–µ–љ–Є–є: 7,940
|
|
|
23.04.2012, 11:00
|
|
–Р–і–Љ–Є–љ–Є—Б—В—А–∞—В–Њ—А
|
|
–†–µ–≥–Є—Б—В—А–∞—Ж–Є—П: 07.09.2010
–°–Њ–Њ–±—Й–µ–љ–Є–є: 7,940
|
|
|
|
|
|
–Ь–µ—В–Ї–Є
|
anlegget, anl√§ggning, armado de los ramos, arranjo, artesanatos passo a passo, augalas, baking, biljka, bitki, blad, blade, blader, bladeren, blatt, bloem, bloemen, blomma, blommor, blomst, blomster, blume, blumen, bl√Љten, bl√Љtenpaste, bl√§tter, boeket, bouquet, buchet, buket, bukett, bukiet, buqu√™, cake decorating, cake decorating techniques, cer√Ґmica pl√°stica, chiodi di garofano, clavo de olor, clous de girofle, cloves, cold porcelain, cold porcelain figurines, cold porcelain flowers, confeitando bolos, csokor, cukrini≈≥ gƒЧli≈≥, curso completo de flores, curso de modelado, cvijet, cvijeƒЗe, decoracion de pasteles, decoraci√≥n de tortas, decorare le torte, decorazioni, deko fondant, dekorace na dort, dekoracija, dekoracije, dekorasyon, dekor√°cie, el abc del armado de ramos, feuille, feuilles, fimo, fimo flowers, fiore, fiori, fleurs, floare, flogistica, flor, floral inspirations, flores, flores azucar, flores e folhas, flori, floristics, floristik, floristikk, floristique, flor√≠stica, flower, flower paste, flowering plants, flowers, flowers on a wire, foglia, foglie, folha, folhas, folhas pintadas, fondan, fondant, fondente, fotopostup, frunze, gum pasta, gum paste, gum paste flowers, gumpaste, gumpaste flowers class, g√Љl, g√Љller, gƒЧlƒЧ, gƒЧlƒЧs, hand painting, handmodelliert, hideg porcel√°n, hladno porculan, hoja, hojas, how to, how t—Ж–≤–µ—В—Л –љ–∞ –њ—А–Њ–≤–Њ–ї–Њ–Ї–µ, how-to's, h≈Щeb√≠ƒНek, impianto, jak na, kage dekoration, kagedekoration, kakebaking, kaldt porselen, kallt porslin, kalt porzellan, kasvi, kolde porcel√¶n, koud porselein, krok za krokem, kukka, kukkakimppu, kukkia, kvetina, kvety, kvƒЫtina, kvƒЫtiny, kwiat, kwiaty, kylm√§ posliini, kytica, la mod√©lisation, lapai, lapas, leaf, leaves, lehdet, lehti, levelek, lev√©l, list, list√≠, li≈°ƒЗe, li≈Ыcie, li≈ЫƒЗ, l√≠stia, l√≠stky na dr√°tku, making sugar flowers, making the rosebud, marshmallow, masa flexible, mazzo, modelado, modelagem, modelare, modeling, modeling paste, modeliranje, modellazione, modelleme, modellering, modellieren, modellierpaste, modell…Щ≈Яdirm…Щ, modelovanie, modelov√°n√≠, modelowanie, montando, motivtorten, nelken, n√°vody a postupy, n√°vody na kvƒЫty a l√≠stky, n√ґv√©ny, oasis o esponja de floristeria, pap, paso a paso, passo a passo, passo-a-passo, pasta flexible, pflanze, plant, planta, plante, plantes, plantƒГ, pocelana fria, polymer clay, polymer clay flowers tutorial, porcelaine froide, porcelana fria, porcelana fr√≠a, porcellana fredda, postup klinƒНek, postupak za ukrasavanje, puok≈°tƒЧ, ramo, rastlina, rece por≈£elan, rododendron, roos, rosa, rosas, rose, rosen, roser, roses, rosor, rostlina, rozen, ro≈ЊƒЧ, ro≈ЊƒЧs, ro≈Ыlina, ruusu, ruusut, ru≈Њa, ru≈Њe, r√≥zsa, r√≥≈Љa, r√≥≈Љe, r≈ѓ≈Њe, schritt f√Љr schritt anleitung, schritt-f√Љr-schritt, sculpey flowers, sculpting, simple, soƒЯuk porselen, stamens, steg, steg for steg, step by step, step-by-step, strau√Я, studen√љ porcel√°n, styrofoam, sugar cane flowers, sugar cloves, sugar flower, sugar flowers, sugar flowers for cake decorating, sugar paste flowers, sugar rose, sugarcraft, sugarpaste, sukker art, technique utilis√©e fleurs en sucre cru, tecnicas de decoracion, tecniche, thai flowers, torte, torte decorate, torten dekorieren, torti, trandafir, trandafiri, trin for trin, trin-for-trin, trinn for trinn, tutorial, tutorijal, ukra≈°avanje torti, uputstvo za dekoraciju, vir√°g, vir√°gok, wedding cake, wedding cakes, wire, yaprak, yapraklar, zimno porcelany, zuckerblumen, аЄФаЄ≠аЄБаєДаЄ°аєЙ, а§Єа§Ьа§Њ а§Ха•За§Х, а§Ѓа•Йа§°а§≤а§ња§Ва§Ч, гГҐгГЗгГЂ, √Іi√Іek, √Іi√Іek modelleme, √ґkade, ≈°alto porceliano, еїЇж®°, и£Эй£ЊиЫЛз≥Х, мІДлЛђлЮ?, ќЇѕБѕНќ± ѕАќњѕБѕГќµќїќђќљќЈ, ќЉѕАќњѕЕќЇќ≠ѕДќњ, ќ±ќґќ±ќїќ≠ќ±, ќїќњѕЕќїќњѕНќіќє, ќїќњѕЕќїќњѕНќіќєќ±, ѕДќ± ѕЖѕНќїќїќ±, ѕДѕБќєќ±ќљѕДќђѕЖѕЕќїќїќњ, ѕДѕБќєќ±ќљѕДќђѕЖѕЕќїќїќ±, ѕЖѕНќїќїќ±, ѕЖѕЕѕДѕМ, –Ї–≤–µ—В–Ї–∞, –Ї–≤–µ—В–Ї—Ц, –Ї–≤—Ц—В–Є, –Ї–≤—Ц—В–Ї–∞, –Ї–∞–Ї —Б–ї–µ–њ–Є—В—М —А–Њ–Ј—Г, –Ї–µ—А–∞–Љ–Є—З–µ—Б–Ї–∞—П —Д–ї–Њ—А–Є—Б—В–Є–Ї–∞, –Ї—Г—Б—В, –≥–≤–Њ–Ј–і–Є–Ї–∞, –њ–Њ–ї–Є–Љ–µ—А–љ–∞—П –≥–ї–Є–љ–∞, –њ–Њ–ї–µ–≤—Л–µ —Ж–≤–µ—В—Л, –њ–Њ—И–∞–≥–Њ–≤–Њ, –њ—А–Є—А–Њ–і–∞, –Љ–Ї, –Љ–Њ–і–µ–ї–Є—А–∞–љ–µ, –Љ–∞–є—Б—В–µ—А-–Ї–ї–∞—Б–Є, –Љ–∞—А—И–Љ–µ–ї–ї–Њ—Г, –Љ–∞—Б—В–Є–Ї–∞, –Љ–∞—Б—В–µ—А-–Ї–ї–∞—Б—Б, –Љ–∞—Б—В–µ—А-–Ї–ї–∞—Б—Б –њ–Њ –ї–µ–њ–Ї–µ, –∞–Ј–∞–ї–Є—П, –∞–Ј–∞–ї—Ц—П, –±—Г–Ї–µ—В, –Ј–∞–≤–Њ–і, –ї–Є—Б—В–∞, –ї–Є—Б—В—М—П, –ї–Є—Б—В—П, –ї–µ–њ–Є–Љ —Ж–≤–µ—В—Л, –ї–µ–њ–Ї–∞, –ї–µ–њ–Ї–∞ –Є–Ј –≥–ї–Є–љ—Л, –ї–µ–њ–Ї–∞ –Є–Ј –њ–ї–∞—Б—В–Є–Ї–Є, –ї–µ–њ–Ї–∞ —А–Њ–Ј—Л –±–µ–Ј –њ—А–Њ–≤–Њ–ї–Ї–Є, –ї–µ–њ–Ї–∞ —Ж–≤–µ—В–Њ–≤, –ї—Ц–њ–ї–µ–љ–љ—П, –ї—Ц—Б—Ж–µ, —А–Њ–Ј–Є, —А–Њ–Ј–∞, —А–Њ–Ј—Л, —А–Њ—Б–ї–Є–љ–∞, —А–∞—Б—В–µ–љ–Є–µ, —А–∞—Б—В–µ–љ–Є—П, —А—Г–ґ–∞, —А—Г–ґ—Л, —Г–Ї—А–∞—И–µ–љ–Є–µ —В–Њ—А—В–Њ–≤, —Г–Ї—А–∞—И–µ–љ–Є–µ —В–Њ—А—В–∞, —Б–≤–∞–і–µ–±–љ—Л–є —В–Њ—А—В, —Б–∞—Е–∞—А–љ–∞—П –Љ–∞—Б—В–Є–Ї–∞, —Б–∞—Е–∞—А–љ—Л–є –Ї–ї–µ–є, —Г—А–Њ–Ї–Є –њ—А–Є–Ї—А–∞—И–∞–љ–љ—П, —Б—В—Г–і–µ–љ –њ–Њ—А—Ж–µ–ї–∞–љ, —В–Њ—А—В, —В—А–Њ—П–љ–і–Є, —В—А–Њ—П–љ–і–∞, —Д–Є–Љ–Њ, —Д–ї–Њ—А–Є—Б—В–Є–Ї–∞, —Д–ї–Њ—А–∞, —Е–Њ–ї–Њ–і–љ–Њ–≥–Њ –њ–Њ—А—Ж–µ–ї—П–љ–Є, —Е–Њ–ї–Њ–і–љ–Њ–≥–Њ —Д–∞—А—Д–Њ—А–∞, —Е–Њ–ї–Њ–і–љ—Л–є —Д–∞—А—Д–Њ—А, —Е–∞–ї–Њ–і–љ–∞–≥–∞ —Д–∞—А—Д–Њ—А—Г, —Ж–≤–µ—В–Њ–Ї, —Ж–≤–µ—В–Њ—З–љ–∞—П –њ–∞—Б—В–∞, —Ж–≤–µ—В–µ, —Ж–≤–µ—В—П, —Ж–≤–µ—В—Л, —Ж–≤–µ—В—Л –Є–Ј –њ–Њ–ї–Є–Љ–µ—А–љ–Њ–є –≥–ї–Є–љ—Л, —Ж–≤–µ—В—Л –Є–Ј —Е–Њ–ї–Њ–і–љ–Њ–≥–Њ —Д–∞—А—Д–Њ—А–∞, —Ж–≤–µ—В—Л –љ–∞ —В–Њ—А—В, —Ж–≤–µ—В—Л —А—Г—З–љ–Њ–є —А–∞–±–Њ—В—Л, —И–∞–≥ –Ј–∞ —И–∞–≥–Њ–Љ  |
| –Ю–њ—Ж–Є–Є —В–µ–Љ—Л |
–Я–Њ–Є—Б–Ї –≤ —Н—В–Њ–є —В–µ–Љ–µ |
|
|
|
|