|
|
Как украсить боковые стороны тортика кремом--How to Decorate Cake with Butter Cream V2
|

12.10.2012, 07:02
|
|
Администратор
|
|
Регистрация: 07.09.2010
Сообщений: 7,940
|
|
 Как украсить боковые стороны тортика кремом--How to Decorate Cake with Butter Cream V2
Огромная благодарность Автору welshcottagecupcakes за Мастер-класс
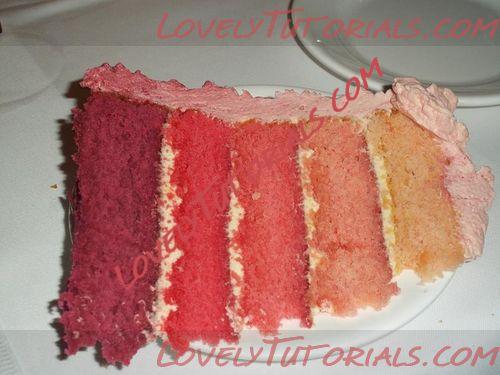
Mix your batter as usual, and add a tiny amount of whatever colour you decide that you are going to use. For this cake I am using pink, use a cocktail stick to add the colour in gradually so you only need to add a tiny bit for the first layer. Bake and cool. Make sure that when you put the batter in the cake tin that you use the same amount of batter for all other layers, but I added more for the darkest layer. (bottom)
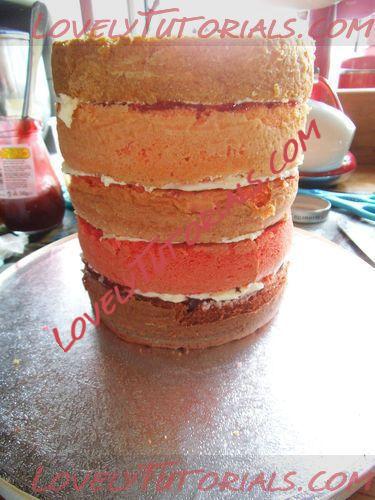
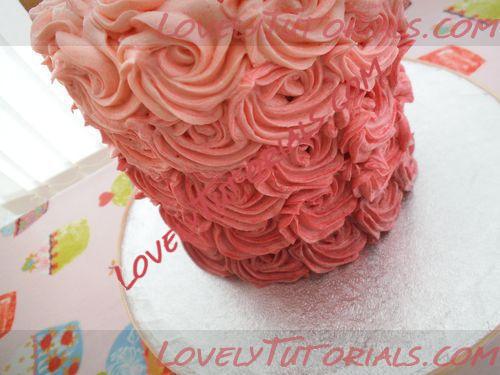
For the second layer add more pink so that it is a bit darker than the first, bake and then cool. Do the same by adding more for the 3rd more for the 4th and for the 5th I added a bit of purple to make it a lot darker as you can see from the photo. The bottom tier (darker) was a bit thicker as well but this was my choice. I then added jam and buttercream in between the layers just as in the photo. Once you are happy with the layers put in the fridge to set for about half an hour.
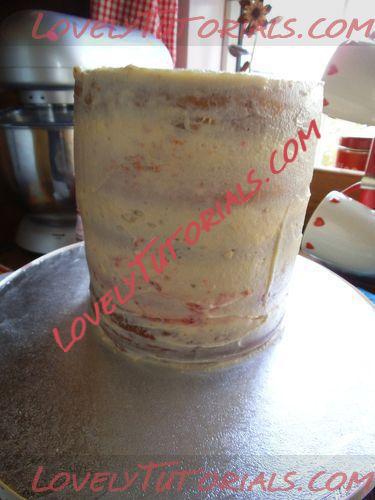
Crumb coat all the cake in buttercream but don’t worry if it isn’t even as this will be hidden with the rest of the coloured buttercream. Don’t worry if you make a mess of the board, once you’ve finished clean the bottom with hot water and some paper towels and you’ll see the buttercream will come off for you. Set in the fridge for about half an hour
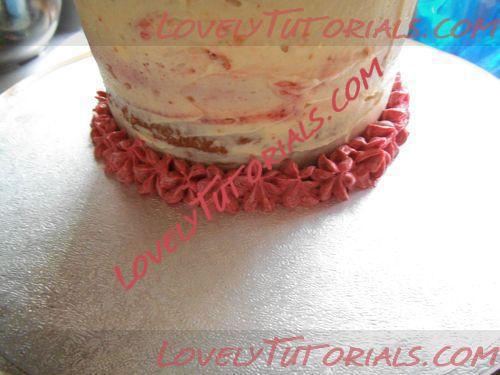
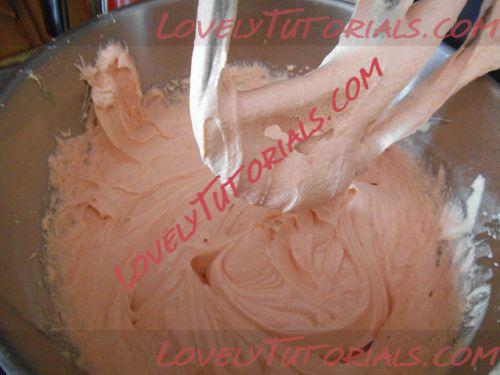
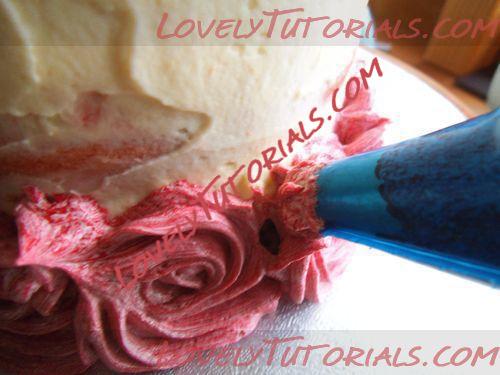
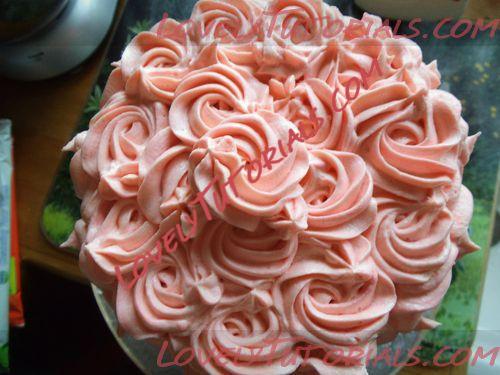
This time with the buttercream you start dark. I started withabout 3 tablespoons of buttercream and added my darkest colour, in this case, pink and a bit of purple and mixed until I was happy with this dark colour. I then piped some “drop flowers” using a 2D nozzle and piped round the bottom of the cake to neaten the bottom, you will see as you go on, this will hide any gaps!
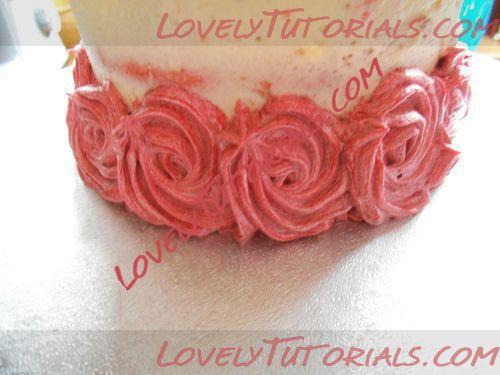
From the back of the cake, in case you make any mistakes, start piping a buttercream rose, starting in the same side and ending in the same side work along the bottom, something like this. Don’t worry if you overlap, it will look nice.
Then once you finish the bottom row, pipe some drop flowers at the top of the gaps in between the top of the roses, I think this looks neater than doing it after you finish the whole cake.
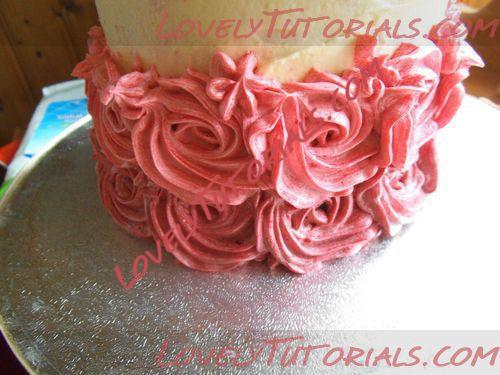
When you finish with the darkest layer pipe the buttercream you have left in the bag back into the small bowl you mixed your colour in and then add a bit of the white buttercream into the bowl to create a lighter shade of pink, this will be up to you. Do the same, pipe on top of the bottom layer again, directly on top of the bottom rose and pipe some drop flowers on the top where the gaps are as in the photo.
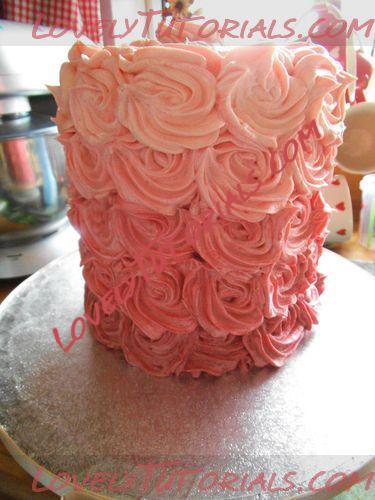
Once finished pipe what you have left in your bag again into the bowl and then add more white buttercream and do the same to all the rest of the layers, notice how I have started in the same spot and finished in the same spot, this will make it look neater. Finish the top layer in a light shade and then you are left with the top of the cake to do
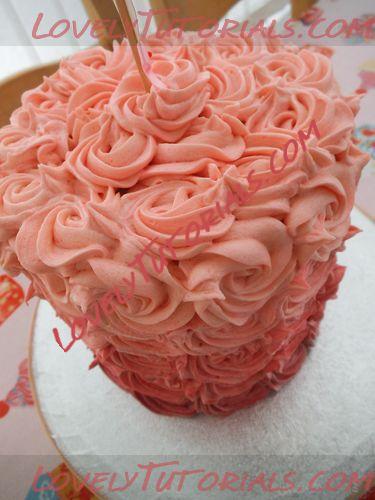
You will need more buttercream to make the top layer and the top of the cake so make sure you will have enough of the same shade. Start in the middle and work around the cake, don’t worry if you overlap, as I had a cake pick on top of the cake I finished off with an extra rose in the middle as in the photo.
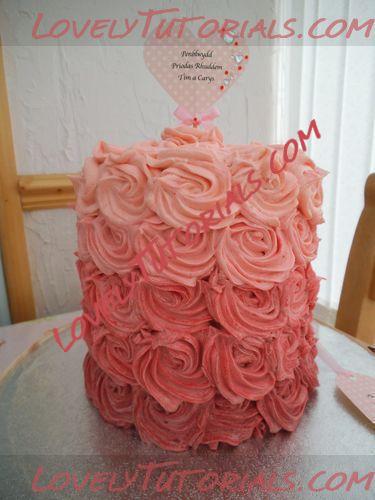
Finished cake with beautiful cake pick from MoreTvicar!
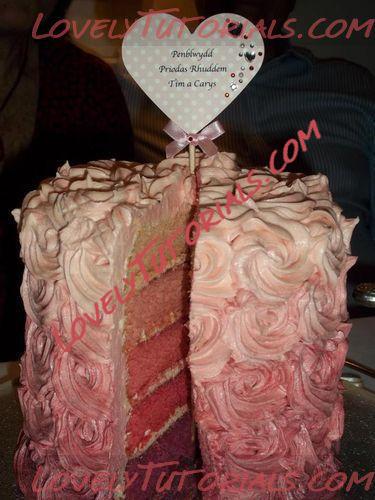
Inside of the cake ♥
|
 |
|
Метки
|
addım-addım təlimat, adım, adım adım yönergeler, artesanatos passo a passo, bemutató, bolando bolos, butter cream, butter icing, buttercream, buttercreme, cake decorating, cake decorating techniques, confeitando bolos, creaming butter, creamy glaze, crema de manteca, crème au beurre, decoracion de pasteles, decoración de tortas, decorada en fondant, decorare le torte, decorazioni, deko fondant, dekorace na dort, dekoracija, dekoracije, dekorasyon, dekorácie, deser, fender, filling, fimo, fotopostup, hand-made, handmade, how to, how to decorate cake with butter cream, how-to's, icing, instrucţiuni, instrukcijas, instrukcje, jak na, kage dekoration, kagedekoration, kakebaking, korak, korak za korakom navodila, korak-po-korak upute, koristeet ja koristelu, krok, krok po kroku, krok za krokem, krok-za-krokem, la crema de mantequilla, las instrucciones, las técnicas, le tecniche, les techniques, master-class, master-klasse, master-klasy, meistras klasės, metodikas, mistr třídy, mock cream, motivtorten, návod, opplæringen, pamoka, pap, pas, pas-cu-pas, paso, paso a paso, passo, passo a passo, passo-a-passo, passo-passo le istruzioni, postupak za ukrasavanje, powdered sugar, schritt für schritt anleitung, schritt-für-schritt, schritt-für-schritt-anleitungen, smjörkrem, stap, stap-voor-stap, stap-voor-stap instructies, steg for steg, steg-för-steg-instruktion, step, step by step, step-by-lépésre, step-by-step, step-by-step instructions, technieken, techniken, techniki, techniky, technikák, techniques, tecnicas de decoracion, tecniche, tehnici, tehnike, teknikker, teknikler, torte, torte decorate, torten dekorieren, torti, trin, trin for trin, trin-for-trin, trin-for-trin instruktioner, trinn, trinn for trinn, trinn-for-trinn-instruksjoner, tutorial, tutoriale, tutorias, tutorias/ideas para decorar los bizcochos, tutoriel, tutorijal, técnicas, ukrašavanje torti, uputstvo za dekoraciju, सजा केक, ट्यूटोरियल मास्टर वर्ग, कदम, कदम दर कदम निर्देश, तकनीक, étape, étape par étape les instructions, öğretici, žingsnis, žingsnis po žingsnio, 宗師級教程,一步,一步一步的指示� � � �技術,udžbenik, 裝飾蛋糕, βήμα, βήμα προς βήμα οδηγίες, οδηγίες βήμα βήμα, παντεσπάνι art, τεχνικές, φροντιστήριο, инструкция, как сделать, как украсить боковые стороны тортика кремом, крок за кроком, крок за крокам, крем, крэм, покроково, пошагово, пошаговые фотки, пакрокава, миниатюра, мк, майстор-класа урок, майстар-клас, майстер-клас, майстер-класи, мастер-класс, ручной работы, ручная работа, украшение тортов, уроки прикрашання, стъпка, стъпка по стъпка инструкции, техники, техника, техніка, туториал, туторіал, тэхніка, шаг за шагом, інструкцыя, інструкція  |
| Опции темы |
Поиск в этой теме |
|
|
|
|


