|
|
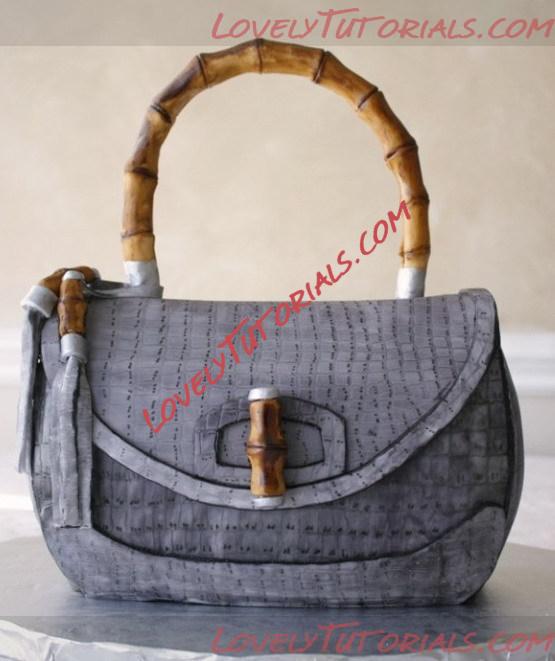
МК торт 3Д сумка -Carved 3D handbag cake tutorial V2
|

06.01.2013, 20:39
|
|
Администратор
|
|
Регистрация: 07.09.2010
Сообщений: 7,940
|
|
 МК торт 3Д сумка -Carved 3D handbag cake tutorial V2
Огромная благодарность Автору cakerator за Мастер-класс
This tutorial is for a cake feeding about 10 – 12 people, you can adjust the size by just increasing the size of the cake OK here is what you will need for the scrap cake:
- 1 contoured 9″ x 3″cake pan or an 8″ x 3″ round
- Plastic wrap
- Aluminum foil
- Cake scraps, lots of cake scraps
- One recipe of Swiss Meringue Buttercream (not a shortening based buttercream)
- Approx. 2 lbs ganache
- 9″ or 8″ cake board
- Large 2 gallon freezer bag
- Very sharp serrated knife
- Almost boiling water
- A small angled spatula
- And a 12″ cake base
Direction
This is a fun and easy process, messy but easy, have your kids join in to help, they love this kind of stuff. Start by lining your cake pan with long pieces of plastic wrap, and have enough of an over hang to wrap and cover the top of the cake pan once filled with cake. This makes it easy to pull out your cake once it’s nice and frozen, be generous with the plastic wrap because the pan will be going into the freezer.  I used foil here because I ran out of plastic wrap, but use plastic wrap!
Now take your cake scrapes and piece them together at the bottom of the cake pan like a puzzle, nice and tightly. Find pieces that fit snugly together, you may need to cut some piece to get them to fit. The object here is to completely cover the bottom of the pan with cake. 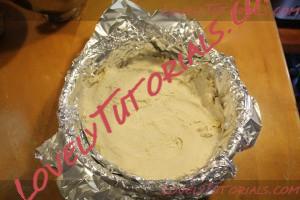 Thin layer of buttercream on top of first layer of cake scraps
Once you have done piecing together the cake, and there are no empty spaces, slather on some buttercream, but not so thick of a layer, just enough to glue the pieces together. Now add another layer of cake and continue alternating layers until the pan is filled up. By the way you can just use ganache for the “glue” as well, it’ll actually work better. In this case I had a lot of buttercream left over and I wanted to use it up. 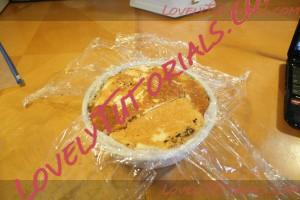 Finally got some plastic wrap!
Now take the over hang of plastic wrap and tightly cover up the cake, and take the cake board and press the cake scraps into the pan to make sure everything is tightly packed in the pan. 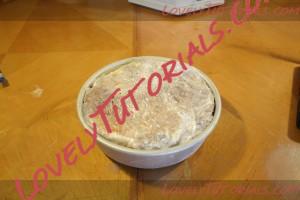 Make sure to press the cake in the pan tightly. Note I forgot to take a picture of the pan with aluminum foil on it, but you know how to do that!
Lastly, cover the top of the pan with aluminum foil and place the cake pan in a freezer bag and leave it in the freezer over night. So now your cake should be covered in plastic wrap, foil and tucked away in a freezer bag. I know I know, over kill but I hate food that taste like freezer! Don’t you! 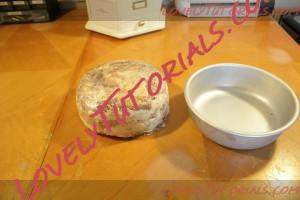 Here is the cake all frozen
Here is my cake all nice and frozen, Now I pop the frozen scrap cake out of the pan and place it back into the freezer, why because I’m going to repeat the process over, but only one layer this time. You don’t have to do this step, but I want both sides of my cake to be rounded. After you line the cake pan with plastic wrap again, piece together one layer of cake scrapes and add a layer of buttercream, take out the cake from the freezer, unwrap it from the plastic wrap and press the flat side (the top of the cake) into the pan, making sure to press it in good. Re-wrap the whole thing and place back in freezer in the pan for about 2 hours. It should look like this, a flatten round ball, now we are ready to carve. 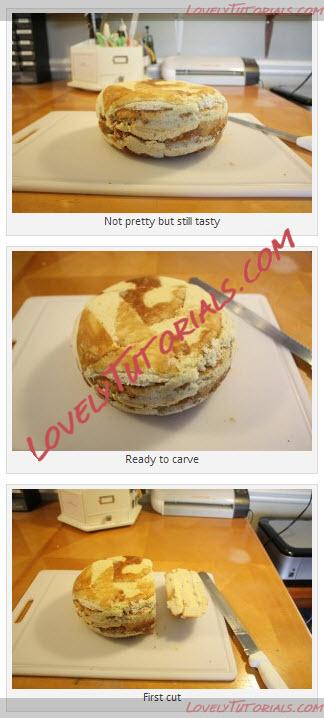 Next, you want to cut off about 2″ of cake on one side so that it will sit flat and vertically on your board. Make sure you cut nice and straight. The nice thing about frozen cake is that you can move it around and man handle it without it falling apart or collapsing. Test it to make sure that it sits up straight before you cut the other end. Now lay it back down flat and cut about 1.5″ in, just a little shorter than the first cut. Next sit it back up and start carving away slivers of cake from what is now the top of the cake, give it a nice shape, make the top opening a little narrower by cutting at a 45 degree angle. As you can see here even though I pieced together this cake it still holds its shape and carves beautifully. 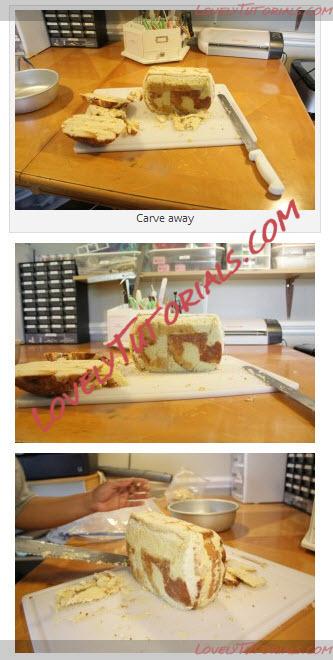 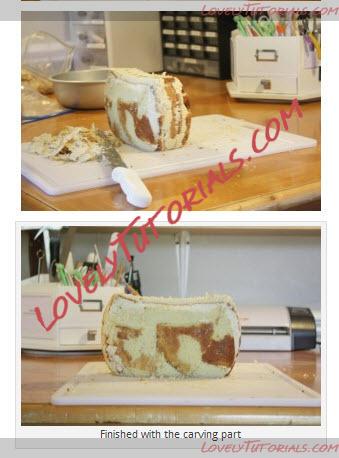 Now because this cake is pieced together with buttercream, when it defrost it will fall apart, so I need to slather on some ganache to hold it together. So at this point I wrap it back up and place it back into the freezer to keep it firm and go make me some ganache. 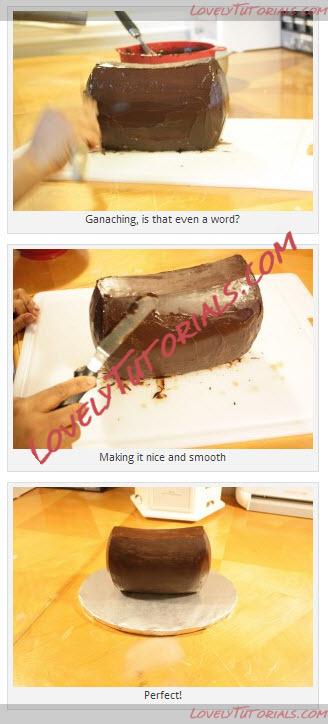
Once the cake is nice and slathered up with some yummy ganached and perfectly smoothed, place it on a prepared cake bass and let it sit out overnight to set. Usually when you make ganache you want it to sit over night, but because we are using it on a frozen cake, you want it to be very soft to make it easier to smooth on, if the ganache was completely cooled it would have harden too fast on the cake.
|
06.01.2013, 20:43
|
|
Администратор
|
|
Регистрация: 07.09.2010
Сообщений: 7,940
|
|
Огромная благодарность Автору cakerator за Мастер-класс
Close up of the "hardware"
Ok, finally the “Posh Designer Purse Cake tutorial Part 2″! I want to start by describing a little about the “hardware” on the purse, the bamboo handle, latches, and tassels. Below I show a few steps on how I made these details such as the bamboo latch and tassels. I used a piece of gum past rolled up into a shape of a sausage and pinched the middle all around. Once I got the middle of the sausage pinched and raised, I used the wheel tool and marked an indentation in the middle of the raised pinched area creating a joint, then I used some cutters that where the same circumference of the “sausage” to create the metal cap end by cutting out gum paste circles, which I will paint silver later once dried, and attach to the bamboo after they are dried also and painted brown. The same technique is used for the handle to create the bamboo handle, using an 18″ gauge wire as part of the internal structure. A more detailed tutorial on how to create these hardware details will be available for purchase at a later date. Stay tuned!
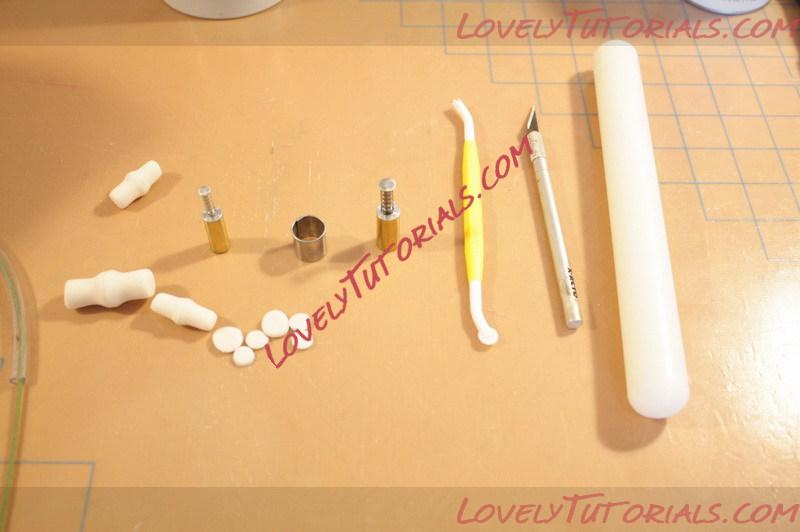
Making "the Hardware" before painting
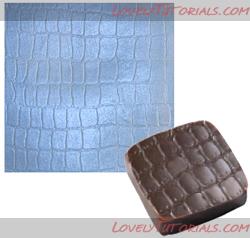
Here is a close up of the alligator skin. I rolled out white fondant and I used the impression mat to begin to create the “skin” look, then let it dry for about 20 minutes. Using a mix of color gels and Ever Clear or Vodka, ( you want to use something that will dry very fast and not sit on the fondant and dissolve or melt it). This part is a little trick to explain, but you want to use a stiff pastry brush and the paint should not be watery, and you want to dab the paint concentrating between the creases, then dab with a dry paper towel, and repeat till you achieve the right look. 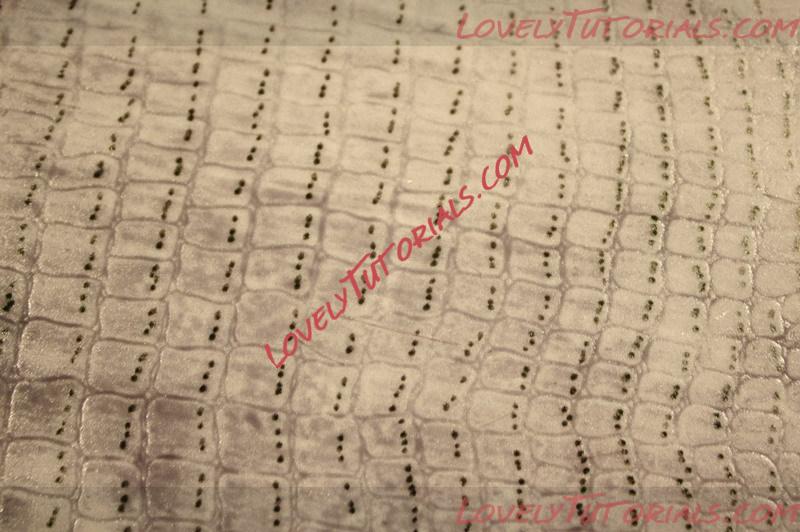
Close up of alligator skin
Then I used a food writer pen to add the little dots at the bottom of each skin cell (that’s what I call it, don’t know what the technical term is) This will all be included in the more detailed tutorial. 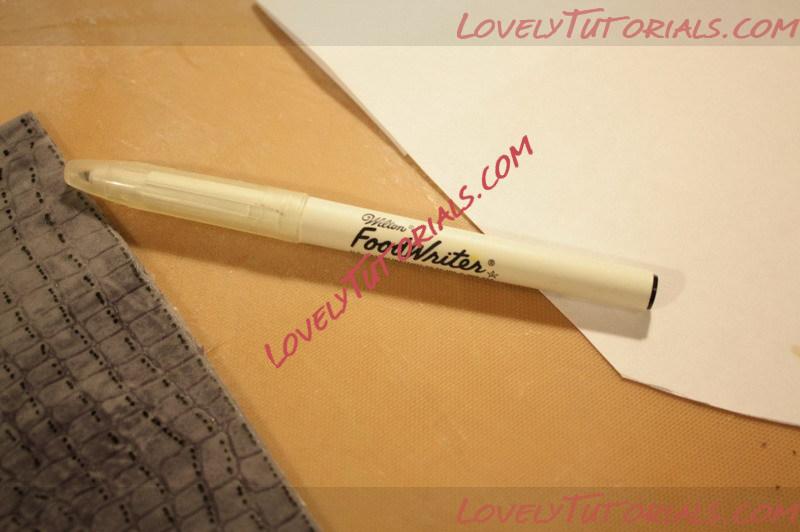
I love the Wilton Food Writers
Place the semi dried fondant on the cake, it needs to be dried so it is easier to handle, don’t worry about elephant skin, it will actually work to your advantage to create the look of alligator skin in this case. Make sure the paint is also completely dried before handling. 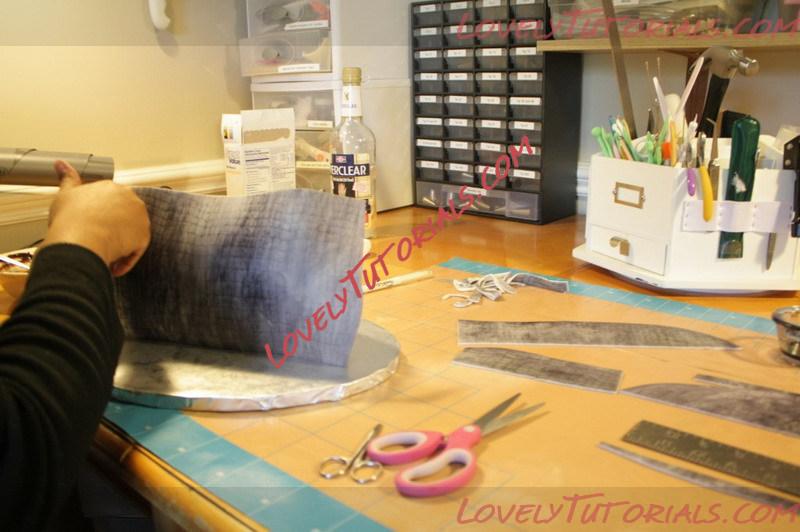
Placing the slightly dried fondant on cake
Apply the fondant on each side of the cake in separate pieces and join them at the seams. 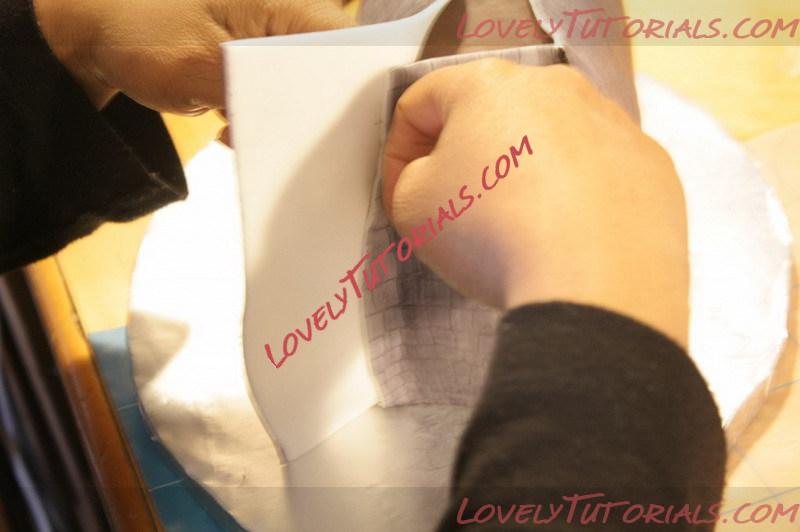
Connecting and joining the ends
Now cut all the seams to shape. 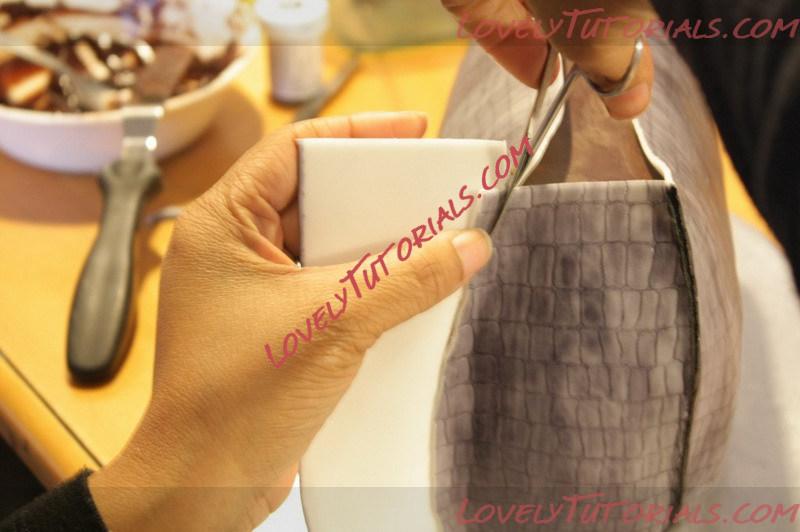
Trimming the ends
Here I am pinching the excess fondant to trim more off, you want it nice and clean. 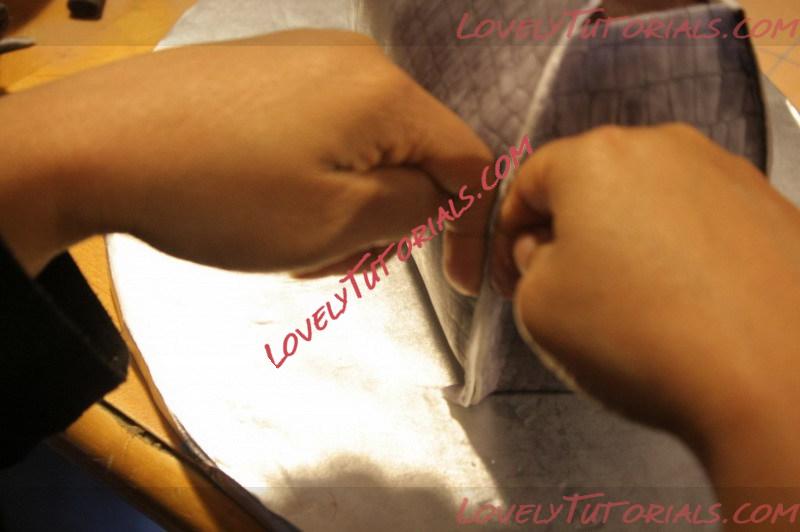
Pinching the ends and trimming excess fondant
Here I’m smoothing the fondant, once you cut the fondant, the “fresh” sticky part of the fondant is exposed and joins easily at the ends. 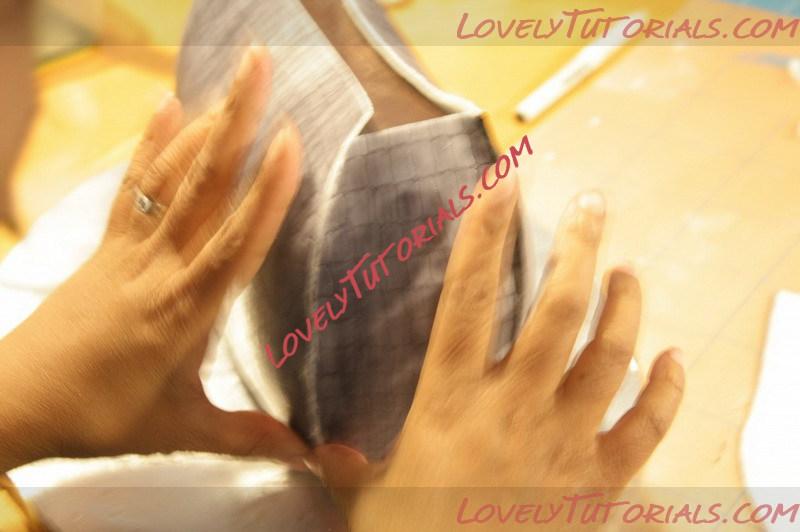
Working the fondant to create a finished seam, sorry for the out of focus pic
Now getting ready to paint all the trims and ends 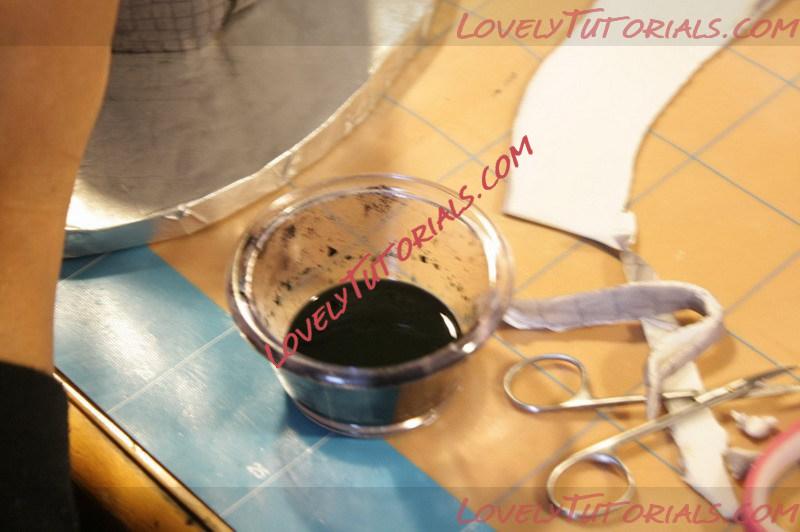
Prepared edible paint
Now use a paint brush to paint the cake details. 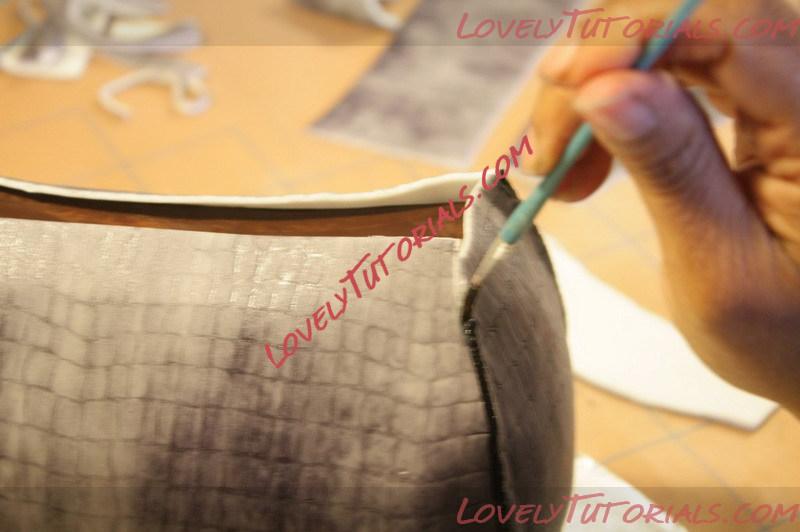
Painting ALL of the seams and ends
And more painting, I did not say this cake was fast to make, like all cakes that have lots of details it takes time, but the end result is worth it. 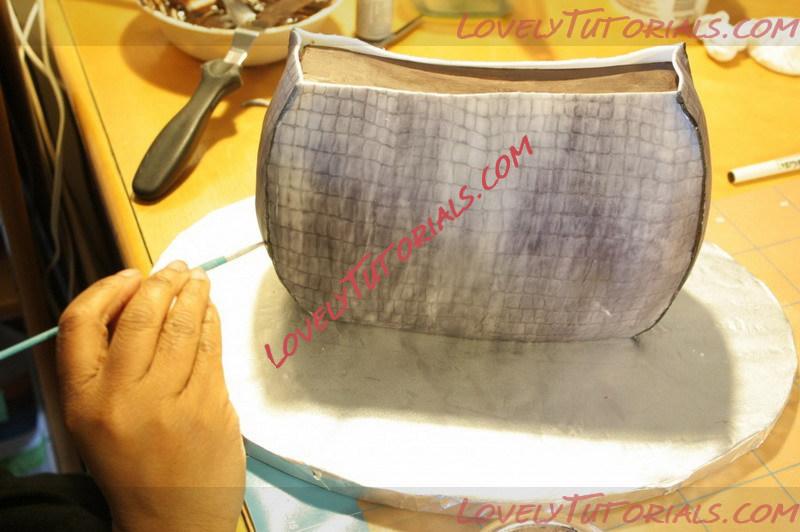
More painting
Adding more details to the “skin” in the back of the purse. It’s an art class people! 
Adding markings to the back of purse
Now I create a template for the flap, roll out some more fondant, paint, add markings and cut. 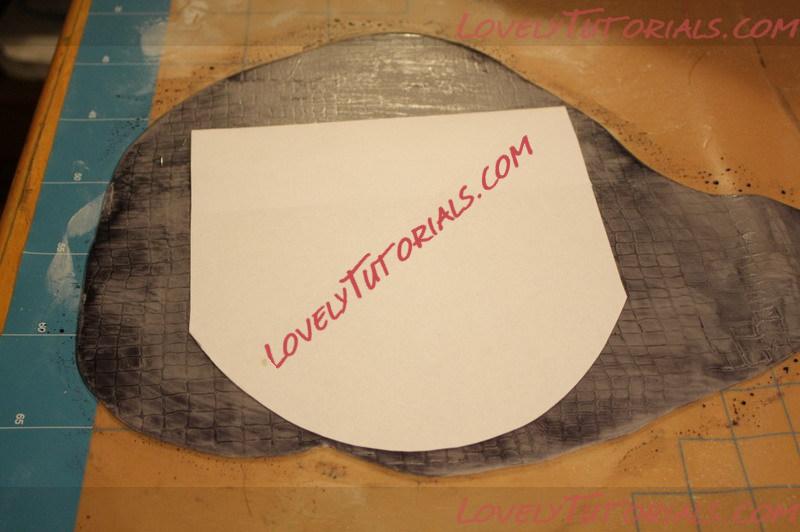
Using a hand drawn template to create flap
Freshly cut flap ready to place on the cake with some edible glue. 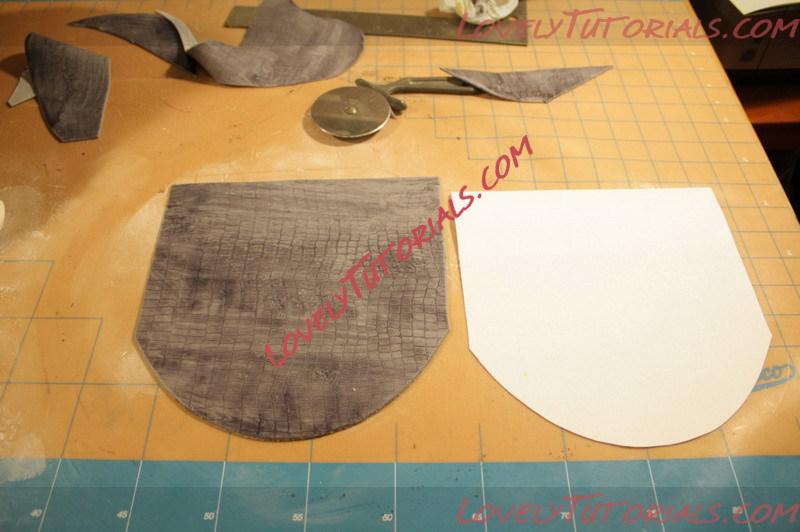
Cut flap
Need to add details on this too… 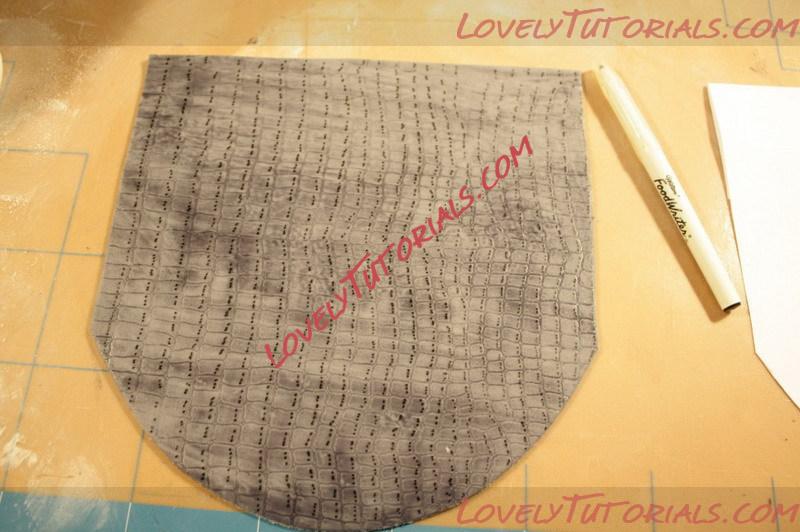
Draw alligator markings
It’s starting to look like a purse after you attach the flap. 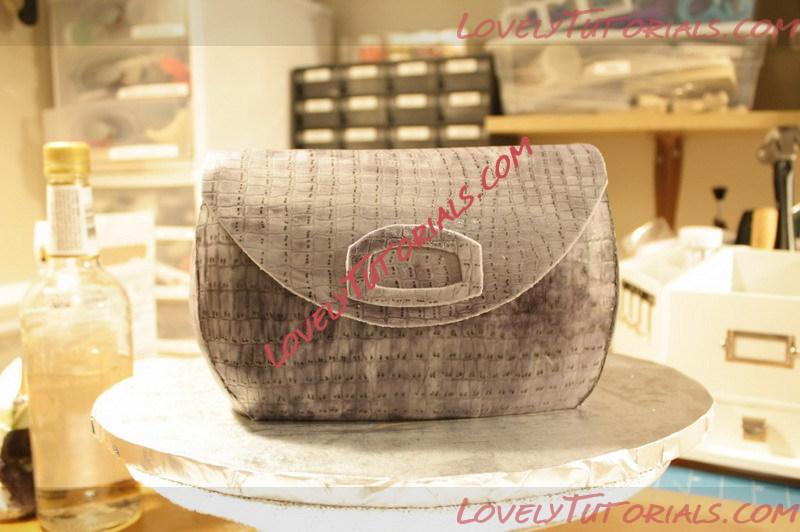
Glue the Flap and other latch details
And now I added a piece of trim to the flap, And you need to paint that too! 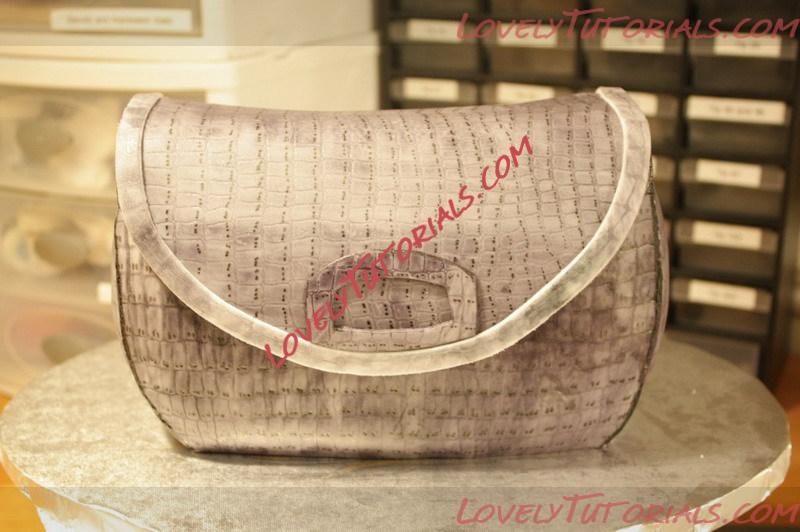
Adding trim on flap
Another hand drawn template to crate more trim on the cake. 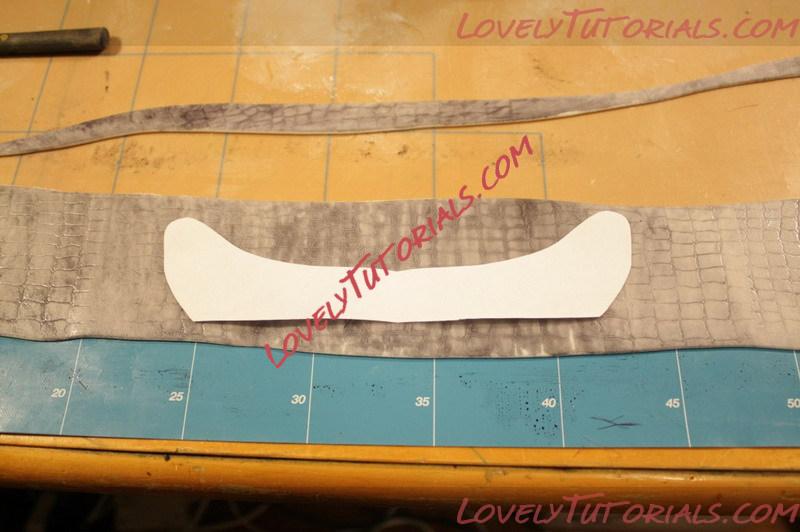
Cutting more purse details with hand drawn template
AND more painting! 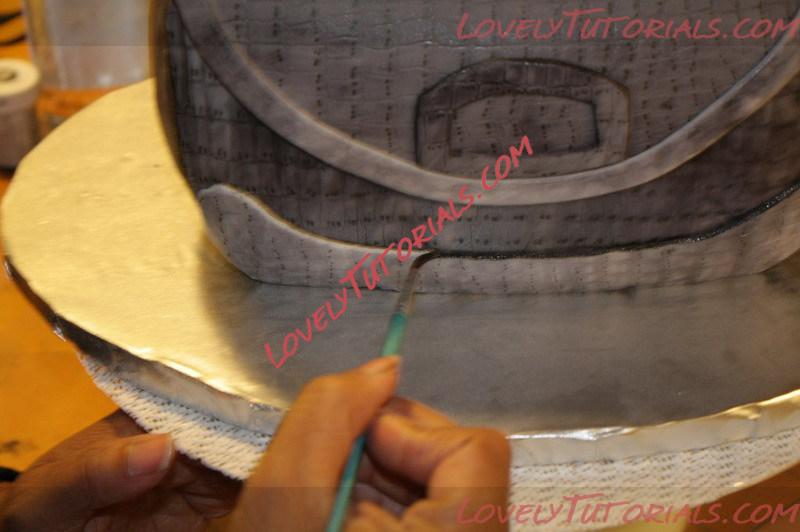
Painting the end of trim
Almost done with the painting and the fine detailing, folks this is why sculpted cakes cost as much as they do, even smaller cakes requires lots of detailed work to create a realistic piece of art to deceive the eye! You are buying a piece of edible art, not just a layered cake with buttercream, you are paying for art as well as a tasty cake! 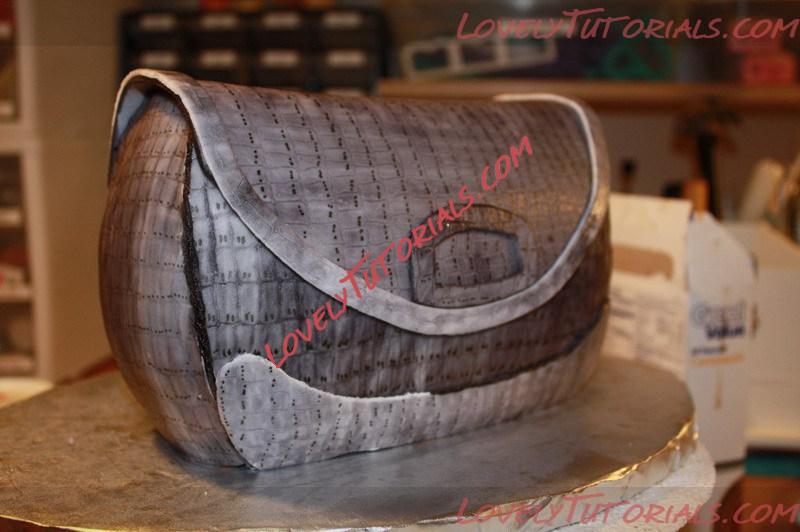
Almost done painting
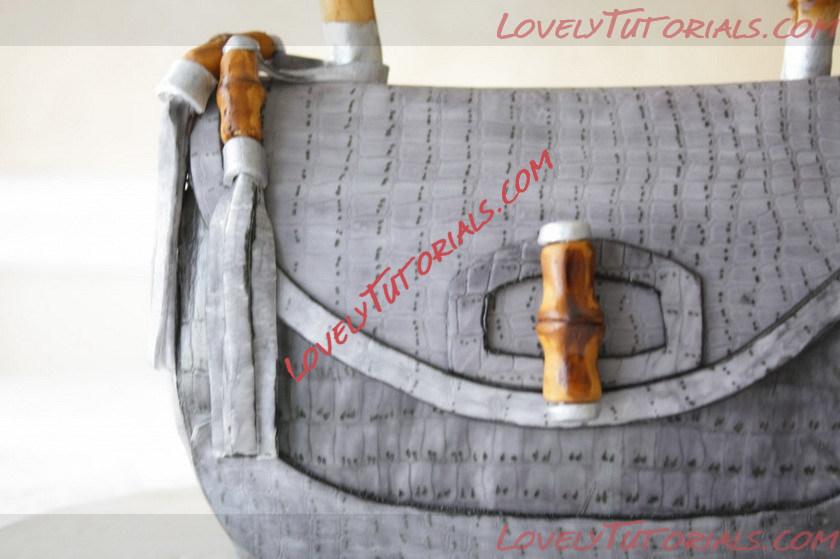
Once everything has dried you can add your finally details such as the handles. I want to add that I glue all my pieces with a gum glue adhesive like tylose glue or gum glue, and I also use melted chocolate for heavier pieces, like the hardware bamboo pieces on this case. 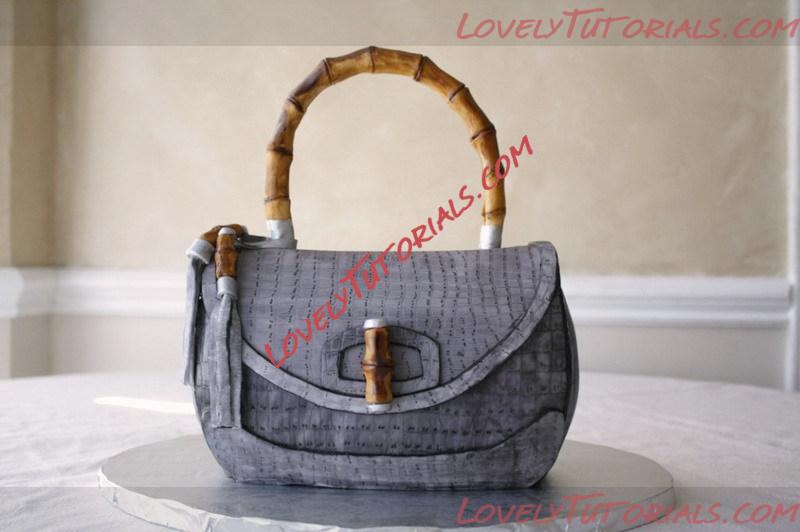
Added the handle, tassels, and latch hardware.
Here are the pictures I used for reference, my cake is a mix version of both purses 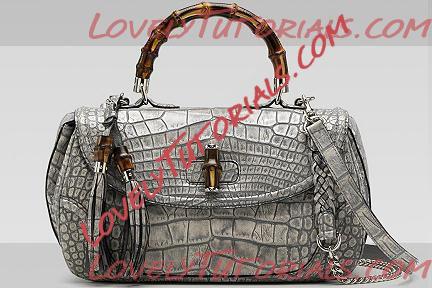
The Real Alligator Purse

The Real Alligator Skin Purse
|
 |
|
Метки
|
3d and sculpted cakes, 3d bizcocho, 3d bolo, 3d cake, 3d dort, 3d handbag cake tutorial, 3d kage, 3d kager, 3d kake, 3d kek, 3d pastel, 3d tarta, 3d torta, 3d torte, 3d torti, 3d torty, 3d κέικ, 3д сумка торт шаг за шагом, addım-addım təlimat, adım, adım adım yönergeler, artesanatos passo a passo, bag, bag cake, baguette, barrel, bemutató, bolando bolos, bolo, bolsa, bolsa (sacola), bolso, bolso de la bolsa, borsa, borsa bag, borsetta, bossa de mà, bourse, bowling bag purse, bucket bag, bánh, cake, cake decorating, cake decorating techniques, carved cake, carved gucci handbag cake tutorial, carved hand bag cake how to, carved handbag cake tutorial, ciasto, clutch, confeitando bolos, cosmetic bag, císte, decoracion de pasteles, decoración de tortas, decorada en fondant, decorare le torte, decorazioni, deko fondant, dekorace na dort, dekoracija, dekoracije, dekorasyon, dekorácie, dort, dámská kabelka, fender, fimo, flower paste, fondan, fondant, fondente, fondente di zucchero, fotopostup, foundant, geantă de mână, gebak, geldbörse, glazuur, gucci perse cake tutorial, gum pasta, gum paste, gumpaste, gâteau, half-moon, hand-made, handbag, handmade, handtas, handtasche, handtasche tasche, handväska, handväska påse, how to, how to make a gum paste brooch, how to make a purse cake, how-to's, håndtaske, instrucţiuni, instrukcijas, instrukcje, jak na, kabelka, kabelka taška, kage, kage dekoration, kagedekoration, kager, kaka, kake, kakebaking, kakku, kejk, kek, keks, kisə, kook, korak, korak za korakom navodila, korak-po-korak upute, koristeet ja koristelu, krok, krok po kroku, krok za krokem, krok-za-krokem, kuchen, kue, kukkaro, kukkaro pussi, käsilaukku, kézitáska, kūka, las instrucciones, las técnicas, le tecniche, les techniques, lommebok, lukie, mansako, marshmallow, masa flexible, master-class, master-klasse, master-klasy, meistras klasės, metodikas, mistr třídy, modeling paste, modellierpaste, modelling past, motivtorten, novčanik, novčanik torba, návod, opplæringen, pamoka, pap, pas, pas-cu-pas, paso, paso a paso, passo, passo a passo, passo-a-passo, passo-passo le istruzioni, pasta de miel, pasta flexible, pastel, peněženka, peňaženka, piniginė, piniginė krepšys, poagey laue, pocketbook, poltsa, portemonnee, portemonnee zak, portmonetka, postup na 3d torty, postupak za ukrasavanje, pung, pung taske, pungă, pungă sac, purse, pâtisserie, pénztárca, pénztárca táska, rankinė, ručna torba, sac à main, sac'h-dorn, saco bolsa, schmelzend, schritt für schritt anleitung, schritt-für-schritt, schritt-für-schritt-anleitungen, stap, stap-voor-stap, stap-voor-stap instructies, steg for steg, steg-för-steg, steg-för-steg-instruktion, step, step by step, step-by-lépésre, step-by-step, step-by-step instructions, sugarcraft, sugarpaste, suikerglazuur, tarta, tarte, taška, technieken, techniken, techniki, techniky, technikák, techniques, tecnicas de decoracion, tecniche, tehnici, tehnike, teknikker, teknikler, tips och trix, torbici, torbu, torebka, torebka damska, tort, torta, tortas, torte, torte decorate, torten dekorieren, torti, tortu, torty, trin, trin for trin, trin-for-trin, trin-for-trin instruktioner, trinn, trinn for trinn, trinn-for-trinn-instruksjoner, tutorial, tutoriale, tutorias, tutorias/ideas para decorar los bizcochos, tutoriel, tutorijal, tårtbottnen, tårtor, técnicas, ukrašavanje torti, uputstvo za dekoraciju, veske, vesken bag, voko, vurza, worek portmonetka, zuckermasse, सजा केक, ट्यूटोरियल मास्टर वर्ग, केक, कदम, कदम दर कदम निर्देश, तकनीक, हैंडबैग, เค้ก, ハンドバッグ, クラッチバッグ, ケーキ, çanta, çanta çanta, étape, étape par étape les instructions, öğretici, žingsnis, žingsnis po žingsnio, 手提包, 裝飾蛋糕, 蛋糕, 케이크, κέικ, βήμα, βήμα προς βήμα οδηγίες, οδηγίες βήμα βήμα, πορτοφόλι, παντεσπάνι art, τεχνικές, τσάντα, τσάντα πορτοφόλι, φροντιστήριο, дамска ръчна чанта, дамска чанта, дамская сумочка, инструкция, кошелек, кошелек мешок, как сделать, кашалёк, кашалёк мяшок, крок за кроком, крок за крокам, гаманець, гаманець мішок, покроково, пошагово, пошаговые фотки, пакрокава, миниатюра, мк, мк 3д сумка торт, мк торт сумка, майстор-класа урок, майстар-клас, майстер-клас, майстер-класи, маршмеллоу, мастика, мастер-класс, жіноча сумочка, зд торт, зд торта, ручной работы, ручная работа, ръчна чанта, украшение тортов, сахарная мастика, уроки прикрашання, сумка, сумочка, сумачка, стъпка, стъпка по стъпка инструкции, торт, торта, техники, техника, техніка, туториал, туторіал, тэхніка, чантата си чанта, шаг за шагом, інструкцыя, інструкція  |
|


