|
|
МК лепка Лук репчатый --Gumpaste (fondant, polymer clay) onion making tutorial
|

27.10.2011, 18:42
|
|
Администратор
|
|
Регистрация: 07.09.2010
Сообщений: 7,940
|
|
 МК лепка Лук репчатый --Gumpaste (fondant, polymer clay) onion making tutorial
Огромная благодарность Angie Scarr за Мастер-класс
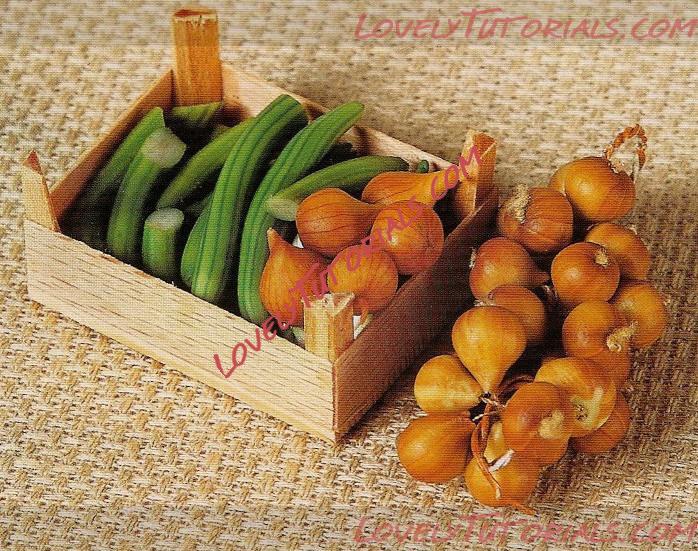
The onion project, introduce advanced stringing, cutting and striping techniques,stacking technique with adding skins to vegetables to produce a stripy skin.
Method
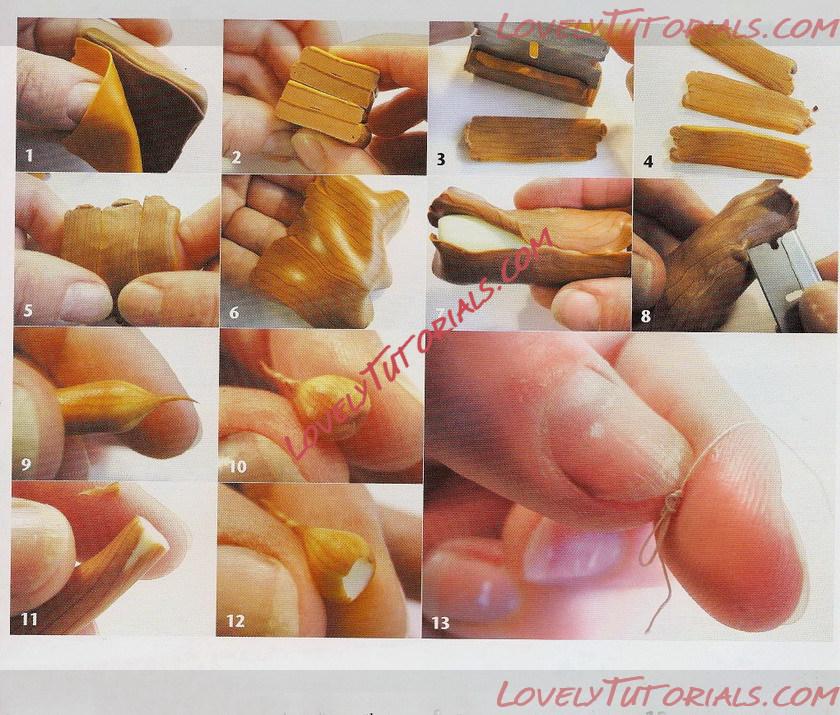
1 Make a sheet of caramel mix approximately 1cm thick. Overlay this with one of terracotta rolled to the same size but this time only 1-2mm deep and, on top of that, a third sheet of orange of the same thickness.
2 Cut this in half and stack one piece on top of the other. Cut a second time and stack the two pieces together again. Squeeze this stack to make it more compact and repeat the process of cutting and stacking once more.
3 and 4 Cut several very thin slices and lay them side by side to form a sheet of 'stripy' clay.
5 Press these slices so they bond together and squeeze or roll them out to make the sheet thinner.
6 Roll the sheet out very thinly. If you are using a pasta maker, set it to No 2. Keep the stripes horizontal as you work.
7 Take the rolled stripy sheet and wrap it around a cylinder of pale translucent green and proceed as with the apples (see page 55).
8 Remove any air bubbles by carefully piercing the skin and pressing the skin back onto the cylinder.
Lengthen the cylinder and dose off the other end as did with the apples.
9 Cut off and pinch one end into a more pointy shape, this time carefully forming a long end by rolling it between your fingers.
10 Make onions with split skins by removing a little of the skin on one side.
12 This time only half enclose the skin on the bottom.
13 Thread a needle and tie a thick, rough knot in one end of some fawn-coloured sewing thread by winding it round your finger, rolling off and dragging the thread towards the end with your fingernails to form a knot. If you have never made a knot in this way before it may take a little practice, but don't worry, you will get it.
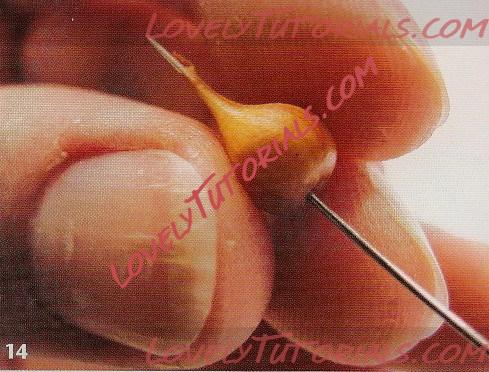 
14 Thread the needle through the centre of the onion from the base to the tip. Pull the knot gently into the base of the onion. Cut the thread off, leaving at least 10cm of thread on each onion. Repeat this process for as many onions as you need to make (20 to 24 for an onion string).
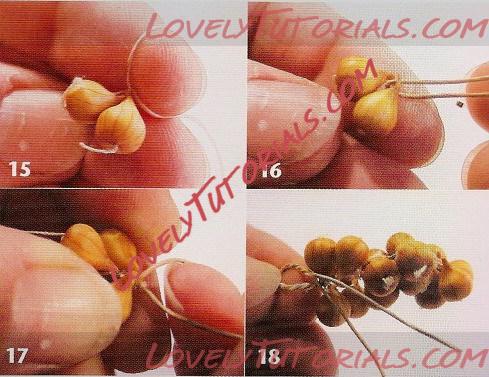
16 Before using the paper-coated wire, paint il brown by dipping a sponge in light brown paint. Once dry, fold it in half, place a pair of your onions over the fold in the wire and then twist the wire over them.
Add the onion pairs one at a time and continue by twisting twice after each addition to the string.
18 When you have enough onions on your string, twist the wire for approximately an extra 2.5cm then twist it back on itself and round the whole string to the bottom.
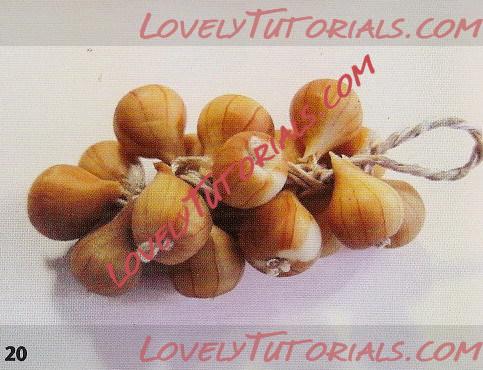
20 Trim of extra wire and the ends of thread from the bottom jf the onions.
|
 |
|
Метки
|
3d figures, addım-addım təlimat, adi soğan, adım, adım adım yönergeler, artesanatos passo a passo, bemutató, birthday cake, biscuit, bolando bolos, bolos decorados, cake decorating, cake decorating techniques, cake topper, cake toppers, cake tops, ceapă, cebola, cebolla, cebula, cerâmica plástica, character figures, characters, children's cake, cibule, cibule kuchyňská, cibuľa, cipolla, cold porcelain, confeitando bolos, curso de modelado, decoracion de pasteles, decoración de tortas, decorada en fondant, decorare le torte, decorazioni, deko fondant, dekorace na dort, dekoracija, dekoracije, dekorasyon, dekorácie, especializada em modelagem de biscuit, fender, figur kager, figuras, figure making tutorials, figuren, figures, figurice, figurice od fondana, figurine on the cake, figurines, figurinhas, figurky, figúrky, figür modelleme, fimo, fixando a cabencinha, flower paste, fondan, fondant, fondente, fondente di zucchero, fotopostup, foundant, gebak, gemüse, glazuur, groente, gum pasta, gum paste, gumpaste, gumpaste (fondant polymer clay) onion making tutorial, hagyma, hand-made, handmade, hortaliça, how to, how-to's, instrucţiuni, instrukcijas, instrukcje, jak na, kage dekoration, kagedekoration, kakebaking, korak, korak za korakom navodila, korak-po-korak upute, koristeet ja koristelu, krok, krok po kroku, krok za krokem, krok-za-krokem, l'oignon, la modélisation, las instrucciones, las técnicas, le tecniche, legumă, les techniques, luk, lukie, løg, løk, légume, lök, marcipanové figurky, marshmallow, marsipanfigurer, masa flexible, master-class, master-klasse, master-klasy, meistras klasės, metodikas, mistr třídy, modelado, modelagem, modelando a barriga, modelando a cabencinha, modelando a perninha, modelando as maozinhas, modelando o cabelinho, modelando o corpinho, modelando os bracinhos, modelando os pezinhos, modelare, modelerte figurer, modeling, modeling paste, modeliranje, modellazione, modelleme, modellering, modellieren, modellierpaste, modelling, modelling past, modelləşdirmə, modelovanie, modelování, modelowanie, motivtorten, návod, oignon, onion, opplæringen, orelhas, ozdoby, pamoka, pap, pas, pas-cu-pas, paso, paso a paso, passo, passo a passo, passo-a-passo, passo-passo le istruzioni, pasta de goma, pasta de miel, pasta flexible, pasta laminada, pintura dos olhos, pocelana fria, polymer clay, postupak za ukrasavanje, povrće, pravljenje figurica za torte, pâtisserie, předměty z marcipánu, schmelzend, schritt für schritt anleitung, schritt-für-schritt, schritt-für-schritt-anleitungen, sculpting, sebze, sipuli, soggetti, souvenirs, soğan, stap, stap-voor-stap, stap-voor-stap instructies, steg for steg, steg-för-steg-instruktion, step, step by step, step-by-lépésre, step-by-step, step-by-step instructions, styrofoam, sugarcraft, sugarpaste, suikerglazuur, svogūnas, technieken, techniken, techniki, techniky, technikák, techniques, tecnicas de decoracion, tecniche, tehnici, tehnike, teknikker, teknikler, telgopor, topo de bolo, topo do bolo, topos de bolo, torte, torte decorate, torten dekorieren, torti, trin, trin for trin, trin-for-trin, trin-for-trin instruktioner, trinn, trinn for trinn, trinn-for-trinn-instruksjoner, tutorial, tutoriale, tutorias, tutorias/ideas para decorar los bizcochos, tutoriel, tutorijal, técnicas, tərəvəz, udžbenik, ui, ukrašavanje torti, uputstvo za dekoraciju, vegetable, verdura, warzywa, zelenina, zuckerfigürchen, zuckermasse, zwiebel, ಈರುಳ್ಳಿ, सजा केक, सब्ज़ी, ट्यूटोरियल मास्टर वर्ग, कांदा, कदम, कदम दर कदम निर्देश, तकनीक, मॉडलिंग, পিঁয়াজ, শাক_সব্জি, モデル, タマネギ, étape, étape par étape les instructions, öğretici, 一步, 一步一步的指示術, žingsnis, žingsnis po žingsnio, 宗師級教程, 建模, 裝飾蛋糕, 菜, 蔬菜, 野菜, 양파, 채소, κρεμμύδι, βήμα, βήμα προς βήμα οδηγίες, οδηγίες βήμα βήμα, λαχανικά, παντεσπάνι art, τεχνικές, φροντιστήριο, инструкция, как сделать, крок за кроком, крок за крокам, овочі, овощи, гародніна, покроково, полимерная глина, пошагово, пошаговые фотки, пакрокава, персонажи, миниатюра, мк, мк лепка лук репчатый, моделиране, майстор-класа урок, майстар-клас, майстер-клас, майстер-класи, маршмеллоу, мастика, мастер-класс, зеленчукови култури, лепка, лук, ліплення, ручной работы, ручная работа, украшение тортов, сахарная мастика, уроки прикрашання, стъпка, стъпка по стъпка инструкции, техники, техника, техніка, туториал, туторіал, тэхніка, фигурки, фигурка на торт, фимо, фігурки, фігуркі, холодный фарфор, цибуля, шаг за шагом, інструкцыя, інструкція  |
|


