|
|
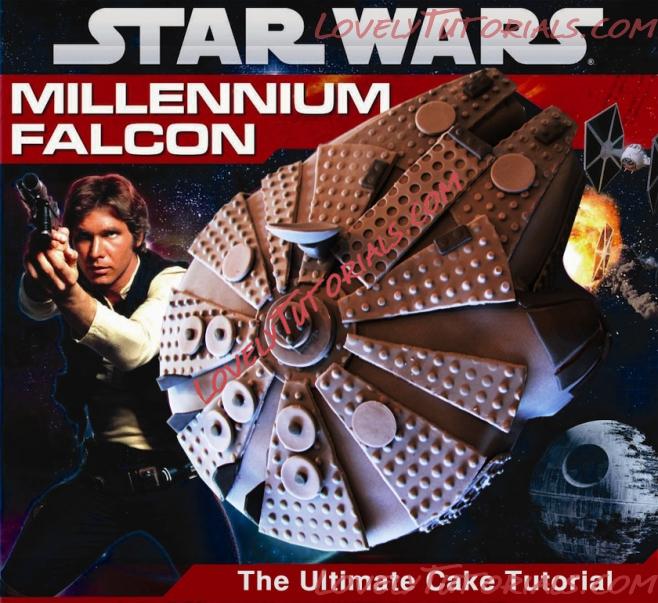
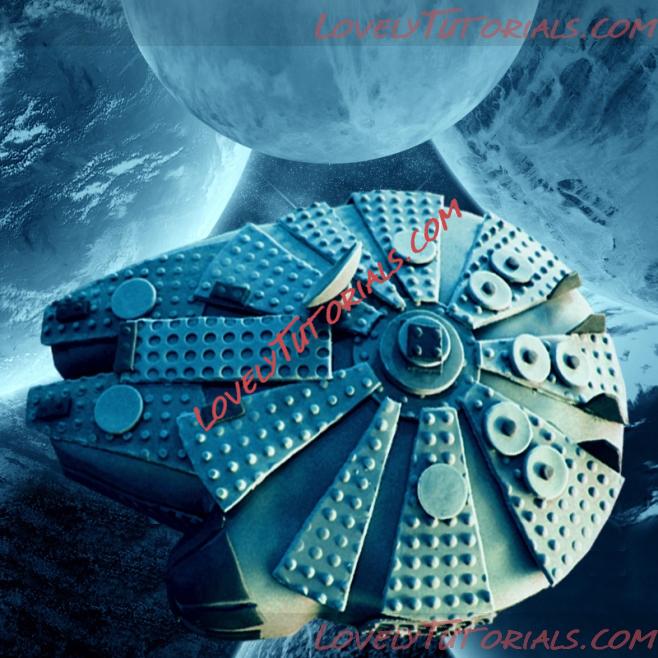
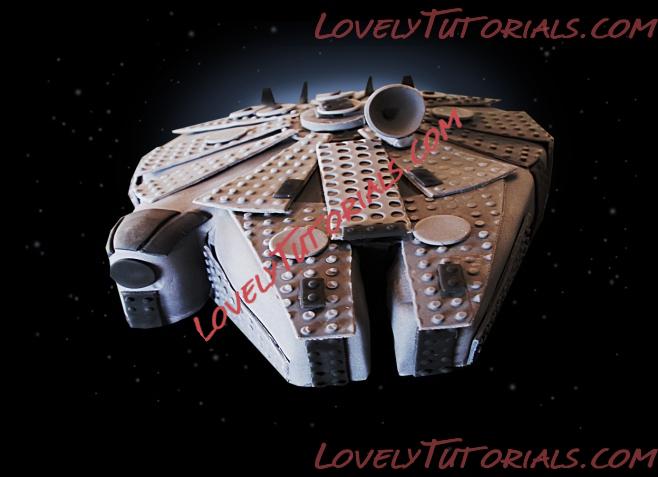
МК торт "Тысячелетний сокол" -Millennium Falcon cake tutorial
|

16.10.2012, 10:22
|
|
Администратор
|
|
Регистрация: 07.09.2010
Сообщений: 7,940
|
|
 МК торт "Тысячелетний сокол" -Millennium Falcon cake tutorial
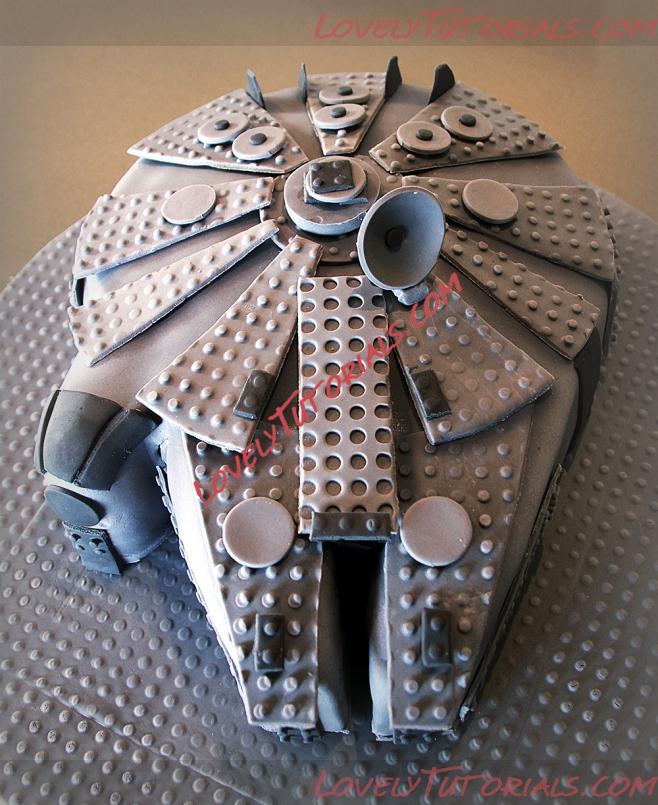
Огромная благодарность Автору cutesweetthings за Мастер-класс
Тысячеле́тний со́кол — вымышленный космический корабль во вселенной «Звёздных войн»
 This cake is built around an 8″ round dark chocolate mud cake but you will also need a 6″ round dark chocolate mud cake to make the Cockpit and Forward Mandibles not to mention the Concussion – Missile Tubes!!!!!! I have given instructions on how to make a 10″ round cake and this will fill the 6″ and 8″ pans. This cake is built around an 8″ round dark chocolate mud cake but you will also need a 6″ round dark chocolate mud cake to make the Cockpit and Forward Mandibles not to mention the Concussion – Missile Tubes!!!!!! I have given instructions on how to make a 10″ round cake and this will fill the 6″ and 8″ pans.
Materials
white card
Mud cake
375g unsalted butter
300g dark chocolate
1.5 tablespoon instant coffee
2 cups warm water
1.5 cup caster sugar
2.25 cups self raising flour
3/8 cup cocoa
3 eggs
1.5 teaspoon vanilla
Ganache
1200g dark chocolate
600ml pure cream
2kg grey sugar-paste
a small amount of black sugar-paste
1. Making the set up board
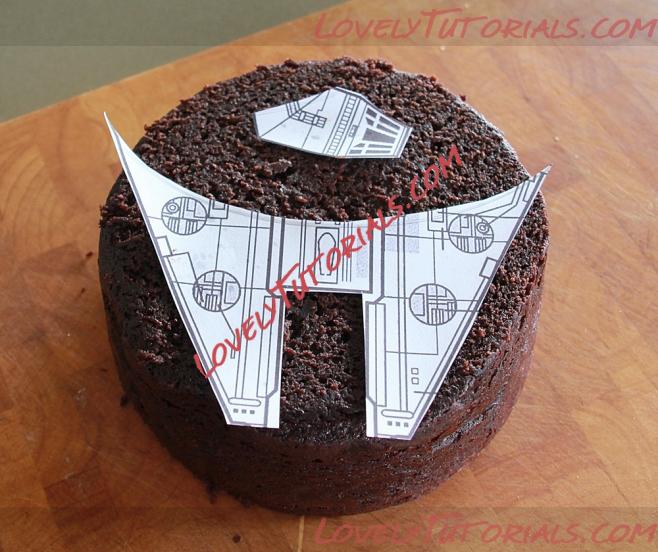
Print out this picture of the Millennium Falcon onto an A4 sheet of paper so that the image fills the page and this will give you the actual size of your finished ship (i.e. 8″ diameter of the large round part of the ship) . You will need two prints as you will be cutting one of them up.
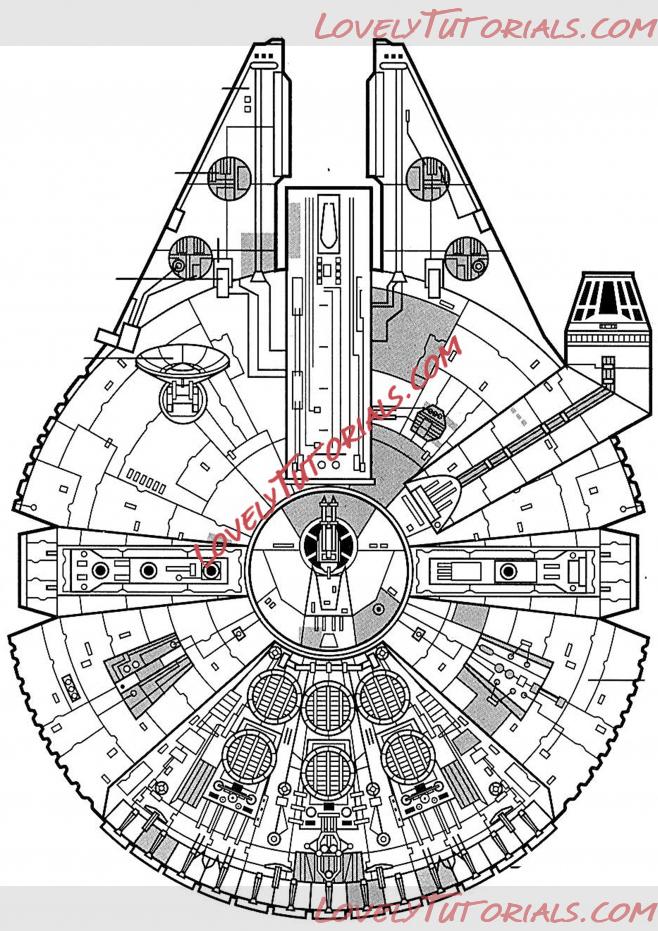
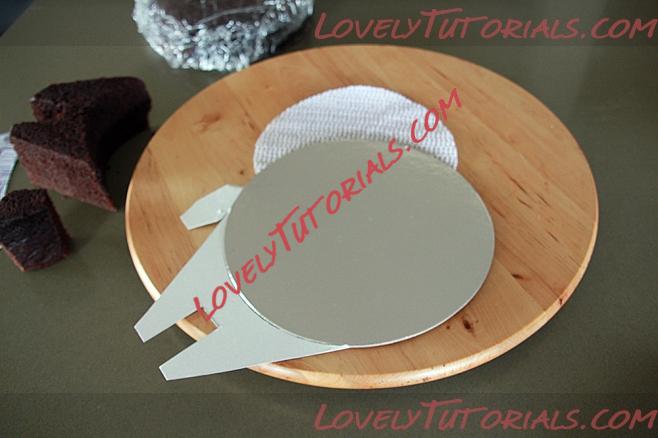
Cut out the shape of the ship in white card or add the extra bits to an 8″ round board as I have done in the picture. This set up board (as it is called) will help you to cut out your pieces of cake and also help when applying the ganache to the sides of your cake. More of that later.
2. Covering the cake board
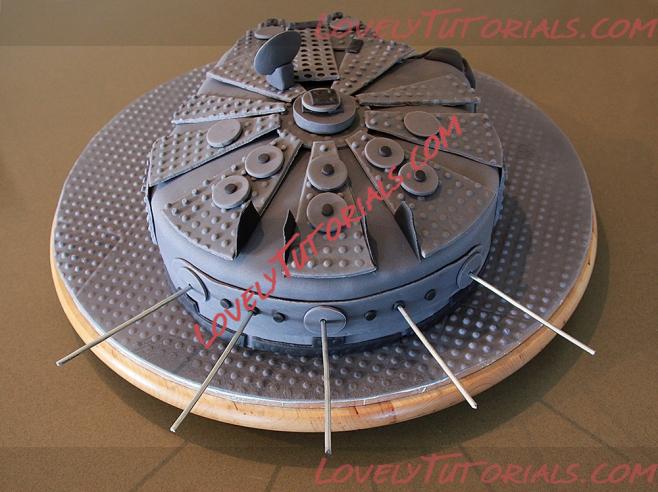
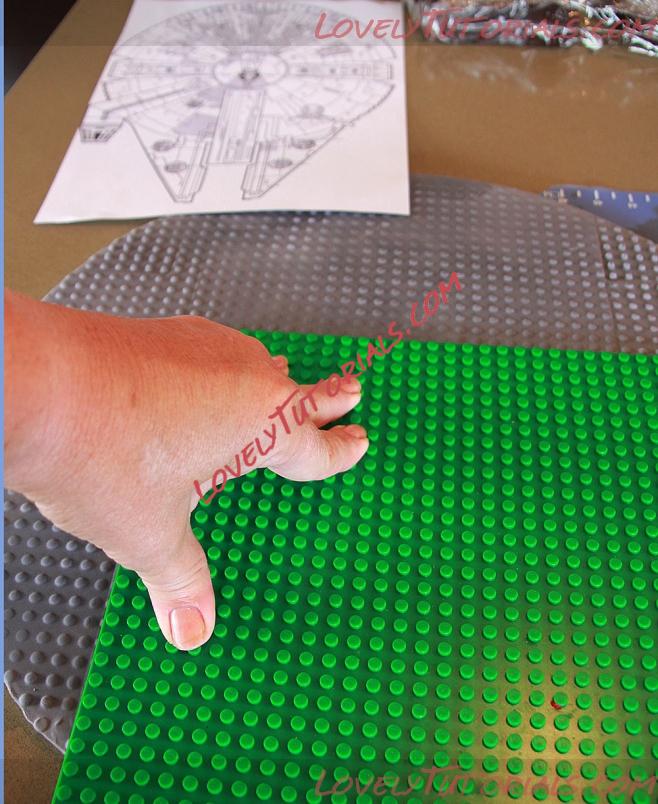 Use the underside of a Lego base board to give you the brick impression. Press down firmly and evenly to get the best results Although some bits of my cake board are a little flat, the ship will cover them. 3. Making the Lego shapes
Use the plan view of the Millennium Falcon to plan and cut out the shapes that you need. 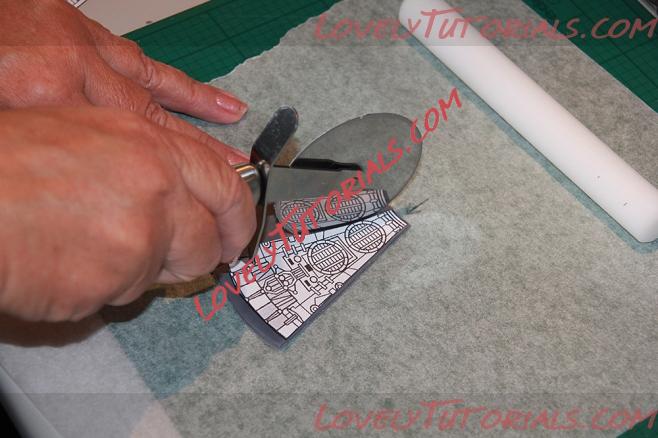
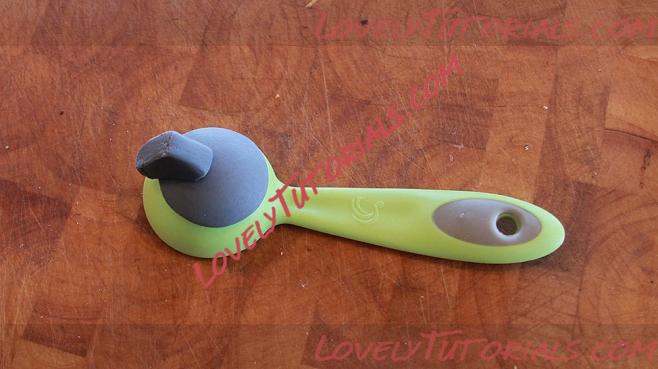
I decided on making mostly triangular shapes and as I cut each one out I placed it on top of the plan view to see how they would all fit together. Once each shape had been cut out, press the Lego board on top to make it look like Lego bricks then neaten up the edges if they have spread a little due to the pressure.
To make the satellite dish, cut out a circle of grey sugar-paste and leave it to harden on the back of a tablespoon to give it a beautiful spherical look. Attach a thick triangle of sugar-paste to its base with edible glue or egg white.
4. Bake the cake
1. Grease and line base and sides of cake pans with one thickness of baking paper, bringing paper 5cm above side of pan.
2. Combine chopped butter, chopped chocolate, coffee, and water in a saucepan.
Stir over low heat until chocolate is melted. Cool 15 minutes. Transfer mixture to bowl of mixer.
3. Add caster sugar to mixture and beat well until dissolved. Add sifted flour and cocoa, lightly beaten eggs and vanilla.
4. Pour mixture into prepared pans. Use a skewer to check that both pans have the same depth of batter. This will ensure that both cakes end up the same height.
5. Bake at 150C for 1 to 1-1/2 hours. Test with skewer. Cool cake in pan.
5. Making the ganache
Heat the cream until it just starts to bubble, pour over chocolate (which you have blitzed in the food processor to coffee granules size) and let it sit for about a minute to melt. Use a hand whisk to blend it all together then set aside to cool.
Your ganache at this point will be thin. You will have to let it set overnight until it thickens to a slightly thicker peanut butter consistency. Since I don’t have the patience to wait, I just let it cool to room temperature and then pop it in the fridge (don’t cover because you might get condensation). It would usually set in the fridge in about an hour or two. If it sets too hard, just microwave it in 10 second intervals (keep mixing it whenever you take it out)
6. Putting the cake together
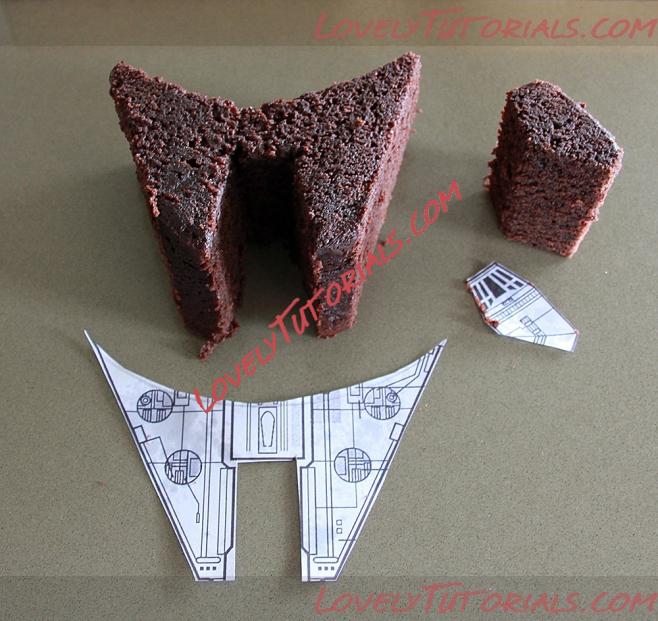 
Use the smaller cake to cut out the cockpit and Mandibles. Lay the templates on top of the cake and cut around them with a sharp knife. Now cut all your pieces in half ready for the ganache filling.
 Use a non-slip mat under your set-up board then stick your pieces to the board with some ganache. 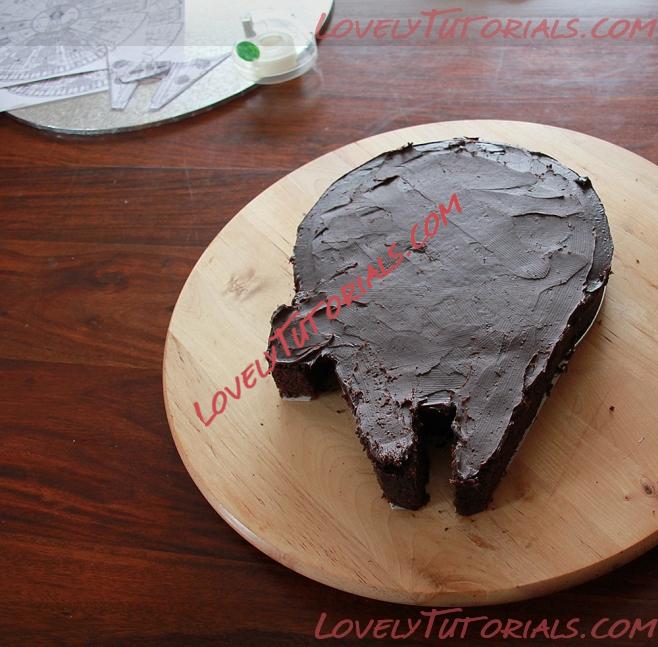
Use ganache to stick all the pieces to each other. 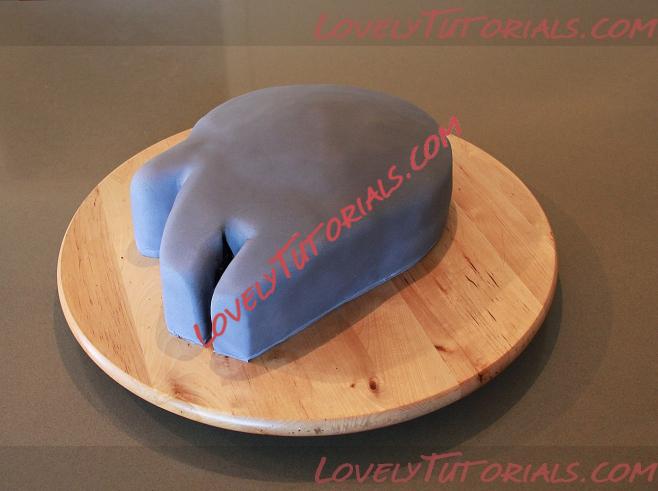
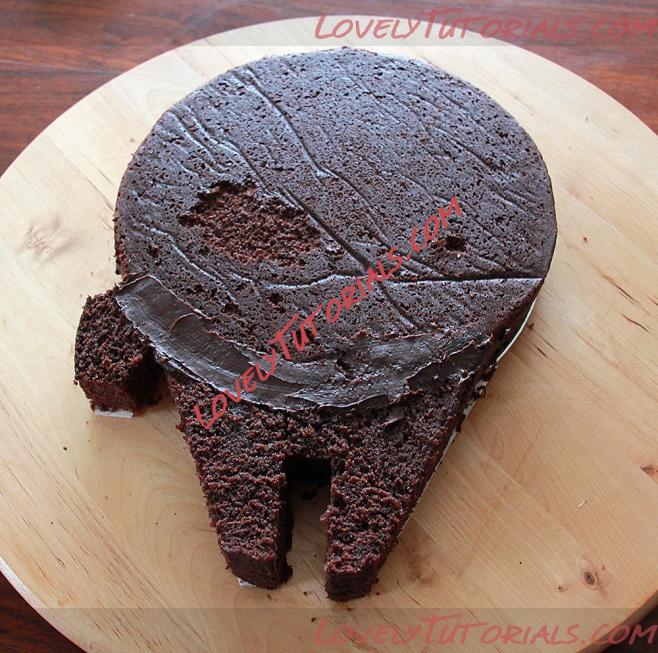
Now add a nice thick layer of ganache across the top as the filling for your cake.
Place the top half of the cake on top of the ganache remembering to stick the pieces together with ganache.
Cover the top and sides of the cake with remaining ganache.
7. Icing the cake
Roll out a large oval of grey sugar-paste making sure it is large enough to cover the cake plus a few centimetres more.
 Getting the sugar-paste neatly in and around the Millennium Falcon shape is probably the most difficult part of making this cake. It might be simpler to make the cockpit and mandibles serarately and attach them to the body of the cake after you apply the sugar-paste. Anyway, it doesn’t have to be mega neat as most of the ship will be covered in Lego shapes! Getting the sugar-paste neatly in and around the Millennium Falcon shape is probably the most difficult part of making this cake. It might be simpler to make the cockpit and mandibles serarately and attach them to the body of the cake after you apply the sugar-paste. Anyway, it doesn’t have to be mega neat as most of the ship will be covered in Lego shapes!
8. Candles
Insert sparkles or candles at the back to resemble thrusters and your done!
|
 |
|
Метки
|
3d bizcocho, 3d bolo, 3d cake, 3d dort, 3d kage, 3d kager, 3d kake, 3d kek, 3d pastel, 3d tarta, 3d torta, 3d torte, 3d torti, 3d torty, 3d κέικ, addım-addım təlimat, adım, adım adım yönergeler, artesanatos passo a passo, bemutató, birthday, birthday cake, bolando bolos, boy, boy's birthday cake and tagged food, cake, cake decorating, cake decorating techniques, chocolate ganache, chocolate mud cake, confeitando bolos, creazione e decorazione torte, decoracion de pasteles, decoración de tortas, decorada en fondant, decorare le torte, decorazioni, deko fondant, dekorace na dort, dekoracija, dekoracije, dekorasyon, dekorácie, fender, fimo, flower paste, fondan, fondant, fondente, fondente di zucchero, fotopostup, foundant, gebak, glazuur, gray, grey, gum pasta, gum paste, gumpaste, han solo, hand-made, handmade, how to, how-to's, instrucţiuni, instrukcijas, instrukcje, jak na, kage dekoration, kagedekoration, kakebaking, korak, korak za korakom navodila, korak-po-korak upute, koristeet ja koristelu, krok, krok po kroku, krok za krokem, krok-za-krokem, las instrucciones, las técnicas, le tecniche, lego, les techniques, lukie, marshmallow, masa flexible, master-class, master-klasse, master-klasy, meistras klasės, metodikas, millennium falcon, millennium falcon cake, millennium falcon cake tutorial, mistr třídy, modeling paste, modelling past, motivtorten, návod, opplæringen, pamoka, pap, pas, pas-cu-pas, pas-à-pas et modèles, paso, paso a paso, passo, passo a passo, passo-a-passo, passo-passo le istruzioni, pasta de miel, postup na 3d torty, postupak za ukrasavanje, pâtisserie, schmelzend, schritt für schritt anleitung, schritt-für-schritt, schritt-für-schritt-anleitungen, ship, special occasion, stap, stap-voor-stap, stap-voor-stap instructies, star wars, steg for steg, steg för steg, steg-för-steg, steg-för-steg-instruktion, step, step by step, step-by-lépésre, step-by-step, step-by-step instructions, sugarcraft, sugarpaste, suikerglazuur, technieken, techniken, techniki, techniky, technikák, techniques, tecnicas de decoracion, tecniche, tehnici, tehnike, teknikker, teknikler, tips och trix, torte, torte decorate, torten dekorieren, torti, trin, trin for trin, trin-for-trin, trin-for-trin instruktioner, trinn, trinn for trinn, trinn-for-trinn-instruksjoner, trucs et questions sur la décoration de gateaux, tutorial, tutoriale, tutorias, tutorias/ideas para decorar los bizcochos, tutoriel, tutorijal, tårtbottnen, tårtor, técnicas, ukrašavanje torti, uputstvo za dekoraciju, zuckermasse, सजा केक, ट्यूटोरियल मास्टर वर्ग, कदम, कदम दर कदम निर्देश, तकनीक, étape, étape par étape les instructions, öğretici, žingsnis, žingsnis po žingsnio, 宗師級教程,一步,一步一步的指示� � �技術,udžbenik, 裝飾蛋糕, 만들기 제작 과정, βήμα, βήμα προς βήμα οδηγίες, οδηγίες βήμα βήμα, παντεσπάνι art, τεχνικές, φροντιστήριο, декорация на торти стъпка по стъпка, инструкция, как сделать, крок за кроком, крок за крокам, покроково, пошагово, пошаговые фотки, пакрокава, миниатюра, мк, мк торт "тысячелетний сокол", майстор-класа урок, майстар-клас, майстер-клас, майстер-класи, маршмеллоу, мастика, мастер-класс, зд торт, зд торта, звёздные войны, ручной работы, ручная работа, украшение тортов, сахарная мастика, уроки прикрашання, стъпка, стъпка по стъпка инструкции, торта стъпка по стъпка, техники, техника, техніка, туториал, туторіал, тэхніка, шаг за шагом, інструкцыя, інструкція  |
| Опции темы |
Поиск в этой теме |
|
|
|
|


