|
|
МК торт-домик в виде лейки -Carved Watering Can-house cake tutorial
|

08.08.2012, 15:39
|
|
Администратор
|
|
Регистрация: 07.09.2010
Сообщений: 7,940
|
|
 МК торт-домик в виде лейки -Carved Watering Can-house cake tutorial
Огромная благодарность Автору Cakes by Lynz за Мастер-класс
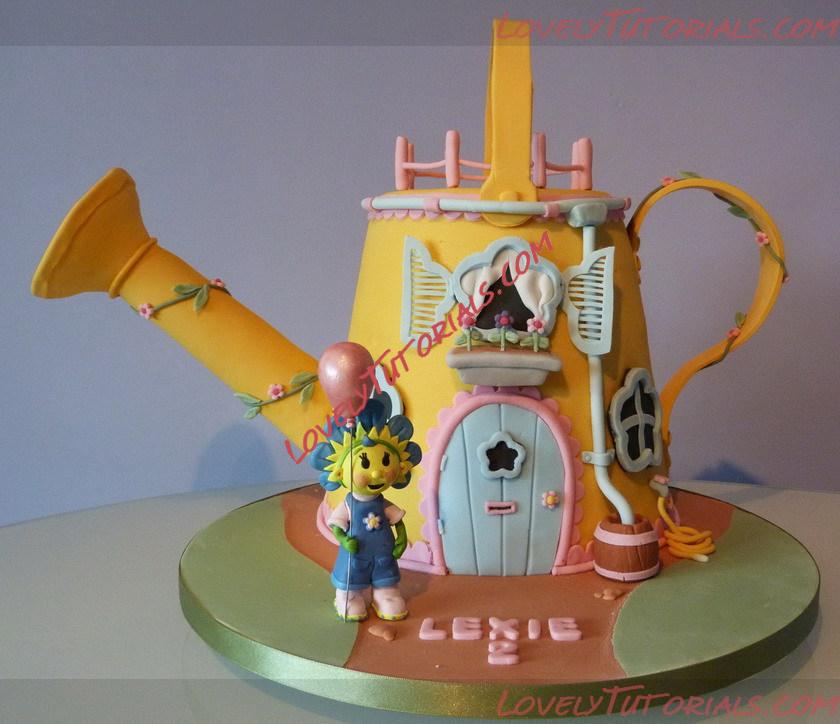
What you are going to need:
To create the Fifi cake you will need the following:
5x 8inch sponge cakes
Buttercream
Icing / Fondant (In lots of colours)
Rolling pin & modelling tools
Straight Frill cutter
Extruder clay tool gun
Gum Paste
Wooden dowels
Chocolate for melting
Edible glue
Corn Flour (to roll out the icing)
Lots of Fifi reference material
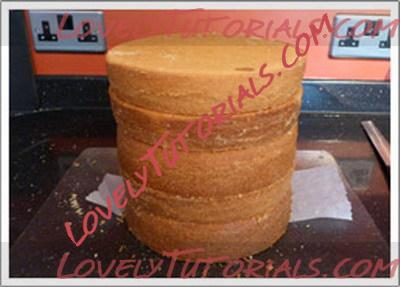
Step 1: The Cake Stack
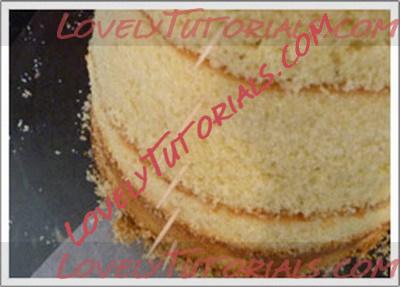
The cakes in this stack were 5x 8 inch round cakes. 3 of the cakes were made with an 8 ounce sponge mixture, and the other 2 a 6 ounce mixture. I trimmed the tops off the cakes to make them flat so they would all stack together well.
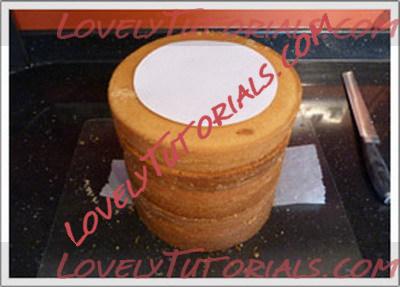
Step 2: Cutting the shape for the house
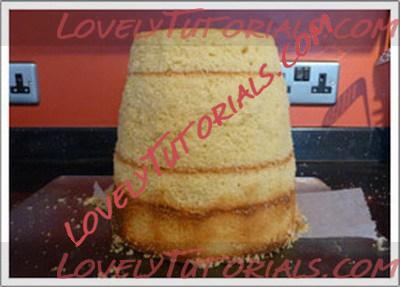
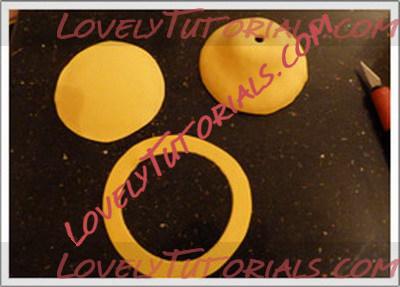
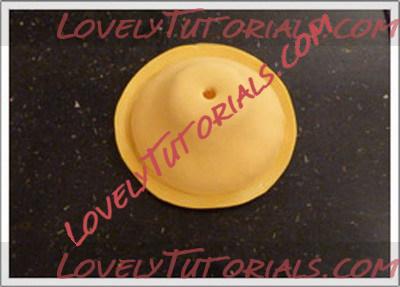
One of the hardest things about this cake was getting the dimensions right. I was aware that everything had to be in proportion to each other to make this cake look right.To make the main shape of the house I cut a small circle 5 1/2 inches round and placed this on the top of the stack. I then used this to carve the cake from top to bottom, creating the angled sides.
Step 3: create a visual guide
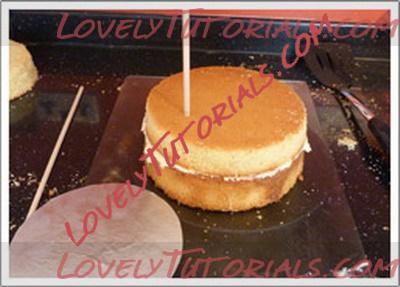
Once you have spent all that time carving your cake you are almost ready to add the buttercream. A tip of mine would be to create a visual guide, so you know where each piece of cake goes. In this case I used cocktail sticks. I placed these in a row at the front of the cake so when it came to putting it back together if these lined up I knew the shape was correct.
Step 4: Adding dowels
Because of the size and weight of this cake I treated it as if it was a 2 tiered cake. I added buttercream between the bottom 2 cakes and placed 4 dowels cut to size in the base. I then placed a cake board which had been cut to size and continued to stack the cake.This was then completely covered in buttercream and left to chill in the fridge whilst I rolled out the icing / fondant. (It was a tight squeeze, but by removing all the shelves I just about managed to get the cake to fit in the fridge)
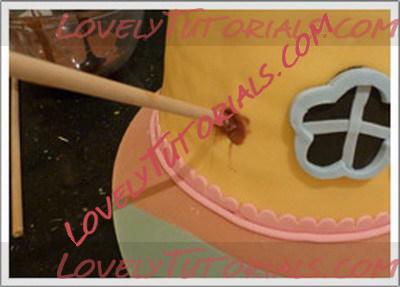
NOTE: At this stage I also slid a horizontal dowel into the front of the 2nd to bottom cake. This was to act as a resting post for the dowel which would create the main structure for the watering can spout. (Sorry I don’t have a picture of this)
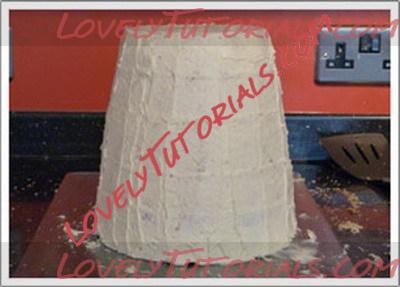
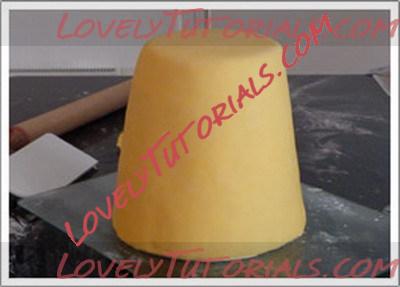
Step 5: Cover the cake in icing / fondant
This was a large cake to cover in 1 piece of icing and I had to admit I was nervous!!I coloured 2 packs of icing with yellow gel food colouring the day before as I didn’t want the icing to be too hot from all the kneading.I then rolled this out to the right diameter and placed this over the top of the cake. I used a smoothing tool down the sides to make a nice finish.
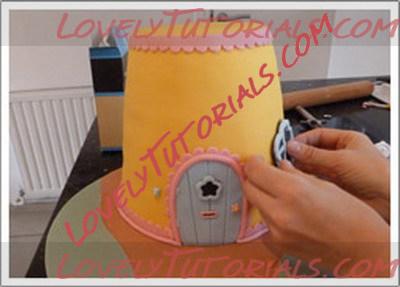
Step 6: Adding the detail
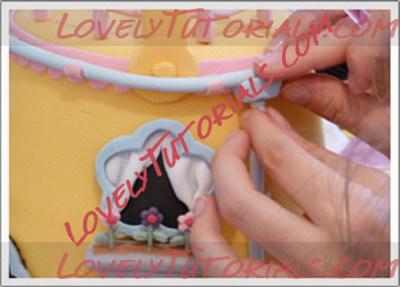
Once the cake was covered it was now time to add the detail. It was quite important that I had good refernce material for this cake. I created all the shapes I needed on paper and cut these out so that I could use them as templates.Around the door I created the trim by using an extruder clay gun for the beading and to make the frill I used a straight frill cutter by PME. To attach the flower box above the door I used cocktail sticks and edible glue. There was alot of edible glue used on this cake.
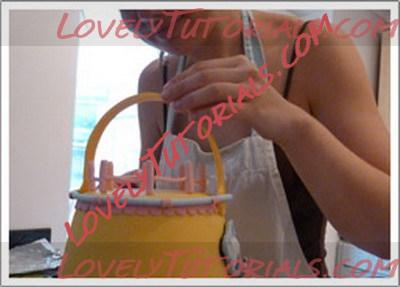
Step 7: Gumpaste handles & features
On this cake I was unable to make everything edible because some of the objects had to hold their shape. In these cases I used gumpaste / flowerpaste.The 2 handles, the fence around the top, the spout and the drainpipe were all made out of gumpaste. These were modelled to the correct size and left to dry for a day.To attach the handles was quite tricky, these were quite heavy and needed to support their own weight. I used some cocktail sticks and edible glue to attach these. I applied the edible glue and as I stuck them into place pushed a cocktail stick through the center. This could then be covered with a circle of gumpaste to make them invisible.
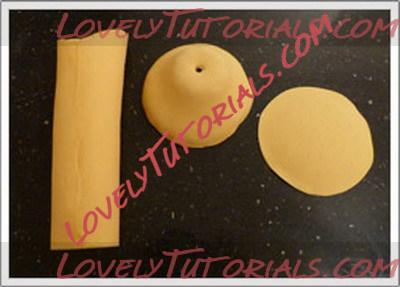
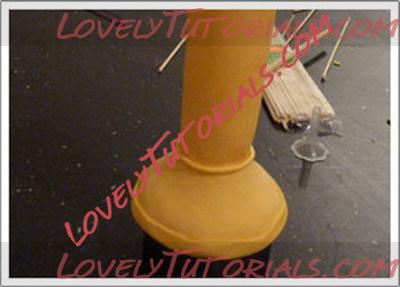
Step 8: Making the Spout
When I was first looking into how to make this cake I could find no information about how to attach a spout to a cake. This process became quite trial and error but I think I finally found the best way of doing it.Initially I was going to make the spout of of rice Krispie squares covered in icing, but once this was made I realised it would be way too heavy to support its own weight. This lead me to rethink the idea and realise that gumpaste, being light and hardening, would be the best option.The fact that I had first made the tube and top of the watering can spout out of Rise Krispie squares was key as I was able to cover these in cling film and use them as molds to place the gumpaste on to set.
NOTE: Place a hole though on the bottom of the spout head for the dowel to fit through. This will allow you to fix it to the cake later.
Once I had the 3 main parts of the spout, I used a small round icing tip to create the tiny circles in the top of the spout to look like water holes. I then cut out a ring of soft gumpaste. I used this to fix the top of the spout together with edible glue. This is then fixed to the main tube with another piece of soft gumpaste and glue.
Step 9: Attaching the spout
At the beginning of making this cake I had put a small horizontal dowel into the side of the cake. I was able to find this position and place another dowel which was cut to size. I then used melted chocolate to secure this into place. Once the chocolate was set and the dowel was quite sturdy. I placed the spout down the dowel fixing it into place with the hole in the top. I then glued around the base and wrapped another piece of gumpaste around the bottom to secure.
Step 10: Leave to dry
Once the cake spout is connected it is just a matter of adding all the finishing touches, and Fifi of course. Because of the amount of edible glue which was used in this cake and to allow the handles and spouts a chance to dry I left the cake over night with supports to make it ready to travel the next day.I really hope this ‘How To’ helped if you ever fancy making this Fifi and the Flowertots cake, or maybe just some of the techniques might come in handy.
|
 |
|
Метки
|
3d bizcocho, 3d bolo, 3d cake, 3d dort, 3d kage, 3d kager, 3d kake, 3d kek, 3d pastel, 3d tarta, 3d torta, 3d torte, 3d torti, 3d torty, 3d κέικ, acasă, accueil, addım-addım təlimat, adım, adım adım yönergeler, ahşap, alberi, albero, annaffiatoio, arbres, arrosoir, artesanatos passo a passo, ağaç, ağaçları, barn tårta, barnas kake, baum, bemutató, bolando bolos, bolo com elefantes, bolo de crianças, bomen, boom, børns kage, bäume, cake decorating, cake decorating techniques, cake met olifanten, carved 3d wooden house cake tutorial, carved watering can cake tutorial, carved watering can-house cake tutorial, casa, casă, confeitando bolos, copac, copaci, creazione e decorazione torte, de lemn, de madeira, de madera, decoracion de pasteles, decoración de tortas, decorada en fondant, decorare le torte, decorazioni, deko fondant, dekorace na dort, dekoracija, dekoracije, dekorasyon, dekorácie, di legno, dječja torta, do domu, dom, domov, domácí, dort pro děti, dort se slony, drambliai, drevený, drewniany, drveni, drvo, drzew, drzewo, dům, dřevěný, elefanten, elefanter, elefantes, elefanti, elefanţi, elefántok, en bois, enfants gâteau, ev, fa, fender, filler, filler ile pastaya, fimo, flower paste, fondan, fondant, fondente, fondente di zucchero, fotopostup, foundant, fák, gebak, gieter, gießkanne, glazuur, gum pasta, gum paste, gumpaste, gyermekek torta, gâteau avec les éléphants, hand-made, handmade, haus, hem, hjem, houten, how to, how-to's, huis, hus, huset, ház, hölzern, instrucţiuni, instrukcijas, instrukcje, jak na, kage dekoration, kage med elefanter, kagedekoration, kake med elefanter, kakebaking, kakku norsuja, kanta za vodu, kastelukannu, kinder-kuchen, kinderen cake, kolač s slonova, konewka, korak, korak za korakom navodila, korak-po-korak upute, koristeet ja koristelu, koti, krok, krok po kroku, krok za krokem, krok-za-krokem, kropiace kanva, kropicí konev, kuchen mit elefanten, kuća, l'arbre, laistytuvas, las instrucciones, las técnicas, lasten kakku, le tecniche, les techniques, les éléphants, locsolókanna, lukie, maison, marshmallow, masa flexible, master-class, master-klasse, master-klasy, medinis, medis, medžių, meistras klasės, metodikas, mistr třídy, modeling paste, modelling past, motivtorten, naar huis, nach hause, namas, namo, norsuja, návod, olifanten, opplæringen, otthon, pamoka, pap, pas, pas-cu-pas, paso, paso a paso, passo, passo a passo, passo-a-passo, passo-passo le istruzioni, pasta de miel, pastel de los niños, postup na 3d torty, postupak za ukrasavanje, prăjitură cu elefanţi, puinen, puu, puut, pyragas vaikams, pâtisserie, regadera, regador, schmelzend, schritt für schritt anleitung, schritt-für-schritt, schritt-für-schritt-anleitungen, sloni, slonova, slony, stabala, stap, stap-voor-stap, stap-voor-stap instructies, steg for steg, steg-för-steg, steg-för-steg-instruktion, step, step by step, step-by-lépésre, step-by-step, step-by-step instructions, strom, stromy, stropitoare, sugarcraft, sugarpaste, suikerglazuur, sulama can, słonie, talo, technieken, techniken, techniki, techniky, technikák, techniques, tecnicas de decoracion, tecniche, tehnici, tehnike, teknikker, teknikler, tips och trix, tort dla dzieci, tort pentru copii, tort ze słoniami, torta con elefantes, torta con gli elefanti, torta elefántok, torta per bambini, torta pre deti, tortas su drambliais, torte, torte decorate, torten dekorieren, torti, tortu so slonmi, tre, tree, trin, trin for trin, trin-for-trin, trin-for-trin instruktioner, trinn, trinn for trinn, trinn-for-trinn-instruksjoner, trä, träd, træ, træer, trær, tutorial, tutoriale, tutorias, tutorias/ideas para decorar los bizcochos, tutoriel, tutorijal, tårta med elefanter, tårtbottnen, tårtor, técnicas, ukrašavanje torti, uputstvo za dekoraciju, vandkande, vannkanne, vattenkanna, watering can, zuckermasse, सजा केक, ट्यूटोरियल मास्टर वर्ग, कदम, कदम दर कदम निर्देश, तकनीक, árbol, árboles, árvore, árvores, çocukların en kek, étape, étape par étape les instructions, öğretici, žingsnis, žingsnis po žingsnio, 宗師級教程,一步,一步一步的指示� � � � � � �技術,udžbenik, 宗師級教程,一步,一步一步的指示� � � �技術,udžbenik, 裝飾蛋糕, δέντρο, δέντρα, κέικ με ελέφαντες, κέικ των παιδιών, ξύλινος, βήμα, βήμα προς βήμα οδηγίες, οδηγίες βήμα βήμα, ελέφαντες, ποτιστήρι, παντεσπάνι art, σπίτι, τεχνικές, φροντιστήριο, дитячий торт, додому, дом, домой, дадому, декорация на торти стъпка по стъпка, дерево, дерева, деревья, деревянный, детски, детский торт, дзіцячы торт, драўляны, дрэва, дрэвы, дърво, дървен, дървета, инструкция, как сделать, крок за кроком, крок за крокам, къща, озера, градинарска лейка, покроково, пошагово, пошаговые фотки, пакрокава, палівачка, миниатюра, мк, мк торт "3д лейка", мк торт 3д деревянный домик, мк торт-домик в виде лейки, майстор-класа урок, майстар-клас, майстер-клас, майстер-класи, маршмеллоу, мастика, мастер-класс, будинок, зд торт, зд торта, лейка, ручной работы, ручная работа, украшение тортов, сахарная мастика, слони, слонове, слоны, сланы, уроки прикрашання, стъпка, стъпка по стъпка инструкции, торт зі слонами, торт со слонами, торт са сланамі, торта, торта със слонове, торта стъпка по стъпка, техники, техника, техніка, туториал, туторіал, тэхніка, шаг за шагом, інструкцыя, інструкція  |
|


