Cake Decorating Tutorials  (How To's) Tortas Paso a Paso

Вернуться   Cake Decorating Tutorials (How To's) Tortas Paso a Paso > Decorated Cookies Tutorials


Ваш профиль:
Your Avatar
Забыли пароль?
Регистрация


Ответ

Dancing Elf and Santa Cookies tutorial

 
LinkBack Опции темы Поиск в этой теме
  #1  
Старый 08.12.2012, 11:37
Администратор
 
Регистрация: 07.09.2010
Сообщений: 7,940
По умолчанию Dancing Elf and Santa Cookies tutorial

Огромная благодарность Автору sweetsugarbelle за Мастер-класс
Название: 01.jpg
Просмотров: 0

Размер: 88.2 Кб
Rather than piecing together two cookies, I snipped off a small part of a single shape.
Название: 02.jpg
Просмотров: 0

Размер: 97.9 Кб
Did you guess? I found this angel cutter in a big container of Betty Crocker cutters I bought recently. As a matter of fact, it was one of the primary reasons I wanted them. Even in the package I could see that cute little angel was just the right shape to become an adorable little elf face. All I did was trim off a corner of the dress after placing them on the cookie sheet.
Название: 03.jpg
Просмотров: 0

Размер: 99.9 Кб
Just in case you can’t find this set, I found an angel cutter at Karen’s cookie that will work. To see it, click HERE.
After that, the rest is easy.
To decorate elf face cookies you will need:

Begin by using 20-second icing to outline the face and then quickly drop in pearl eyes.
Название: 04.jpg
Просмотров: 0

Размер: 58.8 Кб
Next, outline the hat, and fill in alternating green stripes. Let the green set up for twenty or thirty minutes, then flood the middle red. You can speed the process along by using a fan to dry the cookies in between steps. At this point let the cookie dry completely, at least eight hours or overnight.
Название: 05.jpg
Просмотров: 0

Размер: 36.1 КбНазвание: 06.jpg
Просмотров: 0

Размер: 40.2 Кб
The next day, add the details. I used a #67 leaf tip and medium piping icing for the hat and collar, pink petal dust for the cheeks, and a #1.5 PME tip for all of the outlining and detail work.
Название: 07.jpg
Просмотров: 0

Размер: 51.0 Кб
The jingle bell was also easy to make.
Название: 08.jpg
Просмотров: 0

Размер: 61.1 Кб
These smiling elves can stand alone or as part of a larger cookie puzzle. If you’d like to make a full elf, use a bell for the middle, and my leggy little witch tutorial as a guide for legs.
Название: 09.jpg
Просмотров: 0

Размер: 69.6 Кб
Ответить с цитированием
  #2  
Старый 08.12.2012, 11:43
Администратор
 
Регистрация: 07.09.2010
Сообщений: 7,940
По умолчанию Santa belly cookies

Огромная благодарность Автору sweetsugarbelle за Мастер-класс

Название: 01.jpg
Просмотров: 0

Размер: 88.8 Кб
You’ve probably seen Santa belly cookies before. Maybe on a round cookie like these I made last year.
The cookie I’m making today, is the same concept, but a little different.
You’ll soon see why I chose a bell rather than a round.
To make these cookies you will need:

  • red, black, and white piping AND flood icing
  • black candy pearls
  • yellow piping icing
  • gold lustre dust {optional}

Begin by outlining your cookie. Fill the fur and belt portions of the cookie and let dry for about 4 hours. This will deter bleeding.
Название: 02.jpg
Просмотров: 0

Размер: 78.4 Кб
When the black and white areas have dried, fill the red section and use tweezers to quickly drop candy beads into the wet icing
Название: 03.jpg
Просмотров: 0

Размер: 66.7 Кб
At this point the icing must dry at least 8 hours or overnight. The next day use a small tip {I prefer PME #1.5} to embellish the fur and add a button flap.
Название: 04.jpg
Просмотров: 0

Размер: 83.6 Кб
Pipe on a yellow belt buckle and let dry. Then use gold lustre dust mixed with a touch of vodka or extract to paint the buckle gold. Entirely optional, but I think the little bit of bling makes them extra special.
Название: 05.jpg
Просмотров: 0

Размер: 89.3 Кб
Now for the fun part…remember I said I would explain why I chose to use a bell rather than a round? I did that so that the middle would be one part of a whole Santa!
Название: 06.jpg
Просмотров: 0

Размер: 128.4 Кб
Ответить с цитированием
  #3  
Старый 08.12.2012, 11:50
Администратор
 
Регистрация: 07.09.2010
Сообщений: 7,940
По умолчанию

Огромная благодарность Автору sweetsugarbelle за Мастер-класс


Название: 01.jpg
Просмотров: 0

Размер: 45.2 Кб
To make these cookies you will need:
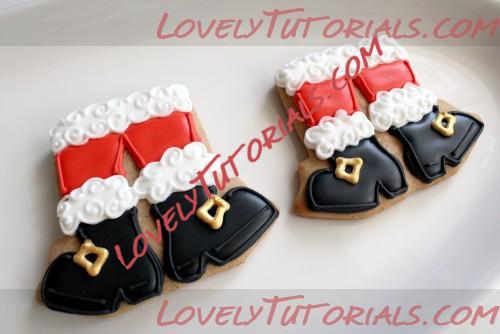
  • red flood and piping icing
  • black flood and piping icing icing
  • white flood and piping icing
  • gold lustre dust
For the base, I used a trimmed onesie cookie like I did for my leggy little witch cookies which you can see HERE.
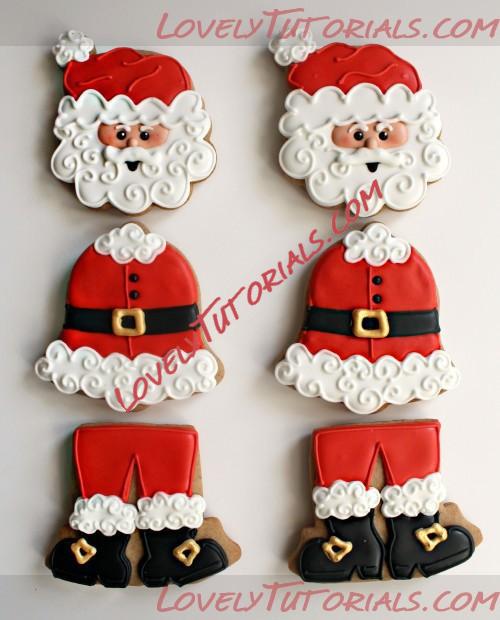
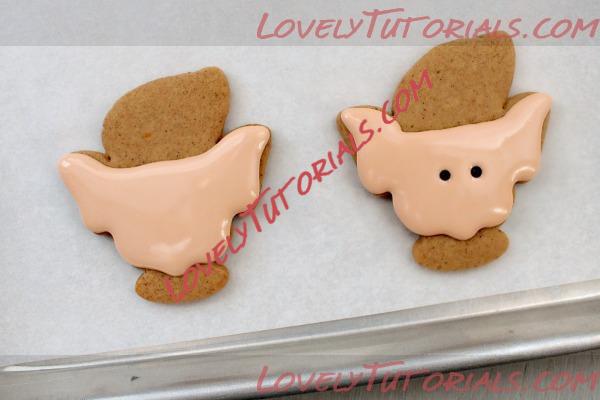
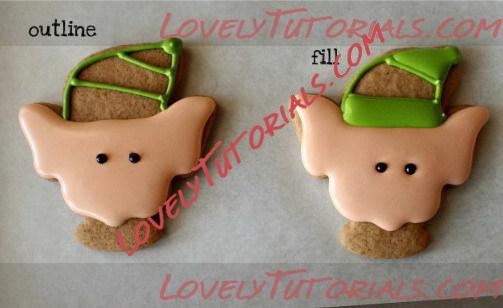
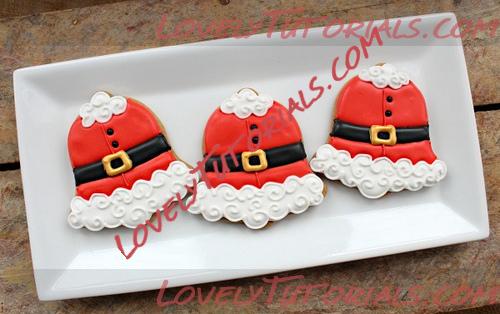
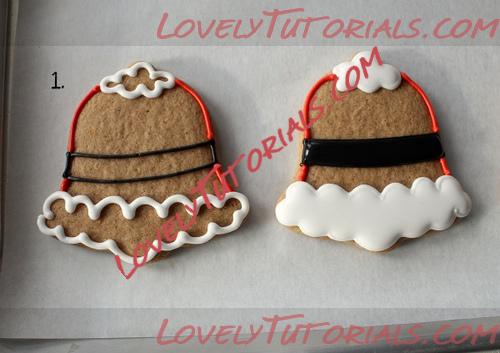
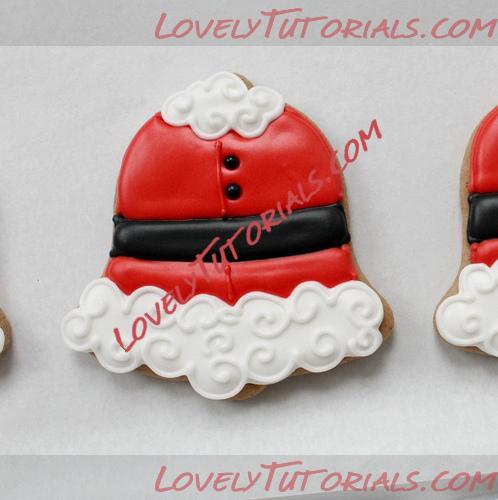
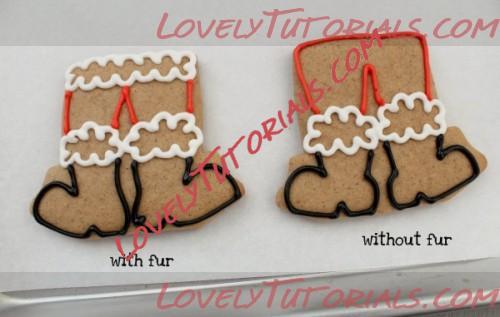
To begin, outline the cookie. Start with the white fur, let it dry a bit, then do the red and black. I made two versions. The one with fur on top is the stand alone cookie. I used a #2 tip for the red and black outlining, and a #3 for the white fur.
Название: 02.jpg
Просмотров: 0

Размер: 35.2 Кб
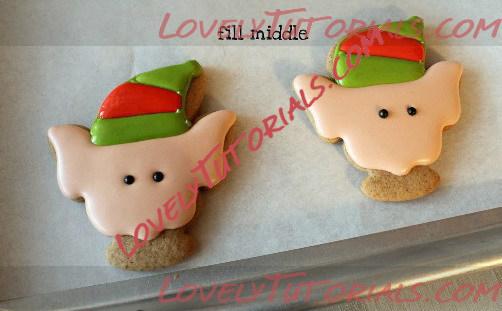
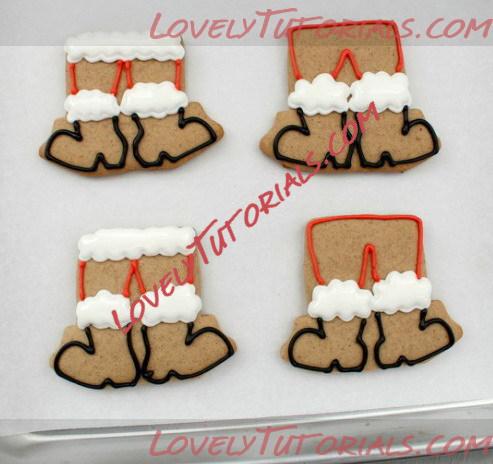
After the outlining has dried, fill the cookie. You’ll have to do it in alternating sections with a bit of drying time in between so that the colors don’t bleed. I use a fan to decrease drying time AND bleeding as you can see HERE.
Название: 03.jpg
Просмотров: 0

Размер: 53.5 КбНазвание: 04.jpg
Просмотров: 0

Размер: 49.9 Кб
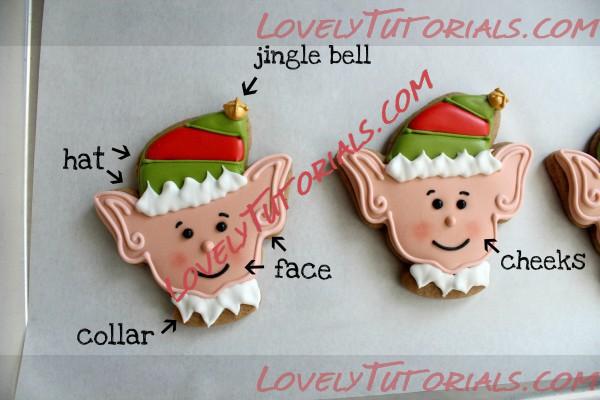
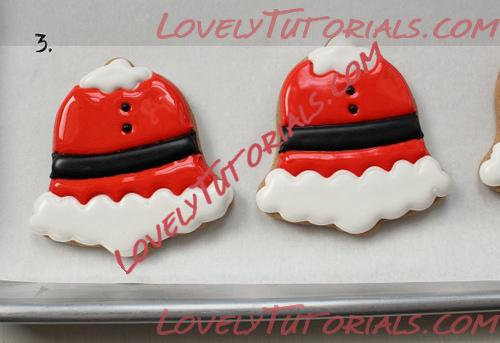
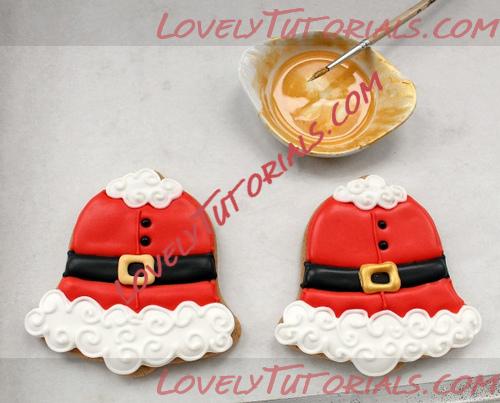
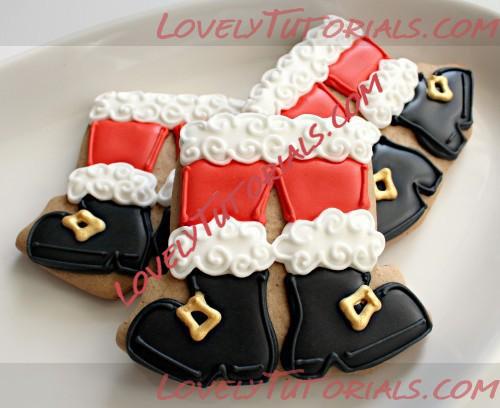
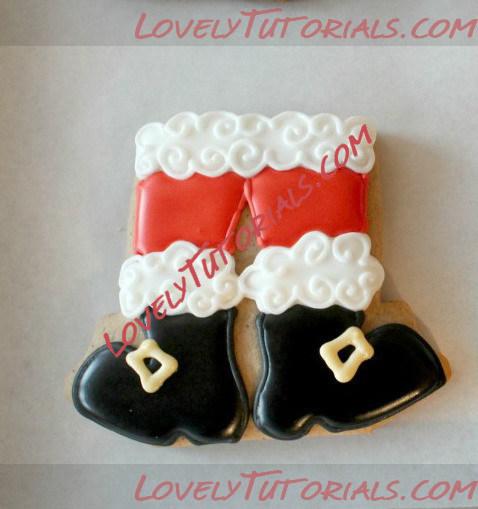
At this point let the cookie dry overnight. The next day, add the details. Use a #1 or #1.5 tip to add a swirly pattern to the fur. Then use a #3 tip to pipe a buckle onto Santa’s shoe. I happened to used light yellow icing, but white will work fine. After the buckle is dry, mix lustre dust with vodka or lemon extract and carefully paint the buckle gold.
Название: 05.jpg
Просмотров: 0

Размер: 47.5 КбНазвание: 06.jpg
Просмотров: 0

Размер: 64.8 Кб
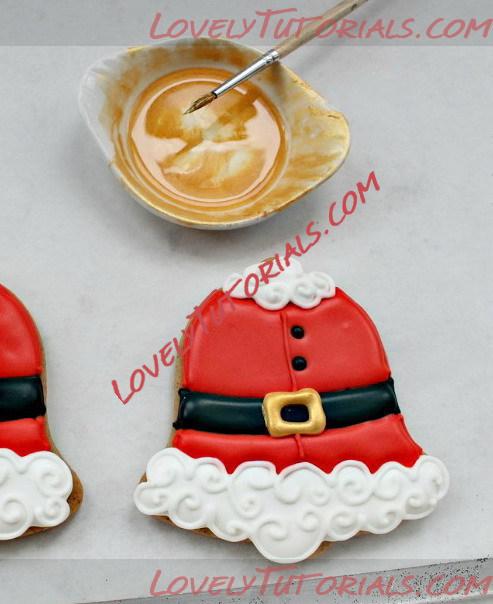
Of course, if you don’t have lustre dust, you can just use a gold icing color for the buckle instead. If you need help with this, I have a helpful printable color chart HERE. Let the detail work dry and you’ll have simple yet adorable Santa leg cookies.
Название: 07.jpg
Просмотров: 0

Размер: 31.1 Кб
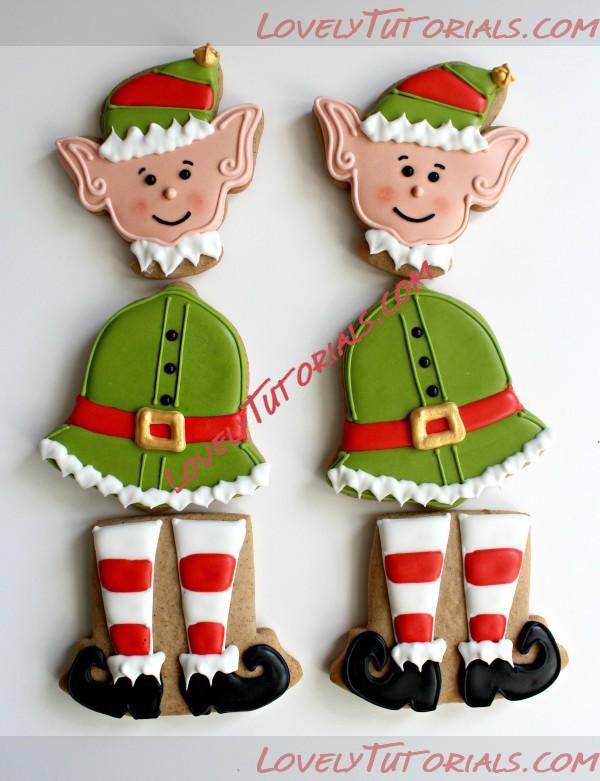
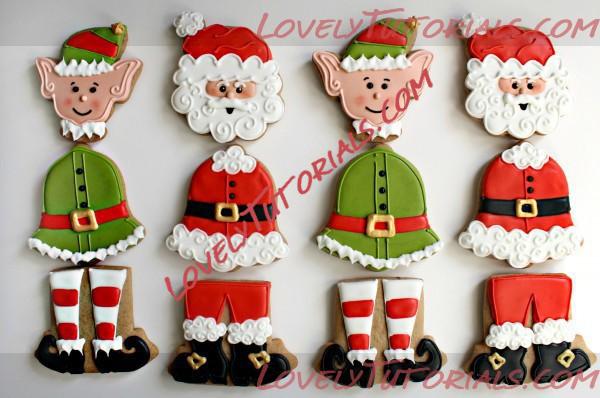
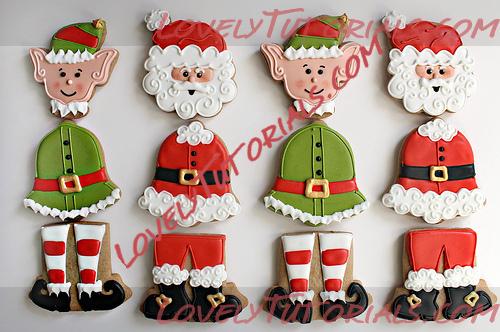
Remember I said these can be stand alone cookies, or part of a bigger cookie picture? Well, here’s the bigger picture…
Название: 08.jpg
Просмотров: 0

Размер: 66.1 Кб
Ответить с цитированием
Ответ

Метки
dancing elf cookies tutorial

Опции темы Поиск в этой теме
Поиск в этой теме:

Расширенный поиск


©2022 Lovely Tutorials