|
|
МК лепка "Малыш" -Baby topper tutorial V4
|

06.06.2014, 20:13
|
|
Администратор
|
|
Регистрация: 23.04.2014
Сообщений: 513
|
|
 МК лепка "Малыш" -Baby topper tutorial V4
Огромная благодарность goodtoknow за Мастер-класс
These adorable little baby cake decorations are the perfect thing to adorn any celebration cake be it christenings, baby showers or first birthdays.
You can play around with hair, eye and outfit colours to suit whoever you’re making it for.
This recipe makes one decoration and you can make it however big or small you like. Follow Victoria Threader’s easy step-by-step to make these gorgeous icing characters - they're a lot easier than you might think!
Ingredients
- White modelling paste
- Skin tone modelling paste
- Black fondant
- Blue fondant
- Yellow fondant
- Silver ball sprinkle nonpareil
- Dusky pink petal dust
- Dried spaghetti strand
Equipment
- Sharp or craft knife
- Soft brush
- Strand of dried spaghetti
- Small/medium ball tool (optional)
- Water brush
- Fondant cutting wheel (optional)
- Veining tool (optional)
- Small plain writing nozzle (optional)
- Cone tool (optional)
- Small circle cookie cutter
- Pin tool or cocktail stick
1 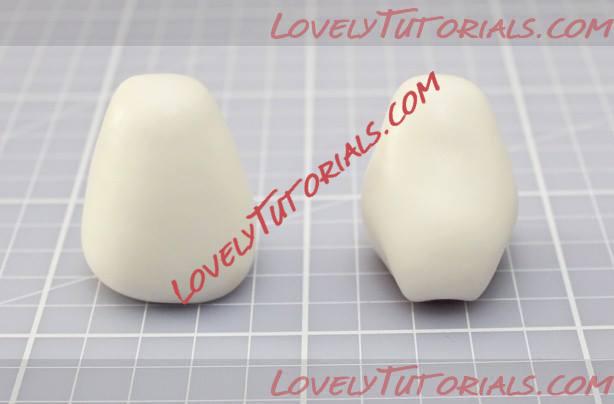 Step 1
For the body: Step 1
For the body: Mould 20g of white modelling paste into a pear shape and then pinch in the bottom to shape where the legs will be.
2 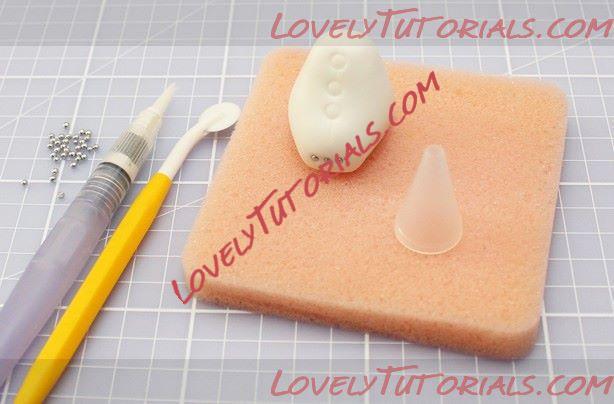 Step 2 Step 2
Add 3 silver ball sprinkles for the poppers by adding a brush of water, and pushing them into the paste. Add studs to the body by pushing the small plain nozzle into the front of the baby grow and add some lines with a cocktail stick or pin tool. It helps to pop the model on a sponge or greaseproof paper, as it makes it easier to move around without getting finger prints in the paste.
3 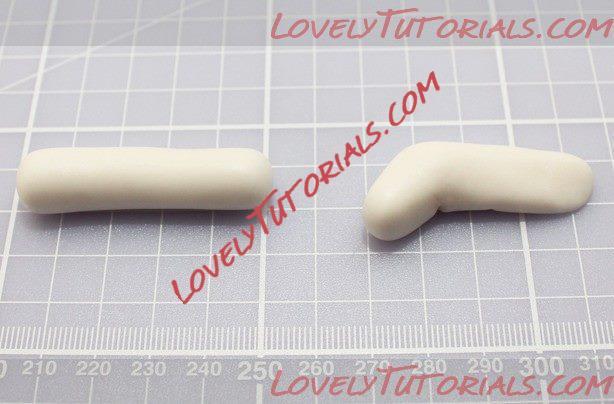 Step 3
For the legs: Step 3
For the legs: Roll a sausage to about 10cm and cut in half diagonally. Bend the uncut end over and mould a foot shape. Thin the hip end by pinching the fondant in between your fingers. It is now ready to stick onto the body.
4  Step 4 Step 4
Stick the thinned end of the leg to the side of the body with a brush of water,
5 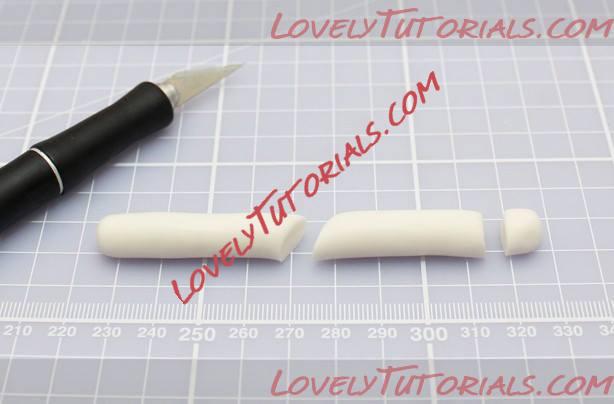 Step 5
For the arms: Step 5
For the arms: Roll a sausage and cut in half diagonally and trim the end. Using the cone tool or a cocktail stick, add a hole to the centre for the hands, and stick the sleeves to the body with a brush of water.
6 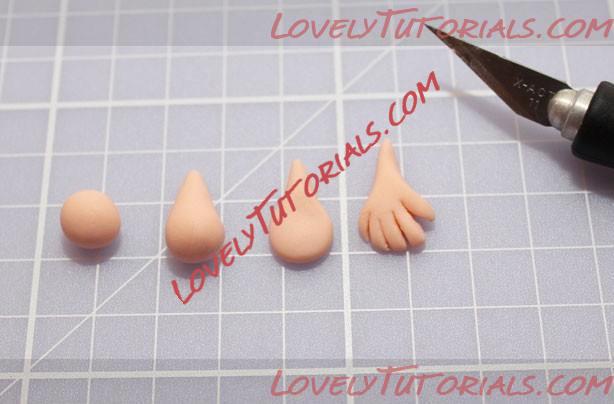 Step 6
For the hands: Step 6
For the hands: Start with 2 small balls of skin tone paste, roll one end to make a cone and flatten with your finger. Cut a mitten shape, then cut 3 lines for the fingers and soften the edges with the tips of your fingers.
7 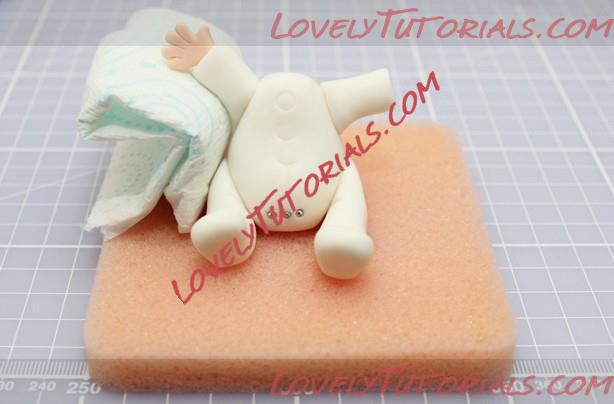 Step 7 Step 7
Add the hands to the sleeves with a brush of water. Sometimes the weight of the hands pull the sleeves down. If this happens, add a piece of kitchen towel under the sleeves as a support until they have dried in postion - this should take about 20 mins or so.
8 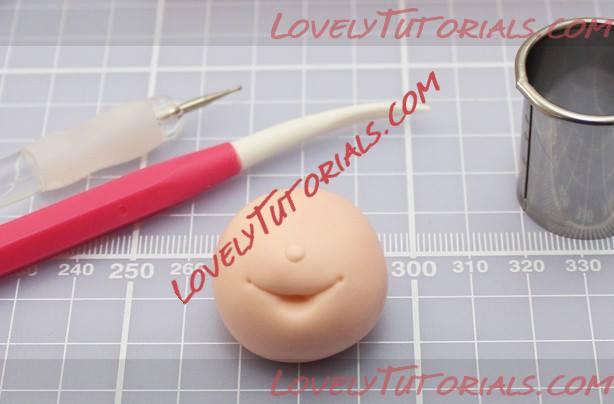 Step 8
For the head: Step 8
For the head: Roll a ball of skin tone paste and add a smile by pushing the edge of a cookie cutter into the front of the face. Add detail with a tiny ball tool and veining tool if you have them, then add a tiny ball of paste for the nose.
9 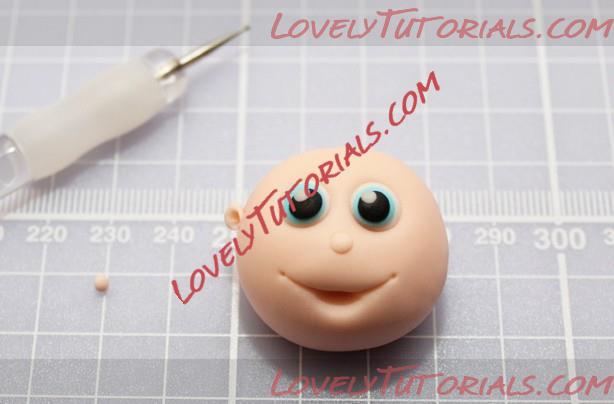 Step 9
For the ears: Step 9
For the ears: Roll tiny balls of skin tone paste and attach them to the side of the head with a dot of water and the small ball tool if you have one.
For the eyes: Indent holes for the eyes and add a small ball of white paste, a smaller ball of blue paste, an even smaller ball of black fondant, then finish with a dot of white paste for the reflection.
10  Step 10 Step 10
Brush the cheeks with a soft brush and dusky pink petal dust (if using).
11  Step 11 Step 11
Roll a tiny curl of yellow fondant and stick it to the top of the head with a brush of water.
12 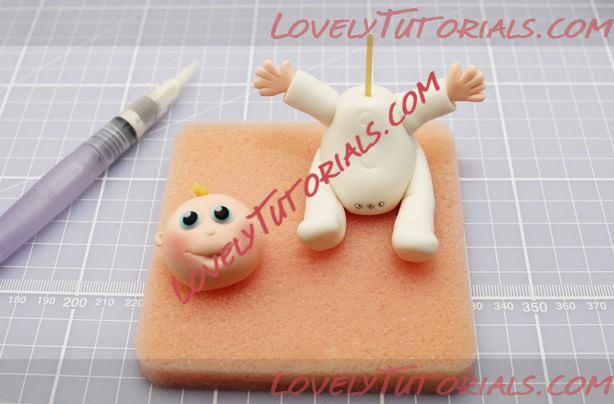 Step 12 Step 12
Add a length of spaghetti to the body and brush around the neck with the water brush, push the head onto the spaghetti.
13  Step 13 Step 13
Add the finished topper to the cake.
|
 |
|
Метки
|
3d figures, addım-addım təlimat, adım, adım adım yönergeler, artesanatos passo a passo, baby boy, baby boy in an envelope step by step, baby dreng, baby jongen, bebek çocuk, bebé, bemutató, bimbo, birthday cake, biscuit, bolando bolos, bolos decorados, boríték, brzdąc, busta, cake decorating, cake decorating techniques, cake topper, cake toppers, cake tops, cerâmica plástica, character figures, characters, children's cake, chlapeček, chlapček, cold porcelain, confeitando bolos, copilaș, copinho, csöppség, curso de modelado, cute tot step by step, decoracion de pasteles, decoración de tortas, decorada en fondant, decorare le torte, decorazioni, deko fondant, dekorace na dort, dekoracija, dekoracije, dekorasyon, dekorácie, dječji dječak, envelop, envelope, enveloppe, especializada em modelagem de biscuit, fender, figur kager, figuras, figure making tutorials, figuren, figures, figurice, figurice od fondana, figurine on the cake, figurines, figurinhas, figurky, figúrky, figür modelleme, fimo, fixando a cabencinha, flower paste, fondan, fondant, fondente, fondente di zucchero, fotopostup, foundant, gebak, glazuur, gum pasta, gum paste, gumpaste, hand-made, handmade, how to, how-to's, instrucţiuni, instrukcijas, instrukcje, jak na, kage dekoration, kagedekoration, kakebaking, kirjekuori, knirps, konvolutt, koperta, korak, korak za korakom navodila, korak-po-korak upute, koristeet ja koristelu, krok, krok po kroku, krok za krokem, krok-za-krokem, kuvert, la modélisation, las instrucciones, las técnicas, lašelis, le tecniche, les techniques, lukie, mališan, marcipanové figurky, marshmallow, marsipanfigurer, masa flexible, master-class, master-klasse, master-klasy, meistras klasės, menino, metodikas, mistr třídy, modelado, modelagem, modelando a barriga, modelando a cabencinha, modelando a perninha, modelando as maozinhas, modelando o cabelinho, modelando o corpinho, modelando os bracinhos, modelando os pezinhos, modelare, modelerte figurer, modeling, modeling paste, modeliranje, modellazione, modelleme, modellering, modellieren, modellierpaste, modelling, modelling past, modelləşdirmə, modelovanie, modelování, modelování krok za krokem, modelowanie, motivtorten, mrně, návod, návody a postupy, návody na květy a lístky, obálka, omotnica, opplæringen, orelhas, ozdoby, pallero, pamoka, pap, pas, pas-cu-pas, pas-à-pas et modèles, paso, paso a paso, passo, passo a passo, passo-a-passo, passo-passo le istruzioni, pasta de goma, pasta de miel, pasta flexible, pasta laminada, pat băiat, peuter, pintura dos olhos, plic, pocelana fria, poikavauva, pojke, polymer clay, postupak za ukrasavanje, pravljenje figurica za torte, pâtisserie, předměty z marcipánu, schmelzend, schritt für schritt anleitung, schritt-für-schritt, schritt-für-schritt-anleitungen, sculpting, sobre, soggetti, sohn, souvenirs, stap, stap-voor-stap, stap-voor-stap instructies, steg for steg, steg för steg, steg-för-steg-instruktion, step, step by step, step-by-lépésre, step-by-step, step-by-step instructions, styrofoam, sugarcraft, sugarpaste, suikerglazuur, sumar, technieken, techniken, techniki, techniky, technikák, techniques, tecnicas de decoracion, tecniche, tehnici, tehnike, teknikker, teknikler, telgopor, topo de bolo, topo do bolo, topos de bolo, torte, torte decorate, torten dekorieren, torti, tot, trin, trin for trin, trin-for-trin, trin-for-trin instruktioner, trinn, trinn for trinn, trinn-for-trinn-instruksjoner, trucs et questions sur la décoration de gateaux, tutorial, tutoriale, tutorias, tutorias/ideas para decorar los bizcochos, tutoriel, tutoriels, tutorijal, técnicas, udžbenik, ukrašavanje torti, umschlag, uputstvo za dekoraciju, vokas, yavrucak, zarf, zuckerfigürchen, zuckermasse, सजा केक, ट्यूटोरियल मास्टर वर्ग, कदम, कदम दर कदम निर्देश, तकनीक, मॉडलिंग, モデル, étape, étape par étape les instructions, öğretici, 一步, 一步一步的指示術, žingsnis, žingsnis po žingsnio, škvŕňa, 宗師級教程, 建模, 裝飾蛋糕, 黏土教程, 만들기 제작 과정, 슈가모델링, βήμα, βήμα προς βήμα οδηγίες, οδηγίες βήμα βήμα, μπόμπιρας, αγόρι μωρό, παντεσπάνι art, τεχνικές, φάκελος, φροντιστήριο, декорация на торти стъпка по стъпка, инструкция, конверт, как сделать, канверт, крок за кроком, крок за крокам, покроково, полимерная глина, пошагово, пошаговые фотки, пакрокава, персонажи, плик, миниатюра, мк, мк лепка "маленький карапуз", мк лепка "малыш в конверте", моделиране, майстор-класа урок, майстар-клас, майстер-клас, майстер-класи, малюк, малыш, маршмеллоу, мастика, мастер-класс, лепка, ліплення, ручной работы, ручная работа, украшение тортов, сахарная мастика, сбор, уроки прикрашання, стъпка, стъпка по стъпка инструкции, торта стъпка по стъпка, техники, техника, техніка, туториал, туторіал, тэхніка, фигурки, фигурка на торт, фимо, фігурки, фігуркі, холодный фарфор, шаг за шагом, інструкцыя, інструкція  |
|


