Cake Decorating Tutorials  (How To's) Tortas Paso a Paso

Вернуться   Cake Decorating Tutorials (How To's) Tortas Paso a Paso > Polymer Clay Cane Tutorials > Flower Canes Tutorials


Ваш профиль:
Your Avatar
Забыли пароль?
Регистрация


Ответ

МК Оранжевый цветок (колбаска) из пластики -Polymer Clay Tutorial: Orange Star Flower Cane

 
LinkBack Опции темы Поиск в этой теме
  #1  
Старый 02.08.2012, 12:00
Администратор
 
Регистрация: 07.09.2010
Сообщений: 7,940
По умолчанию МК Оранжевый цветок (колбаска) из пластики -Polymer Clay Tutorial: Orange Star Flower Cane

Огромная благодарность Автору Kael Mijoy  за Мастер-класс

Supplies:
Polymer Clay in
orange,
white,
deep purple,
light brown,
black,
translucent or other color for packing

Tools:
pasta machine or acrylic roller
tissue blade

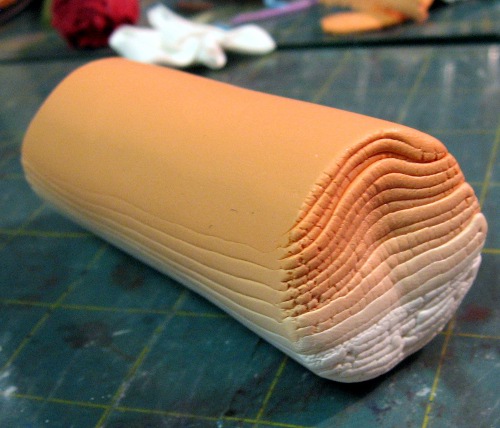
Step 1: Let's start with the petals today. (You'll see why later.) Make a skinner blend with orange and white clay.

Название: 1.JPG
Просмотров: 1

Размер: 80.9 Кб

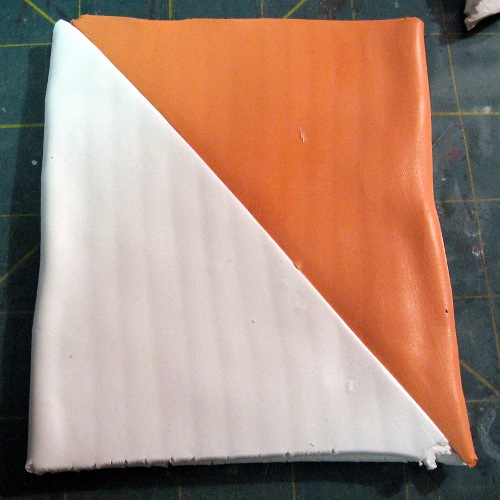
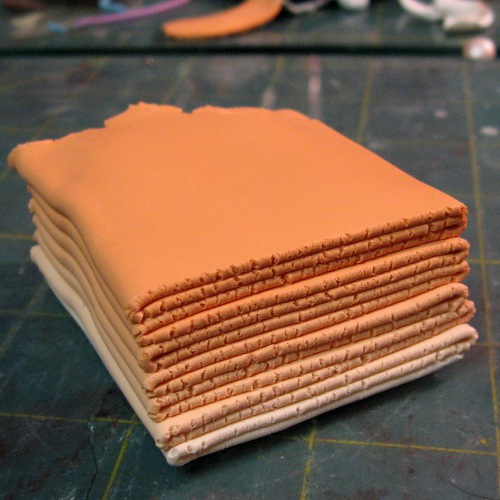
Make your blend into a long strip and fold it accordion-style into a block.
Название: 2.JPG
Просмотров: 1

Размер: 87.3 Кб

(Don't know why I took this photo... but here's another view.)
Название: 3.JPG
Просмотров: 1

Размер: 90.5 Кб

Compress and roll it into a round log.
Название: 4.JPG
Просмотров: 1

Размер: 72.6 Кб

Cut the log in half the long way and perpendicular to the folds and set aside.
Название: 5.JPG
Просмотров: 1

Размер: 72.5 Кб

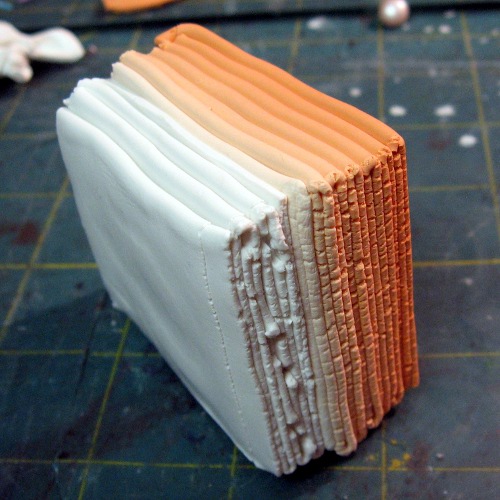
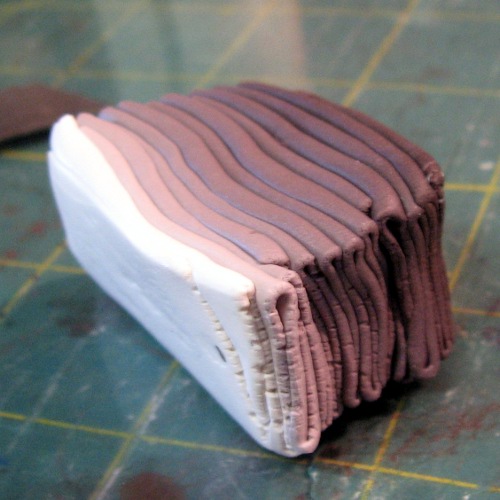
Now make a skinner blend with your deep purple and white. (It looks black but I didn't like the pure gray with the orange so I mixed some purple into my black.)
Название: 6.JPG
Просмотров: 0

Размер: 66.9 Кб

Here you can see the purple in the black. Make your long skinny strip and fold it up accordion-style. The narrower the folds, the more gradual your blend will be. I wish I had made this one narrower...
Название: 7.JPG
Просмотров: 0

Размер: 73.0 Кб

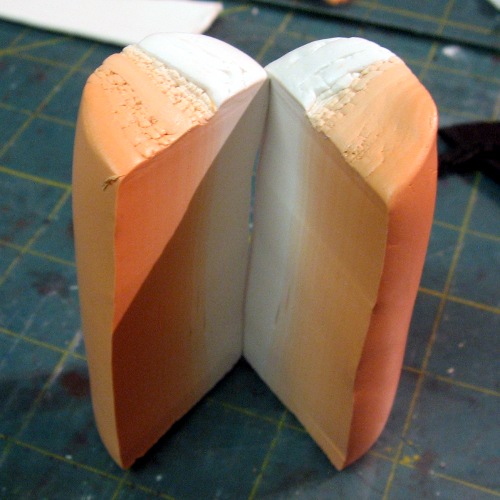
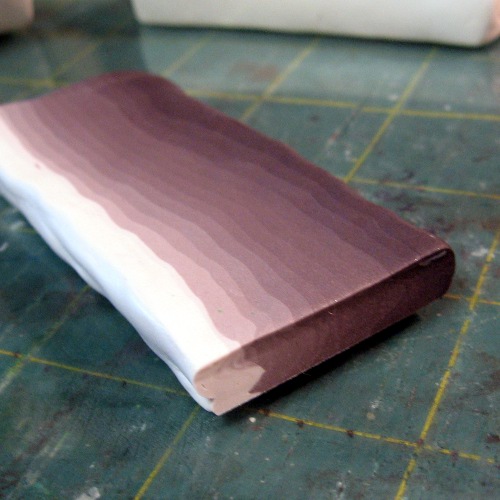
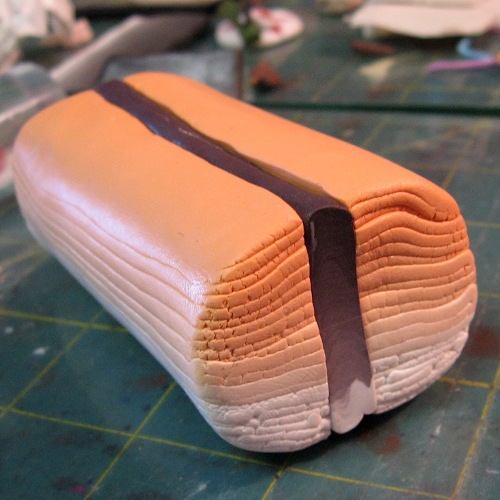
Compress and flatten the block into a flat strip. Try to make it the same size as the cut side of your orange log. (If you made this too big, you can make it longer and cut the end off.) This is going to be the stripe in your petal so the thicker it is, the fatter your stripe will be.
Название: 8.JPG
Просмотров: 0

Размер: 73.2 Кб

Put it betweeen the two halves of your orange log (white sides together). Compress and roll the log to make it round again. Reduce to a long skinny cane.
Название: 9.JPG
Просмотров: 0

Размер: 80.8 Кб

Cut the cane into equal 12 pieces. Next I'm going to share a little more detailed info on how to shape the cane pieces into petals. Skip the next few steps if you don't need this and just form all of your logs into long, skinny petals.
Название: 10.JPG
Просмотров: 0

Размер: 85.3 Кб

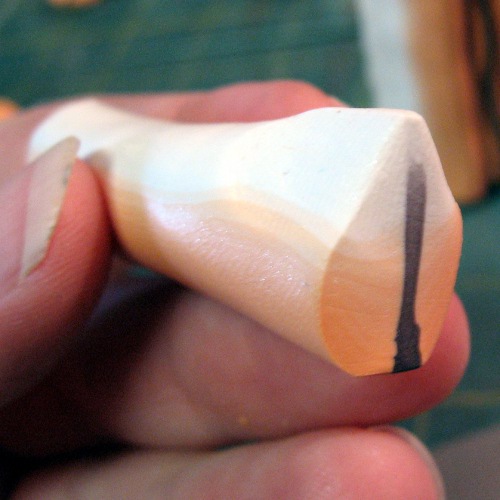
Okay, we want the white side of the cane to be the point of the petal. Look for a faint line along the white side of your cane. You can barely see it here. You are going to pinch the log all along this line.
Название: 11.JPG
Просмотров: 0

Размер: 71.5 Кб

If you can't see the line on your cane, pinch the each end of the cane where the purple line tapers off.
Название: 12.JPG
Просмотров: 0

Размер: 66.8 Кб

Twist the cane to line up the pinched parts and pinch a straight line between them.
Название: 13.JPG
Просмотров: 0

Размер: 57.9 Кб

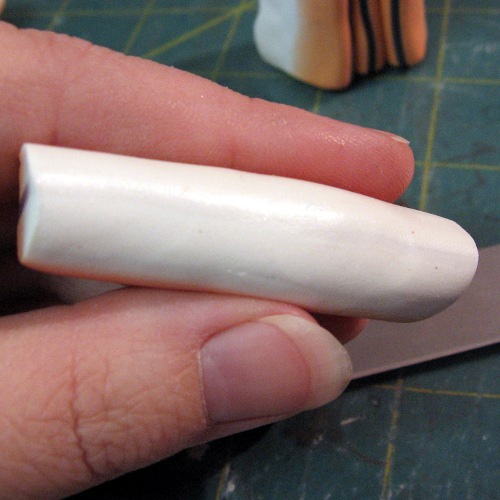
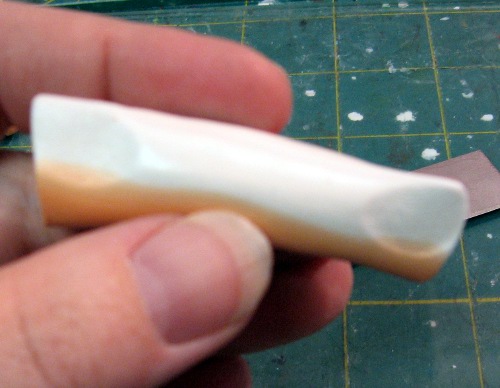
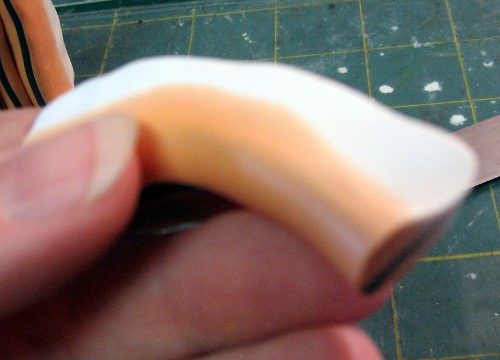
Your log will probably end up curved like this. Flatten the round side of the cane a little.
Название: 14.JPG
Просмотров: 0

Размер: 52.9 Кб

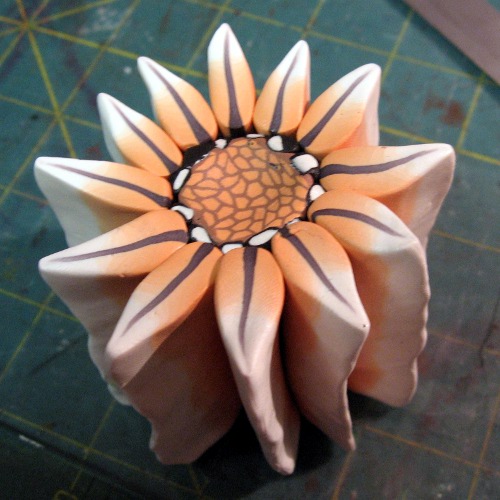
Keep shaping, squashing, pinching and stretching until you have a long skinny petal. Do this for all 12 of your segments. Stand them up on the work surface in a circle with a hole in the middle. This is why we did the petals first instead of the center. Now you can see about how big your center needs to be.
Название: 15.JPG
Просмотров: 0

Размер: 83.0 Кб

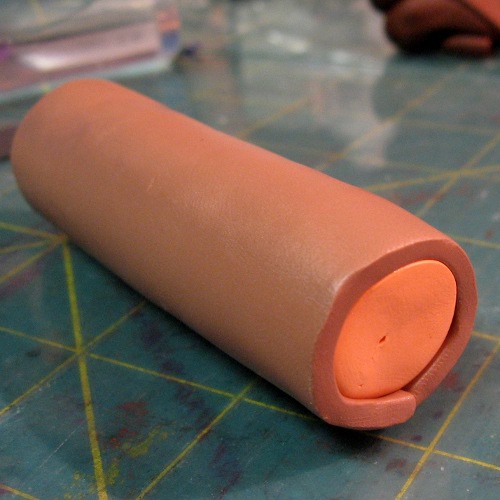
Step 2: Now let's make the flower center. Make an orange log about 1/2 the diameter of the hole in your petals and the same length. Wrap the orange log in a thick sheet of clay so the log is about 3/4 the diameter of the hole.
Название: 16.JPG
Просмотров: 0

Размер: 69.2 Кб

Reduce this log and cut in 7 equal pieces.
Название: 17.JPG
Просмотров: 0

Размер: 71.4 Кб

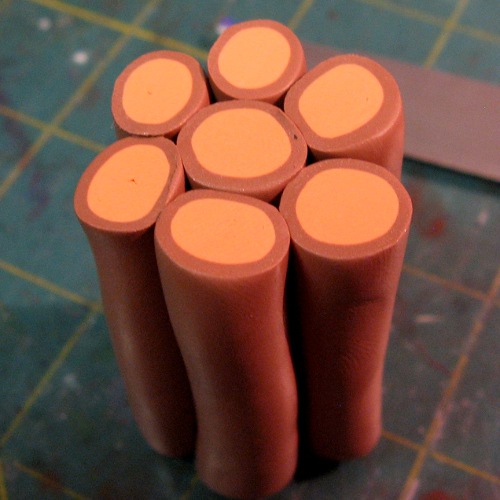
Arrange the pieces in a flower shape, compress and reduce.
Название: 18.JPG
Просмотров: 0

Размер: 68.9 Кб

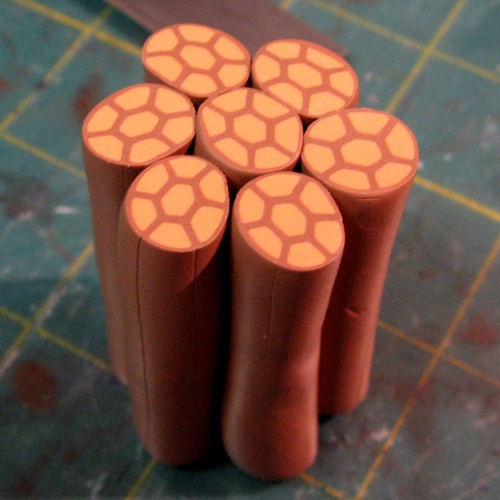
Cut the cane into 7 equal pieces and arrange into a flower shape again. Compress and reduce to the length of the petals.
Название: 19.JPG
Просмотров: 0

Размер: 73.9 Кб

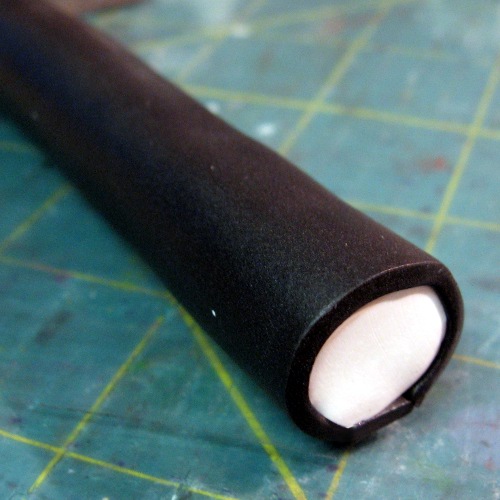
Now make a white log about 1/2 the diameter of your brown and orange center. Wrap a thin sheet of black clay around it. Reduce and cut into 12 pieces.
Название: 20.JPG
Просмотров: 0

Размер: 73.1 Кб

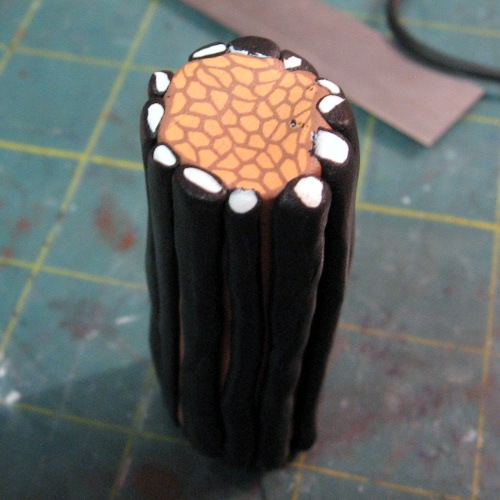
This is where you can really see the trouble I was having with the soft clay. Reduce the pieces as needed to the length of the center piece and arrange them around it. I gave up on getting them all the same diameter and just settled for getting them on there.
Название: 21.JPG
Просмотров: 0

Размер: 71.0 Кб

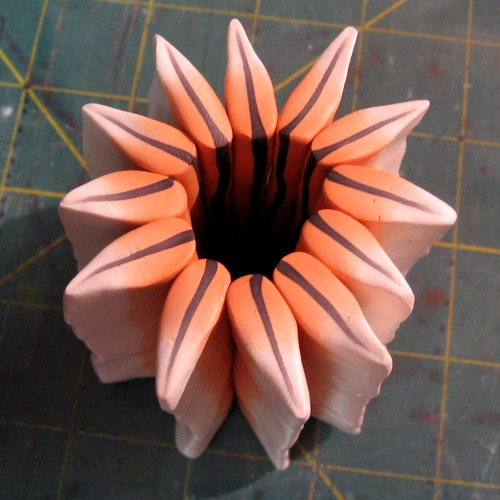
Compress the black and white logs onto the center a little. Arrange the petals around the center. You may have to make some of the petals a little skinnier to get them all around. Kind of try to arrange them so the round base of the petals sits sort of in the groove between the black logs. This will turn the logs into triangles when the cane is reduced.
Название: 21.JPG
Просмотров: 0

Размер: 71.0 Кб

Make wedges of translucent clay and pack in between the petals. Trim off the excess and let it rest overnight.
Название: 22.JPG
Просмотров: 0

Размер: 86.7 Кб

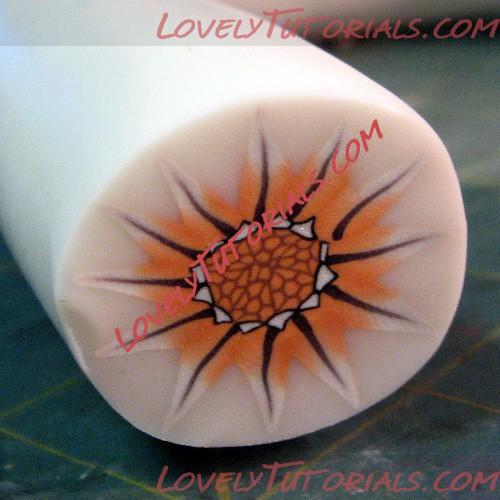
Reduce your cane and cut into it to see what you have made!
Название: 23.JPG
Просмотров: 0

Размер: 90.5 Кб


If you want more definition between your petals, you can wrap them in a slightly darker orange or something before reducing and cutting. I forget that step a lot but I think in this cane it worked out pretty well without wrapping the petals.
Название: 24.JPG
Просмотров: 0

Размер: 84.1 Кб
Ответить с цитированием
Ответ

Метки
addım-addım təlimat, adım, adım adım yönergeler, artesanatos passo a passo, bemutató, cane, clay cane tuts, curso de modelado, deco, especializada em modelagem de biscuit, fender, fimo, fixando a cabencinha, fotopostup, hand-made, handmade, how to, how-to's, instrucţiuni, instrukcijas, instrukcje, jak na, korak, korak za korakom navodila, korak-po-korak upute, krok, krok po kroku, krok za krokem, krok-za-krokem, la modélisation, las instrucciones, las técnicas, le tecniche, les techniques, master class, master-class, master-klasse, master-klasy, masy termoutwardzalnej, meistras klasės, metodikas, millefiori, mistr třídy, modelado, modelagem, modelando a barriga, modelando a cabencinha, modelando a perninha, modelando as maozinhas, modelando o cabelinho, modelando o corpinho, modelando os bracinhos, modelando os pezinhos, modelare, modeling, modeliranje, modellazione, modelleme, modellering, modellieren, modelləşdirmə, modelovanie, modelování, modelowanie, návod, opplæringen, orelhas, pamoka, pap, pas, pas-cu-pas, paso, paso a paso, passo, passo a passo, passo-a-passo, passo-passo le istruzioni, pintura dos olhos, polimer kil, polimeras molis, polymer argila, polymer clay, polymer clay cane tutorials, polymer clay tutorial: orange star flower cane, polymer glina, polymeren clay, postupak za ukrasavanje, premo, schritt für schritt anleitung, schritt-für-schritt, schritt-für-schritt-anleitungen, sculpting, stap, stap-voor-stap, stap-voor-stap instructies, steg for steg, steg-för-steg-instruktion, step, step by step, step-by-lépésre, step-by-step, step-by-step instructions, technieken, techniken, techniki, techniky, technikák, techniques, tehnici, tehnike, teknikker, teknikler, torte, trin, trin for trin, trin-for-trin, trin-for-trin instruktioner, trinn, trinn for trinn, trinn-for-trinn-instruksjoner, tuto et bijoux en polymère, tutorial, tutoriale, tutorias, tutoriel, tutorijal, técnicas, ट्यूटोरियल मास्टर वर्ग, कदम, कदम दर कदम निर्देश, तकनीक, मॉडलिंग, モデル, étape, étape par étape les instructions, öğretici, žingsnis, žingsnis po žingsnio, 宗師級教程,一步,一步一步的指示 術,udžbenik, 建模, βήμα, βήμα προς βήμα οδηγίες, οδηγίες βήμα βήμα, πολυμερικού πηλού, παντεσπάνι art, τεχνικές, φροντιστήριο, декупаж из полимерной глины, инструкция, изделия из пластики, колбаски из полимерной глины, колбаска из полимерной глины, кольцо из полимерной глины, как сделать, как слепить, как слепить колбаска, как слепить колбаску из полимерной глины, кане, крок за кроком, крок за крокам, кулон, кулон из полимерной глины, кулон из пластики, кулон мастер класс, покроково, полимерна глина, полимерная глина, полімерна глина, пошагово, пошаговые фотки, пакрокава, палімерная гліна, пластик, пластика, миниатюра, мк, мк оранжевый цветок (колбаска) из пластики, мк-ы "колбаски из полимерной глины", моделиране, майстор-класа урок, майстар-клас, майстер-клас, майстер-класи, мастер класс, мастер класс из полимерной глины, мастер класс из пластики, мастер класс по полимерной глине, мастер класс полимерная глина, мастер-класс, браслет, браслет из пластики, бусины, бусины из пластики, бусы, лепим, лепим из пластики, лепка, лепка из пластики, ліплення, работы из полимерной глины, ручной работы, ручная работа, создание бижутерии из полимерной глины, своими руками, сережки из полимерной глины, серьги, серьги из пластики, урок, урок из полимерной глины, урок из пластики, урок по полимерной глине, урок полимерная глина, уроки, уроки по полимерной глине, стъпка, стъпка по стъпка инструкции, техники, техника, техника "колбаса", техніка, туториал, туторіал, тэхніка, фимо, фотоурок, цветок, цветы, цветы из полимерной глины, цветы из пластики, шаг за шагом, інструкцыя, інструкція


©2022 Lovely Tutorials