|
|
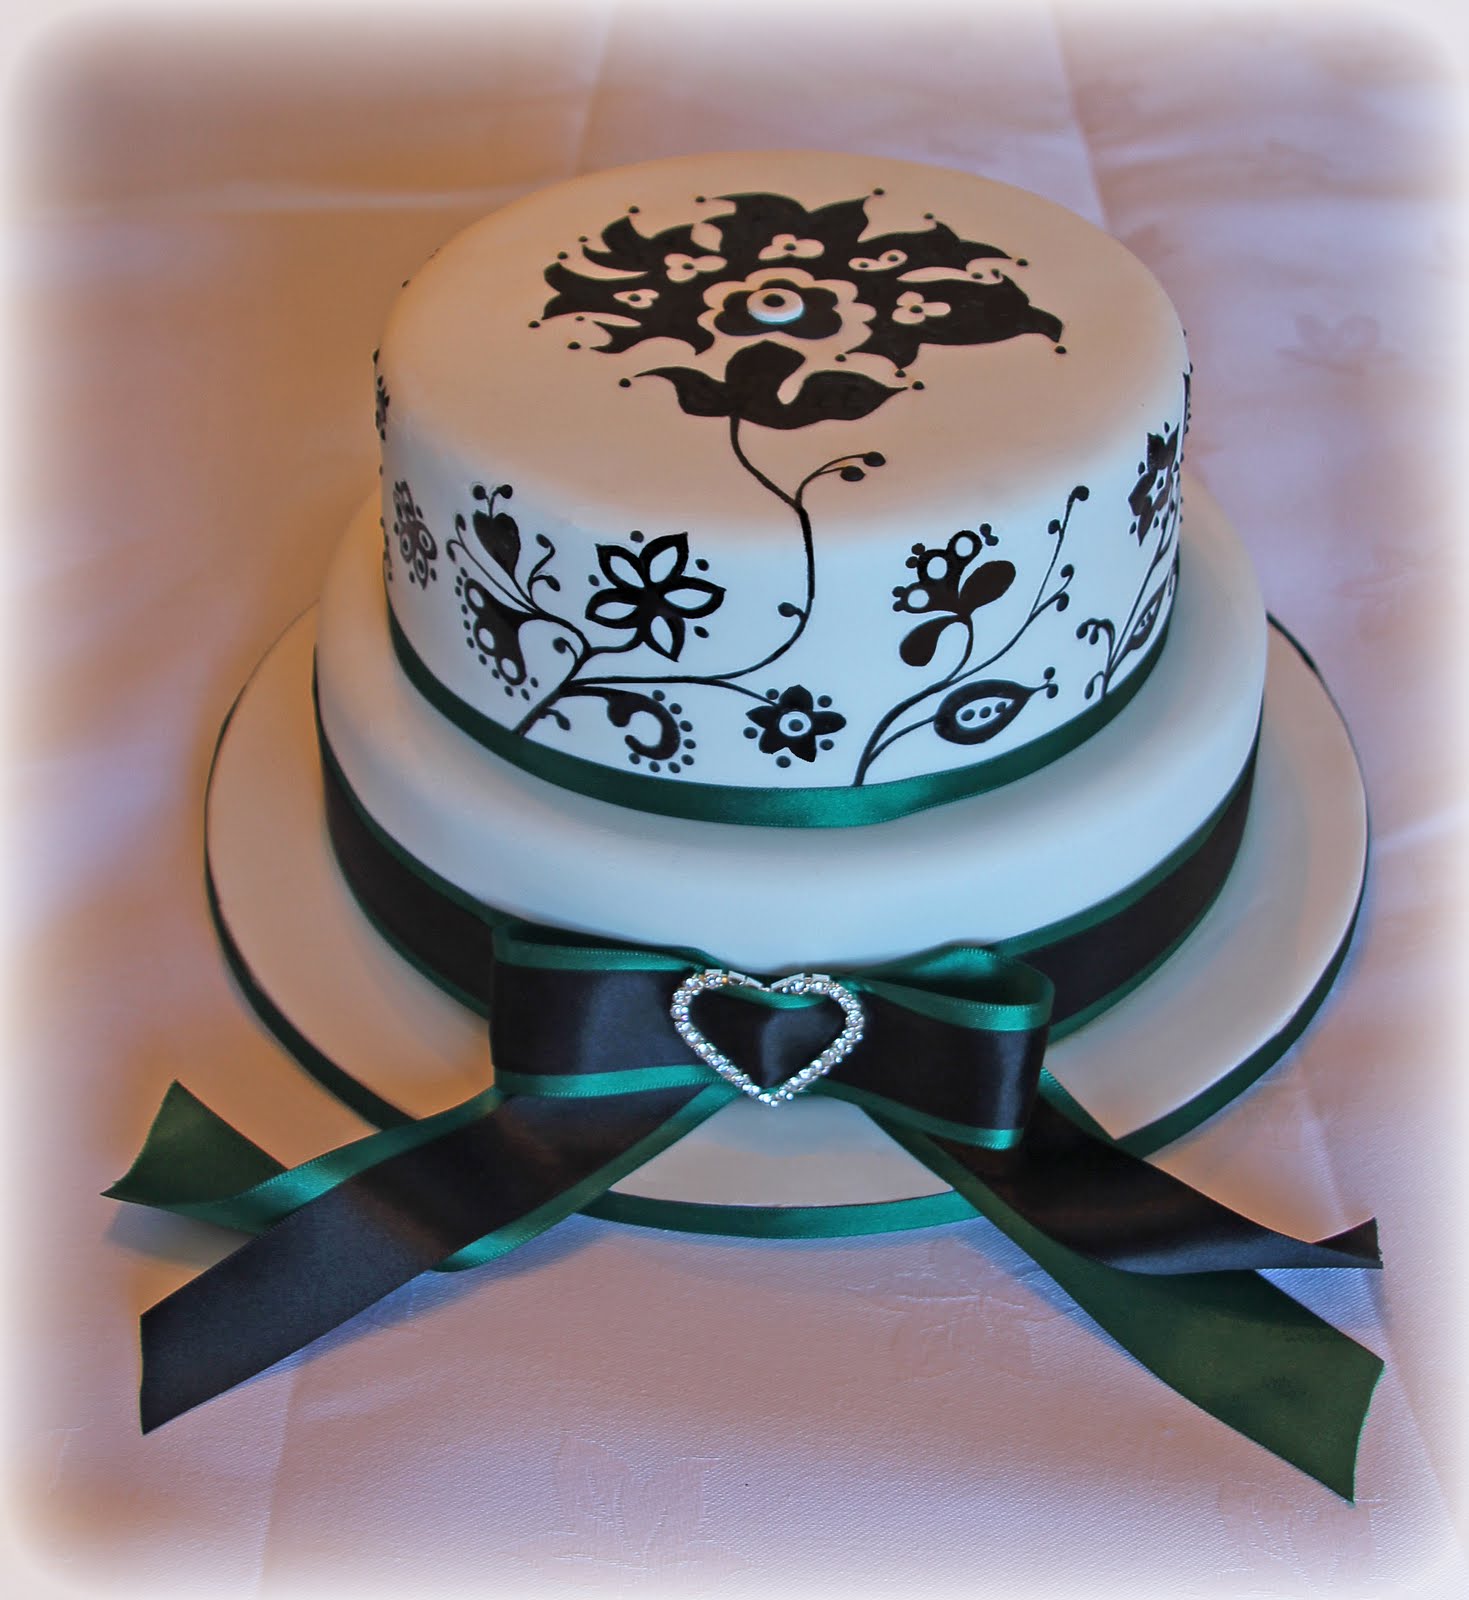
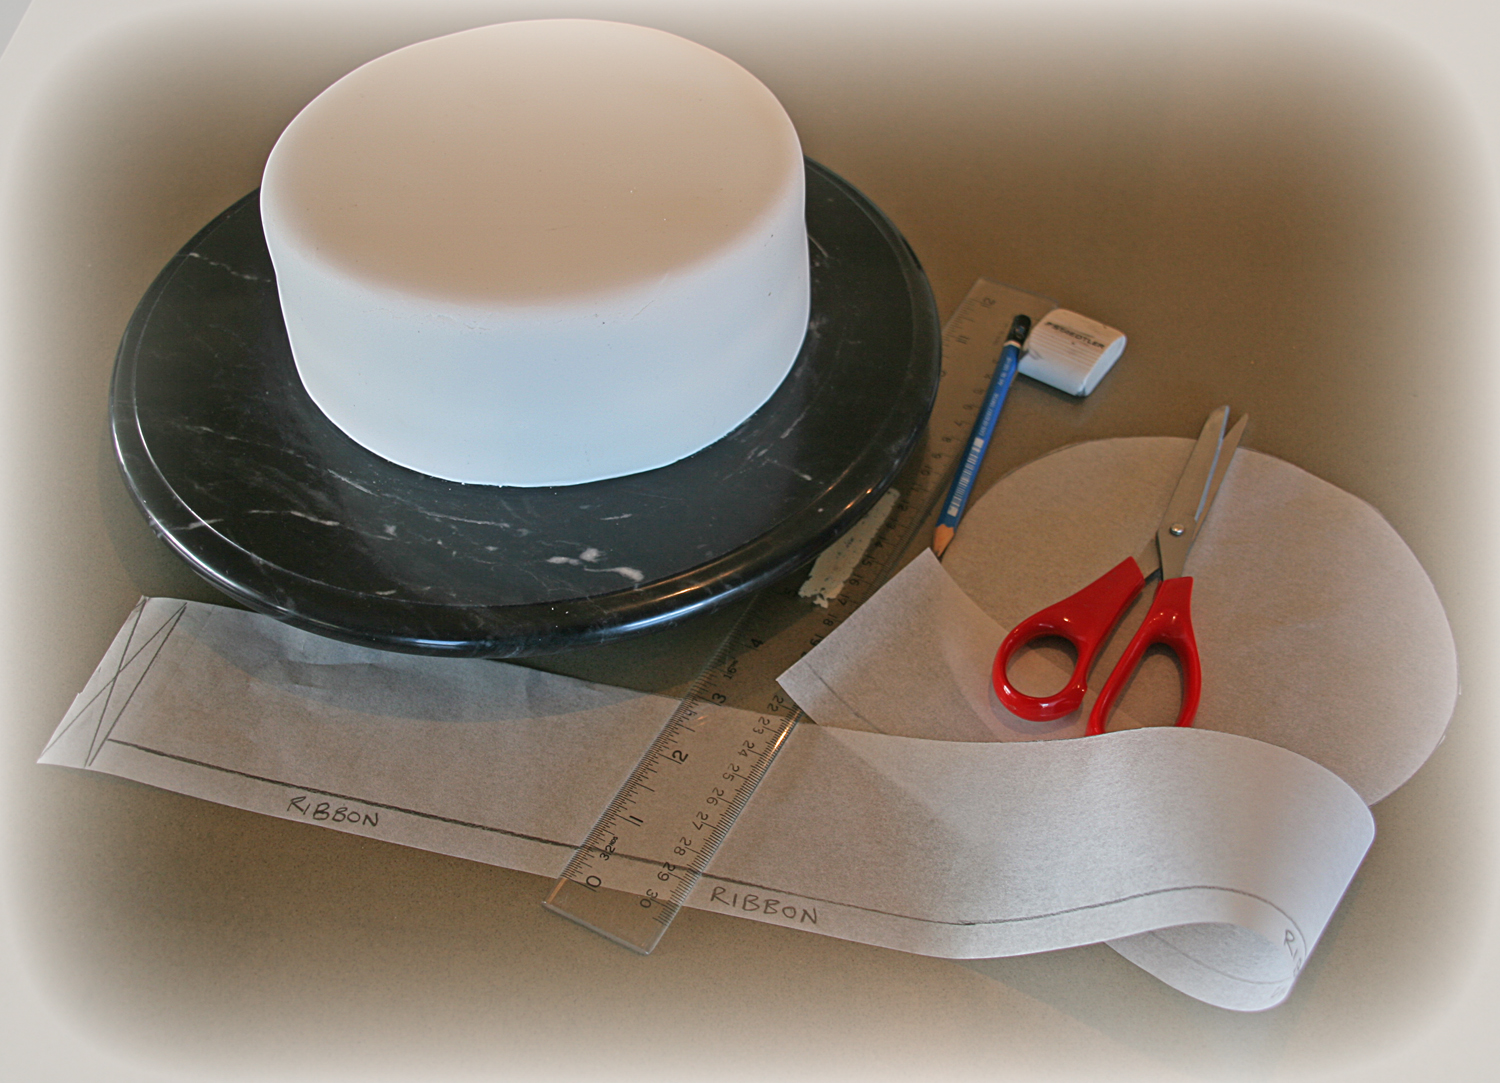
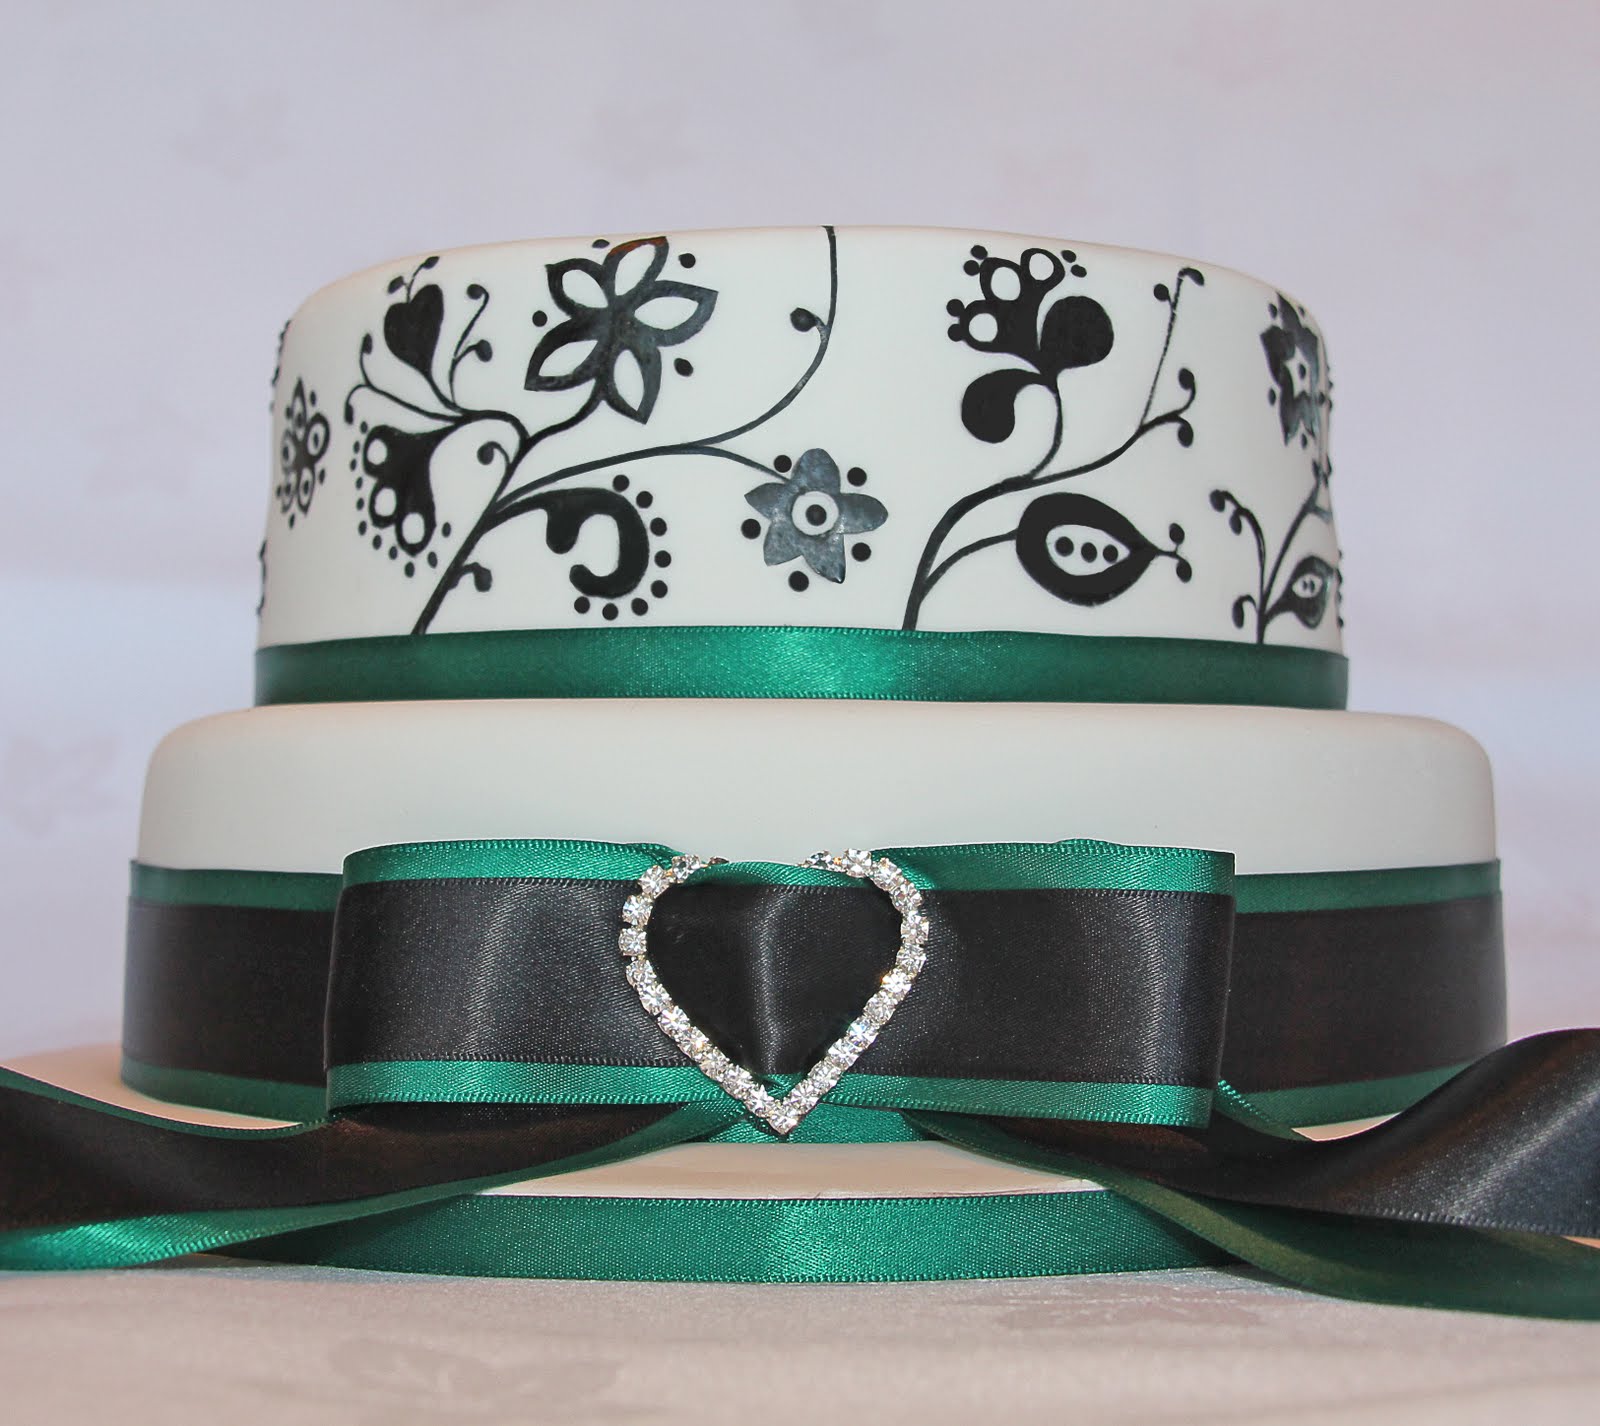
МК свадебный торт "Ручная роспись" -Hand painted Wedding Cake Tutorial
|

10.09.2010, 06:53
|
|
Администратор
|
|
Регистрация: 07.09.2010
Сообщений: 7,940
|
|
 МК свадебный торт "Ручная роспись" -Hand painted Wedding Cake Tutorial
|
 |
|
Метки
|
3d bizcocho, 3d bolo, 3d cake, 3d dort, 3d kage, 3d kager, 3d kake, 3d kek, 3d pastel, 3d tarta, 3d torta, 3d torte, 3d torti, 3d torty, 3d κέικ, addım-addım təlimat, adım, adım adım yönergeler, artesanatos passo a passo, bemutató, bolando bolos, cake decorating, cake decorating techniques, confeitando bolos, creazione e decorazione torte, decoracion de pasteles, decoración de tortas, decorada en fondant, decorare le torte, decorazioni, deko fondant, dekorace na dort, dekoracija, dekoracije, dekorasyon, dekorácie, dipinto a mano, el boyalı, fender, fimo, flower paste, fondan, fondant, fondente, fondente di zucchero, fotopostup, foundant, gebak, glazuur, gum pasta, gum paste, gumpaste, hand painted wedding cake tutorial, hand-made, handbemalt, handbeschilderd, handmade, handmålade, how to, how-to's, håndmalet, håndmalt, instrucţiuni, instrukcijas, instrukcje, jak na, kage dekoration, kagedekoration, kakebaking, korak, korak za korakom navodila, korak-po-korak upute, koristeet ja koristelu, krok, krok po kroku, krok za krokem, krok-za-krokem, käsinmaalatut, kézzel festett, las instrucciones, las técnicas, le tecniche, les techniques, lukie, marshmallow, masa flexible, master-class, master-klasse, master-klasy, meistras klasės, metodikas, mistr třídy, modeling paste, modelling past, motivtorten, návod, opplæringen, pamoka, pap, pas, pas-cu-pas, pas-à-pas et modèles, paso, paso a paso, passo, passo a passo, passo-a-passo, passo-passo le istruzioni, pasta de miel, peint à la main, pictate manual, pintado a mano, pintados à mão, postup na 3d torty, postupak za ukrasavanje, pâtisserie, rankų dažytos, rukom oslikane, ručne maľované, ručně malované, ręcznie malowane, schmelzend, schritt für schritt anleitung, schritt-für-schritt, schritt-für-schritt-anleitungen, stap, stap-voor-stap, stap-voor-stap instructies, steg for steg, steg för steg, steg-för-steg, steg-för-steg-instruktion, step, step by step, step-by-lépésre, step-by-step, step-by-step instructions, sugarcraft, sugarpaste, suikerglazuur, technieken, techniken, techniki, techniky, technikák, techniques, tecnicas de decoracion, tecniche, tehnici, tehnike, teknikker, teknikler, tips och trix, torte, torte decorate, torten dekorieren, torti, trin, trin for trin, trin-for-trin, trin-for-trin instruktioner, trinn, trinn for trinn, trinn-for-trinn-instruksjoner, trucs et questions sur la décoration de gateaux, tutorial, tutoriale, tutorias, tutorias/ideas para decorar los bizcochos, tutoriel, tutorijal, tårtbottnen, tårtor, técnicas, ukrašavanje torti, uputstvo za dekoraciju, zuckermasse, सजा केक, ट्यूटोरियल मास्टर वर्ग, कदम, कदम दर कदम निर्देश, तकनीक, étape, étape par étape les instructions, öğretici, žingsnis, žingsnis po žingsnio, 宗師級教程,一步,一步一步的指示� � �技術,udžbenik, 裝飾蛋糕, 만들기 제작 과정, βήμα, βήμα προς βήμα οδηγίες, οδηγίες βήμα βήμα, ζωγραφισμένα στο χέρι, παντεσπάνι art, τεχνικές, φροντιστήριο, декорация на торти стъпка по стъпка, инструкция, как сделать, крок за кроком, крок за крокам, покроково, пошагово, пошаговые фотки, пакрокава, миниатюра, мк, мк свадебный торт "ручная роспись", майстор-класа урок, майстар-клас, майстер-клас, майстер-класи, маршмеллоу, мастика, мастер-класс, зд торт, зд торта, ручний розпис, ручной работы, ручная роспись, ручная роспіс, ручная работа, ръчно рисувани, украшение тортов, сахарная мастика, уроки прикрашання, стъпка, стъпка по стъпка инструкции, торта стъпка по стъпка, техники, техника, техніка, туториал, туторіал, тэхніка, шаг за шагом, інструкцыя, інструкція  |
| Опции темы |
Поиск в этой теме |
|
|
|
|