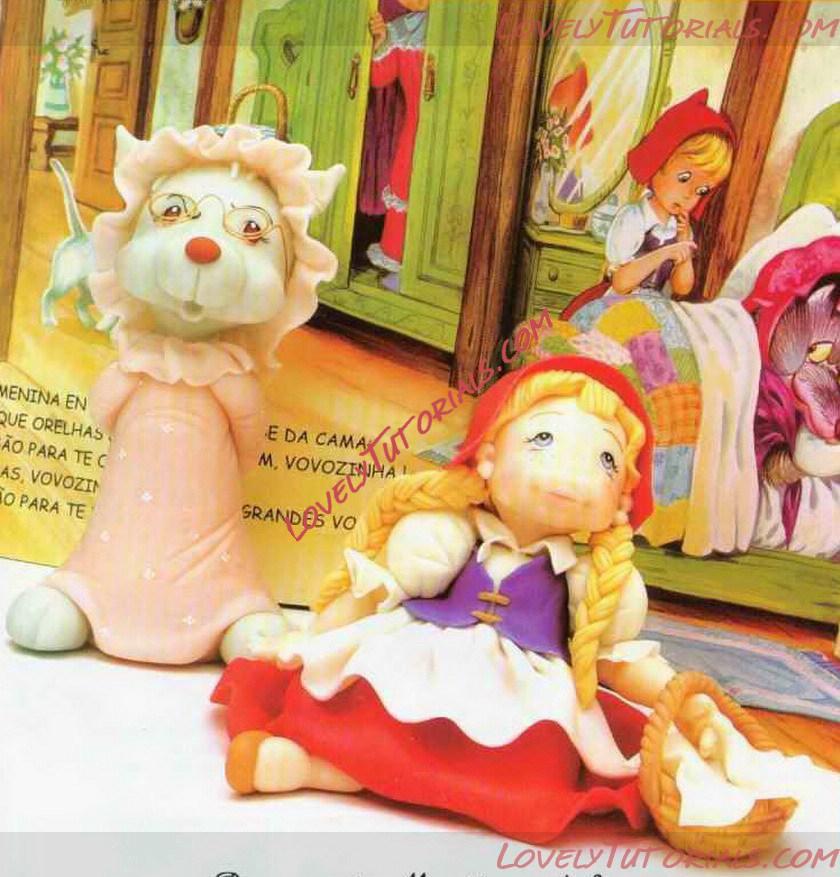
 Little Red Cap and Wolf Characters Sculpting Step By Step | МК лепка Красная шапочка, Волк
Огромная благодарность Автору за Мастер-класс
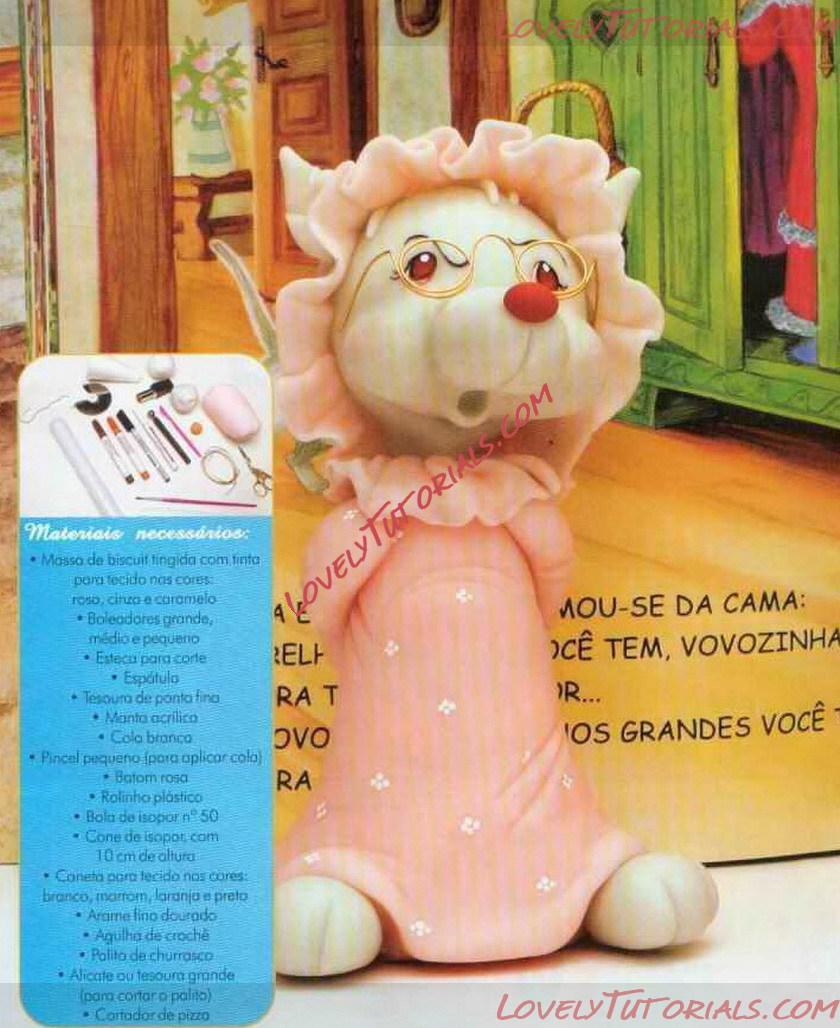
Materials
• Fake biscuit dough with a feint to close in the colors: white, blue, red, yellow, brown, peach or caramel
• Conela for fabric in the colors: bronco, orange, light blue, dark blue and pink.
• Hydrographic connection without charge Boleodores large, medium and small
• Cut stock
• Spatulas large and small
• Ocular clamp
• Fine point scissors
• White collar
• Small brush (to apply glue)
• Pink lipstick
• BBQ pollio
• Plastic roll
• Pliers or large treasure (to cut the toothpick)
• Styrofoam ball n ° 40
• Extruder with round nozzle
• Pizza cutter
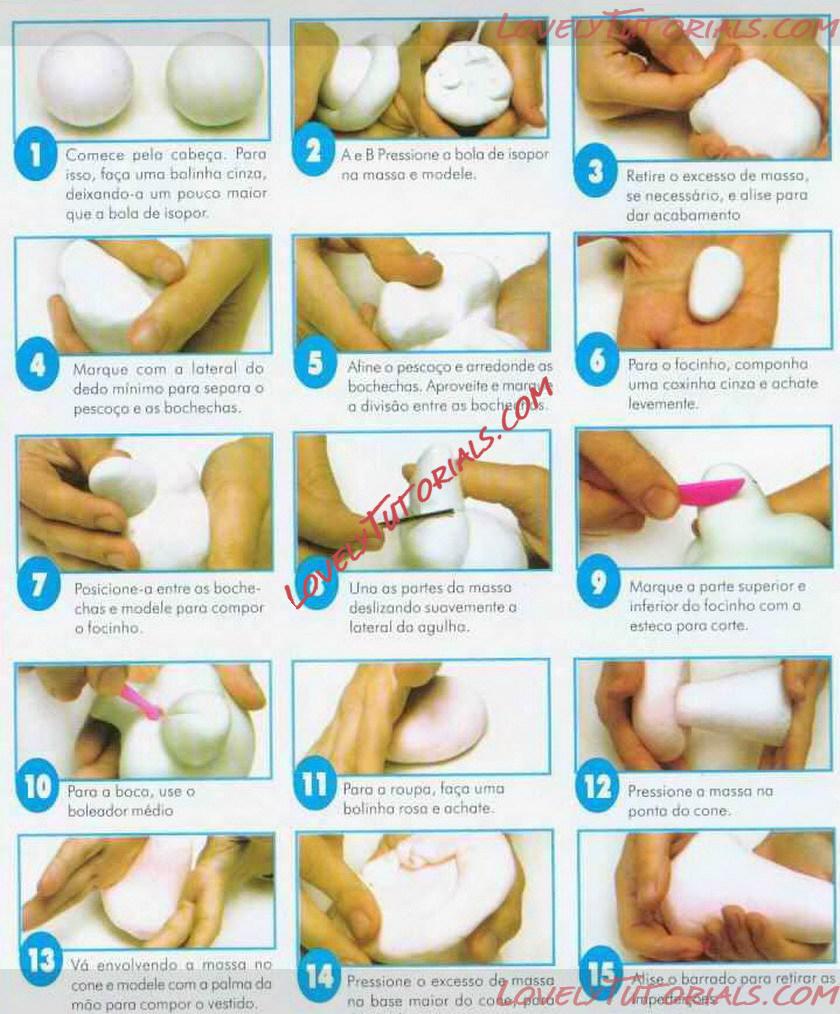
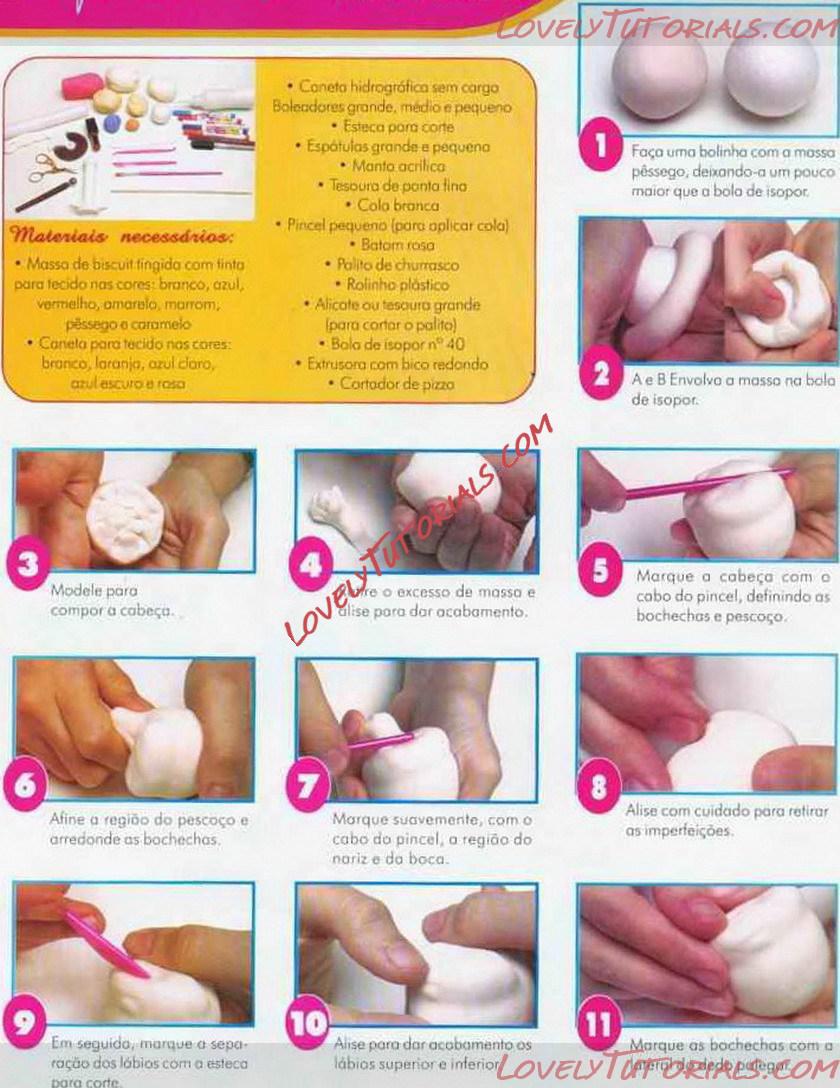 1. I make a ball with my peach dent, making it a little bigger than the Styrofoam ball
2. A and B Wrap the dough in the Styrofoam ball.
3. Model to compose the head
4.? and the excess of smooth and smooth to finish.
5. Mark the head with the brush handle, defining the cheeks and neck
6. Target the neck area and round the mouthwash
7. Gently mark the area of the nose and mouth with the brush handle.
8. Smooth it carefully to remove imperfections.
9. Next, mark the separation of the lips with the cutting head.
10. Smooth to cover the upper and lower lips.
11. Mark the cheeks with the side of the thumb.
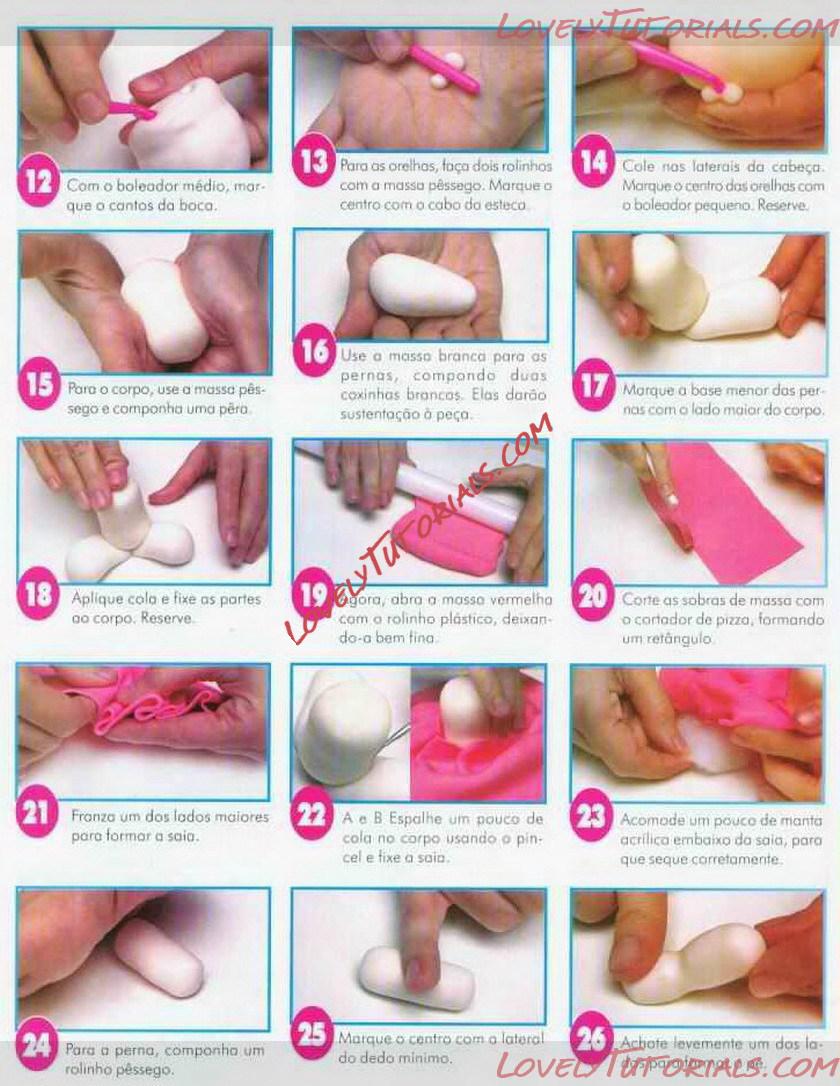 12. With the medium boleodor, mark the corners of the mouth.
13. For the coulters, make two rolls with the possego dough. Mark the center with the eteca cable.
14. Stick to the sides of the head Mark the center of the ears with the small boleodor. Reserve.
15. For the body, use the peach dough and compose a pear.
16. Use the white masso for the legs, composing two brown drumsticks. They will support the piece.
17. Mark the smallest base of the legs with the longest side of the body.
18. Apply glue and fix the parts to the body. Reserve.
19. Now, make the red dough with the plastic roll, making it very thin.
20. Cut the leftover dough with the pizza cutter, forming a rectangle.
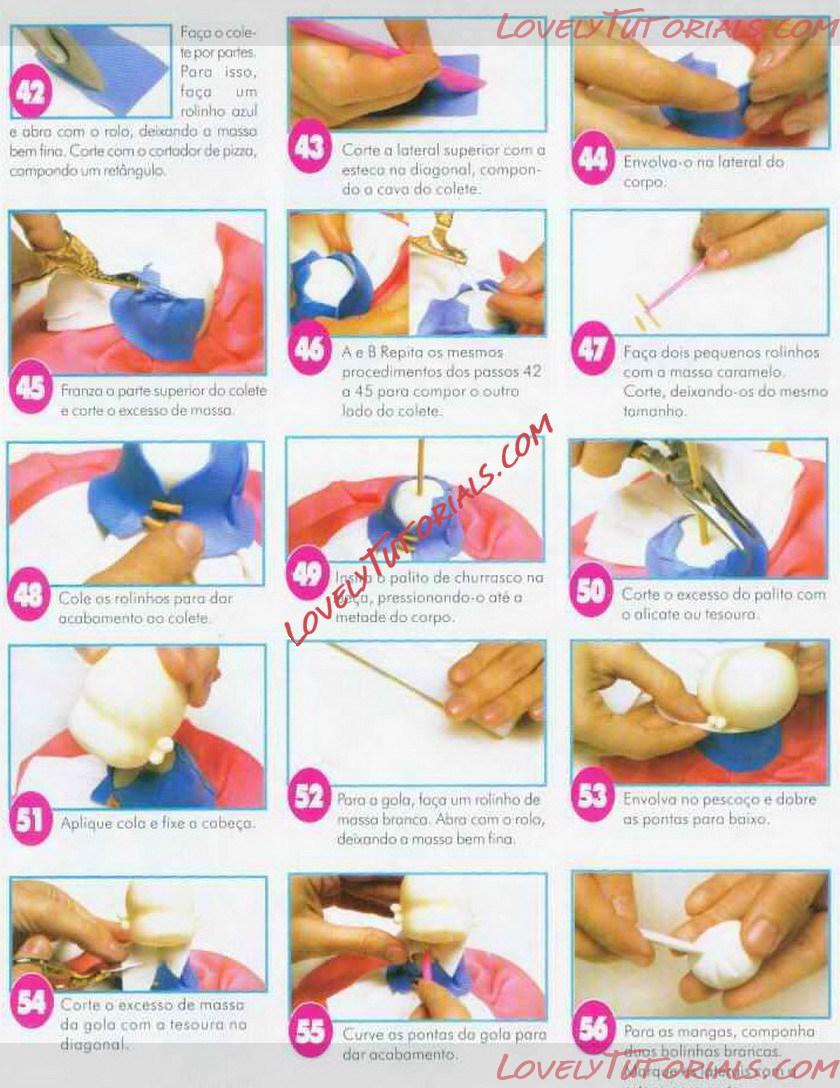
21. Fronza is one of the largest pores to form the outlet.
22. A and B Spread some glue on the body using the brush and fix the skirt.
23. Place a little acrylic blanket under the skirt, so that it dries properly.
24. For the leg, make up a long peach.
25. Wither the center with the loter of the little finger.
26. Lightly ground one of the sides to form the foot.
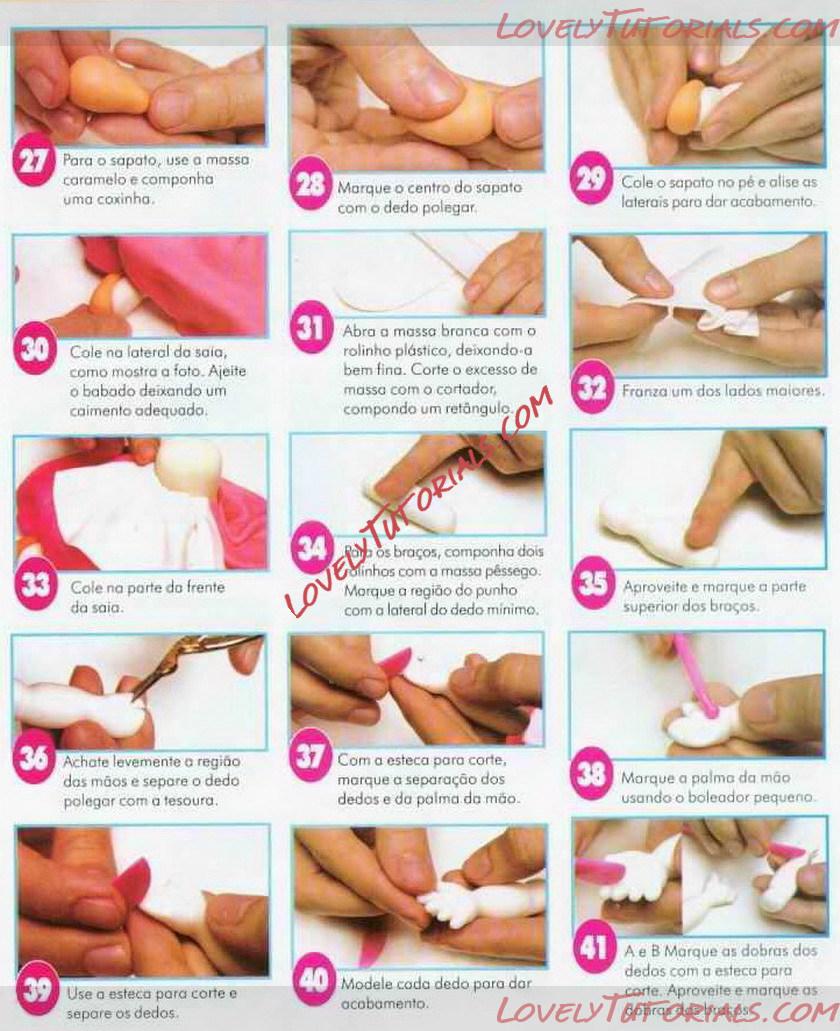 27. For the shoe, use your caramel dent and compose a drumstick.
28. Mark the center of the shoe with your thumb.
29. Glue the shoe to the foot and smooth the sides to finish.
30. Stick to the side of the skirt, as shown in the photo. Straighten the frill leaving a suitable drape.
31. I open the white dough with the plastic roll, making it very thin. Cut the excess dough with the cutter, forming a rectangle.
32. Fronza one of the biggest sides.
33. Stick to the front skirt.
34. For the arms, compose two lines with the peach pastry. Morpple the wrist with the side of the little finger.
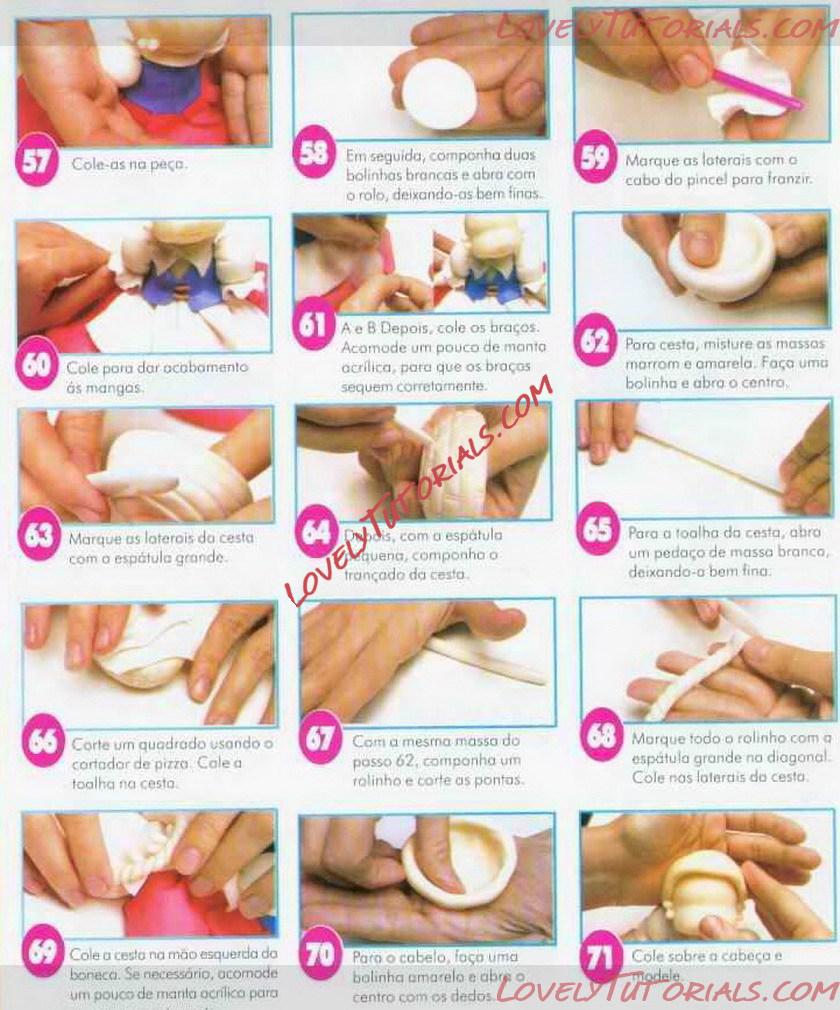
35. Enjoy and mark the upper part of the arms.
36. Flatten the region of the hands slightly and separate the thumb with the scissors.
37. With the cutting stick, mark the separation of the fingers and the palm.
38. Mark the palm using the small ball.
39. Use the stick to cut and bury your fingers.
40. Model your finger through the finish.
41. A and B Mark the folds of the fingers with the cutting stick. Enjoy and check the.
 42. I make the vest for sizes. To do this, make a blue roll and work with the roll, leaving a very thin body. Cut with the pizza cutter, making a rectangle.
43. Cut the upper side with the diagonal line, making up the vest hole.
44. I wrap it around my side.
45. Ruffle the upper part of the vest and cut off the excess dough.
46. A and B Repeat the same procedures as in steps 42 to 45 to compose the other side of the vest.
47. Make two small rolls with the caramel masso. Cut, leaving them the same size.
48. Glue the pain rollers to the vest.
49. Insert the barbecue meat into the piece, pressing it halfway down the body.
50. Cut the excess of the toothpick with pliers or treasure.
51. Apply glue and fix the cover.
52. For the collar, make a scolding roll. Open with the roll, leaving the masso very thin.
53. Wrap around the neck and fold the ends down.
54. Cut the excess mass from the collar with the scissors diagonally.
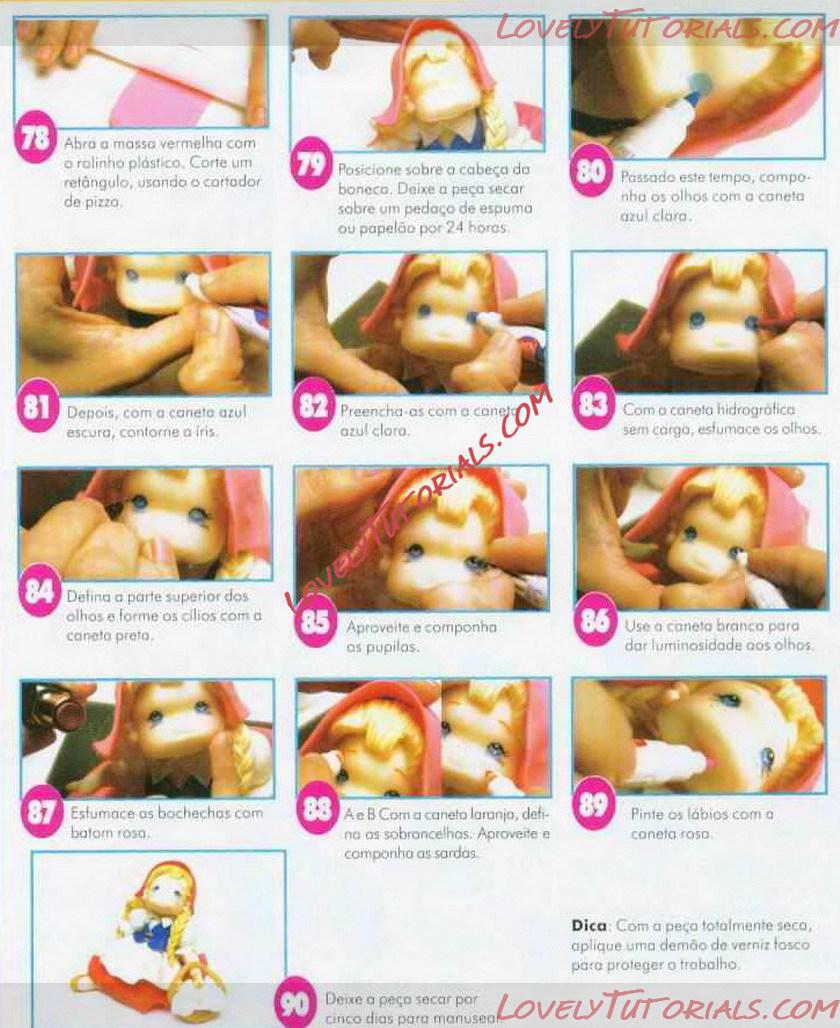
55. Bend the ends of the collar to finish.
56. For the sleeves, compose dips bp; pmjas white.
 57. Glue them to the piece.
58. Next, compose two white balls and open with the roller, dividing them very thin.
59. Mark the loters with the handle of the brush to purse.
60. Glue to finish the sleeves.
61. A and B Then, I put the arms. Accommodate a little bit of acrylic blanket, so that the brocades dry out correlatively.
62. Pore basket, mix brown and yellow pasta Make a ball and open the center.
63. Mark the sides of the basket with the large spatula.
64. Dabois, with the small spatula, make up the locked basket.
65. For the basket towel, I open a piece of white dough leaving it very thin.
66. Cut a square using the pizza cut. Shut the towel in the basket.
67. Using the same masso as in step 62, compose a roll and cut the ends.
68. Morgue the whole roll with the large diagonal spatula. Stick to the sides of the basket.
69. Glue the basket to the doll's left hand. If necessary, accommodate a little acrylic blanket.
70. I stop the hair, make a yellow ball and open the center with my fingers.
71. Glue on the head and model.

72. A and B Mark the hair strands with the gronde spatula.
73. Separate the fringe with the cutting head.
74. Then, pass the yellow mass through the extruder, making a long roll.
75. Cut it into three equal pieces and braid. Fine tune to the point to finish.
76. I compose the other braid, leaving them the same size. Mark the strands with the large spatula.
77. Glue them to piece.
 78. Open the red dough with the plastic roll. Cut a rectangle, using the pizza cartridge.
79. Place it on the doll's head. Let the piece dry on a piece of foam or cardboard for? 4 hours.
80. After this time, make up your eyes with the light blue pen.
81. Then, with the dark blue pen, outline the iris.
82. Fill them with blue chlorine cane.
83. With the straightforward hydrographic pen, smudge your eyes.
84. Deiina the upper part of the eyes and brush the eyelashes with the black pen.
85. Enjoy and compose your pupils.
86. Use the white pen to brighten your eyes.
87. Smudge your cheeks with pink lipstick.
88. A and B With the orange pen, define the eyebrows. Release and compose the freckles.
89. Paint your lips with the pink pen.
90. Die the piece to dry for five days to handle.
 1. Start with cobeça Poro isso, make a little gray ball, making it a little bigger than the Styrofoam candy.
2. A and B Press the Styrofoam cake into the dough and shape.
3. Remove excess weight. if necessary, smooth it out to finish.
4. Mark with the side of the little finger to separate the neck and cheeks.
5. Tighten the neck and round the cheeks. Enjoy and maraye the division between boche
6. For the muzzle, compose a gray drumstick and flatten it slightly.
7. Position it between the mouthwash and shape to form the snout.
8. Join the gates of the dough by gently sliding the side of the needle.
9. Mark the top and bottom of the muzzle with the cut portion.
10. Pore the mouth, use the medium cake maker.
11. For clothes, tie a pink ball and flatten.
12. Press the dough into the cone point.
13. Wrap the dough in the cone and shape with the palm of your hand to compose the dress.
14. Press the excess dent on the larger base of the pose
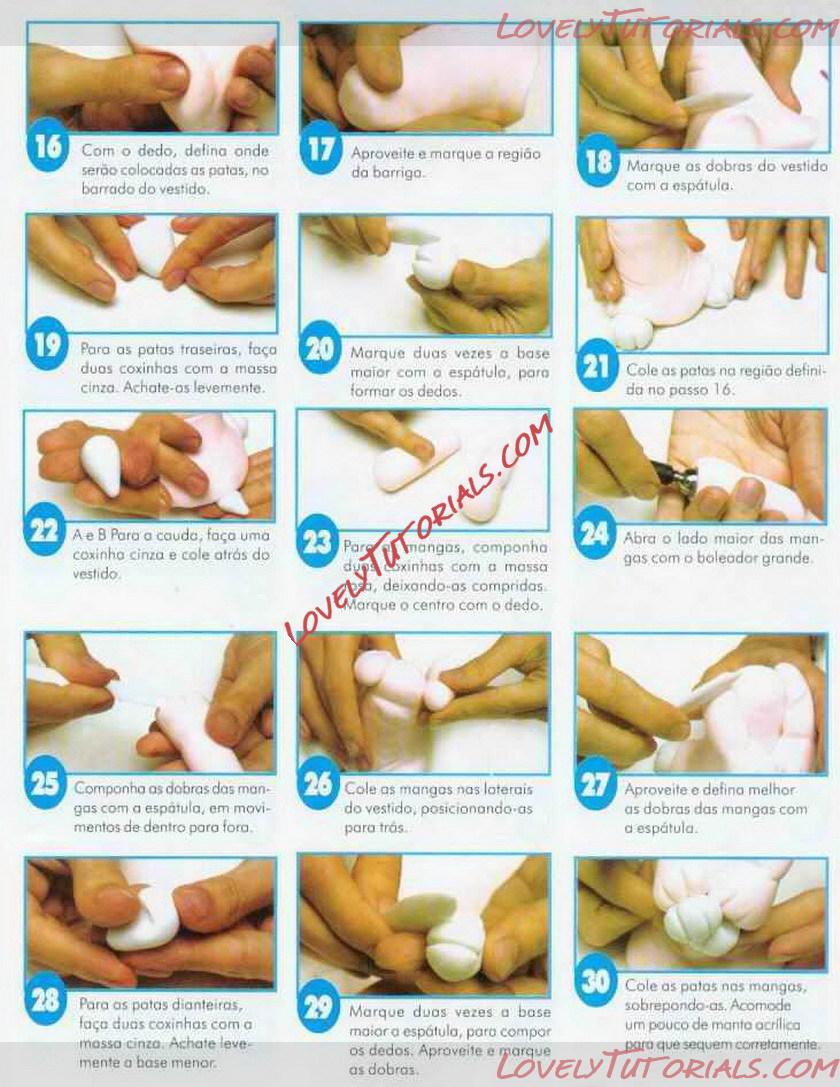 16. With your finger, define where the paws will be placed on the hem of the dress.
17. Enjoy and book the borrigo region.
18. Mark the folds of the dress with the spatula.
19. Stop the back ducks, make two legs with the gray dough. Flatten them slightly.
20. Mark the larger base twice with the spatula, so that fingers are formed.
21. Glue your paws to the region defined in step 16.
22. A and B For the tail, I draw a gray leg and stick it behind the dress.
23. I stop sleeves. compose coxinnas duos with the dough leaving them long. Mark the center with your finger.
24. Open the long side of the sleeves with the large ballet.
25. I compose the sleeves with the spatula, in movements from the inside out.
26. Glue the sleeves to the sides of the dress, positioning them backwards.
27. Enjoy and better define the folds of the sleeves with the spatula.
28. For the front ducks, tie two coxinhos with the gray dent. Flatten the smaller base slightly.
29. Mark the large base twice, to make the fingers. Enjoy and mark the doubles.
30. Glue legs on sleeves, overlapping. Accommodate a little acrylic mantle so that they dry properly.
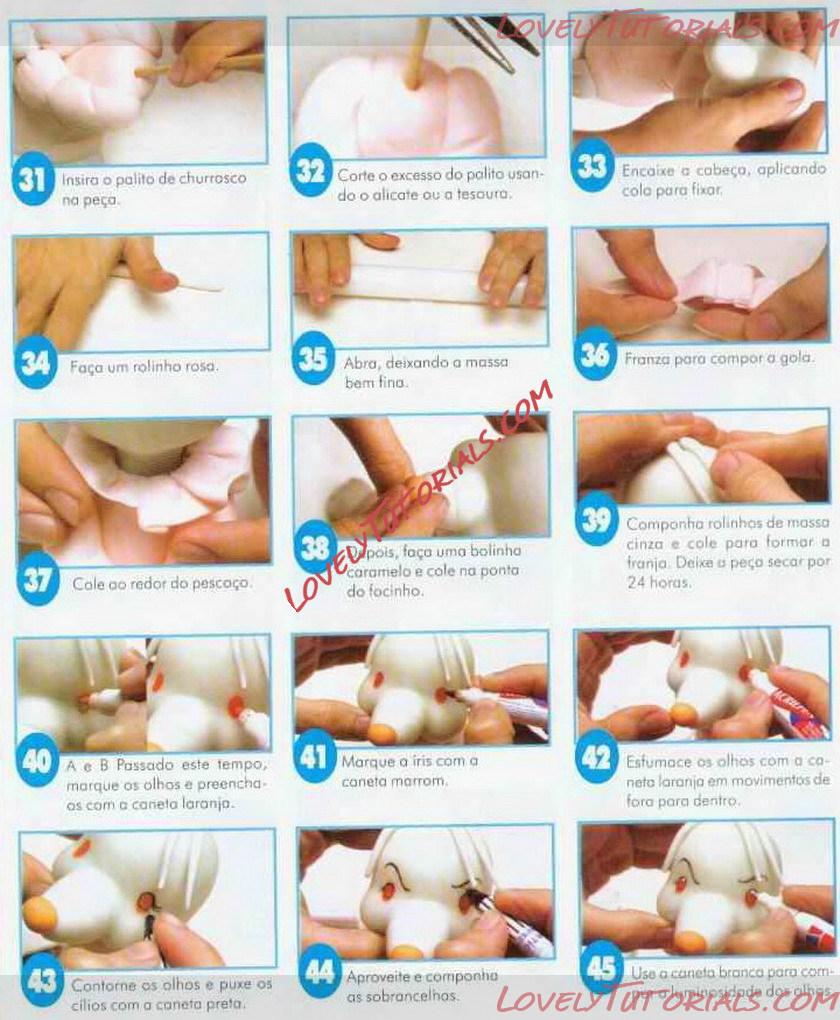 31. Insert the churrosco toothpick into the piece.
32. Cut off excess toothpick using pliers or scissors.
33. Fit with head, applying neck to fix.
34. Make a pink roll.
35. Open, leaving the dough very thin.
36. Purse pore to compose the collar.
37. Glue it around the neck.
38. Then, make a caramel ball and stick it on the tip of the snout.
39. Compose gray dough rolls and glue to form the fringe. Allow the well to dry for 24 hours.
40. A and B After this time, mark the eyes and fill them with the large pen.
41. Mark the iris with the brown pen.
42. Smoke the eyes with the orange connection in the form of outward movements.
43. Contour your eyes and pull your lashes with the black connector.
44. Enjoy and compose eyebrows.
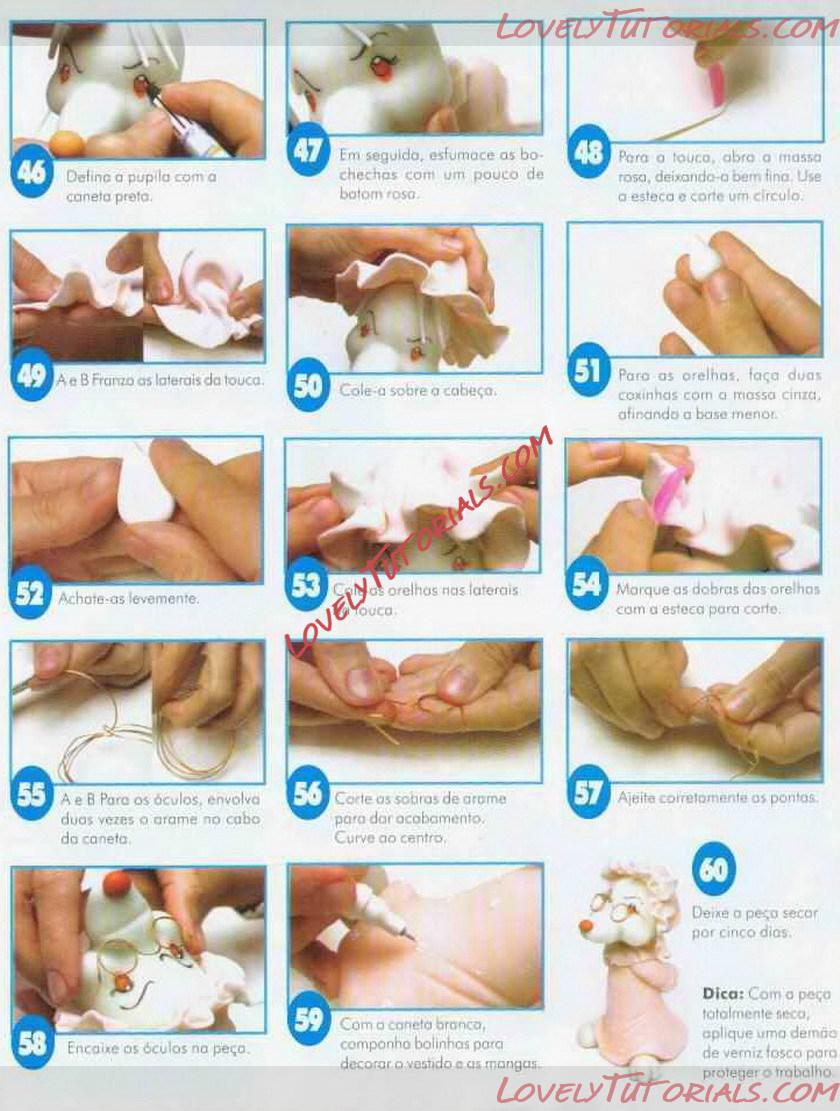 46. Outlines the pupil with the black pen.
47. Then smudge your cheeks with a little pink lipstick.
48. Pore the cap, I open the pink mass, leaving it very thin. Use the stock and cut a circle.
49. A and B Franzo the sides of the cap.
50. Glue it over the head.
51. Stop the ears, make two drumsticks with the circular mass, tapering the smaller base.
52. Squeeze them lightly.
53. Glue the ears to the sides of the husk.
54. Mark the folds of the ears with the cutting head.
55. A and B Stop the glasses, wrap the wire twice in the pen handle.
56. Give up the leftovers of arome to give the cover. Curve to the center.
57. Fix the stitches together.
58. Attach the glasses to the piece.
59. I use cookies to decorate the dress or the sleeves.
60. Leave the dryer for five days.

|