Огромная благодарность автору-
Nurainie за Мастер-класс
Here it is! The tutorial on moth orchid also known as
Phalaenopsis Orchid , particularly popular as wedding flowers. There are about 60 species in a variety of shapes and colours. Some of the big petals can be frilled, or curved inwards or outwards. If unsure, just use the link above or google it to check. That's what I did!

In this picture, you can compare it with the one on my previous blog entry. See how the burgandy has faded.

This picture is taken immediately upon completion of the cake.
Let's get on with the tutorial...

Step 1: Use the cutter to cut out the
labellum (throat), thin out the sides, use the foil to give it a cupped shape. Poke wire 26 (white) through the top and let it harden overnight in its foil.

Step 2: Cut the bigger petals using the cutter and press on to the veiner. Use wire 26 (white) and give it a curved shape by resting the petal on an egg holder overnight.

Step 3: There are 2 different cutters for the smaller petals. Cut and vein them as in Step 2.

Step 4: Above are all the petals needed. Colour them using a specific powdered colour (available in ICCA or any of its
distributors ), costing RM30.00 for one colour.
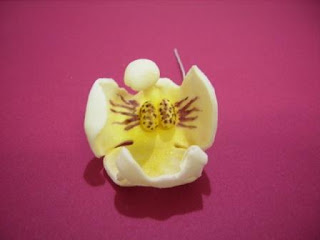
Step 5: This is a close-up of the
labellum. Use a small piece of gum paste to mould the moth's head and poke through the wire. The moth's head is a smaller version of the unopened buds.

Step 6: Atttach both the bigger petals behind the
labellum using the green floristry tape.

Step 7: Attached the top petal.

Step 8: Followed by the 2 bottom petals.
