|
|
дерево, tree, strom, l'arbre, Baum, albero, árvore, árbol
|

01.07.2012, 18:37
|
|
Администратор
|
|
Регистрация: 07.09.2010
Сообщений: 7,940
|
|
|
22.08.2012, 12:10
|
|
Администратор
|
|
Регистрация: 07.09.2010
Сообщений: 7,940
|
|
 МК пальмы V1
МК-ом поделилась Ирина Латышева
спасибо ОГромное за МК
МК пальмы
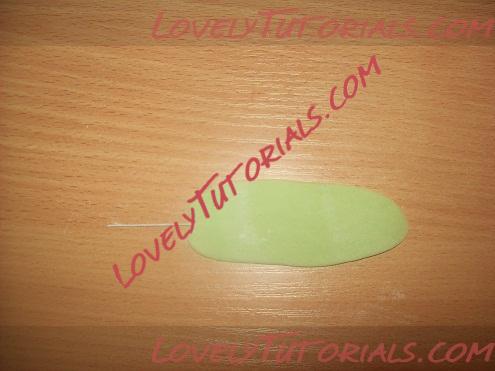
Берем проволоку № 24, 26, делим 3 , можно, наверное, даже на 4 части. На конце проволоки крючок не делала, а нужно было б, т.к. на некоторых листах проволока при прогибе листа, прорвала мастику. Надеваем кусочек мастики на проволоку.

И начинаем раскатывать, по все длине проволоки, затем с каждой стороны от нее.
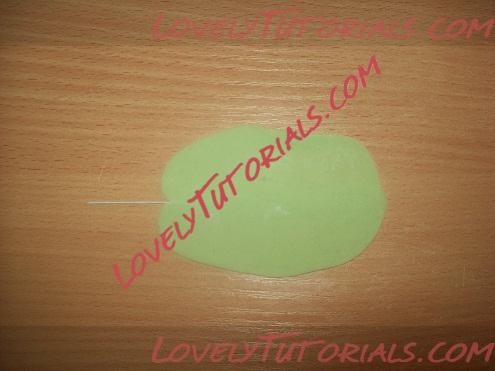
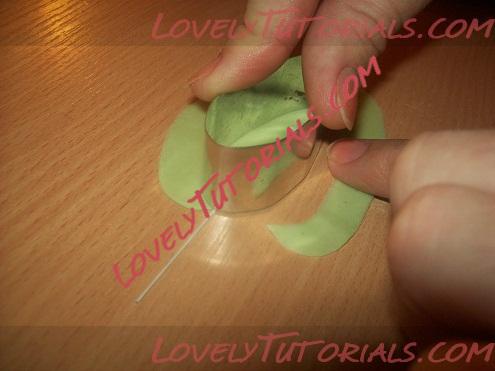
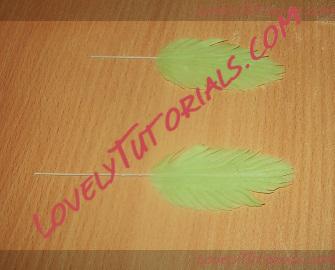
Тоненько раскатала, самодельным катером вырезала форму листика 2 разных размеров. Для одной пальмы делала 4 средних, и 5 больших.
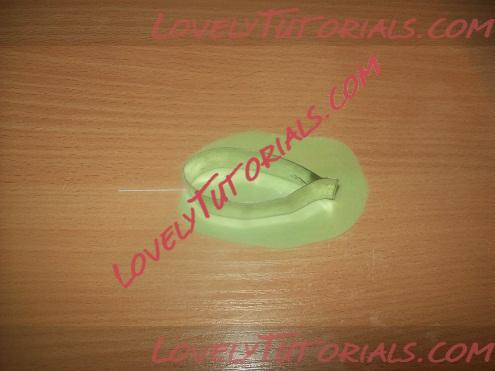
Вырезая какой-либо лепесток или листик на проволоке, изначально «приучите» себя снимать не катер с мастики, а отодвигать мастику вокруг него. Со временем, когда вы приноровитесь, вы поймете, что такая мелочь ускоряет процесс и даст возможность избежать неровных краев у изделия на проволоке.
Взяла вот такие молды для лепестков, наконец, хоть для чего-то они пригодились))))) Сделала двусторонний оттиск.
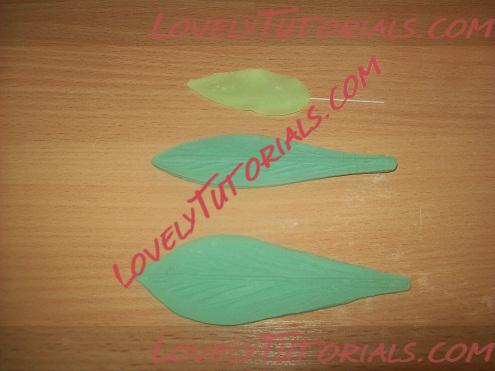
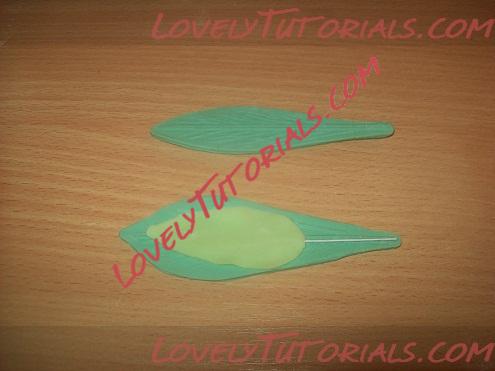
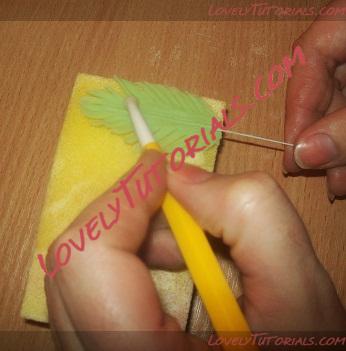
Ножничками надрезала края листьев
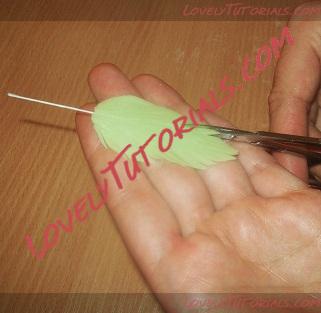
На губке или специальном мате прокатываем округлым стеком или маленьким стеком-шариком у основания надреза, чтобы немножко «распушить» и расправить мелкие листики.
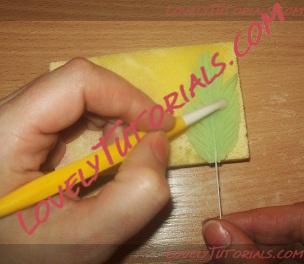

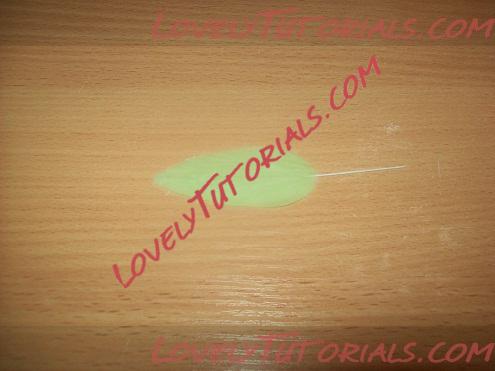
Делаем изгиб на листике и вешаем сушиться.
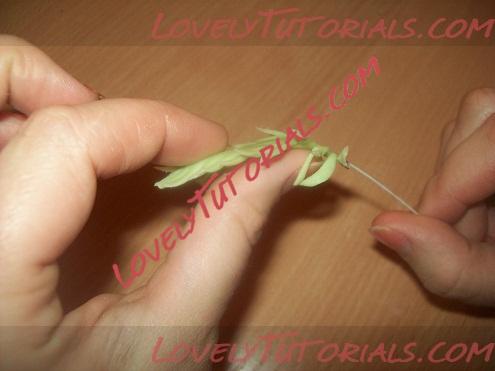
Когда немного подсохло, растушевала зеленый краситель-пыльцу жесткой кистью. Т.к. фото сборки и окрашивания забыла сделать, продублирую сюда из МК по тукану. Начала собирать пальму, когда листья полностью высохли. Берем сначала четыре средних, и шпажку, укладываем листики вокруг шпажки, обматываем тейп-лентой, затем прикладываем 5 больших и также закрепляем на шпажке лентой.
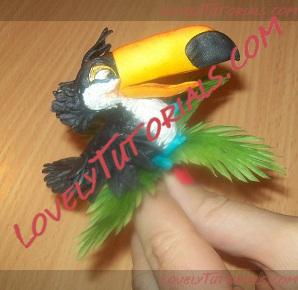
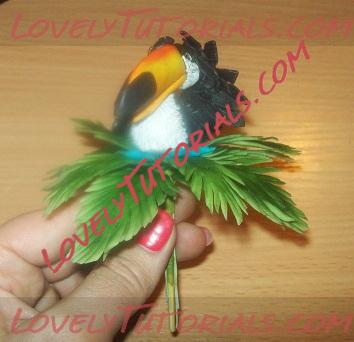
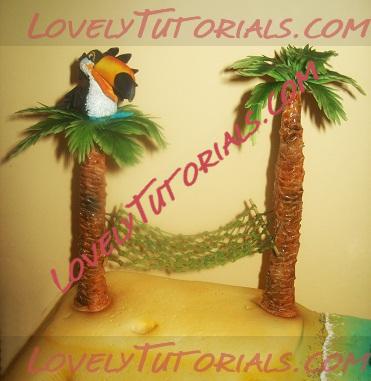
Раньше я делала пальмы почти по такому же принципу, за исключением того, что на ствол пальмы нанизывала лепешечки, и оставляла до полного высыхания мастики. В этот раз побоялась, что из-за тукана высушенные стволы не приклеятся к торту, решила обтянуть цветочной мастикой прямо на торте. Рассчитывала, на то, что цветочка хорошо прилипнет и быстро застынет на торте… и это было моей ошибкой! Пальмы никак не хотели крепиться к торту, их постоянно клонило в разные стороны. Ну, в следующий раз буду умней. Перед тем, как вставить шпажку с пальмой в торт, смазала айсингом, а правильно было б это сделать это шокоглазурью.
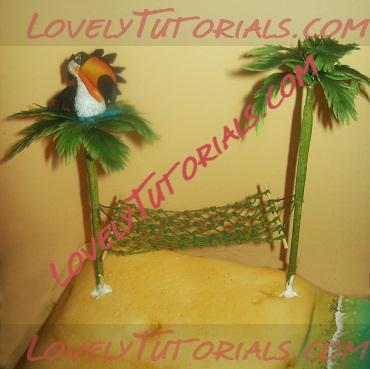
Взяла толстый кусок мастики по всей длине пальмы, обернула ею, придала нужную форму стволу, лишнее обрезала. Маникюрными ножничками сделала надрезы (как на мишках Тедди и елочках). Затонировала аэрографом сначала светло-коричневым цветом, затем черным. Все, пальмы готовы!
|
09.12.2012, 11:52
|
|
Администратор
|
|
Регистрация: 07.09.2010
Сообщений: 7,940
|
|
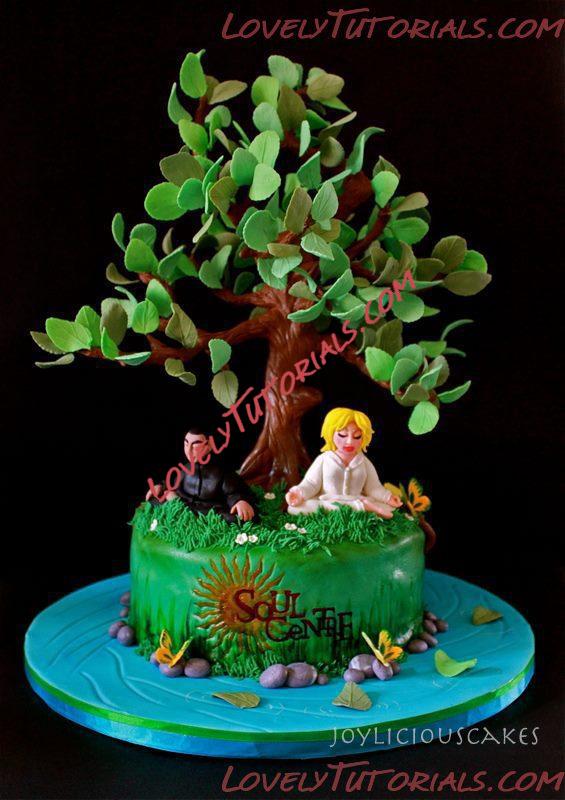
Огромная благодарность Автору Joyliciouscakes за Мастер-класс
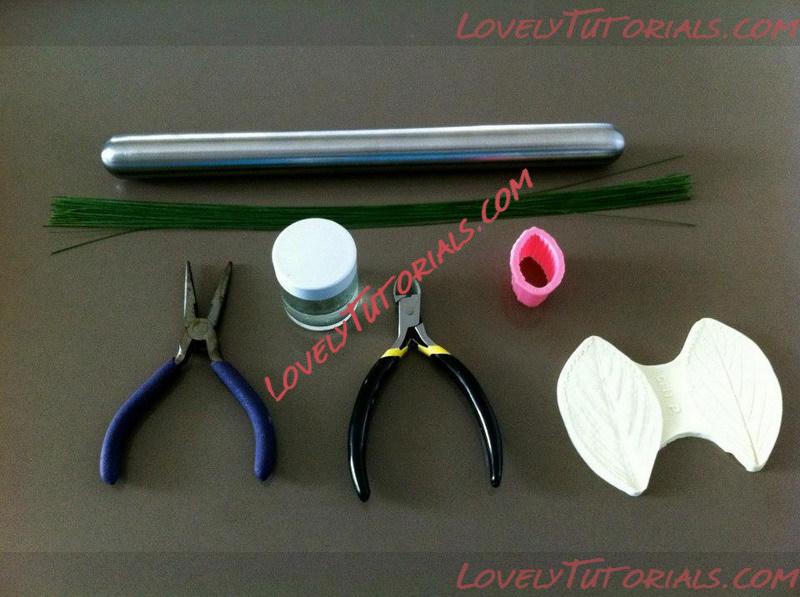
Materials and Equipment for leaves making:
A small rolling pin, 28 gauge wire, edible sugar glue, Fine-nose pliers, wire cutter, leave cutter and multi purpose petal veiner mould.
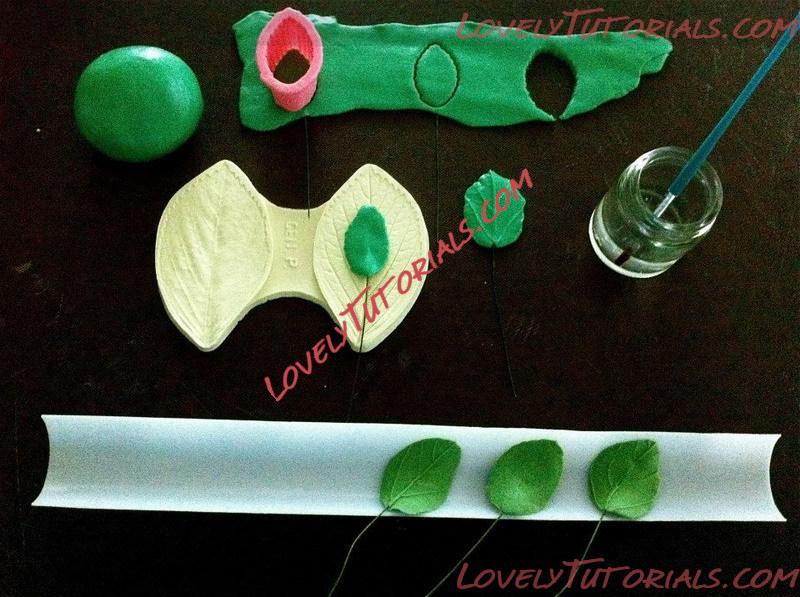
Roll out some green fondant, I prefer to do 3-4 petals at a time by rolling out a long stretch, spread some edible glue on the wire and cut out the petals, press it onto petal vainer mould and place it on the leave former until its dry.
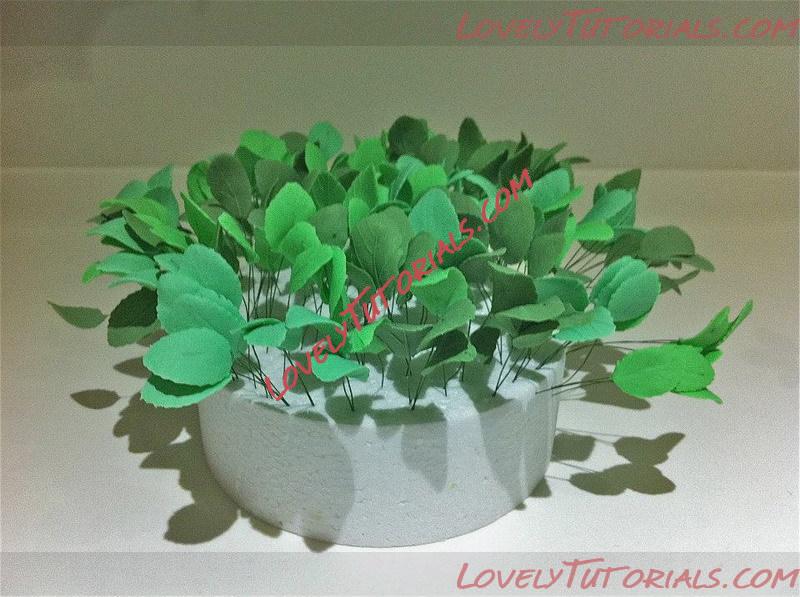
Here is more then 100 petals in different shades of greens.

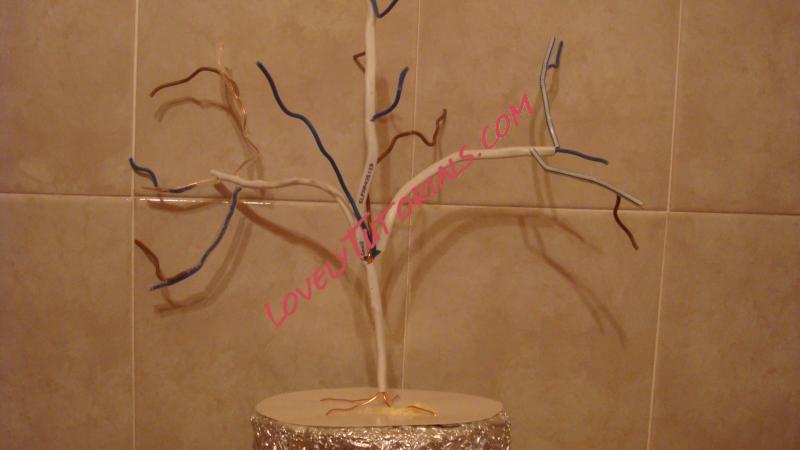
M n E for Tree trunk and brunches making:
A Dummy of any sizes (min 7") I used a 9", 18 gauge wire, 1 dowel rod, masking tape, Fine-nose pliers and wire cutter.
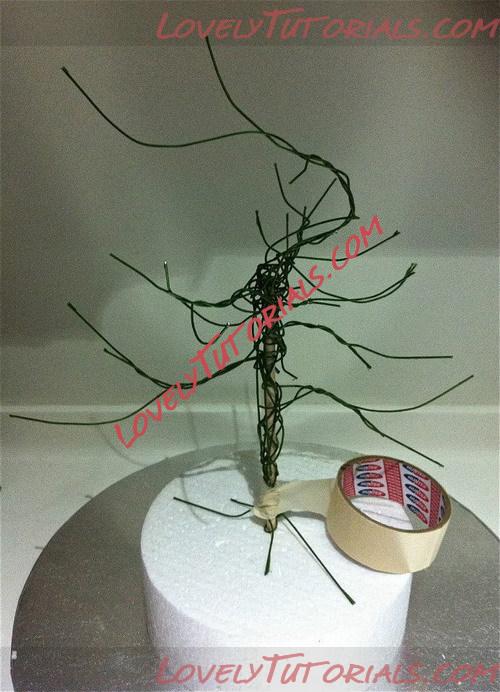
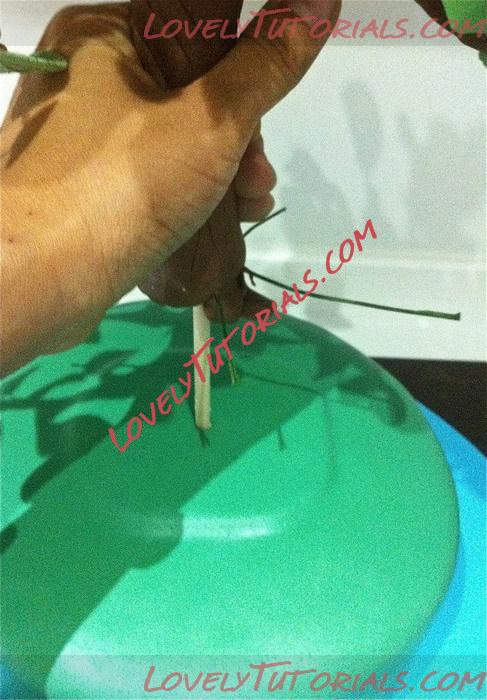
Sharpen the end of the dowel rod and poke into the dummy and through the base board. Take several pieces of wire and twist them together at the trunk and make the brunches. Cover with masking tape.
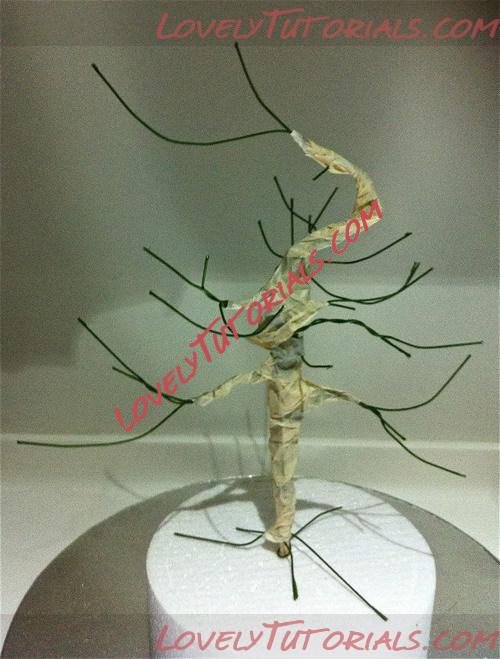
The whole twisted part of the wire is covered with masking tape.
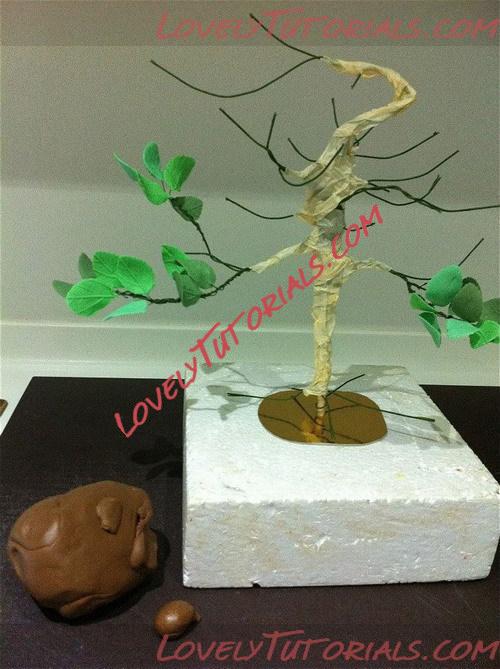
I've cut out a small square card board and place it at the base of the tree for a reason  ... At the mean time start twisting the petals onto the brunches, you can either start from bottom up or top bottom. Prepare some chocolate/brown fondant.
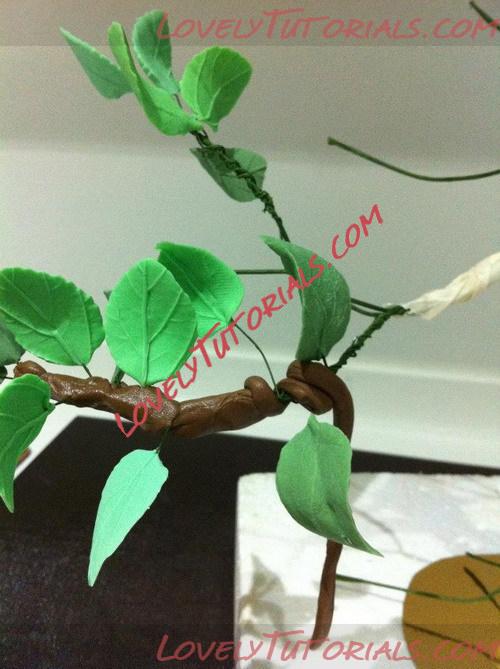
Here is the challenging part, try rolling the brown fondant and cover up all the gaps of the wires, press it with your finger tips.
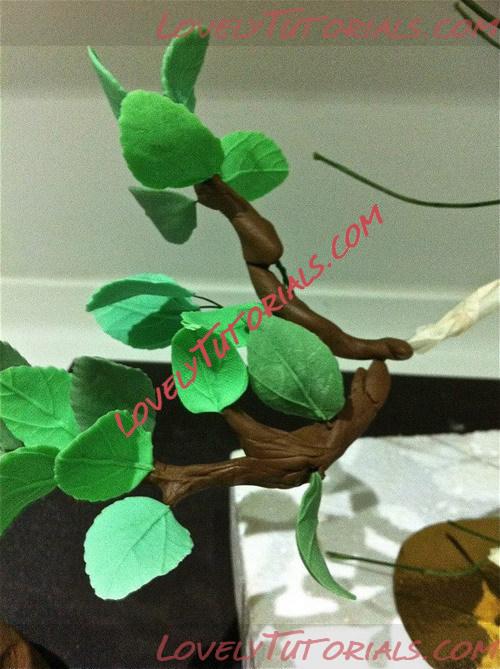
Then move on to the next brunch...
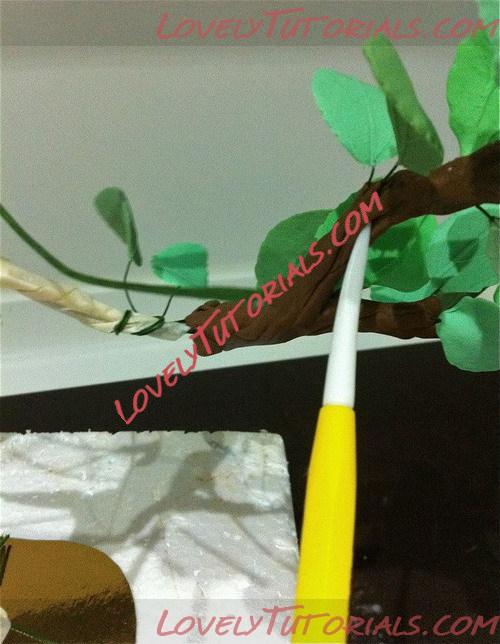
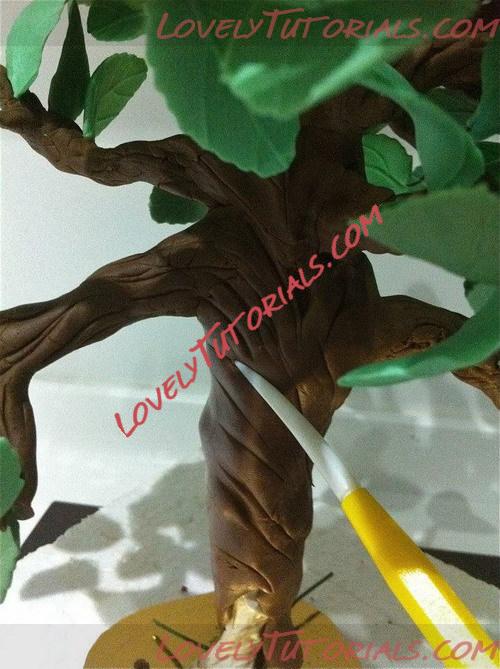
Use a veiner tool or a tooth pick to create the veins of the brunches.
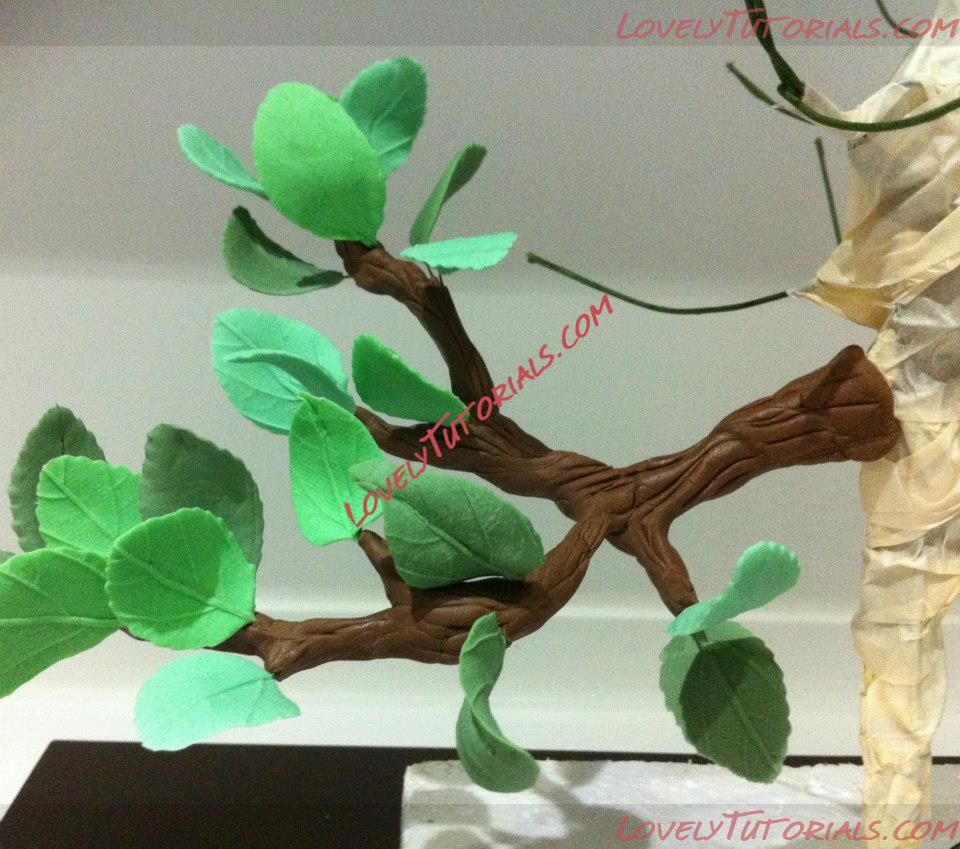
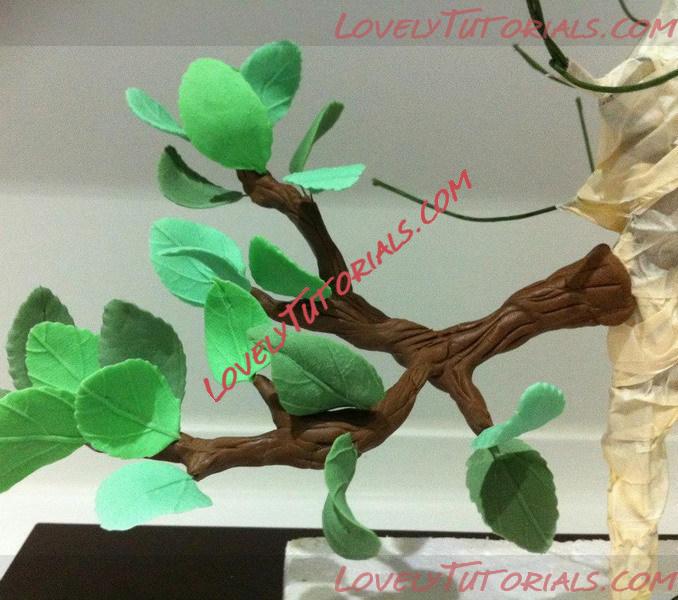
Wallah!! One big brunch is completed
Move on to the next level and be patience...lol!!
Finally the different shades of greens brunches is completed!!
Next is the tree trunk!! Roll out some thick brown fondant and stick it on with edible glue or a brush of water, don't put too much or it gets too messy and sticky!!
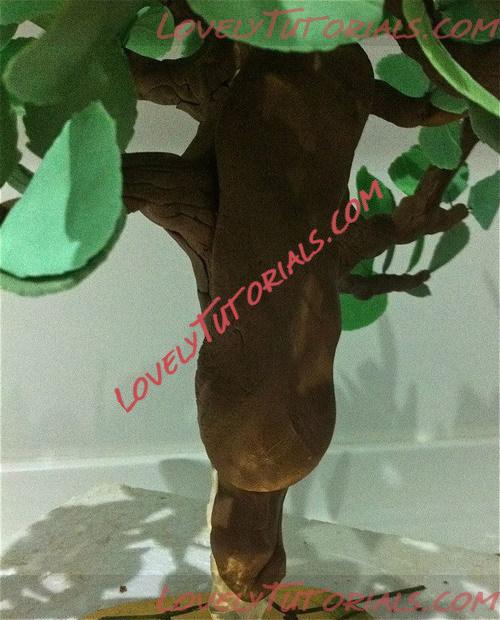
Again, use a veiner tool or tooth pick to make the veins of the tree trunk.
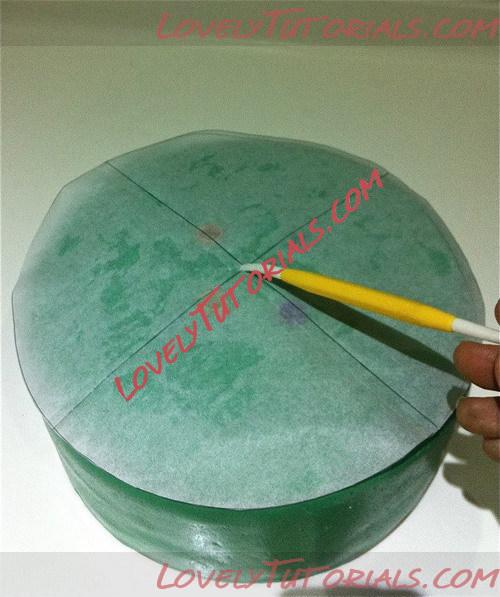
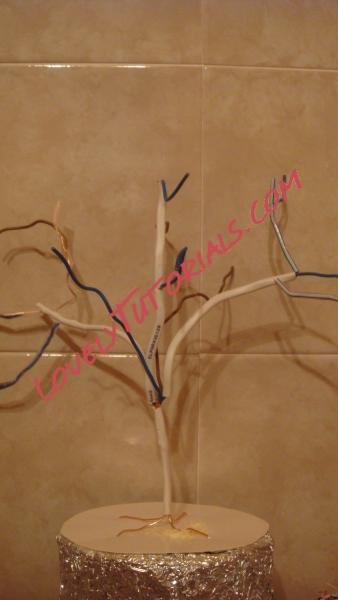
My cake is going to be 10" round so the cake board is 10" too. Cut out a 10" parchment paper.
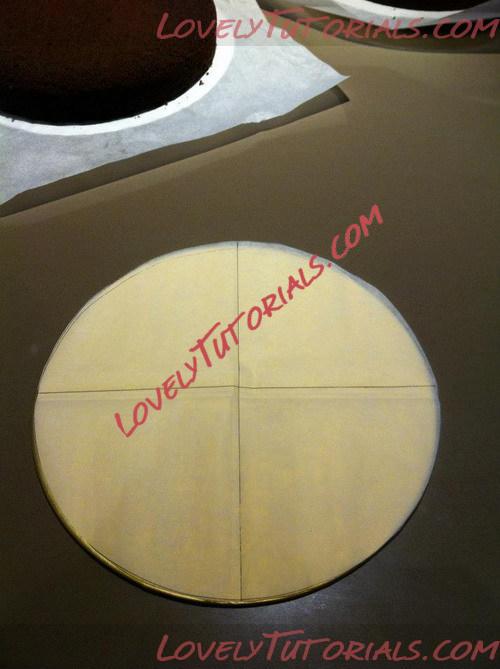
Fold the parchment paper and mark the centre spot, prick a little hole with a needle tool or a clean metal nail.
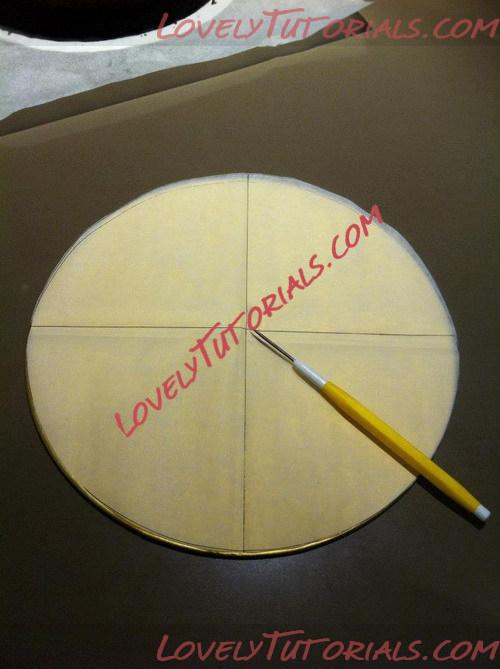
Use the dowel rod and place through the cake board and leave it aside.
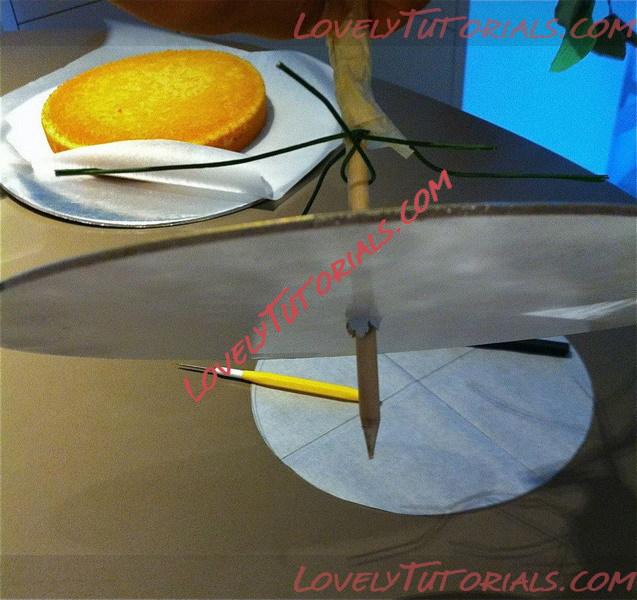
I've used a 16" base board for my base and again try to find the centre spot and make a marking with the dowel rod.
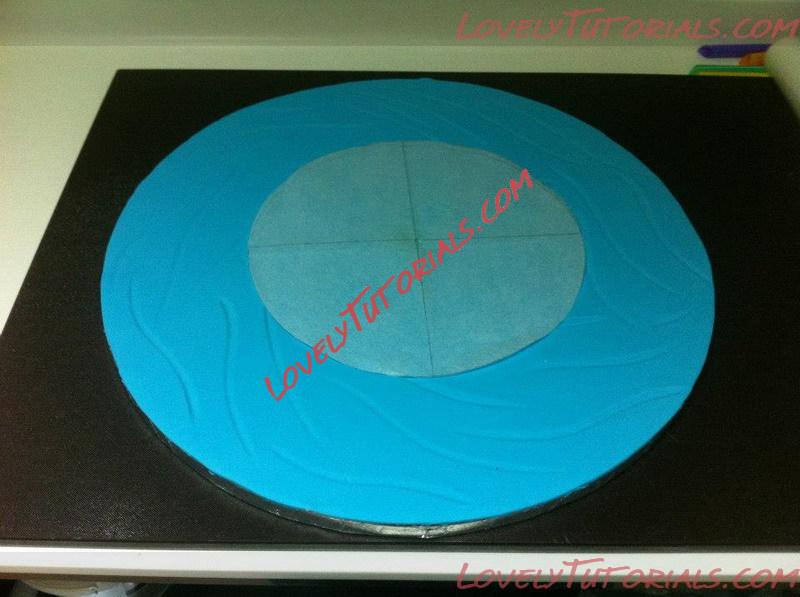
Cover your 10" cake with a thin fondant, I've always use a bubble straw as a support for stacking up cakes 
Mark the centre of the cake
Place the little card board on the top of the support bubble straw which will be use as an important support for the tall skinny tree..
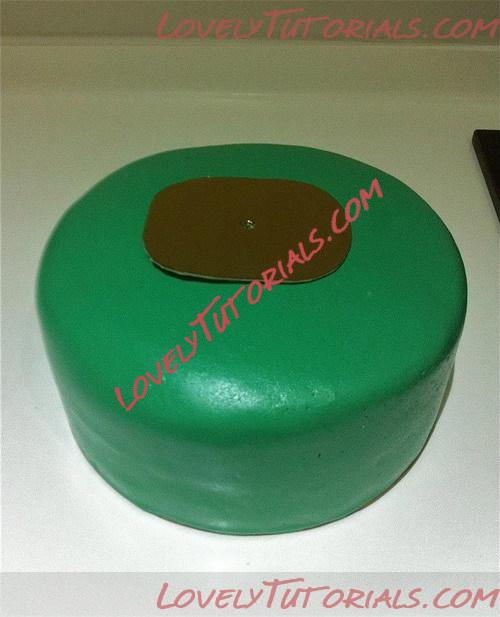
You could either place the little card board already onto the cake and cover with fondant or place it in between the thin fondant like I do ....my reason is ...it will be much more stable for a tall tree to sit on the soft cake from all the weight of the fondant
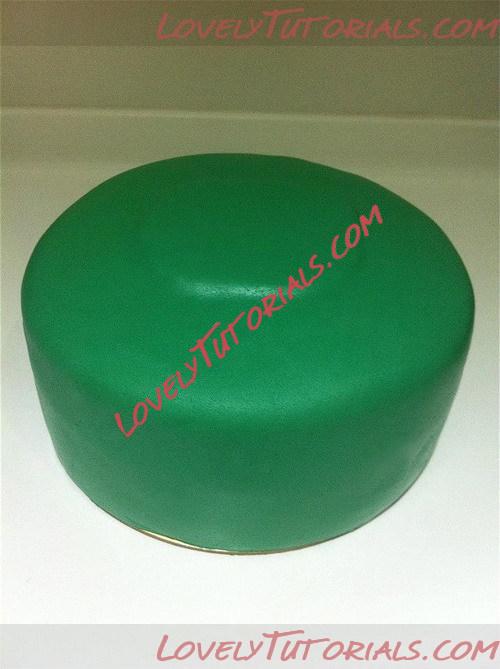
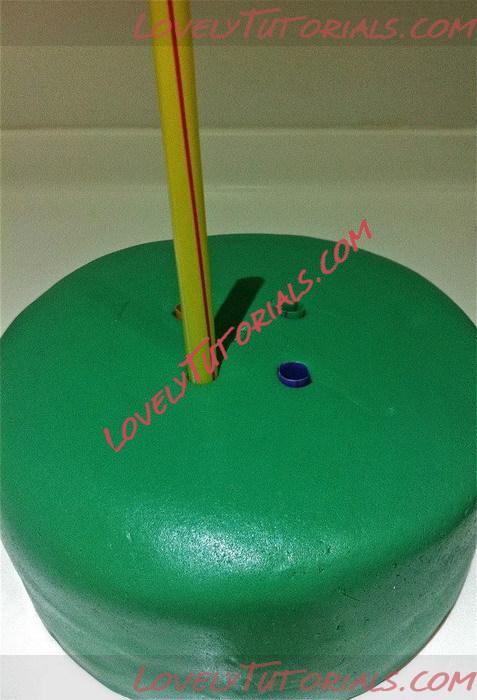
Aline all the central markings you made before from the top of the cake to the base board.
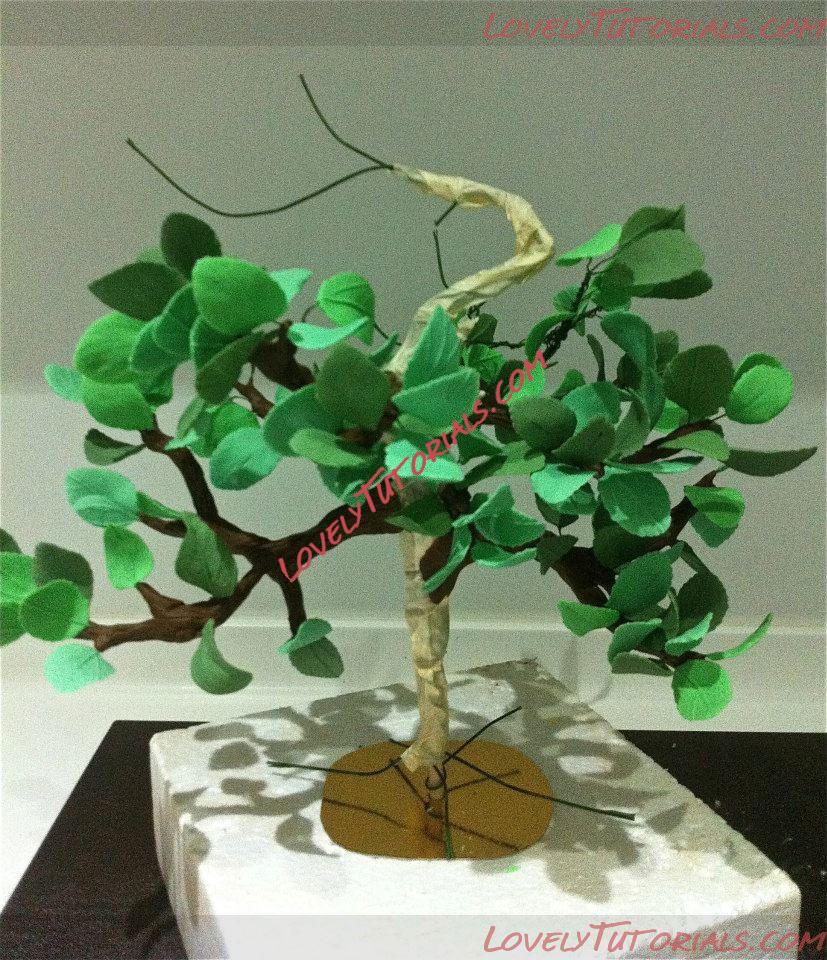
Lift out the tree from the dummy and place the dowel rod into the centre margins of the cake, through the cake board and into the base board!
Tadah!!! The tall slim tree is up on a cake without any worries

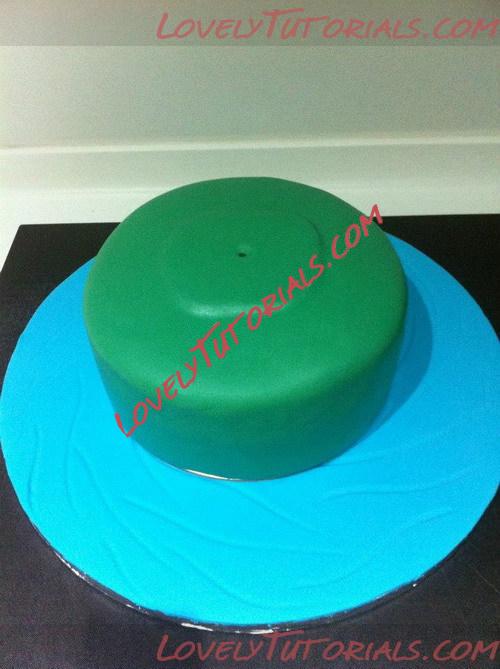
Roll out some thick brown fondant to make the roots, cover up the wires and modeled the roots with your fingers.
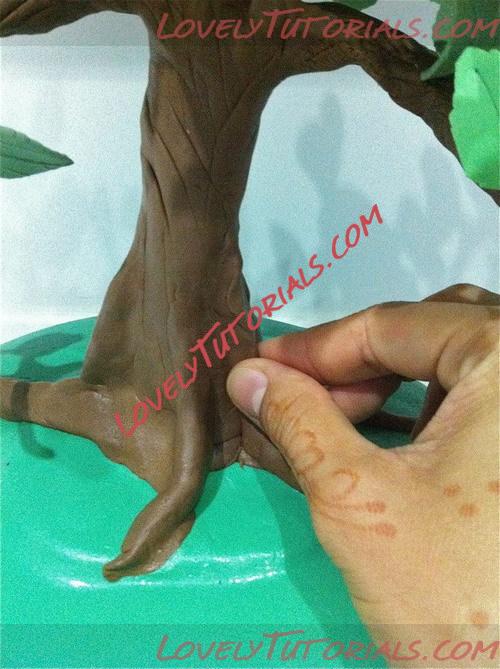
Use a veining tool/tooth pick to create the veins of the tree.
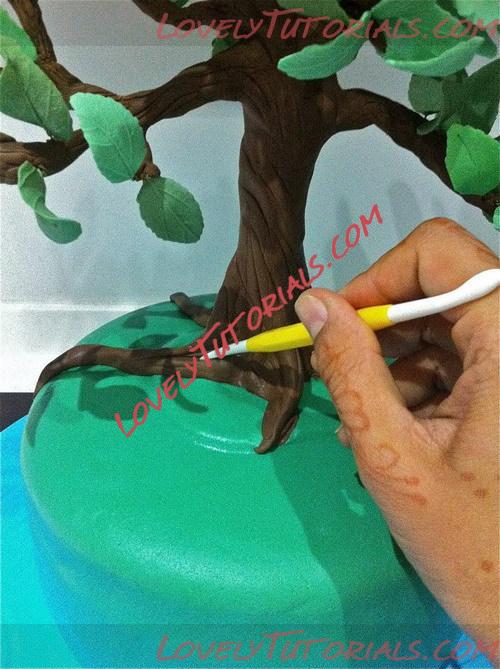
The roots is done!!
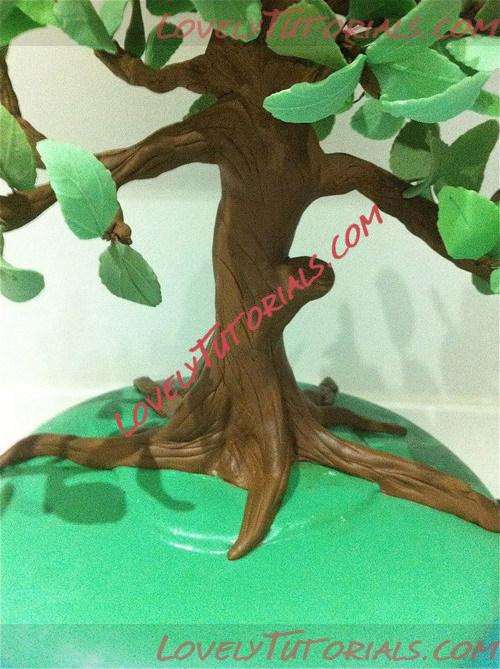
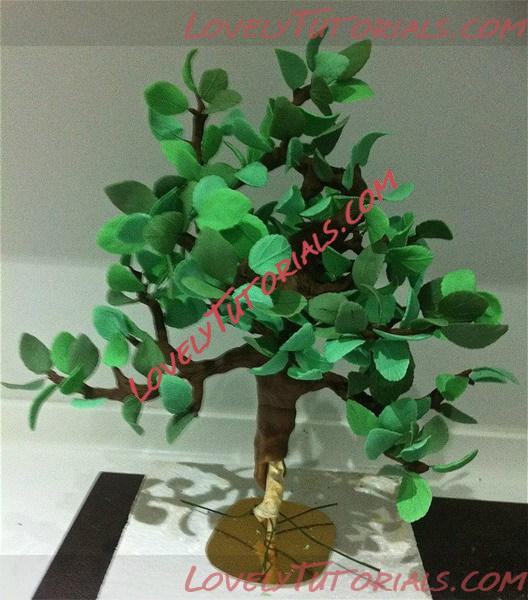
This slim tree is at 43cm high from the base of the roots to the tip of the brunches and the width is 38cm from bottom left tip brunch to the right.
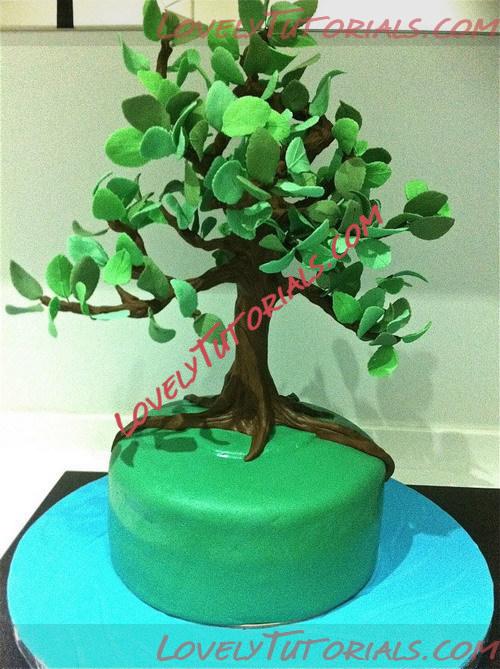
Well, it is definitely not an easy task but if I can do it SO CAN YOU
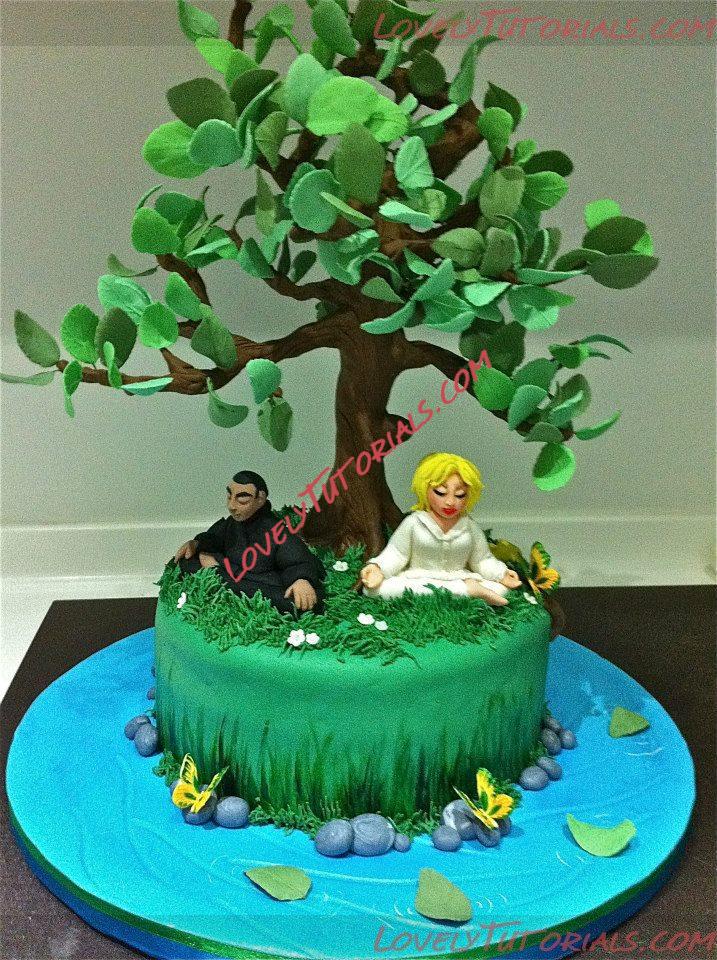
Top view of the tree...
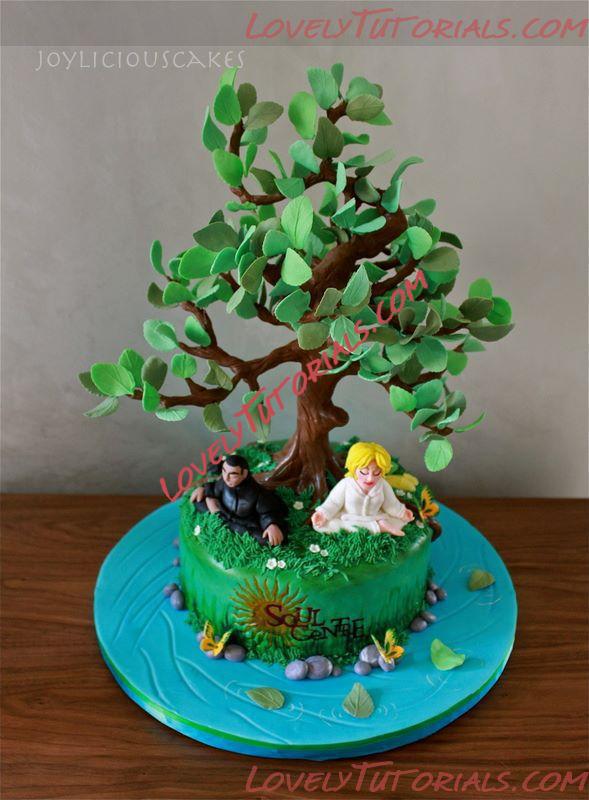
Meditate like a tree grows" ...
|
10.02.2014, 18:47
|
|
Новичок
|
|
Регистрация: 21.08.2012
Сообщений: 2
|
|
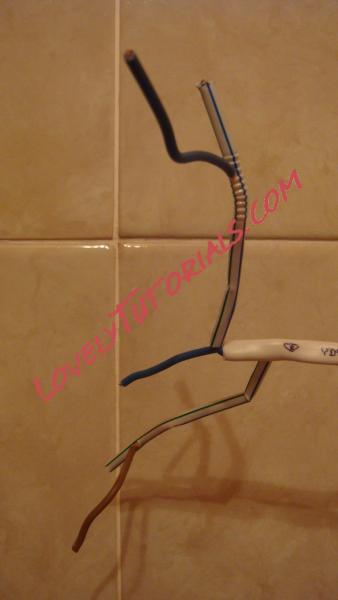
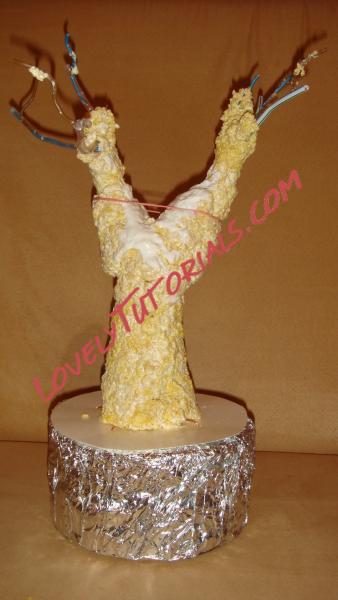
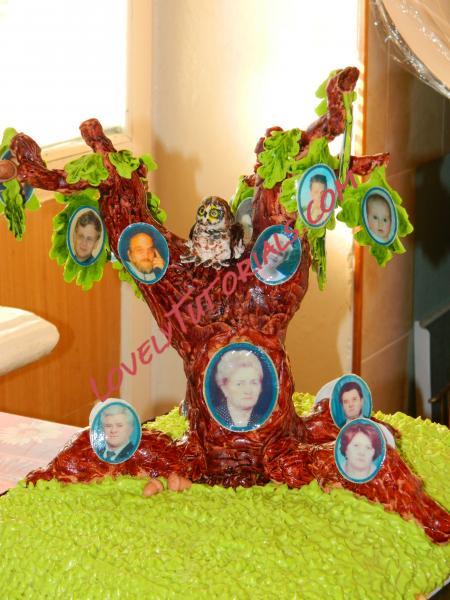
Генеалогическое дерево
Купила кабель с медной проволокой. Сначала очистила всё от изоляции, но потом решила, что медь окислится при соприкосновении с едой поэтому начала экспериментировать.
В основной кабель засунула 4 проволоки, которые потом засунула в пенопласт как крепёж дерева.
Далее сделала 2 основные ветки, в них проткнула дырочки и вставила веточки - детки.
Открытую проволоку закрыла обычными коктельными трубочками.
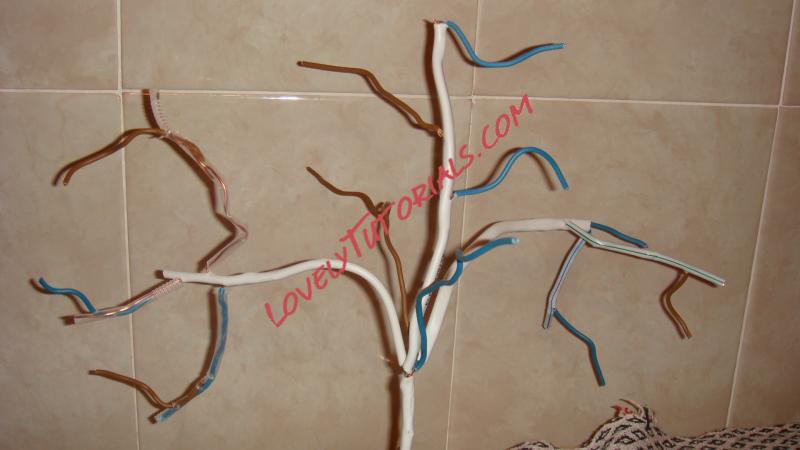
Далее все толстые ветки обложила массой из сухого завтрака и мармышек и поставила сохнуть - сутки. Для надёжности одела резинку, что бы ветки не расподались.

Далее обтянула мастикой все ветки и стянула уже леской. Листики я делать не умею. Поэтому вырезала шаблон из картона и вырезала на мастике, делая длинный хвостик.
Потом этот хвостик на ветку наматывала, а сверху коричневой мастикой обтягивала, т.е листик сох на дереве. И опять на сутки в холод, что бы мастика схватилась и уже ветки не распадались.
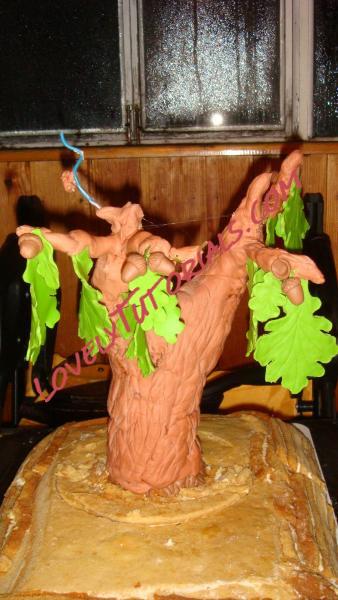
Дале раскрашиваем дерево и листики и устанавливаем в торт, предварительно вырезав в нём дырку.
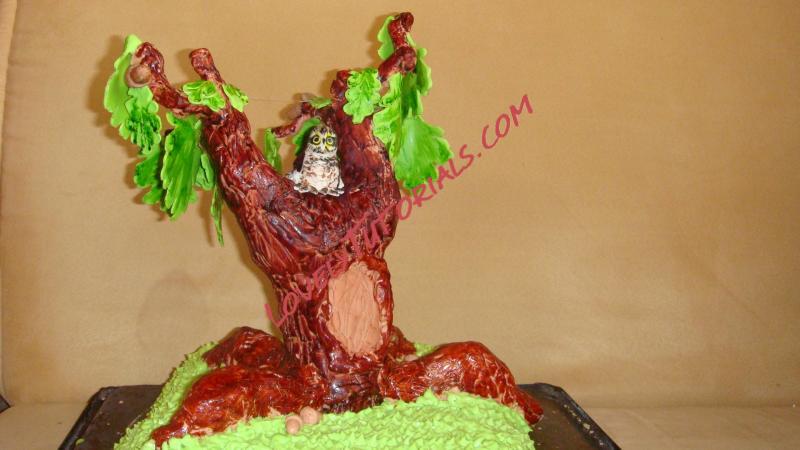
Леску убрала перед отдачей торта, ветки держались хорошо и даже не двигались. Конечный результат.
Последний раз редактировалось Arianchik; 10.02.2014 в 19:15.
|
02.12.2014, 21:34
|
|
Администратор
|
|
Регистрация: 02.12.2014
Сообщений: 396
|
|
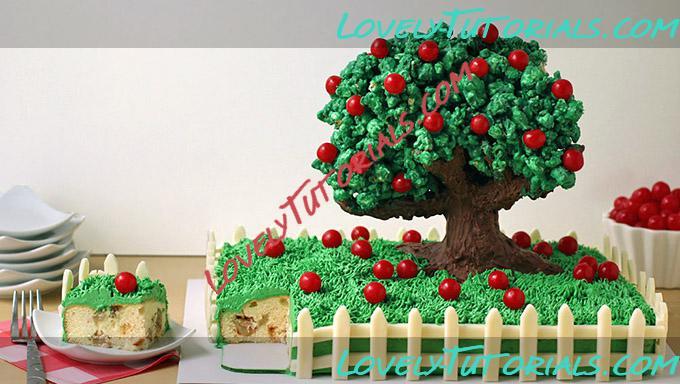
Огромная благодарность Hungry Happenings за Мастер-класс
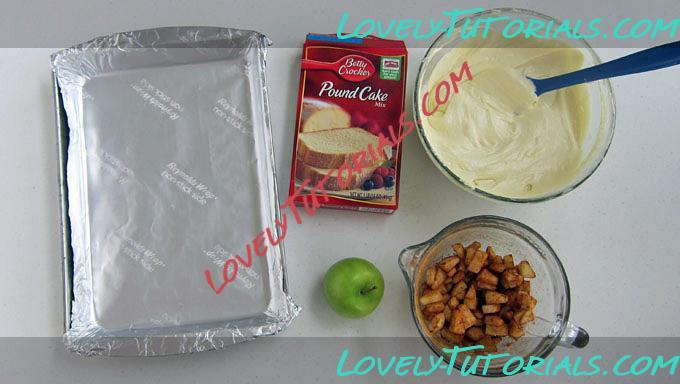
1 Betty Crocker™ pound cake mix 1/4 cup butter, softened 2 eggs 2/3 cup water or milk 2 cups diced Granny Smith Apples, from two apples 1 teaspoon cinnamon
For the Cinnamon Frosting
1-1/2 tubs Betty Crocker™ Whipped white frosting 3/4 teaspoon cinnamon
Green food coloring
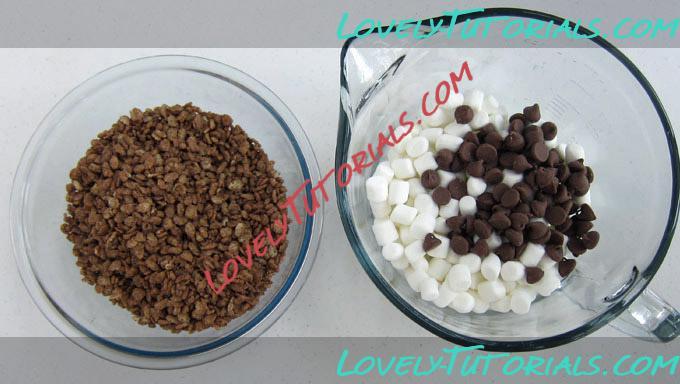
For the Chocolate Popcorn Tree
1 1/2 tablespoons butter 3 1/2 cups miniature marshmallows 1/3 cup chocolate chips 2 cups chocolate crispy rice cereal 6 ounces melted and tempered milk chocolate or melted light cocoa confectionery coating (candy melts) 5 cups popped popcorn 10 ounces melted green confectionery coating (candy melts) 50 small sour cherry candies
For the Picket Fence
10 ounces white modeling chocolate
Directions
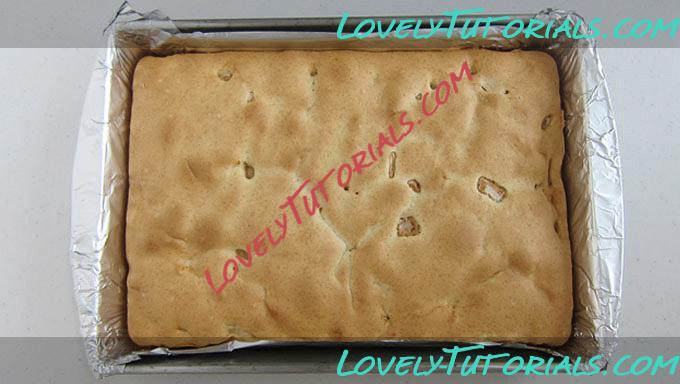
- Apple Pound Cake: Prepare pound cake mix according to package instructions. Toss apple pieces with 1 teaspoon cinnamon. Fold apples into cake batter. Pour batter into a nonstick, tin foil-lined 9x13-inch baking pan. Bake at 350ºF for 32-36 minutes, until a toothpick inserted in the center of the cake comes out clean. Cool cake completely. Remove cake from pan and peel off tin foil. Set cake on a cake board.
- Cinnamon Frosting: Pour Betty Crocker Whipped White Frosting into a mixing bowl. Add 3/4 teaspoon cinnamon and green food coloring. Stir until well blended. Spread a very thin layer of green frosting over cake. Pour remaining frosting into a pastry bag fitted with a grass tip. Pipe grass over top of cake, leaving an open space for the apple tree.
- Cereal Tree Trunk: 1) Make the cereal treat mixture. Combine butter, marshmallows, and chocolate chips in a large bowl. Heat in the microwave on high for 30-second increments, stirring after each, until melted. Stir in cereal. 2) Working on a silicone mat, sculpt a tree trunk with a few low branches out of the cereal treat mixture. Brush melted and tempered milk chocolate or melted light cocoa confectionery coating over the tree trunk. Make smaller branches, brush them with chocolate, allow them to dry, and add them to the tree trunk using chocolate as glue. Then allow that to dry and add one more layer of chocolate over top of the branch. 3) Once you've added all the branches, add one more coat of chocolate then refrigerate it for 15-20 minutes until the chocolate sets hard.
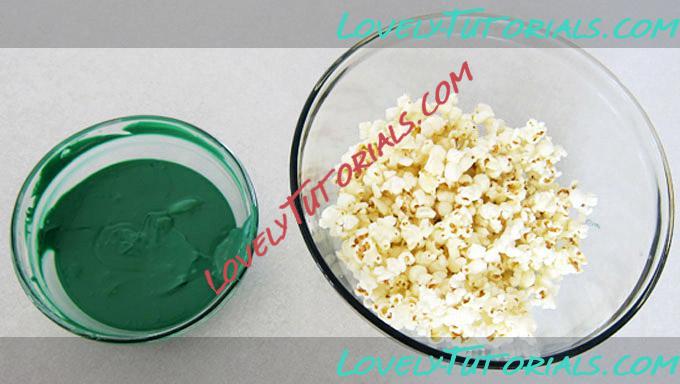
- Popcorn Leaves: Place popcorn in a large mixing bowl. Reserve 1 tablespoon of the green confectionery coating for later, then pour the rest over top of the popcorn and fold until well coated. Add pieces of the green colored popcorn to the tree, placing them between branches first, then start stacking the pieces on top of each other until you have a full tree. Refrigerate for 15 minutes.
- Apples: Attach some of the sour cherry candies to the popcorn tree using the reserved green confectionery coating as edible glue. Reserve the remaining candies to sprinkle on the cake under the tree.
- Picket Fence: Knead white modeling chocolate and roll out on a silicone mat until 1/8-inch thick. Cut four 1/2-inch wide by 12-inch long strips and four 1/2-inch wide by 9-inch long strips. Cut 38 strips that are 1/2-inch wide by 2-inch long. Cut one end of each piece into a point. Set two 12-inch long strips about 3/4 inches apart. Use water to attach the small 2-inch fence pieces along those two strips about an inch apart. Repeat creating one more 12-inch long panel. Then do the same using the 9-inch strips, creating a total of 4 picket fence panels to go around the cake.
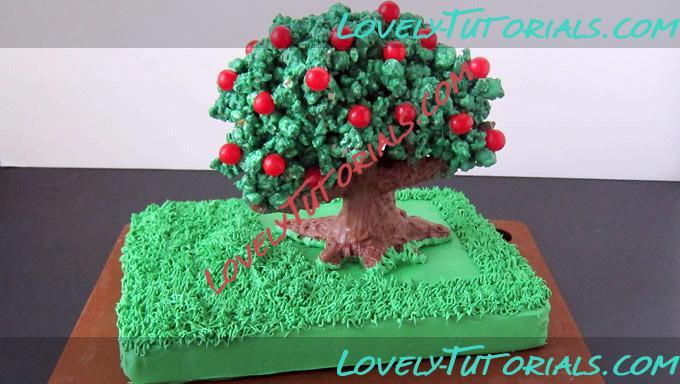
- Before serving, place the tree on top of the cake. Pipe green grass around the tree. Press the picket fence around the base of the cake, cutting off any excess fence. Sprinkle some sour cherry candies on the grass under the tree.
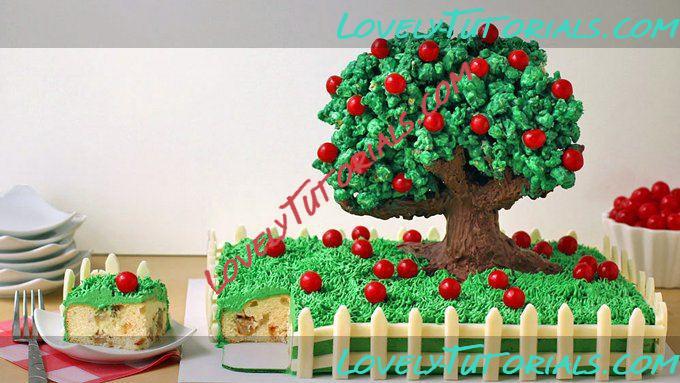
Slice into this adorable cake for a taste of sweet apples and cinnamon.
Autumn is the perfect time to enjoy an apple dessert, and this cake sure won’t disappoint. Cinnamon-coated crisp and tart Granny Smith Apples are baked into a Betty Crocker Pound Cake and then topped with a light cinnamon frosting.
The cake is wonderful all on its own, but to put it over the top, I decorated it to look like a grass-covered yard and planted a cute tree on top that’s made from chocolate cereal treats, white chocolate coated popcorn, and sour candy apples. The white picket fence is made out of white modeling chocolate, which means this entire dessert is edible! So once your friends and family are done oohing and ahhing over the tree, they'll love eating this sweet fall-inspired treat.
First, to really carry the theme through the cake, I added cinnamon apples to a Betty Crocker Pound Cake Mix.
The apples added a lovely fresh fall flavor to the pound cake and helped to keep it moist.
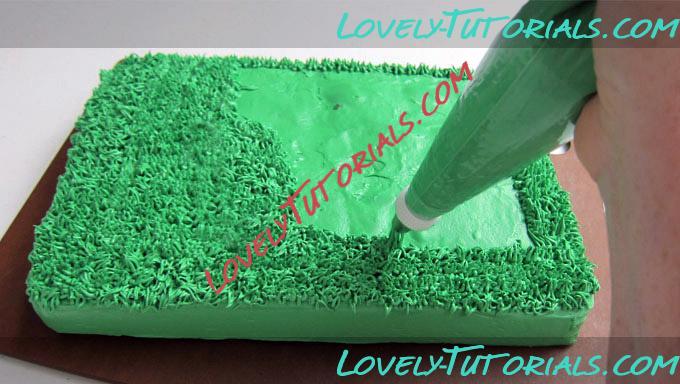
To make the apple flavor really pop, I added a touch of cinnamon to some Betty Crocker Whipped White Frosting, which I then tinted green and spread onto the cake. I could have skipped this step, but the top of my cake was rather bumpy. I could have leveled it, but decided instead to fill in the grooves with frosting.
To make the frosting look like grass, I added a grass decorating tip to a pastry bag, filled it with frosting, and then piped frosting grass all over the top of the cake, leaving room to add my apple tree later. Then I froze my cake for a few hours. I knew the pound cake would be nice and sturdy, but I wanted to make sure the cake was solid enough to hold up my tree without having to add lots of support. Plus, I find that a frozen cake, once thawed, is more moist and tender.
|
02.12.2014, 21:35
|
|
Администратор
|
|
Регистрация: 02.12.2014
Сообщений: 396
|
|
Now for the really fun part of this project: I began my making a batch of cereal treats using chocolate rice crisp cereal. I added some chocolate chips to make a more sturdy mixture.

Working on a silicone mat to keep the tree from sticking, I started to sculpt my tree trunk. One thing to note here: You need to make pretty long roots on your trunk in order to keep the tree from toppling over. Mine did at first; in the final pictures you'll see I had to add longer roots. Learn from my mistake and add them now! Add 6 or more roots. You can always cover some of them up with frosting grass if you don't want them all to show, but they will help to keep your tree upright.
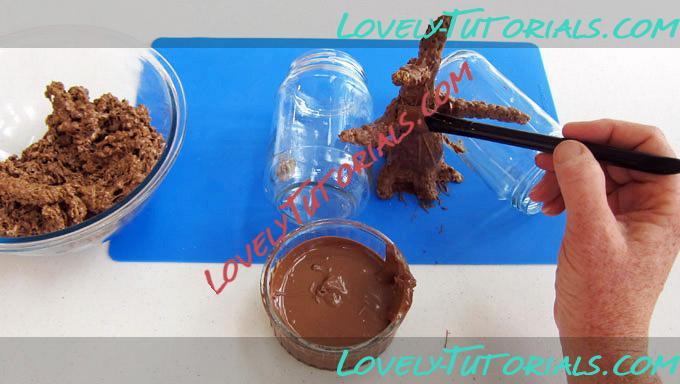
As I worked I painted milk chocolate over the cereal treats. If you use milk chocolate, you need to temper it; otherwise I'd suggest using light cocoa confectionery coating (candy melts) as listed in the ingredients. It's important to allow the chocolate to harden before you start adding a lot of branches. It's also a good idea to add about 3 layers to the trunk to make sure it's really solid.
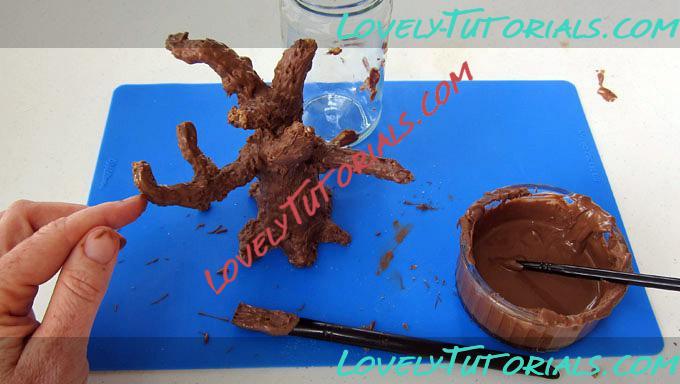
To add branches, I first shaped them out of cereal treats, then painted them with chocolate and allowed them to dry. Then I attached them to the tree using more chocolate, allowed that to dry, and then painted another coat of chocolate over the branch.
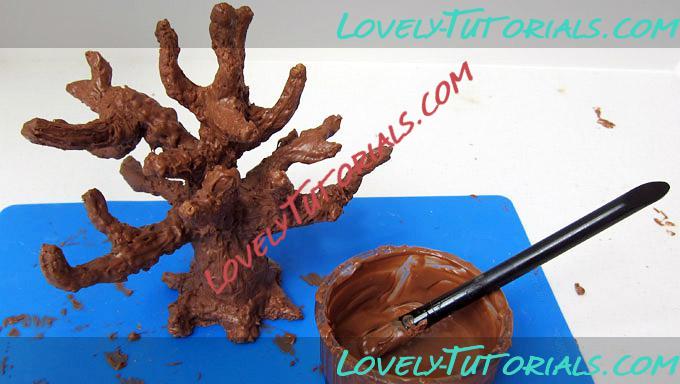
You won’t actually see many of these branches, but you need lots of them to hold up the popcorn leaves. It's important that the tree is really solid and the chocolate has completely hardened before you add the leaves.
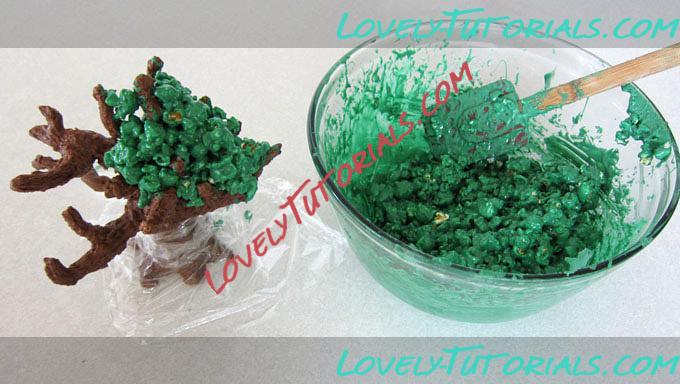
Once my chocolate tree was ready I wrapped the base of the trunk in plastic wrap. Then I whipped up a batch of green-colored white chocolate popcorn.
|
02.12.2014, 21:36
|
|
Администратор
|
|
Регистрация: 02.12.2014
Сообщений: 396
|
|
Making the candy coated popcorn is so easy; just fold melted green confectionery coating into popped popcorn until it's nicely coated.
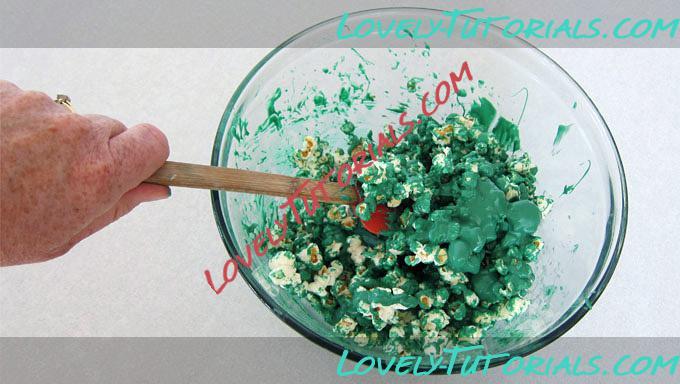
Working quickly, I added popcorn to the tree, placing a few pieces in between the branches then piling more on top once those pieces were secure. This is a messy job! I washed my hands several times while creating my tree.
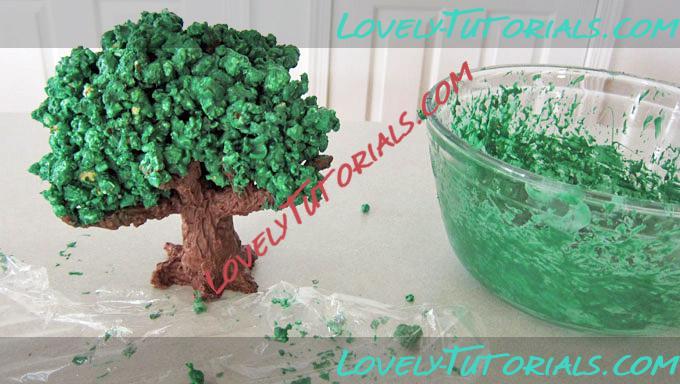
If the popcorn starts to harden as you're working, you can put the bowl in the microwave and heat it for 10-15 seconds. You want to get all the popcorn on the tree, then refrigerate it until the candy-coated popcorn hardens.
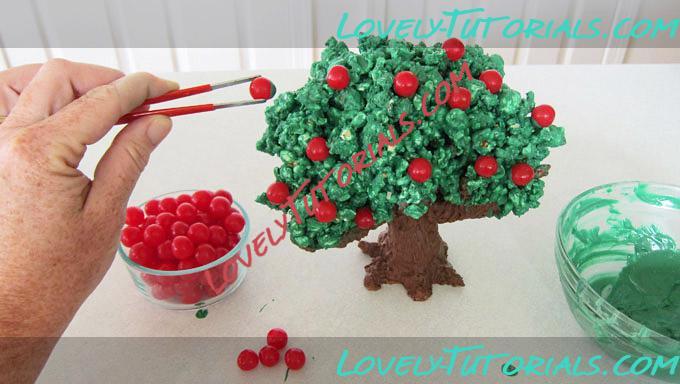
Once my tree was ready, I used the rest of the green candy coating as edible glue to attach the sour cherry candies (AKA the apples) to the tree.
Right after I took this picture, the tree fell over and I realized it needed larger roots! I added the roots, but worried the tree wouldn't stand up well, so I pushed three skewers into the tree in a crisscross pattern and cut off any excess on the bottom. I let it sit overnight to make sure it would stand up, and it did. So, as I said, just start with a sturdy root structure and your tree should stand strong!
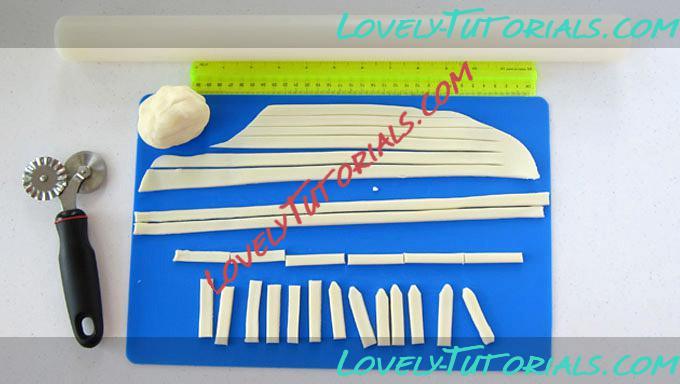
To finish off the cake, I created a picket fence out of white modeling chocolate. I rolled it out on a silicone mat then cut out all the pieces.
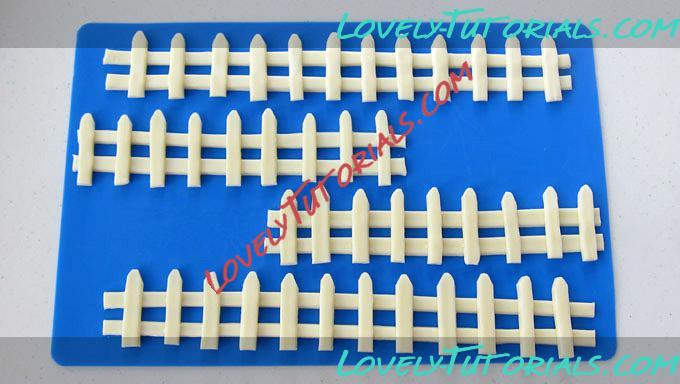
Then I attached the fence pieces using water as glue and let them dry for a while.
Once all the components of my cake were done, I pulled the cake out of the freezer and set the tree on top.

Then I finished the cake by piping on the rest of the grass, adding the fence around the cake and sprinkling on some candy apples under the tree.
|
 |
|
|
Метки
|
addım-addım təlimat, adım, adım adım yönergeler, albero, arbre, artesanatos passo a passo, ağac, ağacı, ağaç, baum, baum postup, bemutató, bolando bolos, boom, cake decorating, cake decorating techniques, cerâmica plástica, cold porcelain, confeitando bolos, copac, curso de modelado, de árboles, decoracion de pasteles, decoración de tortas, decorada en fondant, decorare le torte, decorazioni, deko fondant, dekorace na dort, dekoracija, dekoracije, dekorasyon, dekorácie, drevo, drzewa, fa, fender, figurine on the cake, fimo, flower paste, fondan, fondant, fondente, fondente di zucchero, fotopostup, foundant, gum pasta, gum paste, gumpaste, hand-made, handmade, handmade clay banana tree tutorial, how to, how to make a tree, how to make palm tree, how-to's, hurma ağacı, instrucţiuni, instrukcijas, instrukcje, jak na, kage dekoration, kagedekoration, kakebaking, korak, korak za korakom navodila, korak-po-korak upute, koristeet ja koristelu, krok, krok po kroku, krok za krokem, krok-za-krokem, l'arbre, la modélisation, las instrucciones, las técnicas, le tecniche, les techniques, marshmallow, masa flexible, master-class, master-klasse, master-klasy, medžių, meistras klasės, metodikas, mistr třídy, modelado, modelagem, modelare, modelerte figurer, modeling, modeling paste, modeliranje, modellazione, modelleme, modellering, modellieren, modellierpaste, modelling past, modelləşdirmə, modelovanie, modelování, modelowanie, motivtorten, návod, opplæringen, palm, palm tree, palma, palmboom, palme, palmeira, palmera, palmeras, palmetre, palmetræ, palmier, palmino drvo, palmiye, palmių, palmo, palmu, palmy, palmė, pamoka, pap, pas, pas-cu-pas, paso, paso a paso, passo, passo a passo, passo-a-passo, passo-passo le istruzioni, pasta de goma, pasta de miel, pasta flexible, pasta laminada, pocelana fria, polymer clay, postupak za ukrasavanje, puu, pálma, pálmafa, schritt für schritt anleitung, schritt-für-schritt, schritt-für-schritt-anleitungen, sculpting, stap, stap-voor-stap, stap-voor-stap instructies, steg for steg, steg-för-steg-instruktion, step, step by step, step-by-lépésre, step-by-step, step-by-step instructions, strom, styrofoam, sugarcraft, sugarpaste, technieken, techniken, techniki, techniky, technikák, techniques, tecnicas de decoracion, tecniche, tehnici, tehnike, teknikker, teknikler, telgopor, topo de bolo, topo do bolo, torte, torte decorate, torten dekorieren, torti, tree, trin, trin for trin, trin-for-trin, trin-for-trin instruktioner, trinn, trinn for trinn, trinn-for-trinn-instruksjoner, träd, træ, tutorial, tutoriale, tutorias, tutorias/ideas para decorar los bizcochos, tutoriel, tutorijal, técnicas, ukrašavanje torti, uputstvo za dekoraciju, xurma ağacı, ต้นปาล์ม, ต้นไม้, सजा केक, पेड़, ट्यूटोरियल मास्टर वर्ग, कदम, कदम दर कदम निर्देश, ताड़ के पेड़, तकनीक, मॉडलिंग, モデル, árbol, árvore, étape, étape par étape les instructions, öğretici, žingsnis, žingsnis po žingsnio, 宗師級教程,一步,一步一步的指示� � �技術,udžbenik, 建模, 樹,棕櫚樹,drvo, 木、ヤシの木、, 裝飾蛋糕, δέντρο, βήμα, βήμα προς βήμα οδηγίες, οδηγίες βήμα βήμα, παντεσπάνι art, τεχνικές, φοίνικα, φοίνικας, φροντιστήριο, дерево, дрэва, дърво, инструкция, как сделать, как слепить дерево-мастер-класс, крок за кроком, крок за крокам, покроково, полимерная глина, пошагово, пошаговые фотки, пакрокава, палмово дърво, пальма, миниатюра, мк, моделиране, майстор-класа урок, майстар-клас, майстер-клас, майстер-класи, маршмеллоу, мастика, мастер-класс, банановое дерево, лепка, ліплення, ручной работы, ручная работа, украшение тортов, сахарная мастика, уроки прикрашання, стъпка, стъпка по стъпка инструкции, техники, техника, техніка, туториал, туторіал, тэхніка, фигурка на торт, фимо, холодный фарфор, шаг за шагом, інструкцыя, інструкція  |
| Опции темы |
Поиск в этой теме |
|
|
|
|


