|
|
Little Red Cap and Wolf Characters Tutorial | ÐÐ ÐŧÐĩÐŋКа ÐŅаŅÐ―Ð°Ņ ŅаÐŋÐūŅКа, ÐÐūÐŧК
|

25.09.2010, 04:08
|
|
ÐÐīОÐļÐ―ÐļŅŅŅаŅÐūŅ
|
|
Ð ÐĩÐģÐļŅŅŅаŅÐļŅ: 07.09.2010
ÐĄÐūÐūÐąŅÐĩÐ―ÐļÐđ: 7,669
|
|
 Little Red Cap and Wolf Characters Tutorial | ÐÐ ÐŧÐĩÐŋКа ÐŅаŅÐ―Ð°Ņ ŅаÐŋÐūŅКа, ÐÐūÐŧК
|
15.06.2011, 03:39
|
|
ÐÐīОÐļÐ―ÐļŅŅŅаŅÐūŅ
|
|
Ð ÐĩÐģÐļŅŅŅаŅÐļŅ: 07.09.2010
ÐĄÐūÐūÐąŅÐĩÐ―ÐļÐđ: 7,669
|
|
How to Sculpt a Red Cap Girl | ÐаК ŅÐŧÐĩÐŋÐļŅŅ ÐīÐĩÐēÐūŅКŅ - КŅаŅÐ―Ð°Ņ ŅаÐŋÐūŅКа
|
18.10.2011, 14:34
|
|
ÐÐīОÐļÐ―ÐļŅŅŅаŅÐūŅ
|
|
Ð ÐĩÐģÐļŅŅŅаŅÐļŅ: 07.09.2010
ÐĄÐūÐūÐąŅÐĩÐ―ÐļÐđ: 7,669
|
|
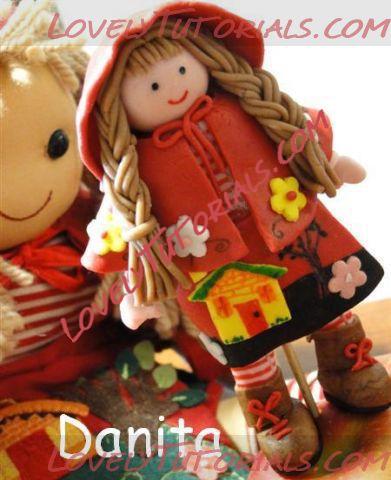
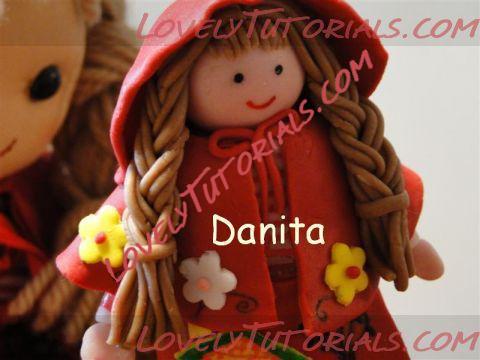
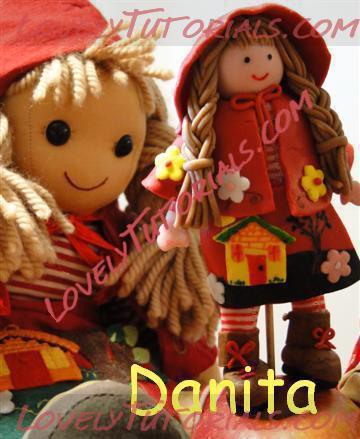
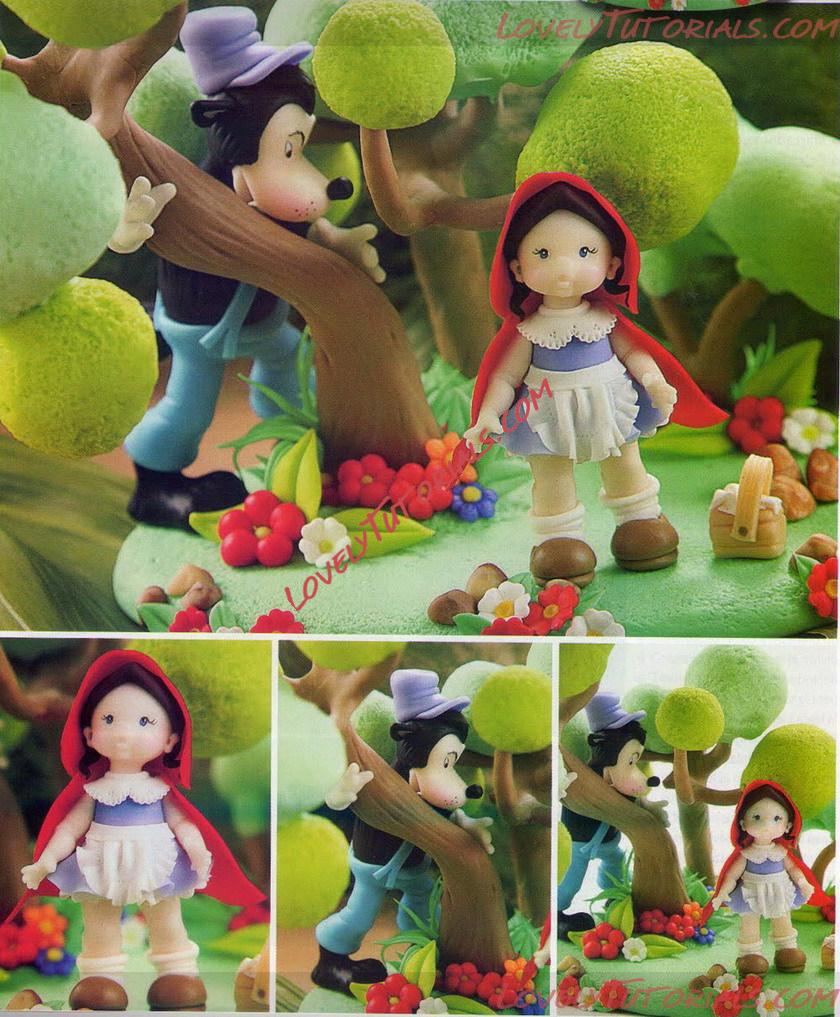
Little Red Cap and Wolf Characters Sculpting Step By Step | ÐÐ ÐŧÐĩÐŋКа ÐŅаŅÐ―Ð°Ņ ŅаÐŋÐūŅКа, ÐÐūÐŧК
ÐÐģŅÐūÐžÐ―Ð°Ņ ÐąÐŧаÐģÐūÐīаŅÐ―ÐūŅŅŅ ÐÐēŅÐūŅŅ за ÐаŅŅÐĩŅ-КÐŧаŅŅ
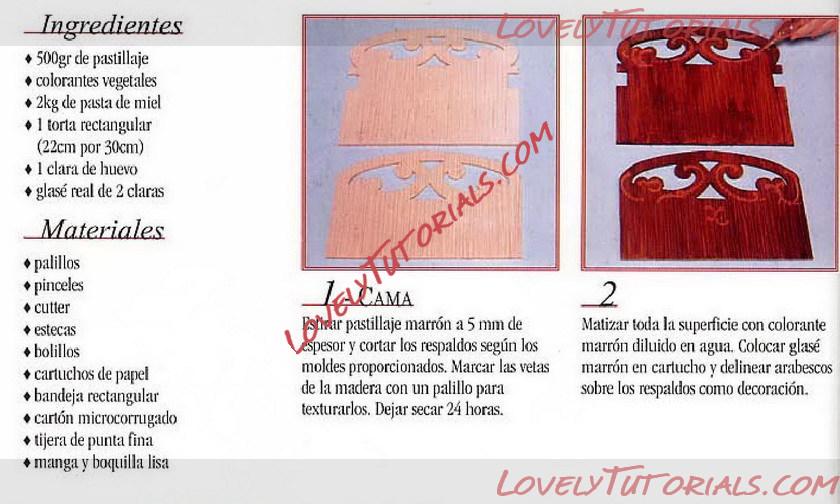
Materials
âĒ Fake biscuit dough with a feint to close in the colors: white, blue, red, yellow, brown, peach or caramel
âĒ Conela for fabric in the colors: bronco, orange, light blue, dark blue and pink.
âĒ Hydrographic connection without charge Boleodores large, medium and small
âĒ Cut stock
âĒ Spatulas large and small
âĒ Ocular clamp
âĒ Fine point scissors
âĒ White collar
âĒ Small brush (to apply glue)
âĒ Pink lipstick
âĒ BBQ pollio
âĒ Plastic roll
âĒ Pliers or large treasure (to cut the toothpick)
âĒ Styrofoam ball n ° 40
âĒ Extruder with round nozzle
âĒ Pizza cutter
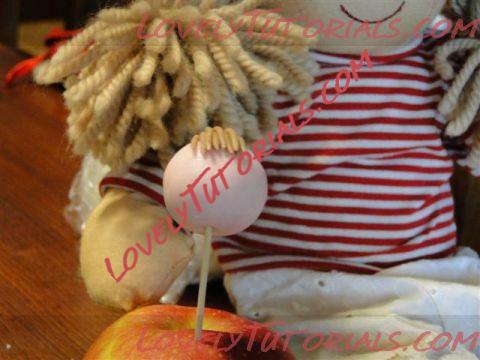
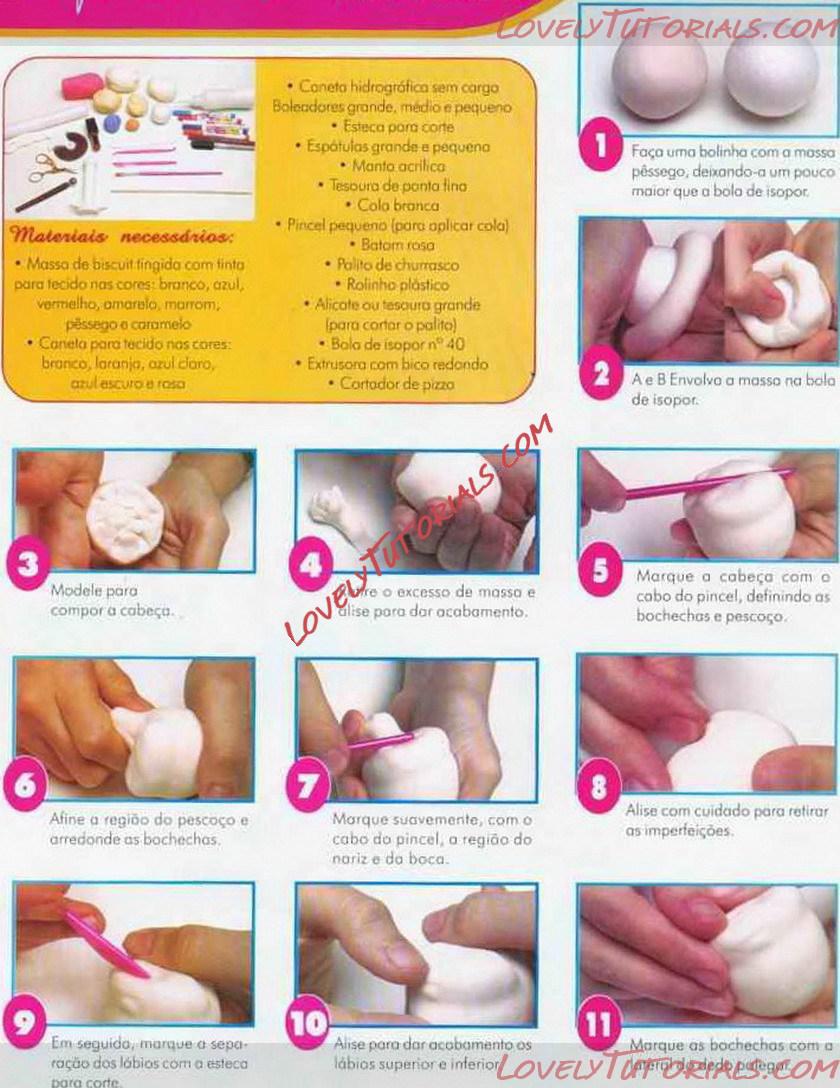 1. I make a ball with my peach dent, making it a little bigger than the Styrofoam ball
2. A and B Wrap the dough in the Styrofoam ball.
3. Model to compose the head
4.? and the excess of smooth and smooth to finish.
5. Mark the head with the brush handle, defining the cheeks and neck
6. Target the neck area and round the mouthwash
7. Gently mark the area of ââthe nose and mouth with the brush handle.
8. Smooth it carefully to remove imperfections.
9. Next, mark the separation of the lips with the cutting head.
10. Smooth to cover the upper and lower lips.
11. Mark the cheeks with the side of the thumb.
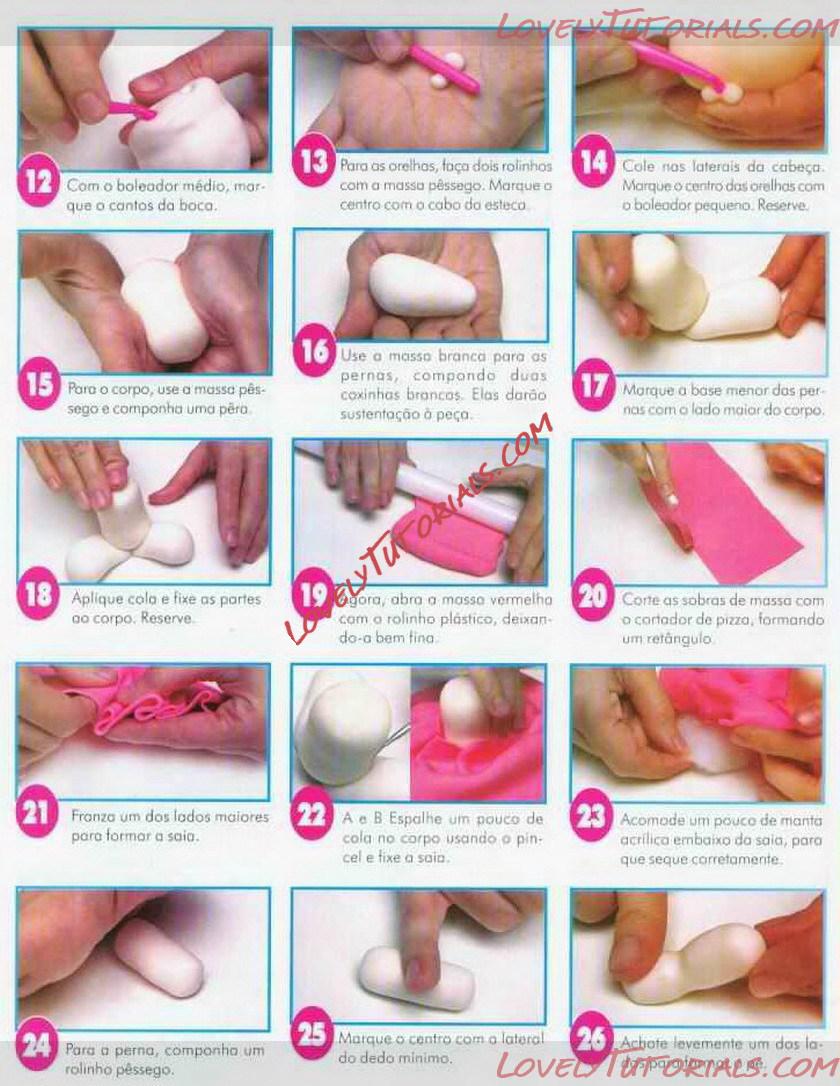 12. With the medium boleodor, mark the corners of the mouth.
13. For the coulters, make two rolls with the possego dough. Mark the center with the eteca cable.
14. Stick to the sides of the head Mark the center of the ears with the small boleodor. Reserve.
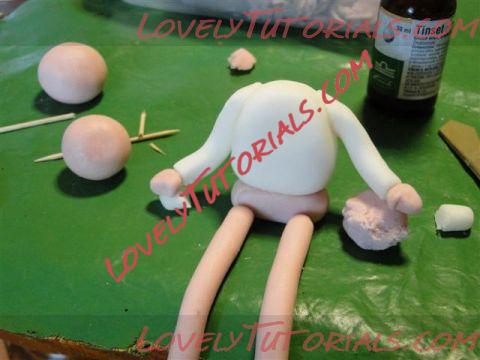
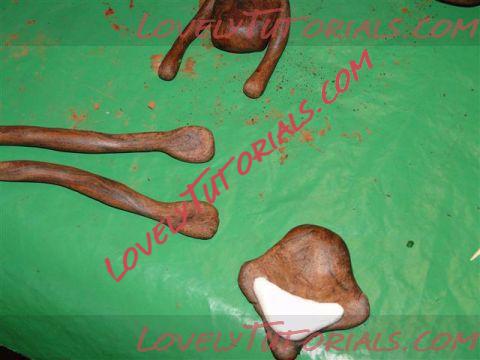
15. For the body, use the peach dough and compose a pear.
16. Use the white masso for the legs, composing two brown drumsticks. They will support the piece.
17. Mark the smallest base of the legs with the longest side of the body.
18. Apply glue and fix the parts to the body. Reserve.
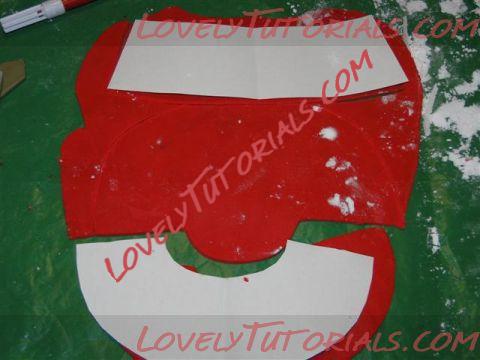
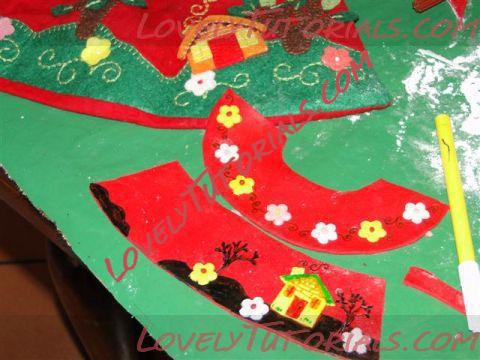
19. Now, make the red dough with the plastic roll, making it very thin.
20. Cut the leftover dough with the pizza cutter, forming a rectangle.
21. Fronza is one of the largest pores to form the outlet.
22. A and B Spread some glue on the body using the brush and fix the skirt.
23. Place a little acrylic blanket under the skirt, so that it dries properly.
24. For the leg, make up a long peach.
25. Wither the center with the loter of the little finger.
26. Lightly ground one of the sides to form the foot.
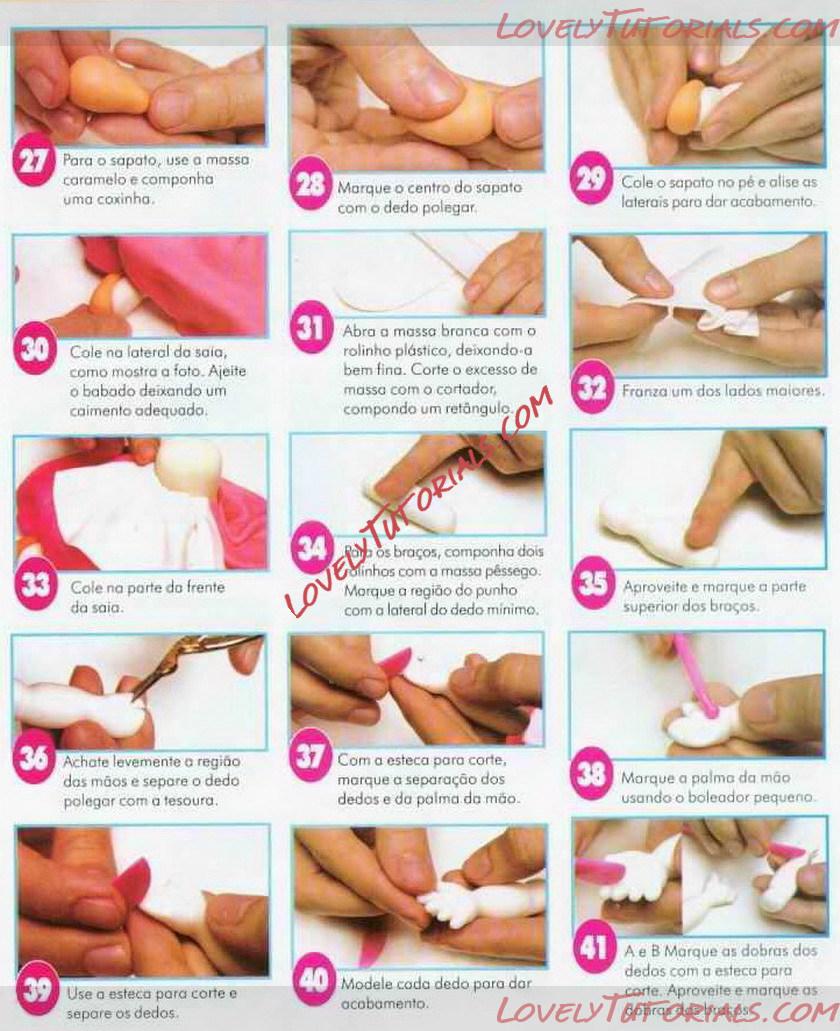 27. For the shoe, use your caramel dent and compose a drumstick.
28. Mark the center of the shoe with your thumb.
29. Glue the shoe to the foot and smooth the sides to finish.
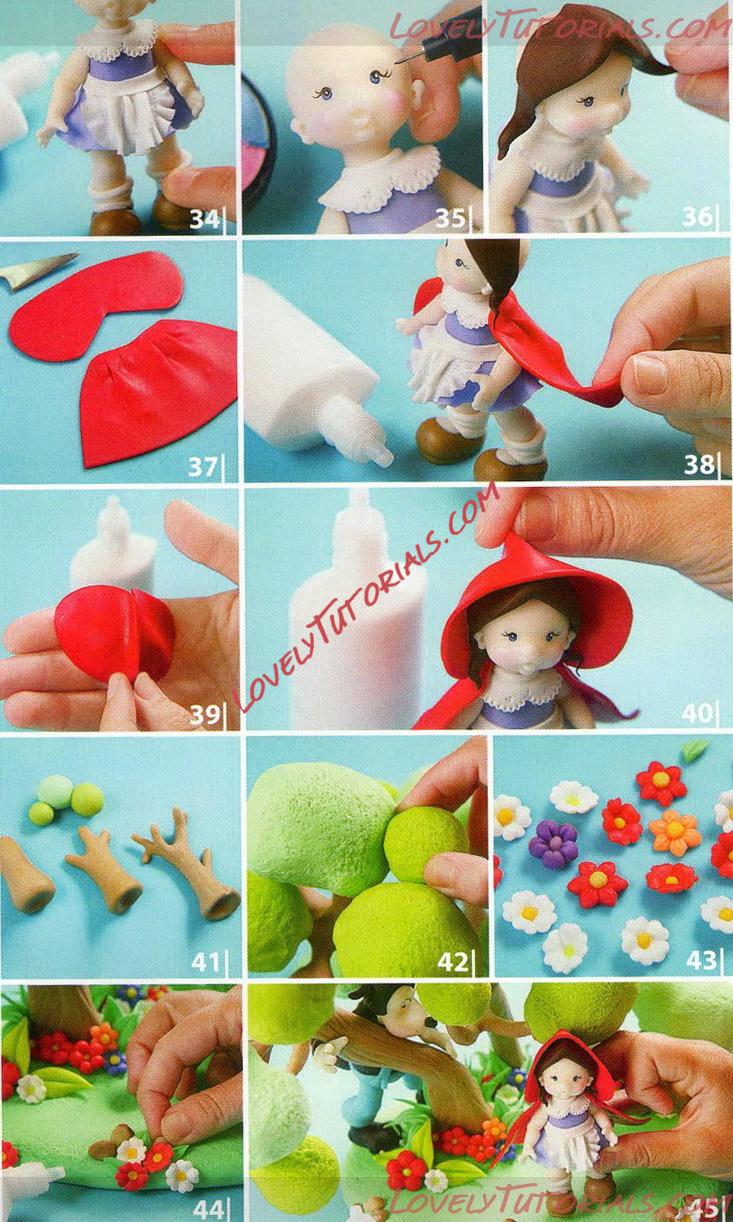
30. Stick to the side of the skirt, as shown in the photo. Straighten the frill leaving a suitable drape.
31. I open the white dough with the plastic roll, making it very thin. Cut the excess dough with the cutter, forming a rectangle.
32. Fronza one of the biggest sides.
33. Stick to the front skirt.
34. For the arms, compose two lines with the peach pastry. Morpple the wrist with the side of the little finger.
35. Enjoy and mark the upper part of the arms.
36. Flatten the region of the hands slightly and separate the thumb with the scissors.
37. With the cutting stick, mark the separation of the fingers and the palm.
38. Mark the palm using the small ball.
39. Use the stick to cut and bury your fingers.
40. Model your finger through the finish.
41. A and B Mark the folds of the fingers with the cutting stick. Enjoy and check the.
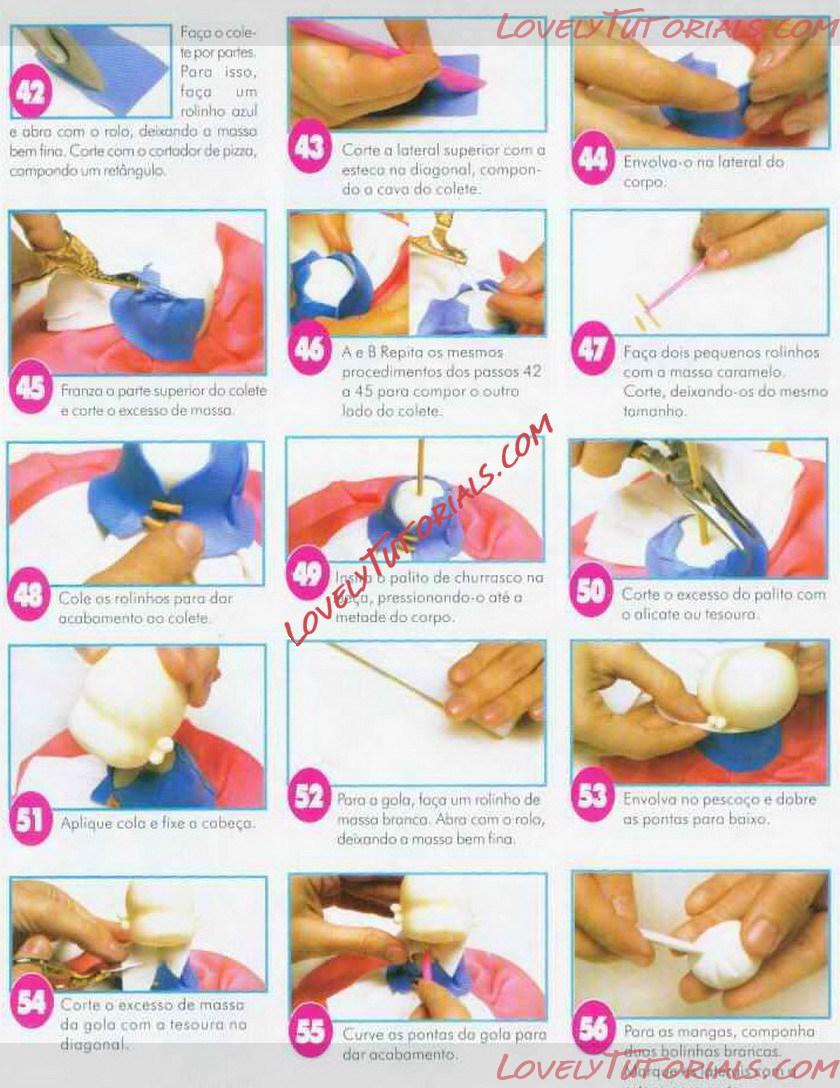 42. I make the vest for sizes. To do this, make a blue roll and work with the roll, leaving a very thin body. Cut with the pizza cutter, making a rectangle.
43. Cut the upper side with the diagonal line, making up the vest hole.
44. I wrap it around my side.
45. Ruffle the upper part of the vest and cut off the excess dough.
46. ââA and B Repeat the same procedures as in steps 42 to 45 to compose the other side of the vest.
47. Make two small rolls with the caramel masso. Cut, leaving them the same size.
48. Glue the pain rollers to the vest.
49. Insert the barbecue meat into the piece, pressing it halfway down the body.
50. Cut the excess of the toothpick with pliers or treasure.
51. Apply glue and fix the cover.
52. For the collar, make a scolding roll. Open with the roll, leaving the masso very thin.
53. Wrap around the neck and fold the ends down.
54. Cut the excess mass from the collar with the scissors diagonally.
55. Bend the ends of the collar to finish.
56. For the sleeves, compose dips bp; pmjas white.
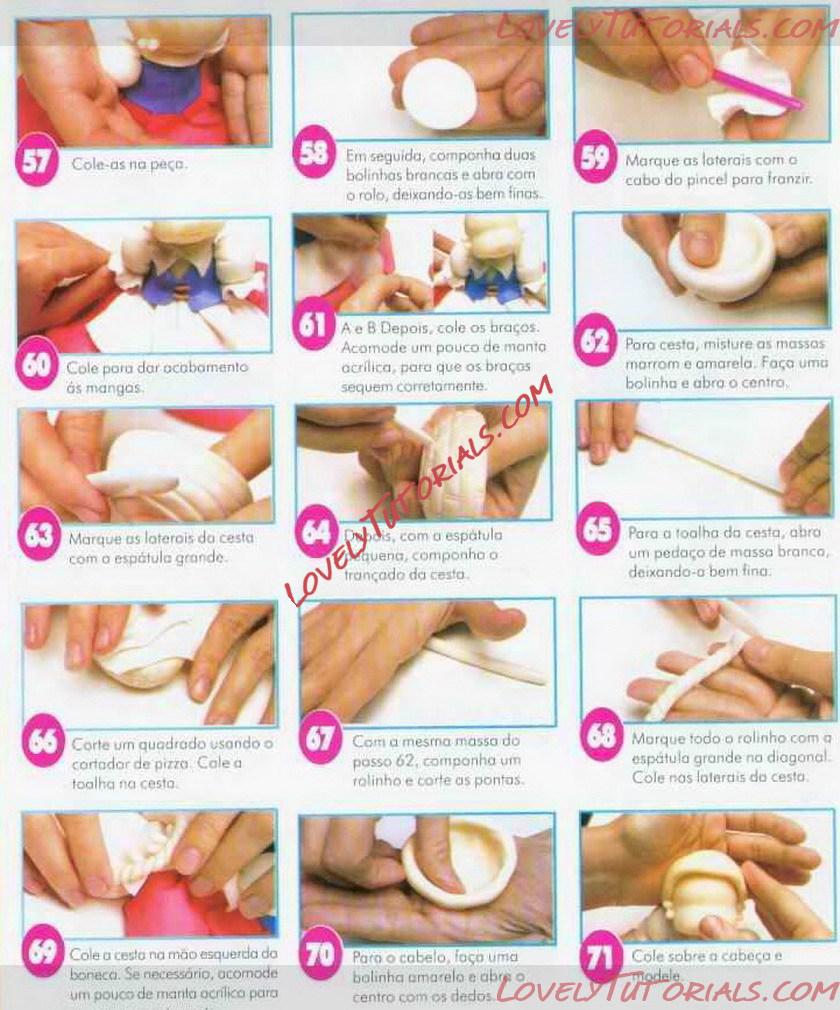 57. Glue them to the piece.
58. Next, compose two white balls and open with the roller, dividing them very thin.
59. Mark the loters with the handle of the brush to purse.
60. Glue to finish the sleeves.
61. A and B Then, I put the arms. Accommodate a little bit of acrylic blanket, so that the brocades dry out correlatively.
62. Pore basket, mix brown and yellow pasta Make a ball and open the center.
63. Mark the sides of the basket with the large spatula.
64. Dabois, with the small spatula, make up the locked basket.
65. For the basket towel, I open a piece of white dough leaving it very thin.
66. Cut a square using the pizza cut. Shut the towel in the basket.
67. Using the same masso as in step 62, compose a roll and cut the ends.
68. Morgue the whole roll with the large diagonal spatula. Stick to the sides of the basket.
69. Glue the basket to the doll's left hand. If necessary, accommodate a little acrylic blanket.
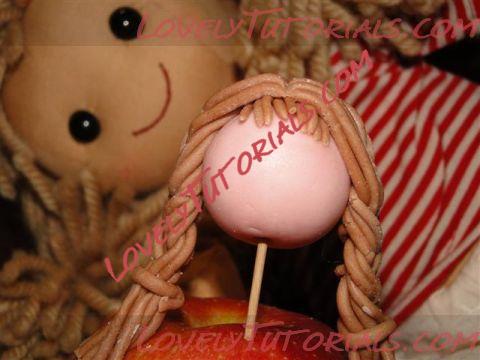
70. I stop the hair, make a yellow ball and open the center with my fingers.
71. Glue on the head and model.

72. A and B Mark the hair strands with the gronde spatula.
73. Separate the fringe with the cutting head.
74. Then, pass the yellow mass through the extruder, making a long roll.
75. Cut it into three equal pieces and braid. Fine tune to the point to finish.
76. I compose the other braid, leaving them the same size. Mark the strands with the large spatula.
77. Glue them to piece.
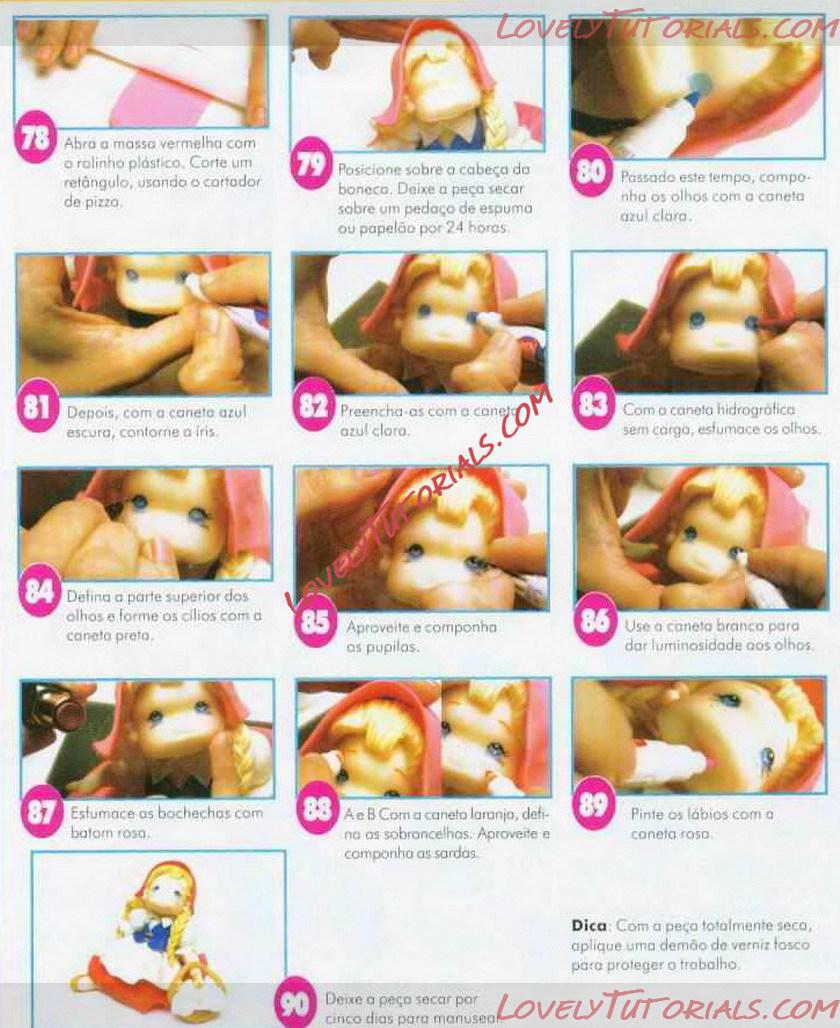 78. Open the red dough with the plastic roll. Cut a rectangle, using the pizza cartridge.
79. Place it on the doll's head. Let the piece dry on a piece of foam or cardboard for? 4 hours.
80. After this time, make up your eyes with the light blue pen.
81. Then, with the dark blue pen, outline the iris.
82. Fill them with blue chlorine cane.
83. With the straightforward hydrographic pen, smudge your eyes.
84. Deiina the upper part of the eyes and brush the eyelashes with the black pen.
85. Enjoy and compose your pupils.
86. Use the white pen to brighten your eyes.
87. Smudge your cheeks with pink lipstick.
88. A and B With the orange pen, define the eyebrows. Release and compose the freckles.
89. Paint your lips with the pink pen.
90. Die the piece to dry for five days to handle.
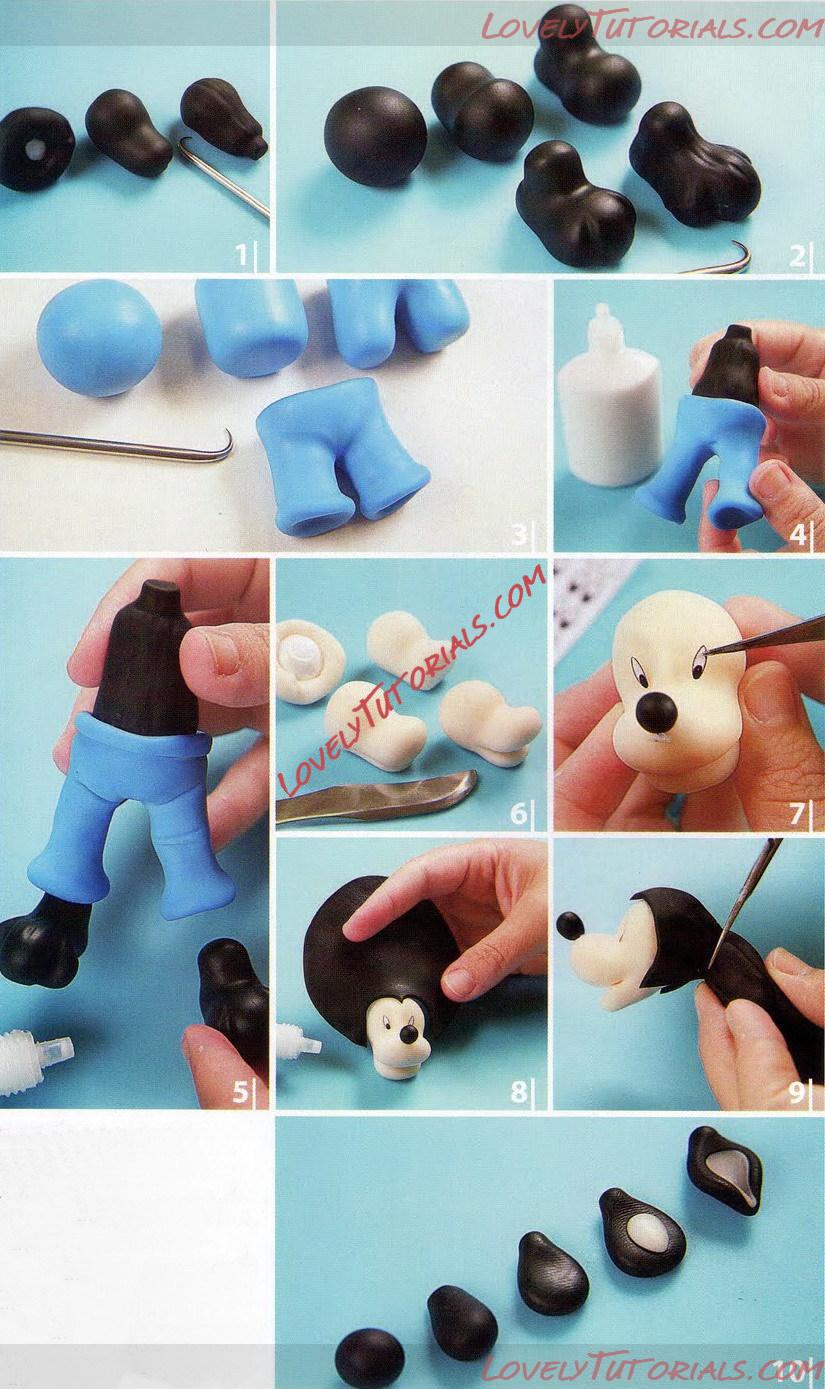
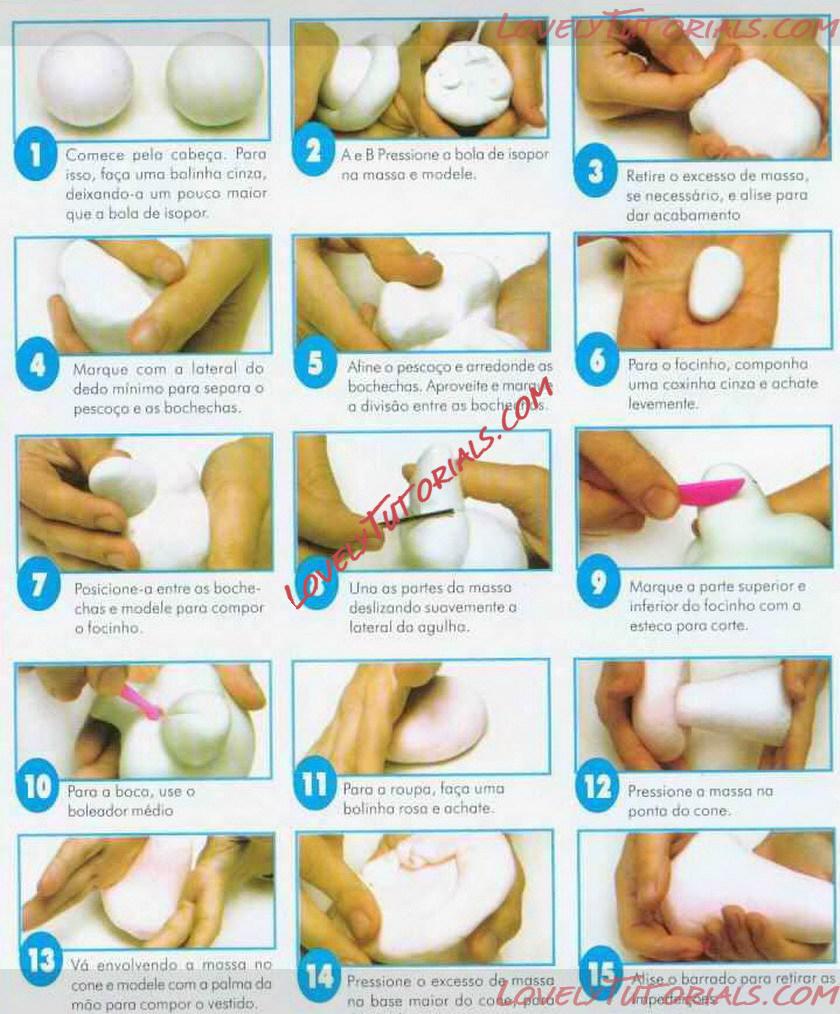 1. Start with cobeça Poro isso, make a little gray ball, making it a little bigger than the Styrofoam candy.
2. A and B Press the Styrofoam cake into the dough and shape.
3. Remove excess weight. if necessary, smooth it out to finish.
4. Mark with the side of the little finger to separate the neck and cheeks.
5. Tighten the neck and round the cheeks. Enjoy and maraye the division between boche
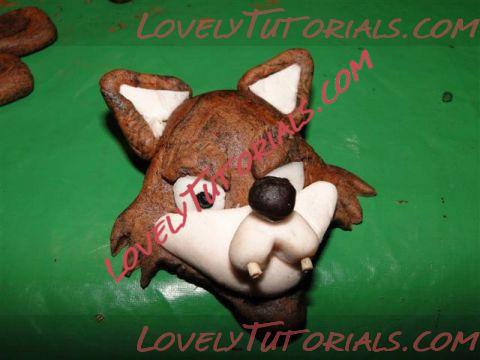
6. For the muzzle, compose a gray drumstick and flatten it slightly.
7. Position it between the mouthwash and shape to form the snout.
8. Join the gates of the dough by gently sliding the side of the needle.
9. Mark the top and bottom of the muzzle with the cut portion.
10. Pore the mouth, use the medium cake maker.
11. For clothes, tie a pink ball and flatten.
12. Press the dough into the cone point.
13. Wrap the dough in the cone and shape with the palm of your hand to compose the dress.
14. Press the excess dent on the larger base of the pose
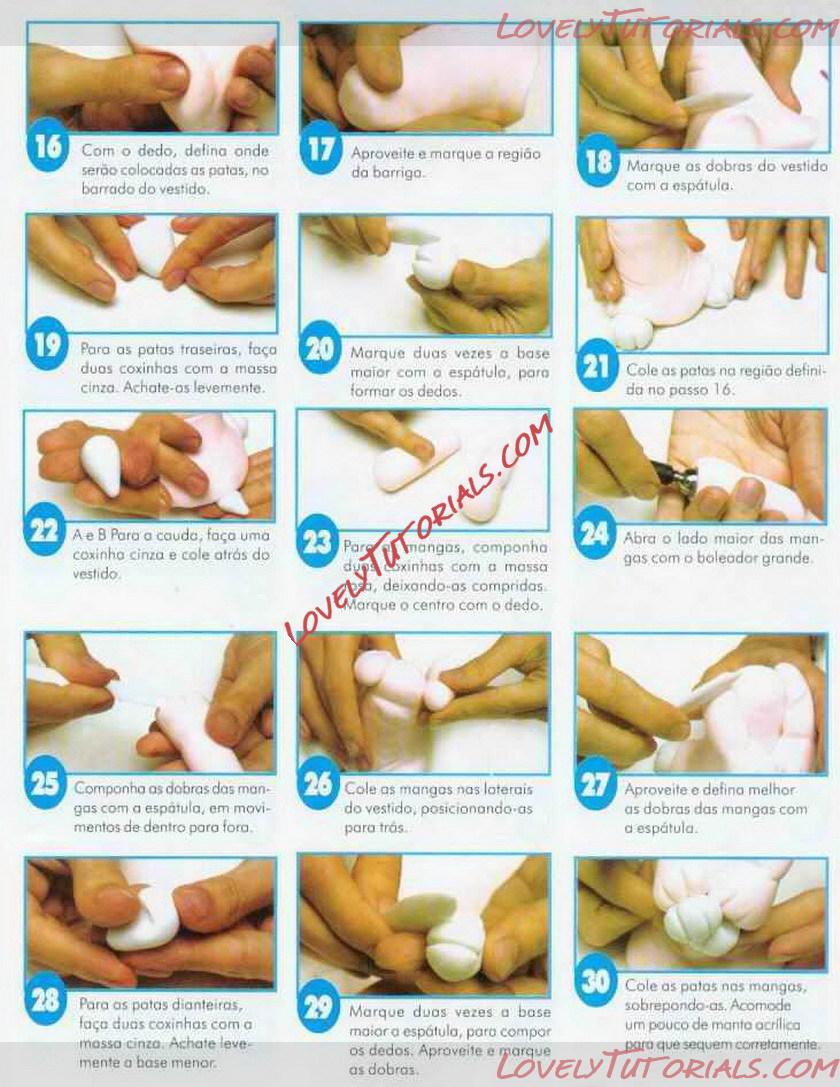 16. With your finger, define where the paws will be placed on the hem of the dress.
17. Enjoy and book the borrigo region.
18. Mark the folds of the dress with the spatula.
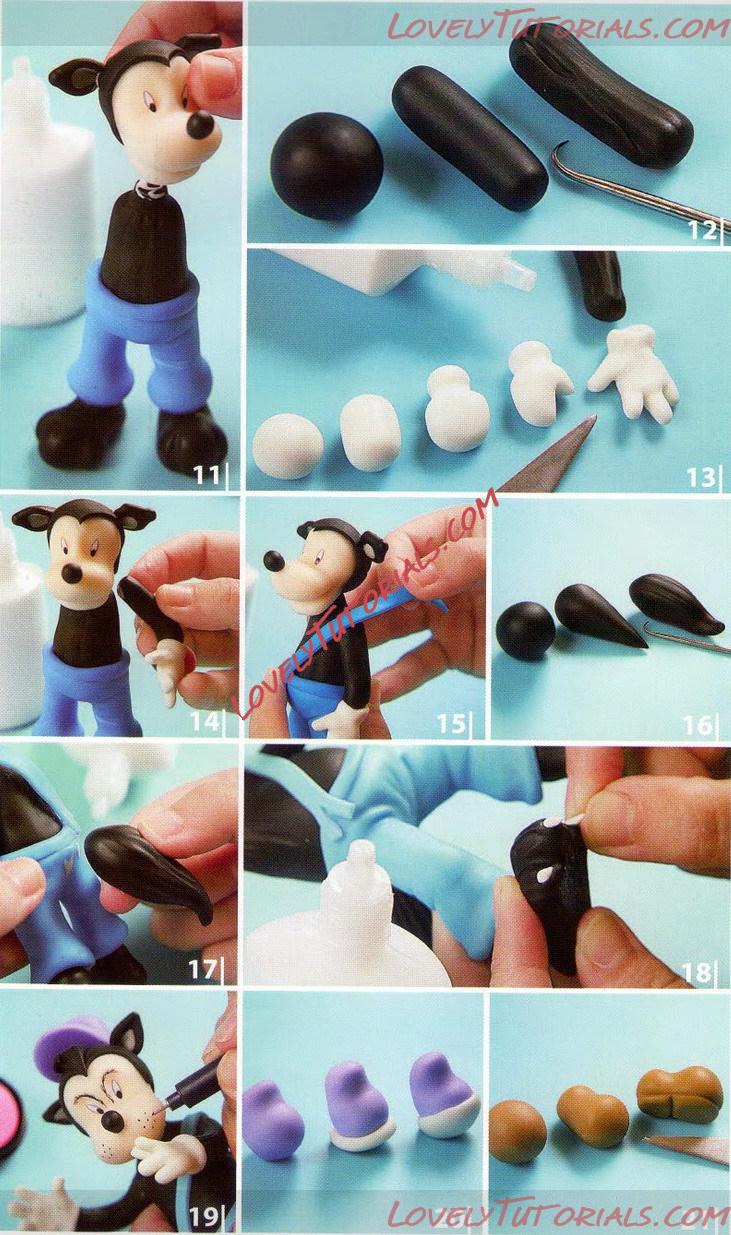
19. Stop the back ducks, make two legs with the gray dough. Flatten them slightly.
20. Mark the larger base twice with the spatula, so that fingers are formed.
21. Glue your paws to the region defined in step 16.
22. A and B For the tail, I draw a gray leg and stick it behind the dress.
23. I stop sleeves. compose coxinnas duos with the dough leaving them long. Mark the center with your finger.
24. Open the long side of the sleeves with the large ballet.
25. I compose the sleeves with the spatula, in movements from the inside out.
26. Glue the sleeves to the sides of the dress, positioning them backwards.
27. Enjoy and better define the folds of the sleeves with the spatula.
28. For the front ducks, tie two coxinhos with the gray dent. Flatten the smaller base slightly.
29. Mark the large base twice, to make the fingers. Enjoy and mark the doubles.
30. Glue legs on sleeves, overlapping. Accommodate a little acrylic mantle so that they dry properly.
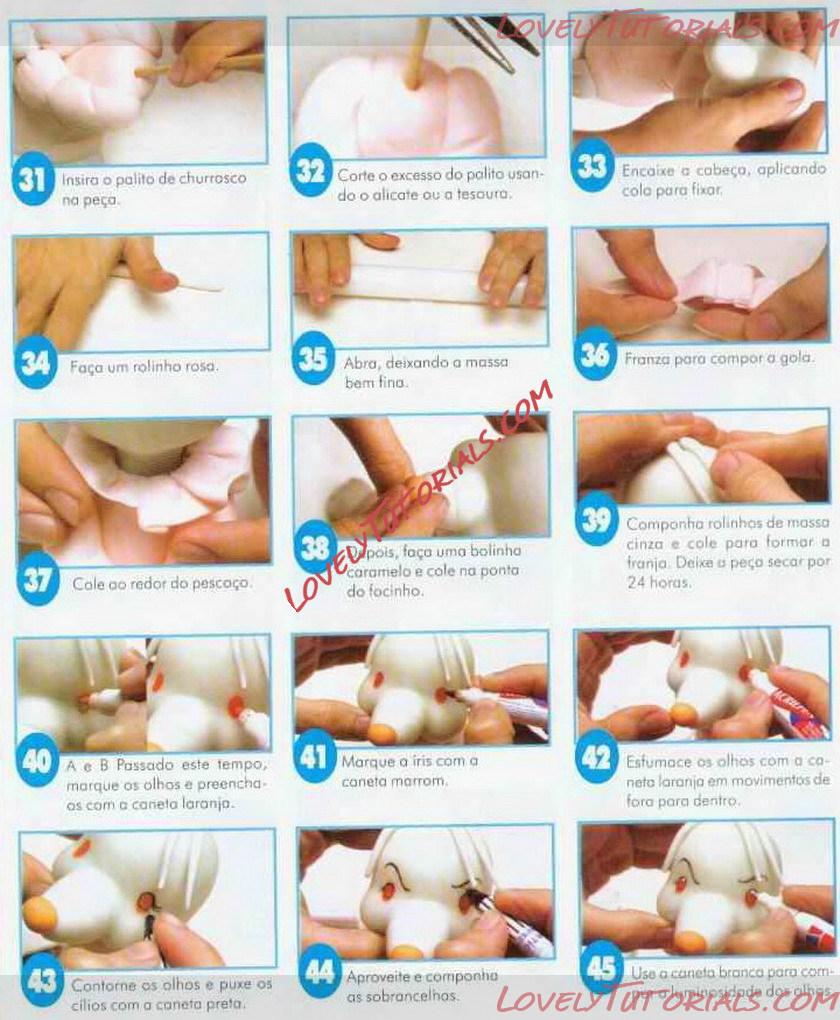 31. Insert the churrosco toothpick into the piece.
32. Cut off excess toothpick using pliers or scissors.
33. Fit with head, applying neck to fix.
34. Make a pink roll.
35. Open, leaving the dough very thin.
36. Purse pore to compose the collar.
37. Glue it around the neck.
38. Then, make a caramel ball and stick it on the tip of the snout.
39. Compose gray dough rolls and glue to form the fringe. Allow the well to dry for 24 hours.
40. A and B After this time, mark the eyes and fill them with the large pen.
41. Mark the iris with the brown pen.
42. Smoke the eyes with the orange connection in the form of outward movements.
43. Contour your eyes and pull your lashes with the black connector.
44. Enjoy and compose eyebrows.
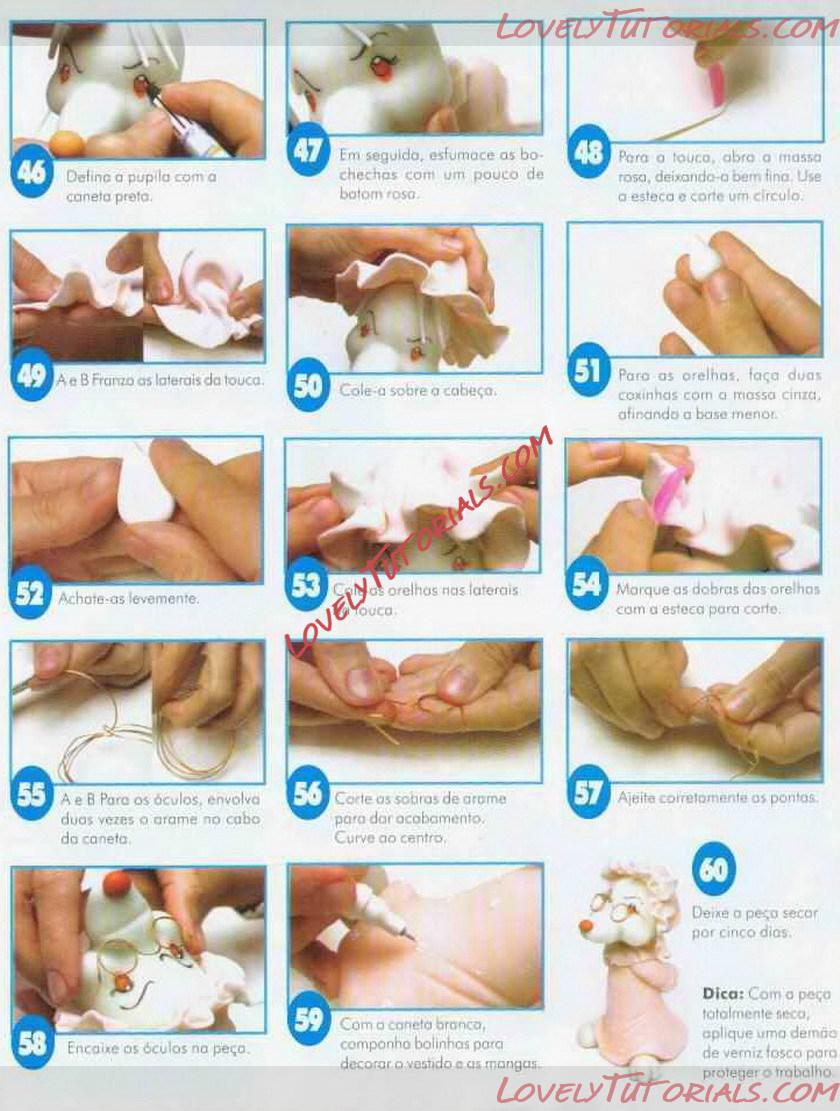 46. ââOutlines the pupil with the black pen.
47. Then smudge your cheeks with a little pink lipstick.
48. Pore the cap, I open the pink mass, leaving it very thin. Use the stock and cut a circle.
49. A and B Franzo the sides of the cap.
50. Glue it over the head.
51. Stop the ears, make two drumsticks with the circular mass, tapering the smaller base.
52. Squeeze them lightly.
53. Glue the ears to the sides of the husk.
54. Mark the folds of the ears with the cutting head.
55. A and B Stop the glasses, wrap the wire twice in the pen handle.
56. Give up the leftovers of arome to give the cover. Curve to the center.
57. Fix the stitches together.
58. Attach the glasses to the piece.
59. I use cookies to decorate the dress or the sleeves.
60. Leave the dryer for five days.
|
19.10.2011, 16:56
|
|
ÐÐīОÐļÐ―ÐļŅŅŅаŅÐūŅ
|
|
Ð ÐĩÐģÐļŅŅŅаŅÐļŅ: 07.09.2010
ÐĄÐūÐūÐąŅÐĩÐ―ÐļÐđ: 7,669
|
|
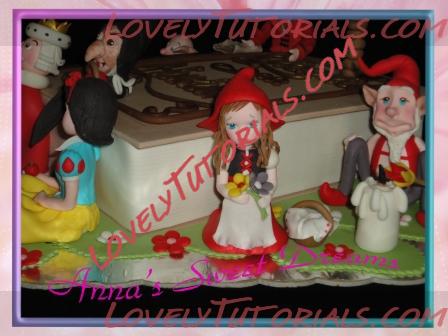
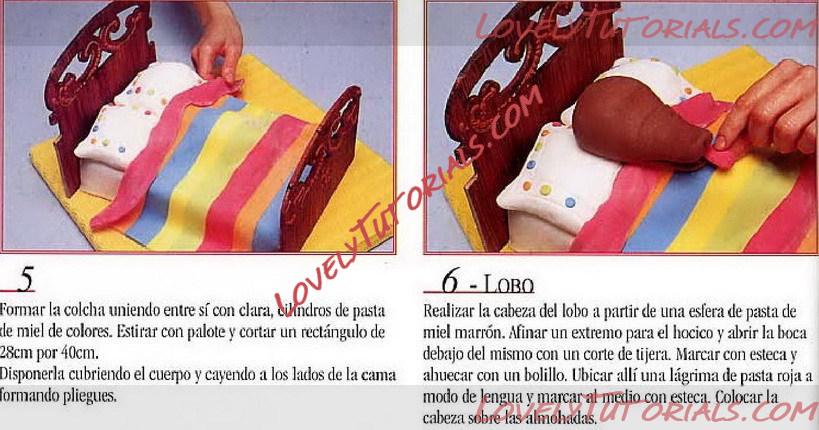
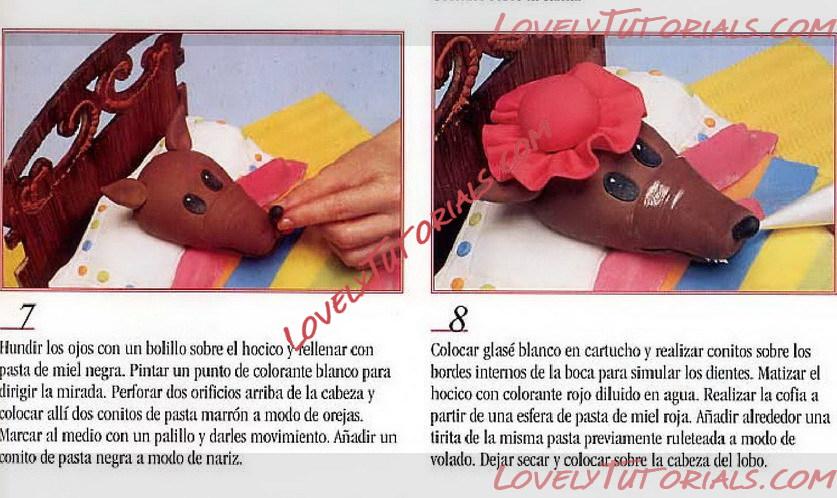
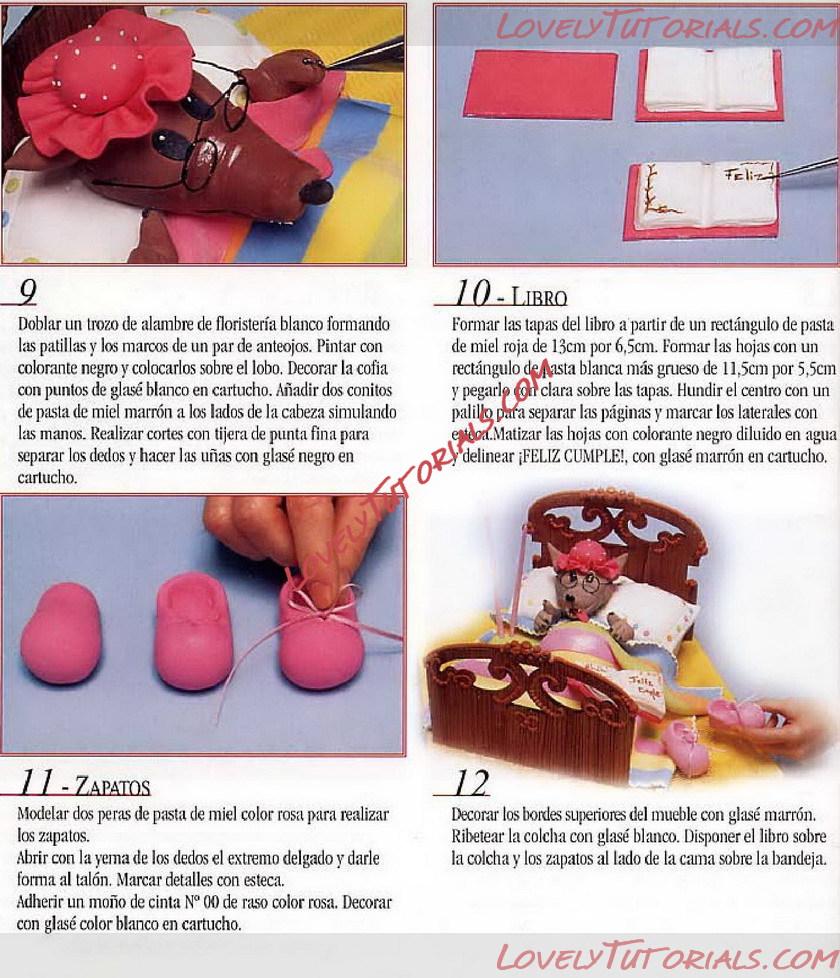
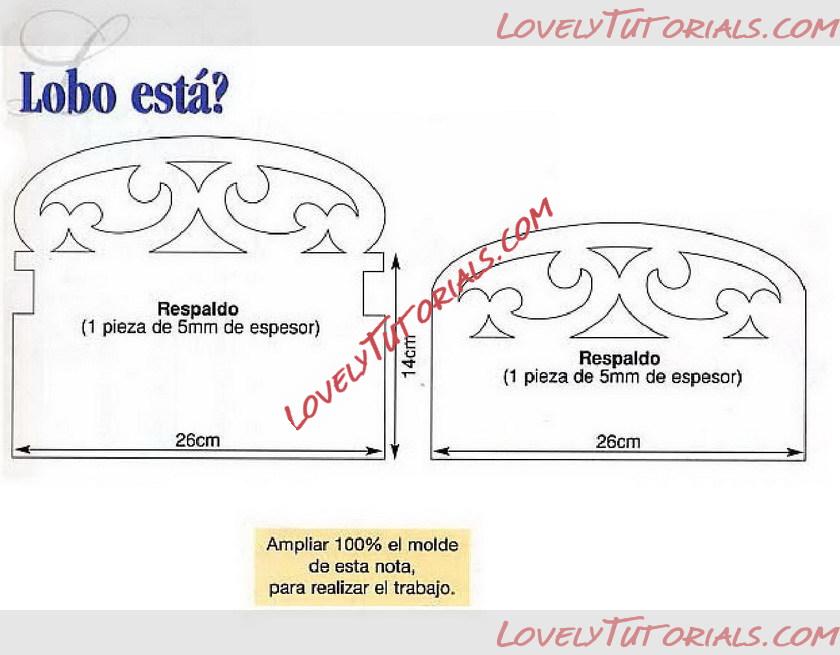
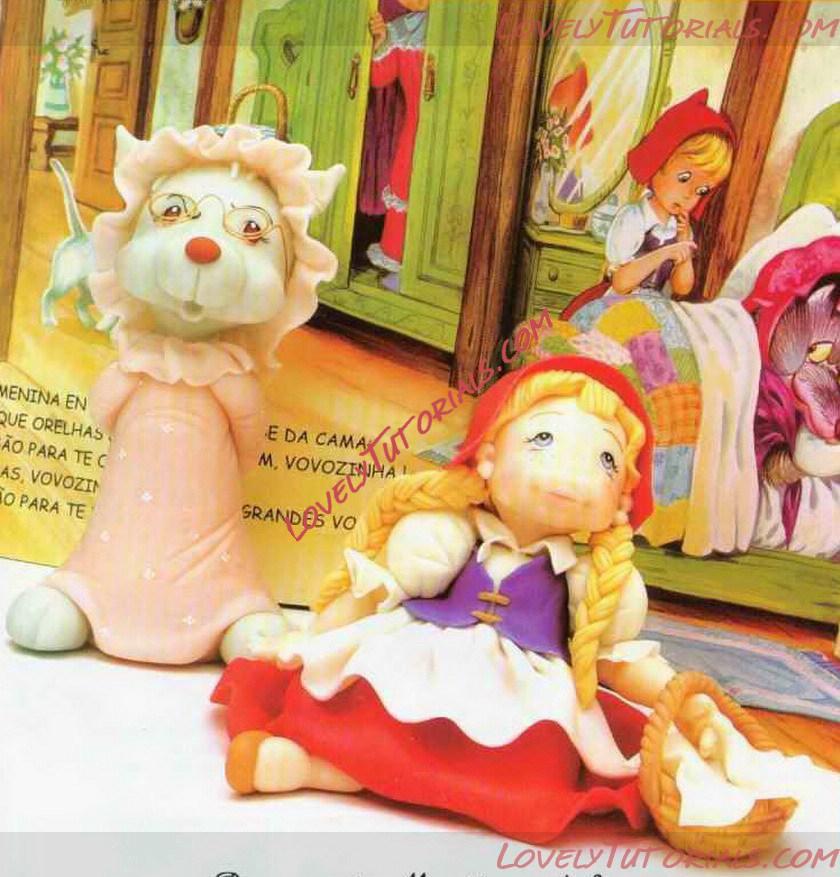
Little Red Cap and Wolf Figure Making Step By Step.
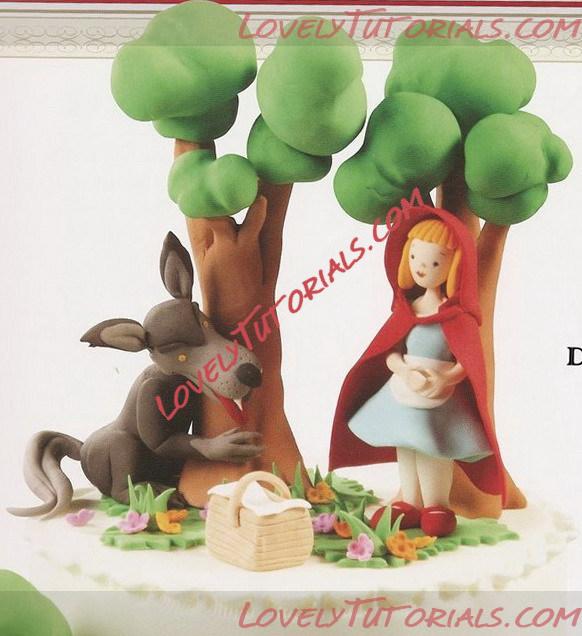
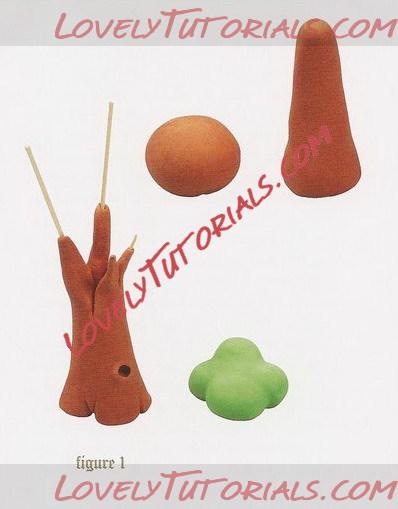
Figure 1.
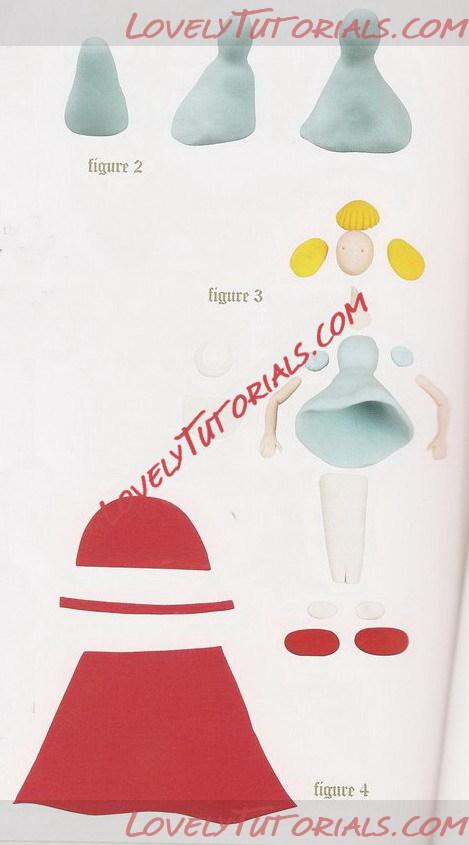
Figure 2.

Figure 3.
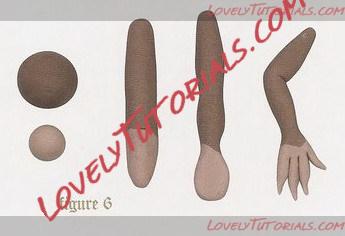
Figure 4.

Figure 5.
|
07.11.2011, 11:03
|
|
ÐÐīОÐļÐ―ÐļŅŅŅаŅÐūŅ
|
|
Ð ÐĩÐģÐļŅŅŅаŅÐļŅ: 07.09.2010
ÐĄÐūÐūÐąŅÐĩÐ―ÐļÐđ: 7,669
|
|
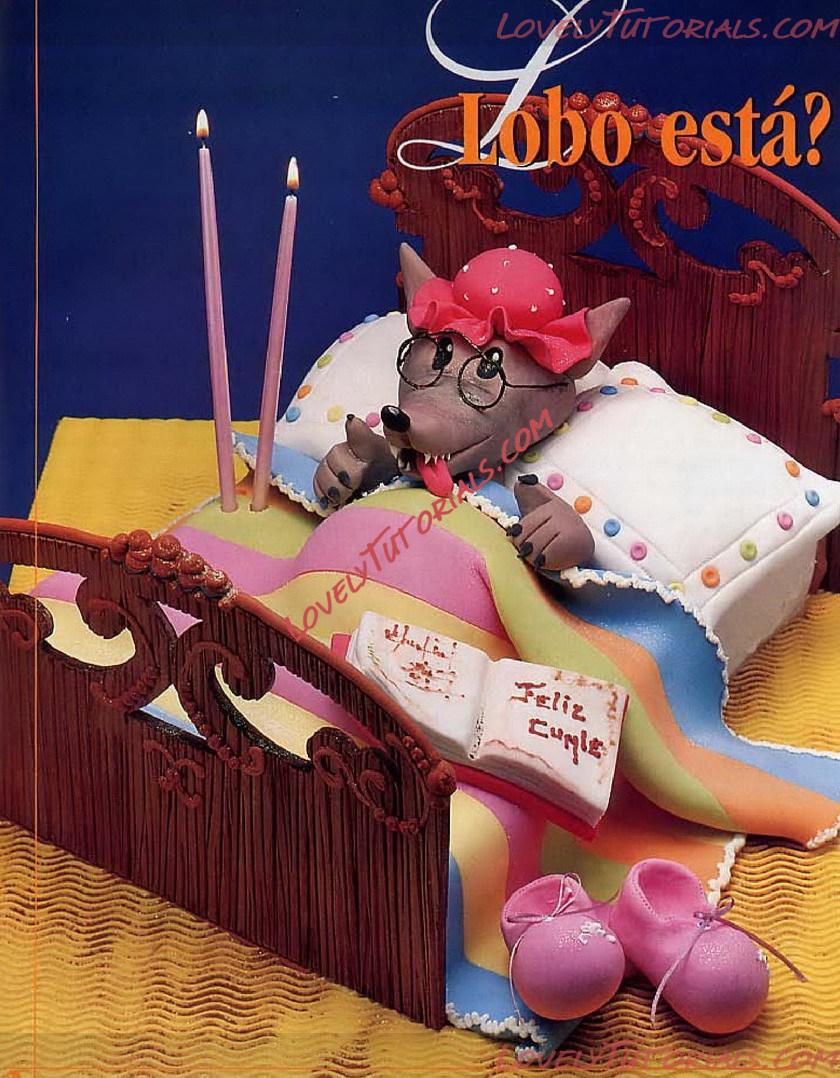
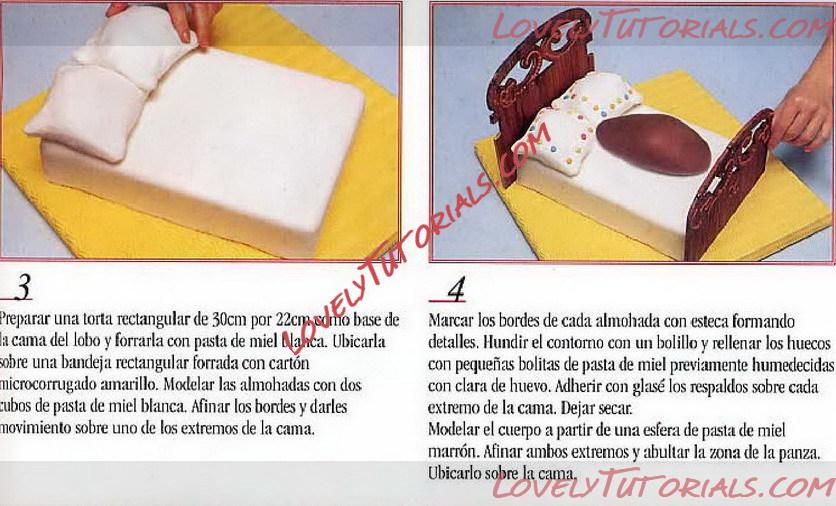
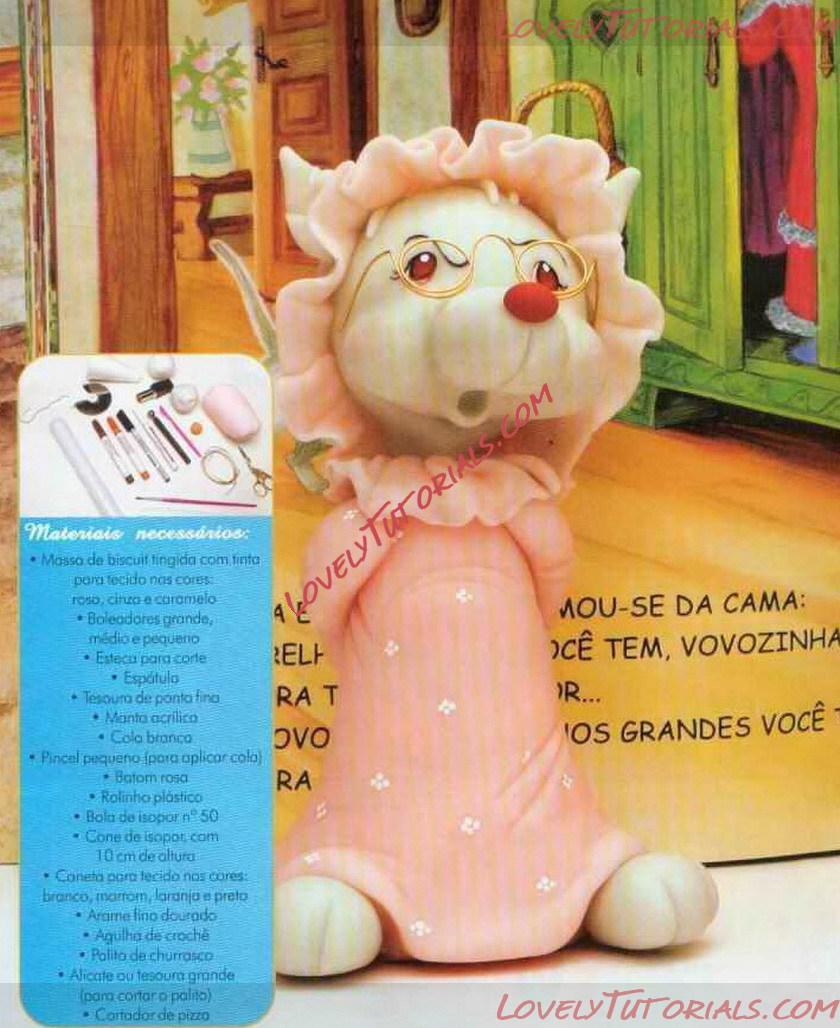
Wolf In Bed Dressed As A Grandmother | ÐÐūÐŧК Ðē ÐŋÐūŅŅÐĩÐŧÐļ ÐūÐīÐĩŅŅÐđ КаК ÐąÐ°ÐąŅŅКа
|
08.10.2012, 19:18
|
|
ÐÐīОÐļÐ―ÐļŅŅŅаŅÐūŅ
|
|
Ð ÐĩÐģÐļŅŅŅаŅÐļŅ: 07.09.2010
ÐĄÐūÐūÐąŅÐĩÐ―ÐļÐđ: 7,669
|
|
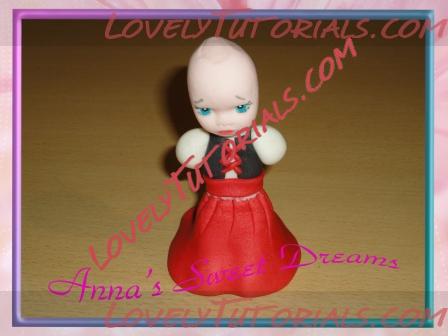
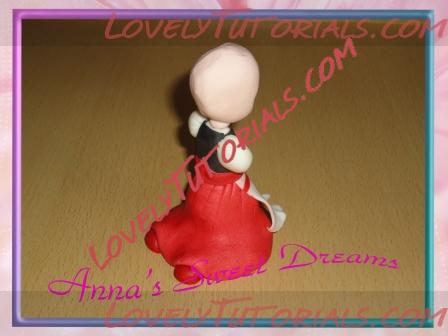
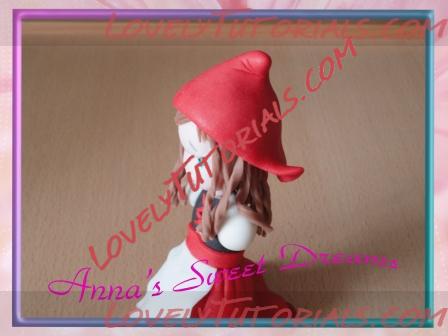
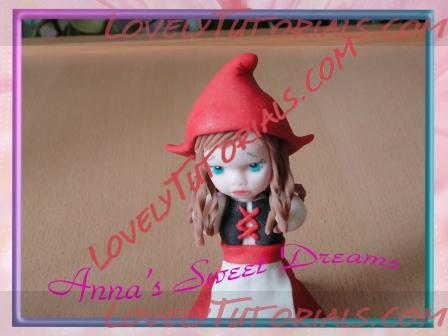
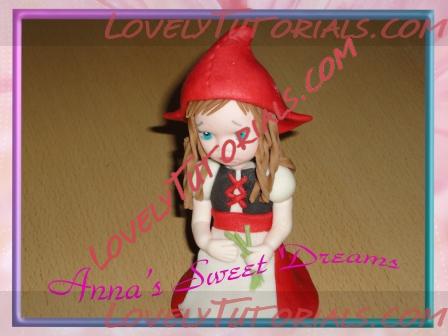
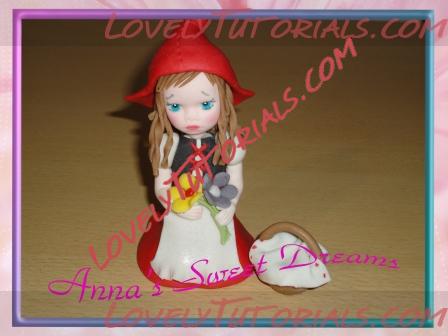
Baby Red Cap Figure Sculpting Tutorial
ÐÐģŅÐūÐžÐ―Ð°Ņ ÐąÐŧаÐģÐūÐīаŅÐ―ÐūŅŅŅ ÐÐēŅÐūŅŅ за ÐаŅŅÐĩŅ-КÐŧаŅŅ
Materials
Porcelain
Bleaching liquid
Scissors
Fine-tipped black fiber
Esteca brush and blush
Bobbins: large and small
Ruletero
Vindic tail
Wooden stick
Baby Face Mold
Cornstarch
Half sphere of telgopor N 5
Telgopor sphere N 3
Red vegetable coloring
Round cutters of 2 sizes
Acrylics: leather, light blue, beige yellow, black white and green
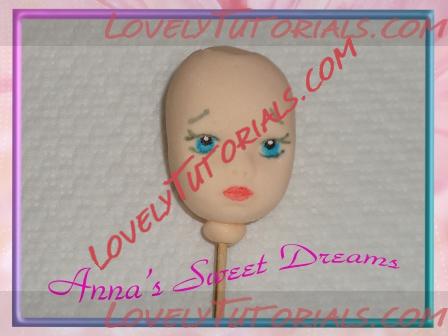
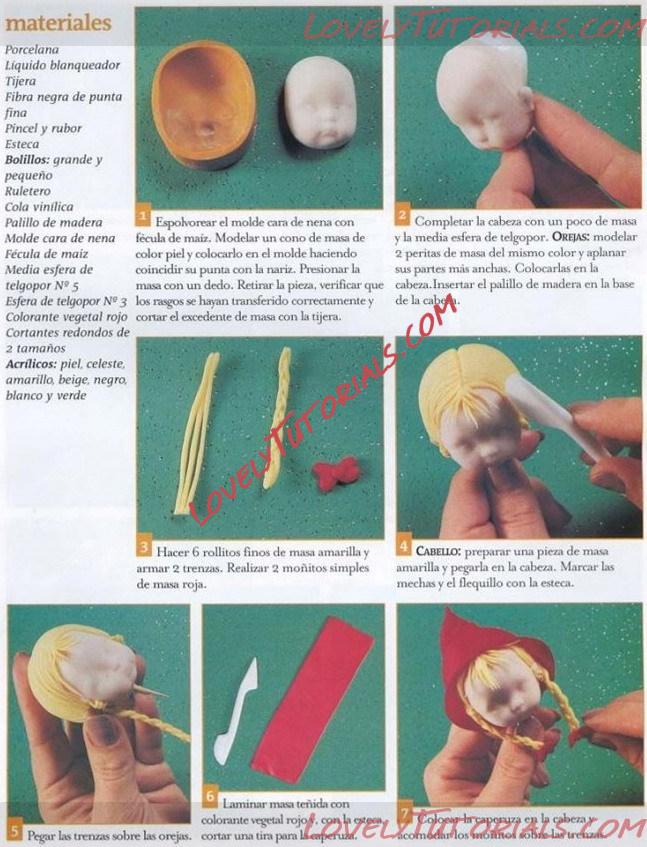 1. By matching its tip with the nose. Press the dough with one finger. Remove the piece, verify that the features have been transferred correctly and cut the excess dough with the scissors.
2. Complete the head with a little dough and the half sphere of telgopor. EARS! model 2 dough rods of the same color and flatten their widest parts Âŧ. Place them on the head. Insert the wooden chicken into the base of the head.
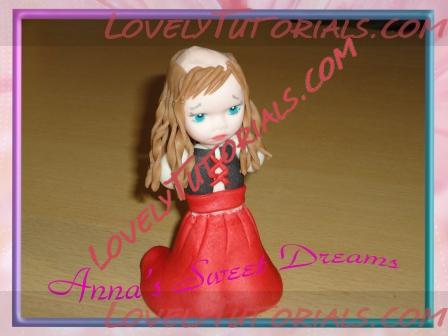
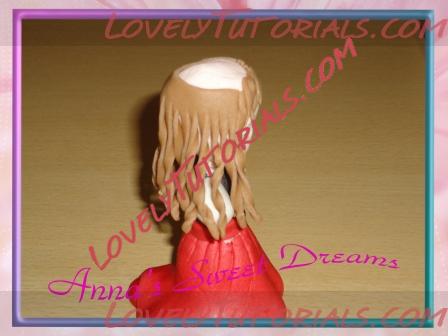
3. Make 6 thin rolls of yellow dough and assemble 2 braids. Perform 2 simple monkeys of red mass.
4. Hair: prepare a piece of yellow dough and stick it on the head. Mark the wicks and bangs with the mat.
5. Paste the braids over the ears.
6. Laminate dyed dough with red vegetable dye with the cut a strip for the hint.
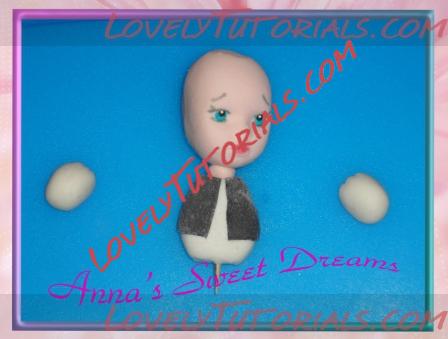
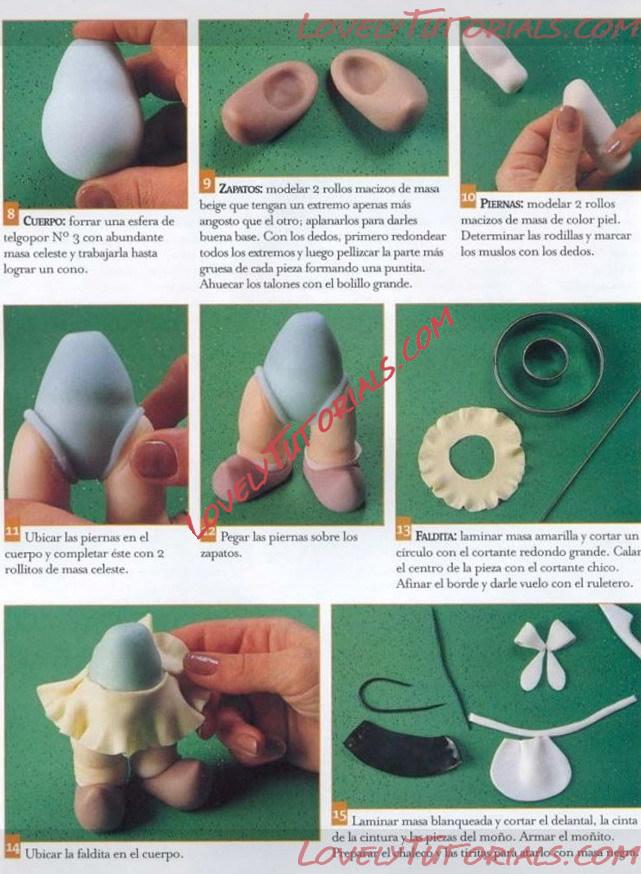 8. Body: line a sphere of telgopor N ° 3 with abundant celestial mass and work it until a cone is achieved.
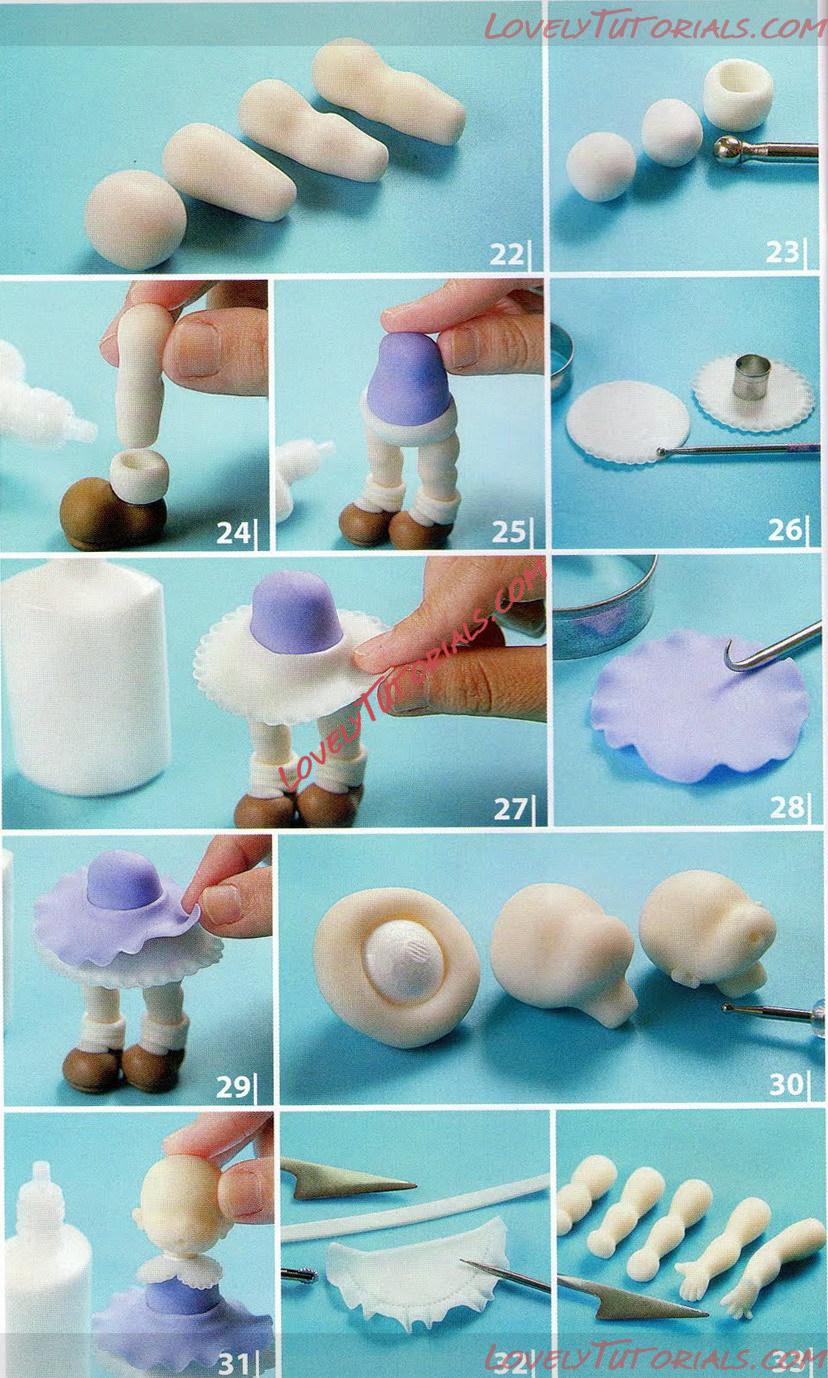
9. Shoes: model 2 solid rolls of beige dough that have one end just narrower than the other; flatten them to give them a good foundation. With the fingers, first round all the ends and then pezzzizear the thickest part of each piece forming a tip. Cup the heels with the large bobbin.
8. Body: line a sphere of telgopor N ° 3 with abundant celestial mass and work it until a cone is achieved.
9. Shoes: model 2 solid rolls of beige dough that have one end just narrower than the other; flatten them to give them a good foundation. With the fingers, first round all the ends and then pezzzizear the thickest part of each piece forming a tip. Cup the heels with the large bobbin.
10. LEGS! Model 2 solid rolls of skin-colored dough. Determine the knees and mark the thighs with the fingers.
11. Locate your legs in the body and complete this with 2 rolls of celestial dough.
12. Glue the legs on the shoes.
13. Skirt: laminate yellow dough and cut a circle with the large round cutter. Calar the center of the piece with the sharp boy. Tighten the edge and give flight with the wheel.
14. Locate the skirt in the body.
15. Laminate bleached dough and cut the apron, waistband and bun pieces. Assemble the bun.
16. Fit the apron over the skirt and glue the back bun.
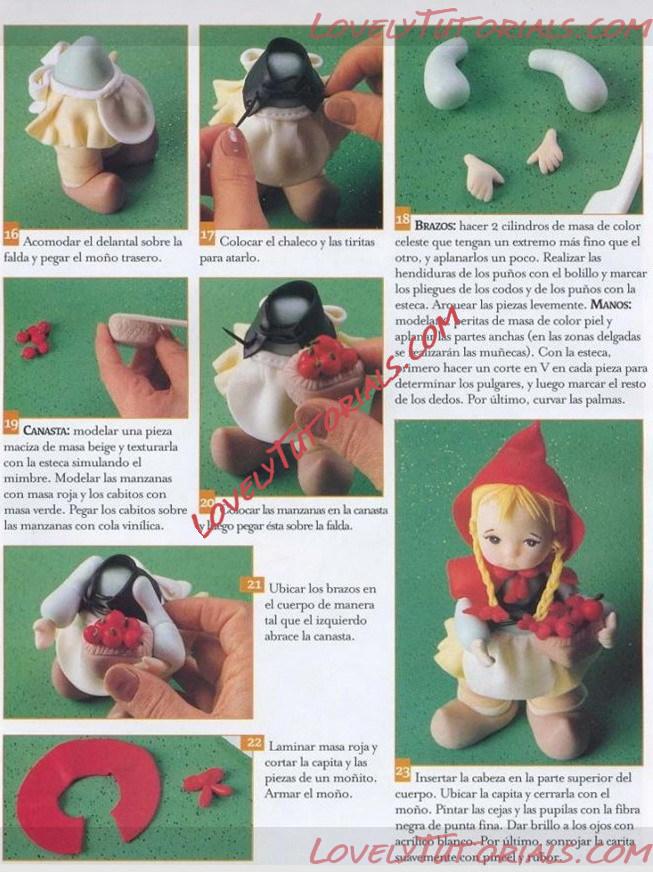
17. Put on vest and strips stop atario.
18. ARMS: make 2 cylinders of light blue mass that have one end thinner than the other, and flatten them a little. Make the clefts of the fists with the bobbin and mark the folds of the elbows and the fists with the stake. Stir the pieces slightly. HANDS: model skin colored dough peritas and flatten the wide parts (in the thin areas the wrists). With the stake, first make a V-cut on each piece to determine the Âŧthumbs, and then mark the rest of the fingers. Finally, bend your palms.
19. Basket: model a solid piece of beige dough and texture with the stake simulating the wicker. Model apples with red dough and cabitos with green dough. Glue the cakes on the apples with vindic glue.
20 Place the apples in the basket and then paste it on the skirt.
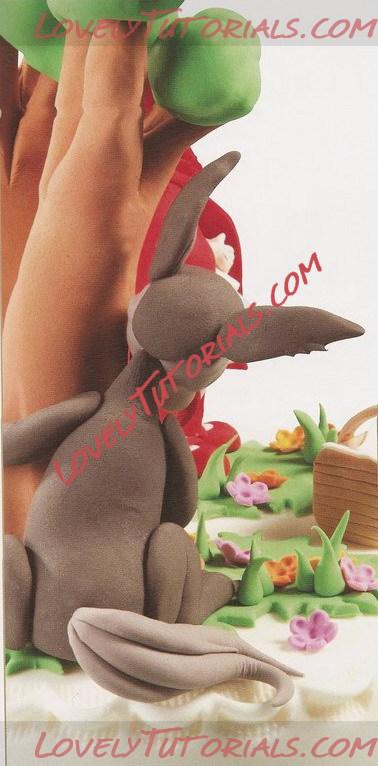
21 Position the arms on the body so that the left one hugs the basket.
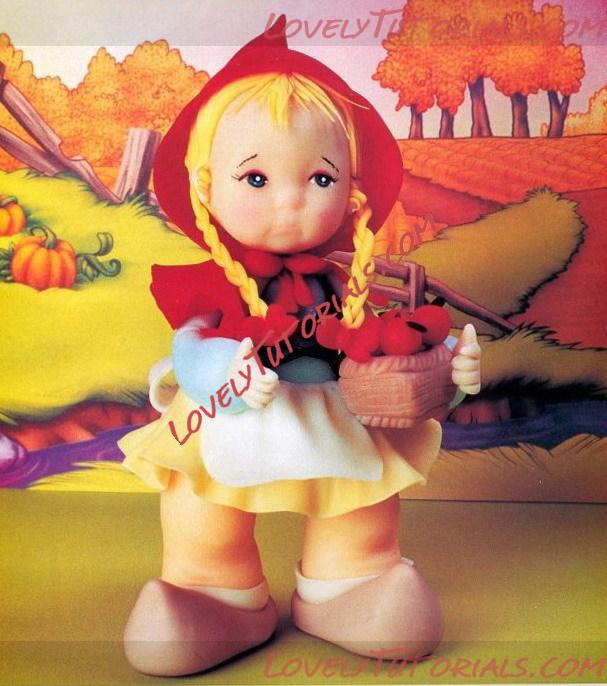
22 Laminate red dough and cut the capita and the pieces of a bun. Assemble the bun.
23. Insert the head into the upper body. Locate the capita and close it with the bun. Paint the eyebrows and pupils with the fine-tipped black fiber. Brighten the eyes with white acrylic. Finally blush the face gently with pin the blush.
|
17.01.2013, 18:19
|
|
ÐÐīОÐļÐ―ÐļŅŅŅаŅÐūŅ
|
|
Ð ÐĩÐģÐļŅŅŅаŅÐļŅ: 07.09.2010
ÐĄÐūÐūÐąŅÐĩÐ―ÐļÐđ: 7,669
|
|
|
 |
|
|
ÐÐĩŅКÐļ
|
3d figures, addÄąm-addÄąm tÉlimat, adÄąm, adÄąm adÄąm yÃķnergeler, artesanatos passo a passo, bed, bemutatÃģ, bett, big bad wolf, birthday cake, birthday cakes, biscuit, bolando bolos, bolos decorados, bÞyÞ, cake decorating, cake decorating techniques, cake topper, cake toppers, cake tops, cakes for kids, cama, caperucita roja, cappuccetto rosso, capuchinho vermelho, cerÃĒmica plÃĄstica, chapeuzinho vermelho, character figures, chica, children's cake, cold porcelain, confeitando bolos, curso de modelado, cКазКа, decoracion de pasteles, decoraciÃģn de tortas, decorada en fondant, decorare le torte, decorazioni, deko fondant, dekorace na dort, dekoracija, dekoracije, dekorasyon, dekorÃĄcie, den lille rÃļdhÃĶtte, dievÄa, div, dorty narozeninovÃĐ, dÃvka, dÄtskÃĐ dorty, especializada em modelagem de biscuit, fairy tail, fairy tale, female, fender, figur kager, figuras, figure making tutorials, figuren, figures, figurice, figurice od fondana, figurine on the cake, figurines, figurinhas, figurky, figÚrky, figÞr modelleme, fillette, fimo, fixando a cabencinha, flower paste, fondan, fondant, fondente, fondente di zucchero, fotopostup, foundant, geburtstagstorte, girl, gum pasta, gum paste, gumpaste, hand-made, handmade, how to, how-to's, instrucÅĢiuni, instrukcijas, instrukcje, jak na, jente, kage dekoration, kagedekoration, kakebaking, kindergeburtstag, korak, korak za korakom navodila, korak-po-korak upute, koristeet ja koristelu, krevet, krok, krok po kroku, krok za krokem, krok-za-krokem, kÄąrmÄązÄą baÅlÄąklÄą kÄąz, kÄąz, la magie, la modÃĐlisation, las instrucciones, las tÃĐcnicas, le petit chaperon rouge, le tecniche, les techniques, letto, lit, little red cap, little red cap characters tutorials, little red riding hood, little red riding hood cake, lova, lÅŊÅūko, magi, magia, magic, magie, marcipanovÃĐ figurky, marshmallow, marsipanfigurer, masa flexible, master-class, master-klasse, master-klasy, meisje, meistras klasÄs, menina, metodikas, milagre, milagro, miracolo, mirakel, mistr tÅÃdy, modelado, modelagem, modelando a barriga, modelando a cabencinha, modelando a perninha, modelando as maozinhas, modelando o cabelinho, modelando o corpinho, modelando os bracinhos, modelando os pezinhos, modelare, modelerte figurer, modeling, modeling paste, modeliranje, modellazione, modelleme, modellering, modellieren, modellierpaste, modelling, modelling past, modellÉÅdirmÉ, modelovanie, modelovÃĄnÃ, modelowanie, motivtorten, mucize, mÃĄgie, mÃĪdchen, mÃķcÞzÉ, nÃĄvod, opplÃĶringen, orelhas, ozdoby, pamoka, pap, pas, pas-cu-pas, paso, paso a paso, passo, passo a passo, passo-a-passo, passo-passo le istruzioni, pasta de goma, pasta de miel, pasta flexible, pasta laminada, pat, pige, pintura dos olhos, pocelana fria, polymer clay, posteÄū, postupak za ukrasavanje, pravljenje figurica za torte, pÅedmÄty z marcipÃĄnu, qÄąz, ragazza, red hot riding hood, roodkapje, rotkÃĪppchen, schritt fÞr schritt anleitung, schritt-fÞr-schritt, schritt-fÞr-schritt-anleitungen, scufiÅĢa roÅie, sculpting, seng, soggetti, souvenirs, stap, stap-voor-stap, stap-voor-stap instructies, steg for steg, steg-fÃķr-steg-instruktion, step, step by step, step-by-lÃĐpÃĐsre, step-by-step, step-by-step instructions, styrofoam, sugarcraft, sugarpaste, sÃĪng, technieken, techniken, techniki, techniky, technikÃĄk, techniques, tecnicas de decoracion, tecniche, tehnici, tehnike, teknikker, teknikler, telgopor, topo de bolo, topo do bolo, topos de bolo, torte, torte decorate, torten dekorieren, torti, trin, trin for trin, trin-for-trin, trin-for-trin instruktioner, trinn, trinn for trinn, trinn-for-trinn-instruksjoner, tutorial, tutoriale, tutorias, tutorias/ideas para decorar los bizcochos, tutoriel, tutorijal, tÃĐcnicas, ukraÅĄavanje torti, uputstvo za dekoraciju, vuode, wunder, yatak, zuckerfigÞrchen, zÃĄzrak, āĪļāĪāĪū āĪāĨāĪ, āĪāĨāĪŊāĨāĪāĨāĪ°āĪŋāĪŊāĪē āĪŪāĪūāĪļāĨāĪāĪ° āĪĩāĪ°āĨāĪ, āĪāĪĶāĪŪ, āĪāĪĶāĪŪ āĪĶāĪ° āĪāĪĶāĪŪ āĪĻāĪŋāĪ°āĨāĪĶāĨāĪķ, āĪĪāĪāĪĻāĨāĪ, āĪŪāĨāĪĄāĪēāĪŋāĪāĪ, ãĒããŦ, ÃĄgy, çocuk & bebek pastalarÄą, ÃĐtape, ÃĐtape par ÃĐtape les instructions, ÃķÄretici, ÄervenÃĄ karkulka, Åūingsnis, Åūingsnis po Åūingsnio, ÅÃģÅžko, åŪåļŦįīæįĻïžäļæĨïžäļæĨäļæĨįæįĪšïŋ ― ïŋ―æčĄïžudÅūbenik, åŧšæĻĄ, čĢéĢūčįģ, čĩĪããã, ΚÏÎĩÎēÎŽÏÎđ, ÎēÎŪΞι, ÎēÎŪΞι ÏÏÎŋÏ ÎēÎŪΞι ÎŋÎīηÎģÎŊÎĩÏ, ÎŋÎīηÎģÎŊÎĩÏ ÎēÎŪΞι ÎēÎŪΞι, ÏÎąÎ―ÏÎĩÏÏÎŽÎ―Îđ art, ÏÎĩÏÎ―ÎđΚÎÏ, ÏÏÎŋÎ―ÏÎđÏÏÎŪÏÎđÎŋ, ÐīÐĩÐ―Ņ ŅÐūÐķÐīÐĩÐ―ÐļŅ, ÐīÐĩÐēÐūŅКа, ÐīÐĩŅКÐļÐĩ ŅÐūŅŅŅ, ÐīзŅŅŅŅÐ―ÐšÐ°, ÐīŅÐēŅÐļÐ―ÐšÐ°, ÐļÐ―ŅŅŅŅКŅÐļŅ, КаК ŅÐīÐĩÐŧаŅŅ, КаК ŅÐŧÐĩÐŋÐļŅŅ КŅаŅÐ―ŅŅ ŅаÐŋÐūŅКŅ, КŅÐūК за КŅÐūКÐūО, КŅÐūК за КŅÐūКаО, КŅÐūÐēаŅŅ, КŅаŅÐ―Ð°Ņ ŅаÐŋÐūŅКа, ÐēÐūÐŧК, ÐēÐūÐŧŅÐĩÐąŅŅÐēÐū, ÐŋÐūКŅÐūКÐūÐēÐū, ÐŋÐūÐŧÐļОÐĩŅÐ―Ð°Ņ ÐģÐŧÐļÐ―Ð°, ÐŋÐūŅаÐģÐūÐēÐū, ÐŋÐūŅаÐģÐūÐēŅÐĩ ŅÐūŅКÐļ, ÐŋаКŅÐūКаÐēа, ÐŋÐĩŅŅ Ðļ КŅаŅÐ―Ð°Ņ ŅаÐŋÐūŅКа, ÐŋŅÐū КŅаŅÐ―ŅŅ ŅаÐŋÐūŅКŅ, ОÐļÐ―ÐļаŅŅŅа, ОК, ОК ÐŧÐĩÐŋКа КŅаŅÐ―Ð°Ņ ŅаÐŋÐūŅКа, ОÐūÐīÐĩÐŧÐļŅÐ°Ð―Ðĩ, ОÐūОÐļŅÐĩ, ОаÐģÐļŅ, ОаÐđŅŅÐūŅ-КÐŧаŅа ŅŅÐūК, ОаÐđŅŅаŅ-КÐŧаŅ, ОаÐđŅŅÐĩŅ-КÐŧаŅ, ОаÐđŅŅÐĩŅ-КÐŧаŅÐļ, ОаŅŅОÐĩÐŧÐŧÐūŅ, ОаŅŅÐļКа, ОаŅŅÐĩŅ-КÐŧаŅŅ, ÐŧÐūÐķаК, ÐŧÐĩÐģÐŧÐū, ÐŧÐĩÐŋКа, ÐŧŅÐŋÐŧÐĩÐ―Ð―Ņ, ÐŧŅÐķКÐū, ŅŅŅÐ―ÐūÐđ ŅÐ°ÐąÐūŅŅ, ŅŅŅÐ―Ð°Ņ ŅÐ°ÐąÐūŅа, ŅКазКа, ŅКŅаŅÐĩÐ―ÐļÐĩ ŅÐūŅŅÐūÐē, ŅаŅ
аŅÐ―Ð°Ņ ОаŅŅÐļКа, ŅÐĩŅŅÐđ ÐēÐūÐŧК, ŅŅÐūКÐļ ÐŋŅÐļКŅаŅÐ°Ð―Ð―Ņ, ŅŅŅÐŋКа, ŅŅŅÐŋКа ÐŋÐū ŅŅŅÐŋКа ÐļÐ―ŅŅŅŅКŅÐļÐļ, ŅÐĩŅ
Ð―ÐļКÐļ, ŅÐĩŅ
Ð―ÐļКа, ŅÐĩŅ
Ð―ŅКа, ŅŅŅÐūŅÐļаÐŧ, ŅŅŅÐūŅŅаÐŧ, ŅŅŅ
Ð―ŅКа, ŅÐļÐģŅŅКÐļ, ŅÐļÐģŅŅКа Ð―Ð° ŅÐūŅŅ, ŅÐļОÐū, ŅŅÐģŅŅКÐļ, ŅŅÐģŅŅКŅ, Ņ
ÐūÐŧÐūÐīÐ―ŅÐđ ŅаŅŅÐūŅ, ŅŅÐī, ŅаŅŅÐēÐ―ÐļŅŅÐēÐū, ŅÐĩŅÐēÐūÐ―Ð° ŅаÐŋÐūŅКа, ŅÐĩŅÐēÐĩÐ―Ð°Ņа ŅаÐŋŅÐļŅа, ŅŅÐīÐū, ŅаÐģ за ŅаÐģÐūО, ŅÐ―ŅŅŅŅКŅŅŅ, ŅÐ―ŅŅŅŅКŅŅŅ  |
|