Огромная благодарность Автору lookatwhatimade за Мастер-класс
Dawn, I didn’t take step-by-step photos of this one, so you’ll have to bear with me. I will try to explain how I made this to the best of my abilities.
You are going to need fondant in yellow, white, greeny-turquoise and black (and a tiny dot of light brown). You will also need red royal icing for the trim on his jacket (or one of those little red icing tubes you buy in the supermarket).
Find a piece of transparent plastic to trace your jacket onto and PRINT OUT A PICTURE OF OSO’S FACE.

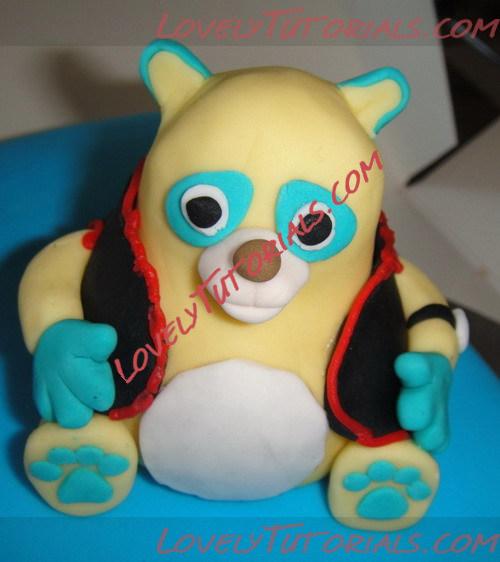
To start, take a ball of yellow fondant and gently push it into a snowman-y shape to form the body and the head. Roll two fat sausages for the legs. Shape the one end of each sausage into a paw and squish the other end flat. Attach the flat end to the side (bottom) of the body with a dab of royal icing or your glue of choice.
When you have done that, make two tiny yellow half-circles for the ears and fold them over. Don’t make them too thin as you want the ear nice and fat.
Now for the trimmings.
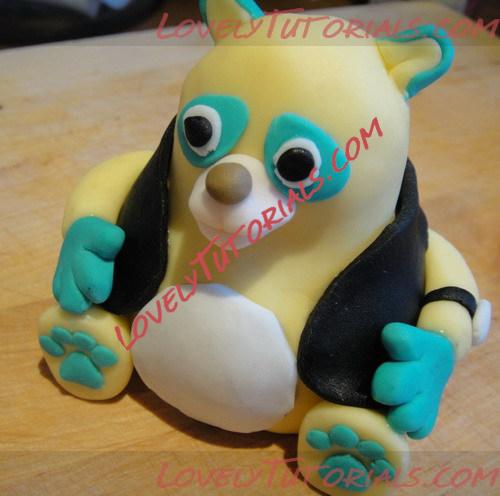
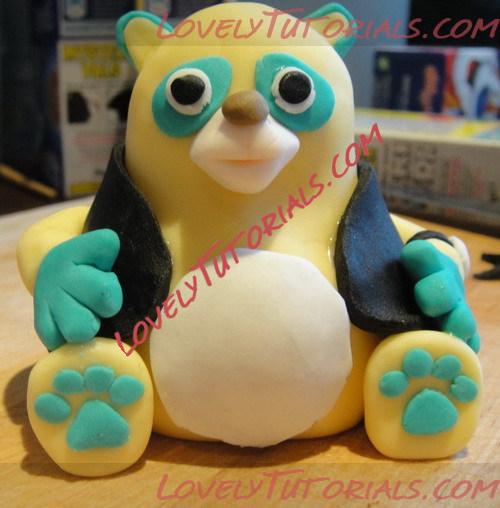
NOSE:
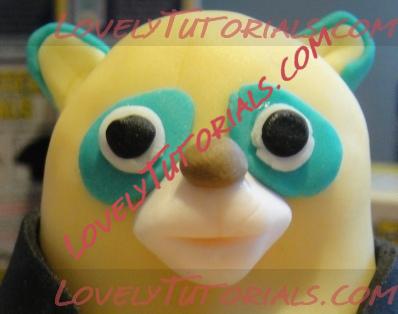
Take a piece of white fondant – I can’t tell you exactly how big, you’re going to have to guestimate – and roll it into a ball before shaping it into a rounded pyramid. This is easily done by placing the ball on a flat surface and squeezing it between the thumbs and index fingers of both hands. Apply more pressure to the tip to obtain a slightly rounded point. When you’re done, take a blunt knife and push it in just below the tip of the mouth/nose/snout (whatever you prefer to call it) to make a horizontal slit for the actual mouth. Use the same knife to make a slight vertical indent from the top “lip” to about halfway up the snout. Stick a tiny ball of fondant at the point where the vertical slit stops. Voila. Nose, mouth and snout

Stick this to Oso’s face.
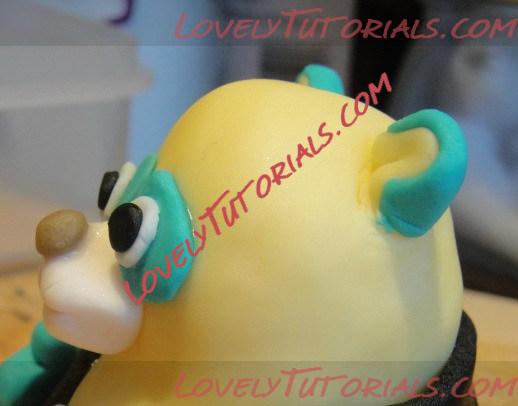
EARS: Now take some greeny-turquoise fondant and roll out two more half-circles. These need to be slightly bigger than the yellow ones as you want to wrap them around the back of the ears like in this photo.
EYES: To get the eyes just right, trace them from the picture (provided you’ve printed it out more or less as big as you are making your Oso) onto the transparency and then place the transparency on top of some thinly rolled-out greeny-turquoise fondant. Run your pen over the tracing of the eyes on the transparency so that an indented outline is formed in the fondant. Use a sharp knife to cut along the indent and stick the eyes to your face. (See photos of nose for placement)
Make two tiny white balls and two even tinier black balls. Place a black ball on top of a white ball and squish to form the insides of each eye. Stick on top of the turquoise as in photo.
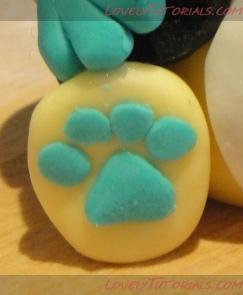
FEET: Make two tiny turquoise balls. Flatten them and shape each into a tiny rounded triangle to form the pads of Oso’s feet. Make 8 teeny-tiny balls and squish 4 on each paw as in the photo to complete the soles of his paws.
TUMMY: Roll out some white fondant quite thinly. Cut out a circle (you can see mine was quite rough) and stick it to the front of Oso’s belly.
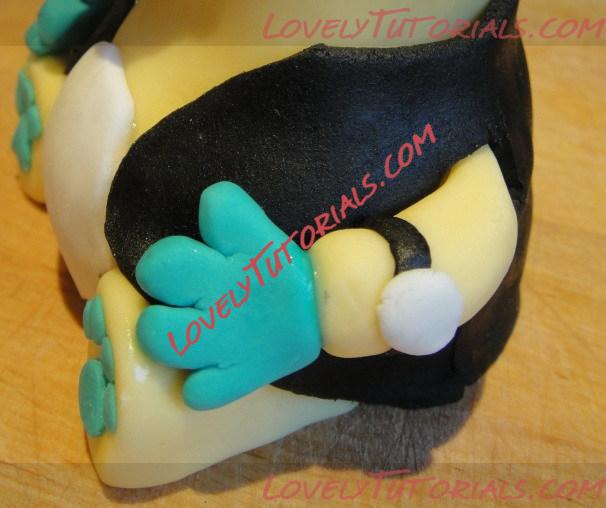
ARMS: Roll two yellow sausages (same as for the legs but thinner) and squish one side of each flat again. This is the side that will attach to the body. Make two hands out of turquoise fondant and keep them to one side. You will attach them to the arms after you have attached the arms to the body.
Make a tiny black watch strap for one of the arms and a squished white ball of fondant for the face of the watch. Now make your jacket first as you will need to attach this at the same time as the arms so that you can hide the spot where the arms join the body.
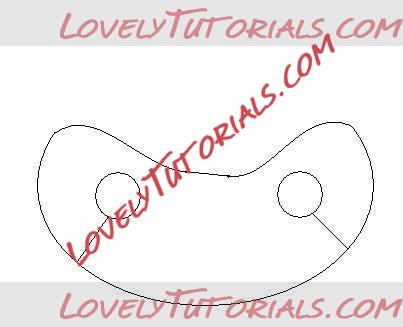
JACKET: This one is gonna be a bit tricky to explain…maybe…we’ll see. This very crude drawing is more or less the shape you will need to trace onto your rolled-out black fondant. You are going to need to scale it to your particular Oso. I measured the distance between where I wanted my armpits to be and went with that for size. The two lollipop-like thingies on either end are the seams and the arm-holes, so cut along the line, and around the circle to create the holes.
Right. Armed with your jacket, stick one arm onto your Oso. Move the wrist part of the arm away from the body slightly and drape the front of the jacket between the arm and the body. Place the arm back against the jacket and stick it down with royal icing if you wish. Now fold the rest of the jacket over the shoulder joint and around the back of Oso’s body. When you get to the hole on the other side, stick your other arm to the body at the shoulder and then drape the remaining piece of the jacket over the joint and under the lower part of the arm.
I hope I’m making sense!!!
Finally make sure that the areas where the jacket joins ( the “seams”) are nice and neat and stretch the fondant a little bit if you have some yellow showing through.
Now you can stick your two fondant hands to the wrists and the jacket.
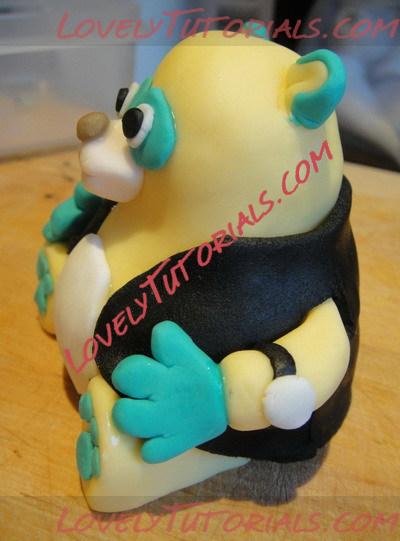
Lastly, take the red royal icing or writing icing and pipe all the way around the jacket for that special Oso trim.